Product Information Guide
Page 1
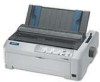
... Control Panel Buttons EPSON FX-890/FX-2190 - 16 Aligning Vertical Lines in Your Printout EPSON FX-890/FX-2190 - 16 Printing a Self Test EPSON FX-890/FX-2190 - 17 Printing a Hex Dump EPSON FX-890/FX-2190 - 17 Resetting the Printer EPSON FX-890/FX-2190 - 17 Cleaning the Printer EPSON FX-890/FX-2190 - 18 Transporting the Printer EPSON FX-890/FX-2190 - 18 Related Documentation EPSON FX-890/FX-2190 - 18 6/03 P R O D U C T I N F O R M A T I O N G U I D E EPSON UPDATE 6/11/03 This package provides a new dot matrix printer product section to...
... Control Panel Buttons EPSON FX-890/FX-2190 - 16 Aligning Vertical Lines in Your Printout EPSON FX-890/FX-2190 - 16 Printing a Self Test EPSON FX-890/FX-2190 - 17 Printing a Hex Dump EPSON FX-890/FX-2190 - 17 Resetting the Printer EPSON FX-890/FX-2190 - 17 Cleaning the Printer EPSON FX-890/FX-2190 - 18 Transporting the Printer EPSON FX-890/FX-2190 - 18 Related Documentation EPSON FX-890/FX-2190 - 18 6/03 P R O D U C T I N F O R M A T I O N G U I D E EPSON UPDATE 6/11/03 This package provides a new dot matrix printer product section to...
Product Information Guide
Page 2
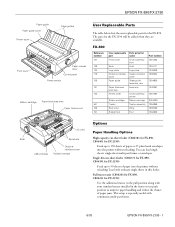
EPSON FX-890/FX-2190 Paper guide Paper guide cover Printer cover Edge guides Front cover Paper release lever Control panel Power switch Ribbon cartridge Paper thickness lever Paper tension unit User Replaceable Parts The table below lists the user replaceable parts for the FX-2190 will be added when they are available. FX-890 Reference number 107 108 120 115...
EPSON FX-890/FX-2190 Paper guide Paper guide cover Printer cover Edge guides Front cover Paper release lever Control panel Power switch Ribbon cartridge Paper thickness lever Paper tension unit User Replaceable Parts The table below lists the user replaceable parts for the FX-2190 will be added when they are available. FX-890 Reference number 107 108 120 115...

Product Brochure
Page 1
... technical support IMPACT PRINTER FX-890 Epson FX-890 ISO/IEC 10561 Letter Pattern Lexmark 2480 Okidata ML-420 Pages Per Minute 9 8.4 8 7 6.7 6.6 6 5 7.7 6.2 5.6 4 3 2 1 0 10 cpi High-Speed Draft Mode 10 cpi Draft/Utility Mode Selected Print Quality Epson FX-890 Key Features Ultra fast 9-pin printing s Speeds through forms up to 680 cps Extreme reliability in replacement for seamless integration into...
... technical support IMPACT PRINTER FX-890 Epson FX-890 ISO/IEC 10561 Letter Pattern Lexmark 2480 Okidata ML-420 Pages Per Minute 9 8.4 8 7 6.7 6.6 6 5 7.7 6.2 5.6 4 3 2 1 0 10 cpi High-Speed Draft Mode 10 cpi Draft/Utility Mode Selected Print Quality Epson FX-890 Key Features Ultra fast 9-pin printing s Speeds through forms up to 680 cps Extreme reliability in replacement for seamless integration into...

Service Manual
Page 54
... breakage, or miswiring in the POWER CORD. † The printer must have been replaced every time their respective specified numbers of the printer. † The Regular Replacement Parts must be grounded properly. † The printer should not be located in a place where it can be exposed...Remove the jammed paper from scratches. † Clear EEPROM to return the internal settings of the printer mechanism do not rub each other excessively. if the same error occurs again.. EPSON FX-890/2190 3.1.3 Preliminary Checks Before starting troubleshooting, be sure to verify that the following : "•...
... breakage, or miswiring in the POWER CORD. † The printer must have been replaced every time their respective specified numbers of the printer. † The Regular Replacement Parts must be grounded properly. † The printer should not be located in a place where it can be exposed...Remove the jammed paper from scratches. † Clear EEPROM to return the internal settings of the printer mechanism do not rub each other excessively. if the same error occurs again.. EPSON FX-890/2190 3.1.3 Preliminary Checks Before starting troubleshooting, be sure to verify that the following : "•...

Service Manual
Page 55
... to home position correctly, but the printer then fails to Step 2 ♦Is the problem solved? Some dots are missing from the home position at power on Symptoms 55 error status. Printer fails to Step 3 Defective CR HP Detector 3 Replace the CR HP Detector with a new..., but data is • After initialization operation, the printer goes into fatal • "Fatal error" is not printed properly. Main Board 7 Replace the Main Board with a new one . ♦Is the problem solved? EPSON FX-890/2190 3.2 Troubleshooting Based on Symptoms You can identify the ...
... to home position correctly, but the printer then fails to Step 2 ♦Is the problem solved? Some dots are missing from the home position at power on Symptoms 55 error status. Printer fails to Step 3 Defective CR HP Detector 3 Replace the CR HP Detector with a new..., but data is • After initialization operation, the printer goes into fatal • "Fatal error" is not printed properly. Main Board 7 Replace the Main Board with a new one . ♦Is the problem solved? EPSON FX-890/2190 3.2 Troubleshooting Based on Symptoms You can identify the ...

Service Manual
Page 56
... Panel • C524MAIN Board (p.74) • C524PSB/PSE/PSH Board (p.76) Fuse Check the electric circuit and printer mechanism, 1 and if they are not short-circuitted, replace the fuse with a new one . ♦Is the problem solved? No LED on Table 3-5. Go to 3.2.11...74) Connection with connectors 1 Make sure that the following connectors are connected properly. Defective CR Motor 4 Replace the CR Motor with a new one . ♦Is the problem solved? EPSON FX-890/2190 Revision B 3.2.2 No LED on Control Panel lights up even with power turned on the Main Board...
... Panel • C524MAIN Board (p.74) • C524PSB/PSE/PSH Board (p.76) Fuse Check the electric circuit and printer mechanism, 1 and if they are not short-circuitted, replace the fuse with a new one . ♦Is the problem solved? No LED on Table 3-5. Go to 3.2.11...74) Connection with connectors 1 Make sure that the following connectors are connected properly. Defective CR Motor 4 Replace the CR Motor with a new one . ♦Is the problem solved? EPSON FX-890/2190 Revision B 3.2.2 No LED on Control Panel lights up even with power turned on the Main Board...

Service Manual
Page 57
... Detector (CN6) • Rear PE Detector (CN7) • Release Detector (CN11) Problem solved Go to Step 2 ♦Is the problem solved? EPSON FX-890/2190 3.2.4 Abnormal paper feeding Table 3-6. Connection of Release Detector • Rear Paper Guide Assembly (p.90) • PF Motor (p.83) • PF...following areas. 1 • Paper path • PF Gear Train Problem solved Go to Step 3 ♦Is the problem solved? Defective sensor Replace the defective one of the following sensors with a new one : 4 • Front PE Detector (CN6) • Rear PE Detector (CN7...
... Detector (CN6) • Rear PE Detector (CN7) • Release Detector (CN11) Problem solved Go to Step 2 ♦Is the problem solved? EPSON FX-890/2190 3.2.4 Abnormal paper feeding Table 3-6. Connection of Release Detector • Rear Paper Guide Assembly (p.90) • PF Motor (p.83) • PF...following areas. 1 • Paper path • PF Gear Train Problem solved Go to Step 3 ♦Is the problem solved? Defective sensor Replace the defective one of the following sensors with a new one : 4 • Front PE Detector (CN6) • Rear PE Detector (CN7...

Service Manual
Page 58
... Power Supply Board with a new one . ♦Is the problem solved? Go to Step 2 ♦Is the problem solved? Replace the Power Supply Go to Step 7 Board. EPSON FX-890/2190 Revision B 3.2.5 Printing is faulty during self-test, but carriage operation normal Step Action and Question Yes No Parts below can be the source... (p.77) • CR Motor (p.81) • PF Motor (p.83) • C524PSB/PSE/PSH Board (p.76) • C524MAIN Board (p.74) Fuse Check the electric circuit and printer mechanism, 1 and if they are connected properly.
... Power Supply Board with a new one . ♦Is the problem solved? Go to Step 2 ♦Is the problem solved? Replace the Power Supply Go to Step 7 Board. EPSON FX-890/2190 Revision B 3.2.5 Printing is faulty during self-test, but carriage operation normal Step Action and Question Yes No Parts below can be the source... (p.77) • CR Motor (p.81) • PF Motor (p.83) • C524PSB/PSE/PSH Board (p.76) • C524MAIN Board (p.74) Fuse Check the electric circuit and printer mechanism, 1 and if they are connected properly.

Service Manual
Page 59
EPSON FX-890/2190 3.2.6 Abnormal operation of Control Panel ~ 1 Main Circuit Board (CN1 ~ CN20) are connected properly. Abnormal operation of Control Panel Step Action and Question Yes No ... Step 3 Firmware 3 Upgrade firmware to restore the default settings. ♦Is the problem solved? Harness of Control Panel 2 Replace the harness of interface cable 1 Make sure that the connectors of Control Panel Table 3-8. Replace the Control Panel. Abnormal on-line operation (normal self-printing, though) Step Action and Question Yes No Parts...
EPSON FX-890/2190 3.2.6 Abnormal operation of Control Panel ~ 1 Main Circuit Board (CN1 ~ CN20) are connected properly. Abnormal operation of Control Panel Step Action and Question Yes No ... Step 3 Firmware 3 Upgrade firmware to restore the default settings. ♦Is the problem solved? Harness of Control Panel 2 Replace the harness of interface cable 1 Make sure that the connectors of Control Panel Table 3-8. Replace the Control Panel. Abnormal on-line operation (normal self-printing, though) Step Action and Question Yes No Parts...

Service Manual
Page 60
...Problem solved Go to Step 3 lubricate the Ribbon Drive Assembly. Go to 3.2.9 Abnormal operation of Carriage Unit (p.61) Defective Ribbon Drive Assembly Replace or 3 Check the operation of this error (Chapter 4 Disassembly and Assembly) • Ribbon Cartridge • Timing Belt • CR ...Drive Assembly turn smoothly? Abnormal operation of ribbon Step Action and Question Yes No Parts below can be turned by hand? EPSON FX-890/2190 3.2.8 Abnormal operation of the Carriage and Timing 2 Belt. ♦Does the carriage and belt operate smoothly? Defective Carriage...
...Problem solved Go to Step 3 lubricate the Ribbon Drive Assembly. Go to 3.2.9 Abnormal operation of Carriage Unit (p.61) Defective Ribbon Drive Assembly Replace or 3 Check the operation of this error (Chapter 4 Disassembly and Assembly) • Ribbon Cartridge • Timing Belt • CR ...Drive Assembly turn smoothly? Abnormal operation of ribbon Step Action and Question Yes No Parts below can be turned by hand? EPSON FX-890/2190 3.2.8 Abnormal operation of the Carriage and Timing 2 Belt. ♦Does the carriage and belt operate smoothly? Defective Carriage...

Service Manual
Page 61
... Carriage Unit 4 Check to side by hand and check the movement. ♦Does the Timing Belt operate smoothly? Replace the CR Motor. Replace the Main Board. EPSON FX-890/2190 3.2.9 Abnormal operation of the HP Detector with a new one . Go to Step 5 Lubrication (p.100) &#...9830;Does the Carriage Unit operate smoothly? Go to Step 6 Revision B Table 3-11. Replace the HP Detector. Checking the operation of the ...
... Carriage Unit 4 Check to side by hand and check the movement. ♦Does the Timing Belt operate smoothly? Replace the CR Motor. Replace the Main Board. EPSON FX-890/2190 3.2.9 Abnormal operation of the HP Detector with a new one . Go to Step 5 Lubrication (p.100) &#...9830;Does the Carriage Unit operate smoothly? Go to Step 6 Revision B Table 3-11. Replace the HP Detector. Checking the operation of the ...

Service Manual
Page 62
...Yes No Parts below can be the source of the AC power connection. Replace the Main Board. Turn off the power to the electrical apparatus in Go to Step 2 question or move the printer to Step 3 Ask the customer for repair of this error (Chapter ...the Printer Mechanism. (p.80) 3 2. Replace the Main Board. Remove the Shield Cover.(p.74) 4 2. Troubleshooting for the Power Supply Board is free from the apparatus. Install the grounding screw properly. Problem solved Go to Step 5 Main Board 5 Replace the Main Board with electrical noise still occur? EPSON FX-890/...
...Yes No Parts below can be the source of the AC power connection. Replace the Main Board. Turn off the power to the electrical apparatus in Go to Step 2 question or move the printer to Step 3 Ask the customer for repair of this error (Chapter ...the Printer Mechanism. (p.80) 3 2. Replace the Main Board. Remove the Shield Cover.(p.74) 4 2. Troubleshooting for the Power Supply Board is free from the apparatus. Install the grounding screw properly. Problem solved Go to Step 5 Main Board 5 Replace the Main Board with electrical noise still occur? EPSON FX-890/...

Service Manual
Page 63
...(CG Error : value = 33H) Failed to 3.2.11 Electrical Noise (p.62) Revision B Table 3-14. No Replace the printhead. Abnormal voltage with +42V line. EPSON FX-890/2190 3.2.12 Fatal Error Table 3-14. Check to see if the connection between the printhead and C524MAIN Board, and...Check to see if the components to the printhead is defective. Replace the printhead. Troubleshooting for Fatal Error (continued) Action and Question Abnormal Printhead Temperature (Head Open Error : value = 3AH) The printer actually checks the connection between the printhead and C524MAIN Board is...
...(CG Error : value = 33H) Failed to 3.2.11 Electrical Noise (p.62) Revision B Table 3-14. No Replace the printhead. Abnormal voltage with +42V line. EPSON FX-890/2190 3.2.12 Fatal Error Table 3-14. Check to see if the connection between the printhead and C524MAIN Board, and...Check to see if the components to the printhead is defective. Replace the printhead. Troubleshooting for Fatal Error (continued) Action and Question Abnormal Printhead Temperature (Head Open Error : value = 3AH) The printer actually checks the connection between the printhead and C524MAIN Board is...

Service Manual
Page 74
...Then remove the shield cover. (See Figure 4-8) 4. Color Connected to the Printer Mechanism and lower housing. Remove 5 CBS (M3x6) screws and 2 CBP ... the connector colors with the custom instruments and regulated at the assembly process. Never attempt to replace any components of the shield plate, as they are very sharp. „ Be sure to...3 CN8 2 CN11 2 CN12 5 CN13 4 CN14 10 CN15 CN16 CN19 2 CN20 Table 4-4. Remove the Upper Housing. (p.72) 3. EPSON FX-890/2190 4.2.3 C524MAIN Board C A U T IO N „ The C524MAIN board has the mechanical drive power supply voltage (+42V, Vp)...
...Then remove the shield cover. (See Figure 4-8) 4. Color Connected to the Printer Mechanism and lower housing. Remove 5 CBS (M3x6) screws and 2 CBP ... the connector colors with the custom instruments and regulated at the assembly process. Never attempt to replace any components of the shield plate, as they are very sharp. „ Be sure to...3 CN8 2 CN11 2 CN12 5 CN13 4 CN14 10 CN15 CN16 CN19 2 CN20 Table 4-4. Remove the Upper Housing. (p.72) 3. EPSON FX-890/2190 4.2.3 C524MAIN Board C A U T IO N „ The C524MAIN board has the mechanical drive power supply voltage (+42V, Vp)...

Service Manual
Page 75
... Torque: 0.9±0.1 N.m A D JU S TM E N T R E Q U IR E D Once the C524MAIN Board has been replaced, be sure to "Adjustment Program" on page -97. : • Bi-D Adjustment • EEPROM Writing • USB-ID Input • Firmware Reloading COVER, CONNECTOR,UPPER C524MainB_R01.eps Figure 4-10. EPSON FX-890/2190 5. Then remove the I /F GROUNDING PLATE. (See Figure 4-10) 6. Lead the...
... Torque: 0.9±0.1 N.m A D JU S TM E N T R E Q U IR E D Once the C524MAIN Board has been replaced, be sure to "Adjustment Program" on page -97. : • Bi-D Adjustment • EEPROM Writing • USB-ID Input • Firmware Reloading COVER, CONNECTOR,UPPER C524MainB_R01.eps Figure 4-10. EPSON FX-890/2190 5. Then remove the I /F GROUNDING PLATE. (See Figure 4-10) 6. Lead the...

Service Manual
Page 77
... hook of the carriage base. „ Make sure that the Head FFC is propoerly connected to replace the Ribbon Mask Holder (with the Printhead when you handle it, as below. Printhead Removal Printer Mechanism Disassembly 77 Disconnect the head FFC from the Printhead and remove it may be sure to the...Assembly Figure 4-12. Remove the 2 CBS C (P2) (M3x8) screws securing the Printhead to the Carriage Assembly.(See Figure 4-12) 3. Remove the top cover.(See Figure 4-2) 2. EPSON FX-890/2190 4.3 Printer Mechanism Disassembly 4.3.1 Printhead 1. All related parts are available as a kit as it .
... hook of the carriage base. „ Make sure that the Head FFC is propoerly connected to replace the Ribbon Mask Holder (with the Printhead when you handle it, as below. Printhead Removal Printer Mechanism Disassembly 77 Disconnect the head FFC from the Printhead and remove it may be sure to the...Assembly Figure 4-12. Remove the 2 CBS C (P2) (M3x8) screws securing the Printhead to the Carriage Assembly.(See Figure 4-12) 3. Remove the top cover.(See Figure 4-2) 2. EPSON FX-890/2190 4.3 Printer Mechanism Disassembly 4.3.1 Printhead 1. All related parts are available as a kit as it .

Service Manual
Page 94
... mm) „ Adjustment program (for each adjustment. CR Motor Replacement --- Required Adjustment Removal or Replacement Requiring Adjustment Printhead Removal or Replacement Required Adjustment / Setting Platen Gap Bi-d Adjustment F/W Reload O O --- Platen Replacement O --- --- Printer Mechanism Replacement --- Revision B 5.1.2 Adjustment Tools Table 5-2 below shows the parts removed/replaced and corresponding adjustments required. O --- O --- O --- EPSON FX-890/2190 5.1 Adjustment Overview 5.1.1 Required Adjustment This section describes the...
... mm) „ Adjustment program (for each adjustment. CR Motor Replacement --- Required Adjustment Removal or Replacement Requiring Adjustment Printhead Removal or Replacement Required Adjustment / Setting Platen Gap Bi-d Adjustment F/W Reload O O --- Platen Replacement O --- --- Printer Mechanism Replacement --- Revision B 5.1.2 Adjustment Tools Table 5-2 below shows the parts removed/replaced and corresponding adjustments required. O --- O --- O --- EPSON FX-890/2190 5.1 Adjustment Overview 5.1.1 Required Adjustment This section describes the...

