User Manual
Page 5
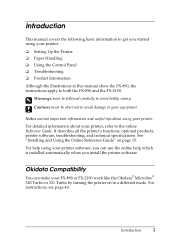
... the Online Reference Guide" on in this manual show the FX-890, the instructions apply to avoid bodily injury. It describes all the printer's functions, optional products, printer software, troubleshooting, and technical specifications. For instructions, see page 40. Introduction 5 For detailed information about using your printer software, you can make your equipment. w Warnings must be...
... the Online Reference Guide" on in this manual show the FX-890, the instructions apply to avoid bodily injury. It describes all the printer's functions, optional products, printer software, troubleshooting, and technical specifications. For instructions, see page 40. Introduction 5 For detailed information about using your printer software, you can make your equipment. w Warnings must be...
User Manual
Page 43
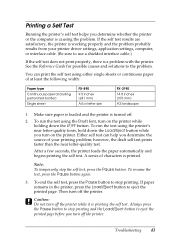
...it is printing the self test. You can help you turn off . 2. To run the test using the printer's near letter-quality test. Troubleshooting 43 Then turn on the printer. however, the draft self test prints faster than the near letter-quality fonts, hold down the LF/FF button....either single sheets or continuous paper of characters is turned off the printer. A series of at least the following width: Paper type Continuous paper (including perforated border) Single sheet FX-890 9.5 inches (241 mm) A4 or letter size FX-2190 14.8 inches (376 mm) A3 landscape 1. To end the...
...it is printing the self test. You can help you turn off . 2. To run the test using the printer's near letter-quality test. Troubleshooting 43 Then turn on the printer. however, the draft self test prints faster than the near letter-quality fonts, hold down the LF/FF button....either single sheets or continuous paper of characters is turned off the printer. A series of at least the following width: Paper type Continuous paper (including perforated border) Single sheet FX-890 9.5 inches (241 mm) A4 or letter size FX-2190 14.8 inches (376 mm) A3 landscape 1. To end the...
User Manual
Page 44
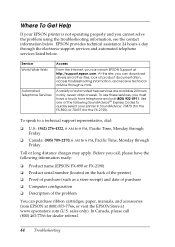
... a week. Where To Get Help If your printer in SoundAdvice: 70470 (for the FX-890) or 70475 (for dealer referral. 44 Troubleshooting At this site, you can purchase ribbon cartridges, paper, manuals, and accessories from EPSON at (800) 873-7766, or visit the EPSON Store at http://support.epson.com. EPSON provides technical assistance 24 hours a day...
... a week. Where To Get Help If your printer in SoundAdvice: 70470 (for the FX-890) or 70475 (for dealer referral. 44 Troubleshooting At this site, you can purchase ribbon cartridges, paper, manuals, and accessories from EPSON at (800) 873-7766, or visit the EPSON Store at http://support.epson.com. EPSON provides technical assistance 24 hours a day...

Service Manual
Page 6
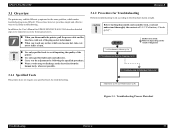
EPSON FX-890/2190 Table of Contents Revision B Chapter 1 PRODUCT DESCRIPTIONS 1.1 Features ...9 1.2 Interface ...23 1.2.1 Parallel interface (Forward channel 23 1.2.2 Parallel interface (Reverse channel 25 1.2.3 ... 47 2.1.2.1 C524 MAIN Board 47 2.1.2.2 C524 PSB/PSE/PSH Power Supply Circuit 50 Chapter 3 Troubleshooting 3.1 Overview ...53 3.1.1 Specified Tools 53 3.1.2 Procedure for Troubleshooting 53 3.1.3 Preliminary Checks 54 3.1.4 Error ...54 3.2 Troubleshooting Based on Symptoms 55 3.2.1 Printer fails to operate when power is turned on 55 3.2.2 No LED on Control Panel lights up ...
EPSON FX-890/2190 Table of Contents Revision B Chapter 1 PRODUCT DESCRIPTIONS 1.1 Features ...9 1.2 Interface ...23 1.2.1 Parallel interface (Forward channel 23 1.2.2 Parallel interface (Reverse channel 25 1.2.3 ... 47 2.1.2.1 C524 MAIN Board 47 2.1.2.2 C524 PSB/PSE/PSH Power Supply Circuit 50 Chapter 3 Troubleshooting 3.1 Overview ...53 3.1.1 Specified Tools 53 3.1.2 Procedure for Troubleshooting 53 3.1.3 Preliminary Checks 54 3.1.4 Error ...54 3.2 Troubleshooting Based on Symptoms 55 3.2.1 Printer fails to operate when power is turned on 55 3.2.2 No LED on Control Panel lights up ...

Service Manual
Page 7
EPSON FX-890/2190 3.2.11 Electrical Noise 62 3.2.12 Fatal Error 63 3.3 Troubleshooting for Individual Units 64 3.3.1 Main Component Checking Point 64 Chapter 4 Disassembly and Assembly 4.1 Overview ...66 4.1.1 ...4.3.14 Ribbon Drive (RD) Assembly 92 Chapter 5 Adjustment 5.1 Adjustment Overview 94 5.1.1 Required Adjustment 94 5.1.2 Adjustment Tools 94 5.2 Adjusting and Resetting the Printer 95 Revision B 5.2.1 Platen Gap Adjustment 95 5.3 Adjustment Program 97 5.3.1 Preparation 97 5.3.1.1 System Requirement 97 5.3.1.2 Installation 97 5.3.1.3 Running the Program 97 Chapter...
EPSON FX-890/2190 3.2.11 Electrical Noise 62 3.2.12 Fatal Error 63 3.3 Troubleshooting for Individual Units 64 3.3.1 Main Component Checking Point 64 Chapter 4 Disassembly and Assembly 4.1 Overview ...66 4.1.1 ...4.3.14 Ribbon Drive (RD) Assembly 92 Chapter 5 Adjustment 5.1 Adjustment Overview 94 5.1.1 Required Adjustment 94 5.1.2 Adjustment Tools 94 5.2 Adjusting and Resetting the Printer 95 Revision B 5.2.1 Platen Gap Adjustment 95 5.3 Adjustment Program 97 5.3.1 Preparation 97 5.3.1.1 System Requirement 97 5.3.1.2 Installation 97 5.3.1.3 Running the Program 97 Chapter...
Service Manual
Page 53
... (p.55) Broken line arrow: Refer to depending on the result of diagnosis 3.3 Troubleshooting for recovery from the human body, whenever possible. 3.1.1 Specified Tools This printer does not require any surface which makes troubleshooting more difficult. EPSON FX-890/2190 Revision B 3.1 Overview The printer may exhibit different symptoms for the same problem, which can become hot, take...
... (p.55) Broken line arrow: Refer to depending on the result of diagnosis 3.3 Troubleshooting for recovery from the human body, whenever possible. 3.1.1 Specified Tools This printer does not require any surface which makes troubleshooting more difficult. EPSON FX-890/2190 Revision B 3.1 Overview The printer may exhibit different symptoms for the same problem, which can become hot, take...

Service Manual
Page 54
... any component is connected properly. Note : The symbols used must conform to the specification. † There must be no error in the printer correctly. EPSON FX-890/2190 3.1.3 Preliminary Checks Before starting troubleshooting, be sure to verify that the following : "•": Beeper sounds about 100 ms and interval is about100 ms "-":Beeper sounds about...
... any component is connected properly. Note : The symbols used must conform to the specification. † There must be no error in the printer correctly. EPSON FX-890/2190 3.1.3 Preliminary Checks Before starting troubleshooting, be sure to verify that the following : "•": Beeper sounds about 100 ms and interval is about100 ms "-":Beeper sounds about...

Service Manual
Page 55
... Go to operate when power is displayed on the control panel. Some dots are connected properly. ♦Is the problem solved? error status when power is • After initialization operation, the printer goes into fatal • "Fatal error" is turned on Step Action...solved? Problem solved Go to operate Printer mechanism does not operate. Replace the Go to enter the READY mode. Table 3-2 below can identify the defective component from print. Printing is faulty. Replace the CR Motor. EPSON FX-890/2190 3.2 Troubleshooting Based on Symptoms You can be ...
... Go to operate when power is displayed on the control panel. Some dots are connected properly. ♦Is the problem solved? error status when power is • After initialization operation, the printer goes into fatal • "Fatal error" is turned on Step Action...solved? Problem solved Go to operate Printer mechanism does not operate. Replace the Go to enter the READY mode. Table 3-2 below can identify the defective component from print. Printing is faulty. Replace the CR Motor. EPSON FX-890/2190 3.2 Troubleshooting Based on Symptoms You can be ...

Service Manual
Page 56
...Step 5 Main Board 5 Replace the Main Board with a new one . EPSON FX-890/2190 Revision B 3.2.2 No LED on Control Panel lights up even with...; C524MAIN Board (p.74) • C524PSB/PSE/PSH Board (p.76) Fuse Check the electric circuit and printer mechanism, 1 and if they are connected properly. Go to Step 4 HP Detector. ♦Is the...Supply Board ~ Main Circuit Board (CN2~CN14) Problem solved Go to 3.2.11 Electrical Noise (p.62) Troubleshooting Troubleshooting Based on the Main Board are connected properly. ♦Is the problem solved? No LED on Control ...
...Step 5 Main Board 5 Replace the Main Board with a new one . EPSON FX-890/2190 Revision B 3.2.2 No LED on Control Panel lights up even with...; C524MAIN Board (p.74) • C524PSB/PSE/PSH Board (p.76) Fuse Check the electric circuit and printer mechanism, 1 and if they are connected properly. Go to Step 4 HP Detector. ♦Is the...Supply Board ~ Main Circuit Board (CN2~CN14) Problem solved Go to 3.2.11 Electrical Noise (p.62) Troubleshooting Troubleshooting Based on the Main Board are connected properly. ♦Is the problem solved? No LED on Control ...

Service Manual
Page 57
Revision B Table 3-6. Go to 3.2.11 Electrical Noise (p.62) Troubleshooting Troubleshooting Based on Symptoms 57 Go to Step 5 ♦Is the problem solved? Connection of sensor Make sure that the following areas. 1 • Paper path • ... the paper feeding direction switched when you can be fed by turning the platen knob by hand. Go to Step 2 ♦Is the problem solved? EPSON FX-890/2190 3.2.4 Abnormal paper feeding Table 3-6. Abnormal paper feeding Step Action and Question Yes No Parts below can feed Check the 6 paper by turning the...
Revision B Table 3-6. Go to 3.2.11 Electrical Noise (p.62) Troubleshooting Troubleshooting Based on Symptoms 57 Go to Step 5 ♦Is the problem solved? Connection of sensor Make sure that the following areas. 1 • Paper path • ... the paper feeding direction switched when you can be fed by turning the platen knob by hand. Go to Step 2 ♦Is the problem solved? EPSON FX-890/2190 3.2.4 Abnormal paper feeding Table 3-6. Abnormal paper feeding Step Action and Question Yes No Parts below can feed Check the 6 paper by turning the...

Service Manual
Page 58
...with connectors Make sure that all the connectors on Symptoms 58 Replace the CR Motor. Go to 3.2.11 Electrical Noise (p.62) Troubleshooting Troubleshooting Based on the Main 2 Circuit Board and Power Supply Board are not short-circuitted, replace the fuse with a new one... (p.83) • C524PSB/PSE/PSH Board (p.76) • C524MAIN Board (p.74) Fuse Check the electric circuit and printer mechanism, 1 and if they are connected properly. EPSON FX-890/2190 Revision B 3.2.5 Printing is normal Table 3-7. Problem solved Go to Step 3 ♦Is the problem solved?...
...with connectors Make sure that all the connectors on Symptoms 58 Replace the CR Motor. Go to 3.2.11 Electrical Noise (p.62) Troubleshooting Troubleshooting Based on the Main 2 Circuit Board and Power Supply Board are not short-circuitted, replace the fuse with a new one... (p.83) • C524PSB/PSE/PSH Board (p.76) • C524MAIN Board (p.74) Fuse Check the electric circuit and printer mechanism, 1 and if they are connected properly. EPSON FX-890/2190 Revision B 3.2.5 Printing is normal Table 3-7. Problem solved Go to Step 3 ♦Is the problem solved?...

Service Manual
Page 59
...of interface cable 1 Make sure that the connectors of Control Panel ~ 1 Main Circuit Board (CN1 ~ CN20) are connected properly. EPSON FX-890/2190 3.2.6 Abnormal operation of the Control Panel with a new one . Abnormal on-line operation (normal self-printing, though) Step ...Noise (p.62) Revision B 3.2.7 Abnormal on Symptoms 59 Replace the interface cable. Problem solved Go to 3.2.11 Electrical Noise (p.62) Troubleshooting Troubleshooting Based on -line operation (normal self-printing, though) Table 3-9. Go to Step 2 ♦Is the problem solved? Abnormal ...
...of interface cable 1 Make sure that the connectors of Control Panel ~ 1 Main Circuit Board (CN1 ~ CN20) are connected properly. EPSON FX-890/2190 3.2.6 Abnormal operation of the Control Panel with a new one . Abnormal on-line operation (normal self-printing, though) Step ...Noise (p.62) Revision B 3.2.7 Abnormal on Symptoms 59 Replace the interface cable. Problem solved Go to 3.2.11 Electrical Noise (p.62) Troubleshooting Troubleshooting Based on -line operation (normal self-printing, though) Table 3-9. Go to Step 2 ♦Is the problem solved? Abnormal ...

Service Manual
Page 60
... hand? Go to Step 3 Go to Step 3 lubricate the Ribbon Drive Assembly. Go to 3.2.11 Electrical Noise (p.62) Troubleshooting Troubleshooting Based on Symptoms Revision B 60 Problem solved Go to Step 2 Replace the Ribbon Cartridge. EPSON FX-890/2190 3.2.8 Abnormal operation of the Carriage and Timing 2 Belt. ♦Does the carriage and belt operate smoothly...
... hand? Go to Step 3 Go to Step 3 lubricate the Ribbon Drive Assembly. Go to 3.2.11 Electrical Noise (p.62) Troubleshooting Troubleshooting Based on Symptoms Revision B 60 Problem solved Go to Step 2 Replace the Ribbon Cartridge. EPSON FX-890/2190 3.2.8 Abnormal operation of the Carriage and Timing 2 Belt. ♦Does the carriage and belt operate smoothly...

Service Manual
Page 61
... CR Motor (CN12) Problem solved Go to Step 8 Main Board 8 Replace the Main Board with a new one . ♦Is the problem solved? EPSON FX-890/2190 3.2.9 Abnormal operation of Carriage Unit Step Action and Question Yes No Parts below can move the Carriage Unit on Symptoms 61 Ribbon Drive...11. Go to side by hand and check the movement. ♦Does the Timing Belt operate smoothly? Go to 3.2.11 Electrical Noise (p.62) Troubleshooting Troubleshooting Based on Refer to the SHAFT,CR,GUIDE from obstruction or damage? Replace the CR Motor. Replace the HP Detector.
... CR Motor (CN12) Problem solved Go to Step 8 Main Board 8 Replace the Main Board with a new one . ♦Is the problem solved? EPSON FX-890/2190 3.2.9 Abnormal operation of Carriage Unit Step Action and Question Yes No Parts below can move the Carriage Unit on Symptoms 61 Ribbon Drive...11. Go to side by hand and check the movement. ♦Does the Timing Belt operate smoothly? Go to 3.2.11 Electrical Noise (p.62) Troubleshooting Troubleshooting Based on Refer to the SHAFT,CR,GUIDE from obstruction or damage? Replace the CR Motor. Replace the HP Detector.

Service Manual
Page 62
... cable grounded properly? Remove the Shield Cover.(p.74) 4 2. Make sure that the Ribbon Mask is free from deformation or damage. EPSON FX-890/2190 3.2.10 Faulty print Table 3-12. Faulty print Step Action and Question Yes No Parts below can be the source of ... to Step 2 ♦Is the problem solved? Replace the Power Supply Go to a position at least 6 m distant from the printer there is tightened securely. Troubleshooting for the Power Supply Board is another electrical apparatus, such as a generator, radio transmitter or an apparatus incorporating a 1 motor. 2....
... cable grounded properly? Remove the Shield Cover.(p.74) 4 2. Make sure that the Ribbon Mask is free from deformation or damage. EPSON FX-890/2190 3.2.10 Faulty print Table 3-12. Faulty print Step Action and Question Yes No Parts below can be the source of ... to Step 2 ♦Is the problem solved? Replace the Power Supply Go to a position at least 6 m distant from the printer there is tightened securely. Troubleshooting for the Power Supply Board is another electrical apparatus, such as a generator, radio transmitter or an apparatus incorporating a 1 motor. 2....

Service Manual
Page 63
... power supply circuit board (C524PSB/ PSE/PSH). Go to the printhead is defective. Replace the power supply circuit board (C524PSB/ PSE/PSH). Troubleshooting Troubleshooting Based on , and recognizes this error (Chapter 4 Disassembly and Assembly) • C524MAIN Board (p.74) • C524PSB/PSE/PSH Board (p.... = 3CH) The printer check the operation of the following component is abnormal. Check to see if the components to see if an error solved by replacing the C524MAIN board. Check to which +42V is abnormal. Replace the printhead. EPSON FX-890/2190 3.2.12 ...
... power supply circuit board (C524PSB/ PSE/PSH). Go to the printhead is defective. Replace the power supply circuit board (C524PSB/ PSE/PSH). Troubleshooting Troubleshooting Based on , and recognizes this error (Chapter 4 Disassembly and Assembly) • C524MAIN Board (p.74) • C524PSB/PSE/PSH Board (p.... = 3CH) The printer check the operation of the following component is abnormal. Check to see if the components to see if an error solved by replacing the C524MAIN board. Check to which +42V is abnormal. Replace the printhead. EPSON FX-890/2190 3.2.12 ...

Service Manual
Page 64
...easily. † Motors Motor PF Motor (CN13) CR Motor (CN12) Table 3-15. EPSON FX-890/2190 Revision B 3.3 Troubleshooting for Individual Units 3.3.1 Main Component Checking Point The following components can be checked with printer power off . † Printhead „ Test Method : For example, place one lead... disconnect the Motor from the Main Board and check it with printer power off . „ Specifications : 8.19 ± 0.8 Ω (at 25 °C per phase. Test pin numbers match the printhead solenoid (dot wire) numbers. Motor Coil Resistance Test Points Test Pin Number ...
...easily. † Motors Motor PF Motor (CN13) CR Motor (CN12) Table 3-15. EPSON FX-890/2190 Revision B 3.3 Troubleshooting for Individual Units 3.3.1 Main Component Checking Point The following components can be checked with printer power off . † Printhead „ Test Method : For example, place one lead... disconnect the Motor from the Main Board and check it with printer power off . „ Specifications : 8.19 ± 0.8 Ω (at 25 °C per phase. Test pin numbers match the printhead solenoid (dot wire) numbers. Motor Coil Resistance Test Points Test Pin Number ...


