
Printer Guide
Page 2
...part of this publication may be liable to the purchaser of this product or unauthorized modifications, repairs, or alterations to this product or third parties for any use of this information as a result of: accident, misuse, or abuse of this product, or (excluding the U.S.) failure to other than those marks. Epson... parties as applied to strictly comply with these Epson printers. Legal Notices Neither Seiko Epson Corporation nor its affiliates shall be trademarks of Epson America, Inc. Trademarks Epson, Epson Stylus, Epson ESC/P, and MicroWeave are service marks, of their...
...part of this publication may be liable to the purchaser of this product or unauthorized modifications, repairs, or alterations to this product or third parties for any use of this information as a result of: accident, misuse, or abuse of this product, or (excluding the U.S.) failure to other than those marks. Epson... parties as applied to strictly comply with these Epson printers. Legal Notices Neither Seiko Epson Corporation nor its affiliates shall be trademarks of Epson America, Inc. Trademarks Epson, Epson Stylus, Epson ESC/P, and MicroWeave are service marks, of their...

Printer Guide
Page 7
Contents | 7 4 Printing with Epson Drivers for Windows Choosing Basic Print Options 100 Choosing ...114 Setting Monitoring Preferences and Optimizing Print Speed . . . . . 115 5 Maintaining and Transporting the Printer Checking Printer Status and Part Life 120 Printing Status Information 120 Viewing Status Information 121 Checking and Cleaning the Print Head 122 Running the... Ink Cartridges 132 Draining the Old Ink 132 Installing the New Black Ink Cartridge 134 Updating the Printer Driver Information 135 Changing the Date and Time 136 Using Maintenance Mode 136 Replacing the Paper Cutter...
Contents | 7 4 Printing with Epson Drivers for Windows Choosing Basic Print Options 100 Choosing ...114 Setting Monitoring Preferences and Optimizing Print Speed . . . . . 115 5 Maintaining and Transporting the Printer Checking Printer Status and Part Life 120 Printing Status Information 120 Viewing Status Information 121 Checking and Cleaning the Print Head 122 Running the... Ink Cartridges 132 Draining the Old Ink 132 Installing the New Black Ink Cartridge 134 Updating the Printer Driver Information 135 Changing the Date and Time 136 Using Maintenance Mode 136 Replacing the Paper Cutter...
Printer Guide
Page 10
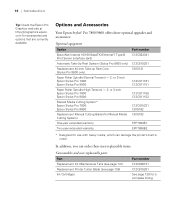
... available. In addition, you can damage the printer's built-in cutter. or 3-inch Epson Stylus Pro 7800: Epson Stylus Pro 9800: Paper Roller Spindle (High Tension) - 2- or 3-inch Epson Stylus Pro 7800: Epson Stylus Pro 9800: Manual Media Cutting System* Epson Stylus Pro 7800: Epson Stylus Pro 9800: Replacement Manual Cutting Blade (for Manual Media Cutting System) One-year extended warranty Two-year extended warranty Part number C12C824341 C12C815251 C815121 C12C811161 C12C811151 C12C811155...
... available. In addition, you can damage the printer's built-in cutter. or 3-inch Epson Stylus Pro 7800: Epson Stylus Pro 9800: Paper Roller Spindle (High Tension) - 2- or 3-inch Epson Stylus Pro 7800: Epson Stylus Pro 9800: Manual Media Cutting System* Epson Stylus Pro 7800: Epson Stylus Pro 9800: Replacement Manual Cutting Blade (for Manual Media Cutting System) One-year extended warranty Two-year extended warranty Part number C12C824341 C12C815251 C815121 C12C811161 C12C811151 C12C811155...

Printer Guide
Page 18
Unpack the stand and make sure you have all these items. Parts: 2 Bases 2 Legs Bottom horizontal strut Top horizontal strut Tools and Accessories: 4 Basket hooks 2 Hex wrenches 4 Base bolts 6 Hex screws with washers 2 Collars Paper basket 2 Strut bolts 2 Wing screws 1-18 18 | Setting Up the Printer Unpacking and Assembling the Stand 1.
Unpack the stand and make sure you have all these items. Parts: 2 Bases 2 Legs Bottom horizontal strut Top horizontal strut Tools and Accessories: 4 Basket hooks 2 Hex wrenches 4 Base bolts 6 Hex screws with washers 2 Collars Paper basket 2 Strut bolts 2 Wing screws 1-18 18 | Setting Up the Printer Unpacking and Assembling the Stand 1.

Printer Guide
Page 20
Use the small hex wrench to fasten the hex screws. 6. Make sure each part of the stand is tightened securely. Open the box and remove the roll paper, spindle, polystyrene foam, and cardboard cushions. 1-20 Unpacking the Printer 1. 20 | Setting Up the Printer 5. Attach the top horizontal strut as shown.
Use the small hex wrench to fasten the hex screws. 6. Make sure each part of the stand is tightened securely. Open the box and remove the roll paper, spindle, polystyrene foam, and cardboard cushions. 1-20 Unpacking the Printer 1. 20 | Setting Up the Printer 5. Attach the top horizontal strut as shown.
Printer Guide
Page 28
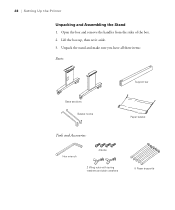
28 | Setting Up the Printer Unpacking and Assembling the Stand 1. Open the box and remove the handles from the sides of the box. 2. Unpack the stand and make sure you have all these items: Parts: Support bar Base sections Basket hooks Paper basket Tools and Accessories: Hex wrench 4 Bolts 2 Wing nuts with spring washers and plain washers 5 Paper supports 1-28 Lift the box up, then set it aside. 3.
28 | Setting Up the Printer Unpacking and Assembling the Stand 1. Open the box and remove the handles from the sides of the box. 2. Unpack the stand and make sure you have all these items: Parts: Support bar Base sections Basket hooks Paper basket Tools and Accessories: Hex wrench 4 Bolts 2 Wing nuts with spring washers and plain washers 5 Paper supports 1-28 Lift the box up, then set it aside. 3.

Printer Guide
Page 41
...-head screwdriver to install the card: 1. Setting Up the Printer | 41 Note: The print server card is a 10/100 BaseTX Type-B Ethernet interface card (part number C12C824341). To find the nearest reseller, call 800-GO-EPSON (800-463-7766) or visit www.prograpics.epson.com. Turn off the cover as shown: 1-41 Connecting to...
...-head screwdriver to install the card: 1. Setting Up the Printer | 41 Note: The print server card is a 10/100 BaseTX Type-B Ethernet interface card (part number C12C824341). To find the nearest reseller, call 800-GO-EPSON (800-463-7766) or visit www.prograpics.epson.com. Turn off the cover as shown: 1-41 Connecting to...

Printer Guide
Page 109
... image size up to 650% and decrease the output resolution to access the advanced settings and turn off color management in the printer driver, as described on the lower part of the original image and the print size, you complete control over your application program, click Optimize Enlargement...settings give you are using color management settings in the print. You see a window like the following: These settings give you may see reduced quality in Photoshop or another application, it is very important to stay within the pixel limitations. Printing with Epson Drivers for Windows | ...
... image size up to 650% and decrease the output resolution to access the advanced settings and turn off color management in the printer driver, as described on the lower part of the original image and the print size, you complete control over your application program, click Optimize Enlargement...settings give you are using color management settings in the print. You see a window like the following: These settings give you may see reduced quality in Photoshop or another application, it is very important to stay within the pixel limitations. Printing with Epson Drivers for Windows | ...
Printer Guide
Page 119
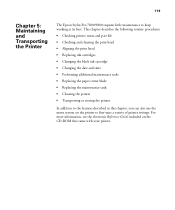
119 Chapter 5: Maintaining and Transporting the Printer The Epson Stylus Pro 7800/9800 requires little maintenance to fine-tune a variety of printer settings. For more information, see the electronic Reference Guide included on the printer to keep working at its best. This chapter describes the following routine procedures: • Checking printer status and part life • Checking and cleaning the...
119 Chapter 5: Maintaining and Transporting the Printer The Epson Stylus Pro 7800/9800 requires little maintenance to fine-tune a variety of printer settings. For more information, see the electronic Reference Guide included on the printer to keep working at its best. This chapter describes the following routine procedures: • Checking printer status and part life • Checking and cleaning the...
Printer Guide
Page 120
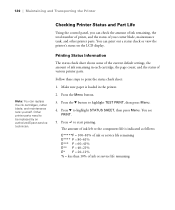
...Printing Status Information The status check sheet shows some of the current default settings, the amount of various printer parts. Follow these steps to highlight TEST PRINT, then press Menu. 4. Press to highlight STATUS SHEET, then...Printer Status and Part Life Using the control panel, you can print out a status check or view the printer's status on the LCD display. You see PRINT. 5. 120 | Maintaining and Transporting the Printer Note: You can replace the ink cartridges, cutter blade, and maintenance tank yourself. Other printer parts need to be replaced by an authorized Epson...
...Printing Status Information The status check sheet shows some of the current default settings, the amount of various printer parts. Follow these steps to highlight TEST PRINT, then press Menu. 4. Press to highlight STATUS SHEET, then...Printer Status and Part Life Using the control panel, you can print out a status check or view the printer's status on the LCD display. You see PRINT. 5. 120 | Maintaining and Transporting the Printer Note: You can replace the ink cartridges, cutter blade, and maintenance tank yourself. Other printer parts need to be replaced by an authorized Epson...

Printer Guide
Page 122
...: You can also turn on Auto Nozzle Check from the printer's control panel. The status of other printer parts, press d to highlight TOTAL PRINTS, then press Menu. For more information about the Printer Status menu, see your printed image shows a color shift or horizontal lines, you see the status of prints, press d to highlight SERVICE...
...: You can also turn on Auto Nozzle Check from the printer's control panel. The status of other printer parts, press d to highlight TOTAL PRINTS, then press Menu. For more information about the Printer Status menu, see your printed image shows a color shift or horizontal lines, you see the status of prints, press d to highlight SERVICE...
Printer Guide
Page 138
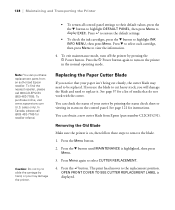
...operating mode. Press the P Power button again to be replaced. If you use the blade to cut cleanly, the cutter blade may damage the printer. See page 57 for a list of your paper isn't being cut heavy stock, you may need to replace it. Press Menu again to highlight... these steps to display EXEC. Replacing the Paper Cutter Blade If you notice that do not work with the cutter. You can purchase replacement parts from Epson (part number C12C815291). Note: You can check the status of media that your cutter by pressing the P Power button. Press the button. The ...
...operating mode. Press the P Power button again to be replaced. If you use the blade to cut cleanly, the cutter blade may damage the printer. See page 57 for a list of your paper isn't being cut heavy stock, you may need to replace it. Press Menu again to highlight... these steps to display EXEC. Replacing the Paper Cutter Blade If you notice that do not work with the cutter. You can purchase replacement parts from Epson (part number C12C815291). Note: You can check the status of media that your cutter by pressing the P Power button. Press the button. The ...
Printer Guide
Page 142
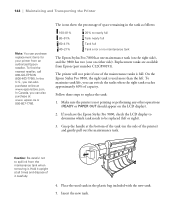
...tank The Epson Stylus Pro 7800 has one maintenance tank (on either side). Place the used more than the left or right). 3. Replacement tanks are available from an authorized Epson reseller. To maximize tank life, you have the Epson Stylus Pro 9800, ...20% to replace the tank: 1. The printer will not print if one on the right side), and the 9800 has two (one of the maintenance tanks is full. On the Epson Stylus Pro 9800, the right tank is not printing or...tank. 5. In Canada, you can purchase replacement items for your printer from Epson (part number C12C890191). Hold it .
...tank The Epson Stylus Pro 7800 has one maintenance tank (on either side). Place the used more than the left or right). 3. Replacement tanks are available from an authorized Epson reseller. To maximize tank life, you have the Epson Stylus Pro 9800, ...20% to replace the tank: 1. The printer will not print if one on the right side), and the 9800 has two (one of the maintenance tanks is full. On the Epson Stylus Pro 9800, the right tank is not printing or...tank. 5. In Canada, you can purchase replacement items for your printer from Epson (part number C12C890191). Hold it .
Printer Guide
Page 144
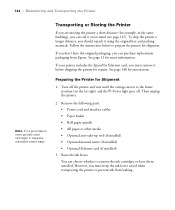
... the EpsonNet Ethernet card, you must keep the ink levers raised when transporting the printer to prevent ink from Epson. However, you must remove it using the original box and packing materials. If you don't have the original packaging, you... can purchase replacement packaging from leaking. 5-144 See page 148 for shipment. Raise the ink levers. Turn off . Follow the instructions below to prepare the printer for instructions. Remove the following parts...
... the EpsonNet Ethernet card, you must keep the ink levers raised when transporting the printer to prevent ink from Epson. However, you must remove it using the original box and packing materials. If you don't have the original packaging, you... can purchase replacement packaging from leaking. 5-144 See page 148 for shipment. Raise the ink levers. Turn off . Follow the instructions below to prepare the printer for instructions. Remove the following parts...
Printer Guide
Page 152
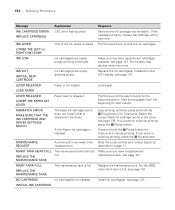
...cancel printing. LEVER RELEASED Paper is released Pull the lever all the way forward, to be Note the code number and contact Epson as replaced soon. described on the LCD display; Make sure you have a replacement maintenance tank; see page 135. see page...cartridge(s) are nearly empty (printing continues). Select the correct black ink cartridge option in the driver A non-Epson ink cartridge is low. MAINTENANCE REQUEST A printer part may decline when ink is installed. Remove the ink cartridge and reinstall it. Make sure you have replacement ...
...cancel printing. LEVER RELEASED Paper is released Pull the lever all the way forward, to be Note the code number and contact Epson as replaced soon. described on the LCD display; Make sure you have a replacement maintenance tank; see page 135. see page...cartridge(s) are nearly empty (printing continues). Select the correct black ink cartridge option in the driver A non-Epson ink cartridge is low. MAINTENANCE REQUEST A printer part may decline when ink is installed. Remove the ink cartridge and reinstall it. Make sure you have replacement ...
Printer Guide
Page 166
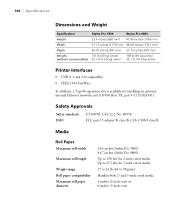
.../100 Base TX, part # C12C824341). 166 | Specifications Dimensions and Weight Specification Stylus Pro 7800 Stylus Pro 9800 Height 22.4 inches (560 mm) 47.84 inches (1196 mm) Width 47.12 inches (1178 mm) 68.08 inches (1702 mm) Depth 20.04 inches (501mm) 27.12 inches (678 mm) Weight 131 lb (59 kg) printer (without consumables) 23...
.../100 Base TX, part # C12C824341). 166 | Specifications Dimensions and Weight Specification Stylus Pro 7800 Stylus Pro 9800 Height 22.4 inches (560 mm) 47.84 inches (1196 mm) Width 47.12 inches (1178 mm) 68.08 inches (1702 mm) Depth 20.04 inches (501mm) 27.12 inches (678 mm) Weight 131 lb (59 kg) printer (without consumables) 23...

Product Information Guide
Page 1
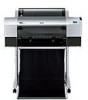
Epson Stylus Pro 7800 and 9800 Printer Parts - Front cover Roll paper cover Ink cartridge compartment Paper basket Paper lever Control panel Ink cartridge compartment Printer Specifications Printing Printing method On-demand ink jet Nozzle configuration Black: 180 nozzles × 3 (photo black or matte black, light black, light light black) Color: 180 nozzles × 5 (cyan, magenta, light cyan, light...
Epson Stylus Pro 7800 and 9800 Printer Parts - Front cover Roll paper cover Ink cartridge compartment Paper basket Paper lever Control panel Ink cartridge compartment Printer Specifications Printing Printing method On-demand ink jet Nozzle configuration Black: 180 nozzles × 3 (photo black or matte black, light black, light light black) Color: 180 nozzles × 5 (cyan, magenta, light cyan, light...
Product Information Guide
Page 5
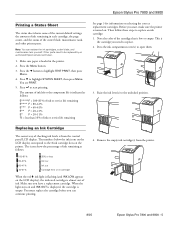
Epson Stylus Pro 7800 and 9800 Printing a Status Sheet The status sheet shows some of the current default settings, the amount of ink remaining in the printer. 2. Press to start , make sure the printer is the cartridge you have a replacement cartridge. Note the color of the cutter blade, maintenance tank, and other printer parts... sure paper is loaded in each cartridge, the page count, and the status of the cartridge that is from the printer. 8/05 Epson Stylus Pro 7800 and 9800 - 5 Before you can replace the ink cartridges, cutter blade, and maintenance tank yourself. Note: You ...
Epson Stylus Pro 7800 and 9800 Printing a Status Sheet The status sheet shows some of the current default settings, the amount of ink remaining in the printer. 2. Press to start , make sure the printer is the cartridge you have a replacement cartridge. Note the color of the cutter blade, maintenance tank, and other printer parts... sure paper is loaded in each cartridge, the page count, and the status of the cartridge that is from the printer. 8/05 Epson Stylus Pro 7800 and 9800 - 5 Before you can replace the ink cartridges, cutter blade, and maintenance tank yourself. Note: You ...

Quick Reference Guide
Page 7
Replacing Printer Parts Replacing the Printer Cutter Blade If you notice that the paper isn't cut cleanly, you may have the wrong cartridge. Check the package and product code. The print head moves to replace the cutter blade (part # C12C815291). Note: If you may need ...Cartridges (continued) 5 Hold the cartridge with the arrow mark pointing toward the printer. E*****F indicates a new cutter. CUTTER REPLACEMENT is displayed. Don't force it . 6 Return the ink lever to its status as Epson UltraSmooth™, Textured, or Velvet) • Canvas • Backlight fi...
Replacing Printer Parts Replacing the Printer Cutter Blade If you notice that the paper isn't cut cleanly, you may have the wrong cartridge. Check the package and product code. The print head moves to replace the cutter blade (part # C12C815291). Note: If you may need ...Cartridges (continued) 5 Hold the cartridge with the arrow mark pointing toward the printer. E*****F indicates a new cutter. CUTTER REPLACEMENT is displayed. Don't force it . 6 Return the ink lever to its status as Epson UltraSmooth™, Textured, or Velvet) • Canvas • Backlight fi...

Quick Reference Guide
Page 8
...printer is on, and pull out the maintenance tank as shown, then turn the latch to replace the maintenance tank (part # C12C890191) when you see MAINTENANCE TANK FULL on either side). The carriage returns to be replaced (left . On the Epson Stylus Pro 9800, the right tank is full. Replacing the Maintenance Tank The Epson Stylus Pro 7800... more than the left or right). To maximize tank life, you have the Epson Stylus Pro 9800, check the LCD to determine which tank needs to the home position. 7 Replacing Printer Parts (continued) 5 Hold down the side pin, as shown. 8 Hold down ...
...printer is on, and pull out the maintenance tank as shown, then turn the latch to replace the maintenance tank (part # C12C890191) when you see MAINTENANCE TANK FULL on either side). The carriage returns to be replaced (left . On the Epson Stylus Pro 9800, the right tank is full. Replacing the Maintenance Tank The Epson Stylus Pro 7800... more than the left or right). To maximize tank life, you have the Epson Stylus Pro 9800, check the LCD to determine which tank needs to the home position. 7 Replacing Printer Parts (continued) 5 Hold down the side pin, as shown. 8 Hold down ...


