Getting Started - ColorBurst RIP
Page 5
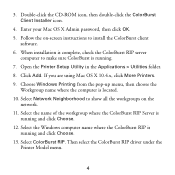
...the ColorBurst RIP server computer to install the ColorBurst client software. 6. Select ColorBurst RIP. Click Add. If you are using Mac OS X 10.4.x, click More Printers. 9. Select Network Neighborhood to show all the workgroups on -screen instructions to make sure ColorBurst is running . 7. Select the... name of the workgroup where the ColorBurst RIP Server is located. 10. Then select the ColorBurst RIP driver under the Printer Model menu. 4 Double-click the CD-ROM icon, then double-click the ColorBurst Client Installer icon. 4. 3. Select the Windows ...
...the ColorBurst RIP server computer to install the ColorBurst client software. 6. Select ColorBurst RIP. Click Add. If you are using Mac OS X 10.4.x, click More Printers. 9. Select Network Neighborhood to show all the workgroups on -screen instructions to make sure ColorBurst is running . 7. Select the... name of the workgroup where the ColorBurst RIP Server is located. 10. Then select the ColorBurst RIP driver under the Printer Model menu. 4 Double-click the CD-ROM icon, then double-click the ColorBurst Client Installer icon. 4. 3. Select the Windows ...

Getting Started - ColorBurst RIP
Page 7
... Print Driver zip file. 4. Windows 2000: Click Start > Settings > Printers. 5. Click Yes to a Mac OS X RIP Server ColorBurst supports Windows XP and Windows 2000. Click Finish when you see a screen telling you want to the same network as your default printer, choose Yes. Make sure your printer name ...to use the ColorBurst RIP as the ColorBurst RIP server computer. 2. Select Browse for a printer (Windows XP) or Type your computer is complete. Copy the CB Windows Print Driver zip file from the ColorBurst > Utilities folder on the server to the ColorBurst RIP. ...
... Print Driver zip file. 4. Windows 2000: Click Start > Settings > Printers. 5. Click Yes to a Mac OS X RIP Server ColorBurst supports Windows XP and Windows 2000. Click Finish when you see a screen telling you want to the same network as your default printer, choose Yes. Make sure your printer name ...to use the ColorBurst RIP as the ColorBurst RIP server computer. 2. Select Browse for a printer (Windows XP) or Type your computer is complete. Copy the CB Windows Print Driver zip file from the ColorBurst > Utilities folder on the server to the ColorBurst RIP. ...

Printer Guide
Page 44
...printer driver. 6. Do one of the following: • If you are finished installing software, click Exit. • If you see the prompt, click Restart. You can use , as described on page 45 for Mac OS X 10.4 or page 46 for your password and follow the instructions on page 53. 44 | Setting Up the Printer.... Enter your password again and follow the on-screen instructions to configure your printer for network use EpsonNet Config to install your password and follow the on -screen instructions. Double-click Install Additional Color Profiles to install the EPSON LFP Remote Panel. 7.
...printer driver. 6. Do one of the following: • If you are finished installing software, click Exit. • If you see the prompt, click Restart. You can use , as described on page 45 for Mac OS X 10.4 or page 46 for your password and follow the instructions on page 53. 44 | Setting Up the Printer.... Enter your password again and follow the on-screen instructions to configure your printer for network use EpsonNet Config to install your password and follow the on -screen instructions. Double-click Install Additional Color Profiles to install the EPSON LFP Remote Panel. 7.
Printer Guide
Page 45
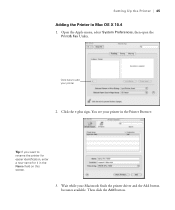
Click here to rename the printer for easier identification, enter a new name for it in the Name field on this screen. 3. You see your printer in Mac OS X 10.4 1. Then click the Add button. 1-45 Open the Apple menu, select System Preferences, then open the Print & Fax Utility. Wait while your printer 2. Setting Up the Printer | 45 Adding the Printer in the Printer Browser: Tip: If you want to add your Macintosh finds the printer driver and the Add button becomes available. Click the + plus sign.
Click here to rename the printer for easier identification, enter a new name for it in the Name field on this screen. 3. You see your printer in Mac OS X 10.4 1. Then click the Add button. 1-45 Open the Apple menu, select System Preferences, then open the Print & Fax Utility. Wait while your printer 2. Setting Up the Printer | 45 Adding the Printer in the Printer Browser: Tip: If you want to add your Macintosh finds the printer driver and the Add button becomes available. Click the + plus sign.

Printer Guide
Page 56
...Mac OS X) or page 107 (Windows) for instructions on a flat surface. Using Roll Paper You can use cotton gloves. • Always choose the correct Media Type setting in your printer driver software before you send your authorized Epson dealer for available media. 2-56 Check the Epson Pro Graphics web site (http://prographics.epson...in both the printer driver software and on the printer's control panel. See page 84 (Mac OS X) or page 101 (Windows) for instructions. • Always select the correct paper source (roll or sheet) in a cool, dry place to 24 inches wide (7800) or 44 ...
...Mac OS X) or page 107 (Windows) for instructions on a flat surface. Using Roll Paper You can use cotton gloves. • Always choose the correct Media Type setting in your printer driver software before you send your authorized Epson dealer for available media. 2-56 Check the Epson Pro Graphics web site (http://prographics.epson...in both the printer driver software and on the printer's control panel. See page 84 (Mac OS X) or page 101 (Windows) for instructions. • Always select the correct paper source (roll or sheet) in a cool, dry place to 24 inches wide (7800) or 44 ...
Printer Guide
Page 64
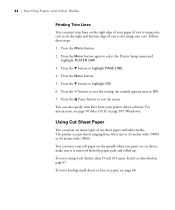
Press the Pause button to select the Printer Setup menu and highlight PLATEN GAP. 3. make sure it as described on page 67.... leave your roll paper on the spindle when you 're loading small sheets or fine art paper, see page 90 (Mac OS X) or page 105 (Windows). Press the d button to save the setting. Using Cut Sheet Paper You can ...appears next to highlight ON. 6. Follow these steps: 1. Press the d button to ON. 7. The printer accepts sheets ranging from letter size to 24 inches wide (7800) or 44 inches wide (9800). If you 're not using stock thicker than 19 mil (0.5 mm), ...
Press the Pause button to select the Printer Setup menu and highlight PLATEN GAP. 3. make sure it as described on page 67.... leave your roll paper on the spindle when you 're loading small sheets or fine art paper, see page 90 (Mac OS X) or page 105 (Windows). Press the d button to save the setting. Using Cut Sheet Paper You can ...appears next to highlight ON. 6. Follow these steps: 1. Press the d button to ON. 7. The printer accepts sheets ranging from letter size to 24 inches wide (7800) or 44 inches wide (9800). If you 're not using stock thicker than 19 mil (0.5 mm), ...
Printer Guide
Page 76
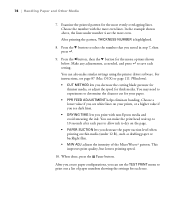
...can use the TEST PRINT menu to save each setting. You can make similar settings using the printer driver software. After printing the pattern, THICKNESS NUMBER is highlighted. 8. Press the d button to select...on your paper. • PPR FEED ADJUSTMENT helps eliminate banding. For instructions, see page 87 (Mac OS X) or page 111 (Windows). • CUT METHOD lets you see dark lines. •...even. This improves print quality, but lowers printing speed. 10. Choose the number with non-Epson media and avoid smearing the ink. Examine the printed pattern for each pass to allow ink to...
...can use the TEST PRINT menu to save each setting. You can make similar settings using the printer driver software. After printing the pattern, THICKNESS NUMBER is highlighted. 8. Press the d button to select...on your paper. • PPR FEED ADJUSTMENT helps eliminate banding. For instructions, see page 87 (Mac OS X) or page 111 (Windows). • CUT METHOD lets you see dark lines. •...even. This improves print quality, but lowers printing speed. 10. Choose the number with non-Epson media and avoid smearing the ink. Examine the printed pattern for each pass to allow ink to...
Printer Guide
Page 79
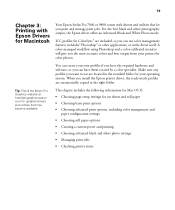
...you install the Epson printer driver, the ready-made profiles are located in the standard folder for updated drivers and utilities that let you can use are automatically copied to the right folder. Tip: Check the Epson Pro Graphics website at http://prographics.epson. You can ...for your own profiles if you have them created by a color specialist. This chapter includes the following information for Mac OS X: • Choosing page setup settings for Macintosh Your Epson Stylus Pro 7800 or 9800 comes with Epson Drivers for cut sheets and roll paper • Choosing basic print...
...you install the Epson printer driver, the ready-made profiles are located in the standard folder for updated drivers and utilities that let you can use are automatically copied to the right folder. Tip: Check the Epson Pro Graphics website at http://prographics.epson. You can ...for your own profiles if you have them created by a color specialist. This chapter includes the following information for Mac OS X: • Choosing page setup settings for Macintosh Your Epson Stylus Pro 7800 or 9800 comes with Epson Drivers for cut sheets and roll paper • Choosing basic print...
Printer Guide
Page 82
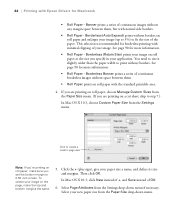
... give your new paper size from the Settings menu. In Mac OS X 10.3, click New instead of +, and Save instead of continuous images without borders. Select your paper size a name, and define its size and margins. 82 | Printing with Epson Drivers for more information. • Roll Paper - This selection is..., choose Manage Custom Sizes from the Settings drop-down menu. 3-82 Borderless (Retain Size) prints your image (up to 3%) to step 7.) In Mac OS X 10.3, choose Custom Paper Size from the Paper Size drop-down menu if necessary. Then click OK. See page 90 for Macintosh •...
... give your new paper size from the Settings menu. In Mac OS X 10.3, click New instead of +, and Save instead of continuous images without borders. Select your paper size a name, and define its size and margins. 82 | Printing with Epson Drivers for more information. • Roll Paper - This selection is..., choose Manage Custom Sizes from the Settings drop-down menu. 3-82 Borderless (Retain Size) prints your image (up to 3%) to step 7.) In Mac OS X 10.3, choose Custom Paper Size from the Paper Size drop-down menu if necessary. Then click OK. See page 90 for Macintosh •...

Printer Guide
Page 135
... 6. Only media types that work with Matte Black ink will no longer see glossy media types in your operating system. • Mac OS X: Check the ink status using the Epson Printer Utility, following the instructions on page 97. If not, click the Utility tab and then the... close the cover. Confirm that the correct ink cartridge is displayed. • Windows: Access the printer driver as described on the right ink compartment. Repeat this step for example: Updating the Printer Driver Information After you have switched black ink modes, you installed and click OK. 5-135 When RAISE ...
... 6. Only media types that work with Matte Black ink will no longer see glossy media types in your operating system. • Mac OS X: Check the ink status using the Epson Printer Utility, following the instructions on page 97. If not, click the Utility tab and then the... close the cover. Confirm that the correct ink cartridge is displayed. • Windows: Access the printer driver as described on the right ink compartment. Repeat this step for example: Updating the Printer Driver Information After you have switched black ink modes, you installed and click OK. 5-135 When RAISE ...
Printer Guide
Page 156
... ◗ Make sure color settings in your ink supply is low, as described on page 127. ◗ Make sure the Media Type setting in the printer driver. If the cartridge is ...Epson media, custom color profiles will give you the best color reproduction. ◗ If you're using the color management features in Photoshop or another application, you must turn off color management in the printer ...on each of the ink cartridges. See page 87 (Mac OS X) or page 110 (Windows). ◗ Adjust the Color Density setting in the printer software is too old, replace it as described on...
... ◗ Make sure color settings in your ink supply is low, as described on page 127. ◗ Make sure the Media Type setting in the printer driver. If the cartridge is ...Epson media, custom color profiles will give you the best color reproduction. ◗ If you're using the color management features in Photoshop or another application, you must turn off color management in the printer ...on each of the ink cartridges. See page 87 (Mac OS X) or page 110 (Windows). ◗ Adjust the Color Density setting in the printer software is too old, replace it as described on...
Printer Guide
Page 173
...Problems banding, 154 blank paper, 159 blurry prints, 157 cable, 158, 159 color, 159 diagnosing, 149 faint prints, 156 garbled characters, 159 ghosting, 155 graininess... paper, 160 to 163 print quality, 154 to 157 print speed, 116 printer driver, 158 to 159 -173 Index | 173 printing stops, 158 roll paper cannot... Progress Meter, 114, 116 R Registering non-Epson media, 75 to 77 Requirements, system, 12 to 13 Resolution Mac OS X, 86 Windows, 110 Roll paper attaching...SP 7800, 17 to 26 SP 9800, 27 to 36 Shipping bracket SP 7800, removing, 24 SP 9800, removing, 33 using, 145 Software installing in Mac ...
...Problems banding, 154 blank paper, 159 blurry prints, 157 cable, 158, 159 color, 159 diagnosing, 149 faint prints, 156 garbled characters, 159 ghosting, 155 graininess... paper, 160 to 163 print quality, 154 to 157 print speed, 116 printer driver, 158 to 159 -173 Index | 173 printing stops, 158 roll paper cannot... Progress Meter, 114, 116 R Registering non-Epson media, 75 to 77 Requirements, system, 12 to 13 Resolution Mac OS X, 86 Windows, 110 Roll paper attaching...SP 7800, 17 to 26 SP 9800, 27 to 36 Shipping bracket SP 7800, removing, 24 SP 9800, removing, 33 using, 145 Software installing in Mac ...


