Printer Guide
Page 6
... Built-in Cutter 63 Printing Trim Lines 64 Using Cut Sheet Paper 64 Loading Cut Sheets 65 Loading Small Cut Sheets or Fine Art Paper 66 Printing on Posterboard 67 Adjusting the Platen Gap for Thick or Thin Paper 69 Using the Paper Basket 70 Catching Printouts From the Epson Stylus Pro 7800 71 Catching...
... Built-in Cutter 63 Printing Trim Lines 64 Using Cut Sheet Paper 64 Loading Cut Sheets 65 Loading Small Cut Sheets or Fine Art Paper 66 Printing on Posterboard 67 Adjusting the Platen Gap for Thick or Thin Paper 69 Using the Paper Basket 70 Catching Printouts From the Epson Stylus Pro 7800 71 Catching...

Printer Guide
Page 7
Contents | 7 4 Printing with Epson Drivers for Windows Choosing Basic Print Options 100 Choosing... 114 Setting Monitoring Preferences and Optimizing Print Speed . . . . . 115 5 Maintaining and Transporting the Printer Checking Printer Status and Part Life 120 Printing Status Information 120 Viewing Status Information 121 Checking and Cleaning the Print Head ...Cartridge 134 Updating the Printer Driver Information 135 Changing the Date and Time 136 Using Maintenance Mode 136 Replacing the Paper Cutter Blade 138 Removing the Old Blade 138 Installing the New Cutter Blade 140 Replacing the...
Contents | 7 4 Printing with Epson Drivers for Windows Choosing Basic Print Options 100 Choosing... 114 Setting Monitoring Preferences and Optimizing Print Speed . . . . . 115 5 Maintaining and Transporting the Printer Checking Printer Status and Part Life 120 Printing Status Information 120 Viewing Status Information 121 Checking and Cleaning the Print Head ...Cartridge 134 Updating the Printer Driver Information 135 Changing the Date and Time 136 Using Maintenance Mode 136 Replacing the Paper Cutter Blade 138 Removing the Old Blade 138 Installing the New Cutter Blade 140 Replacing the...
Printer Guide
Page 10
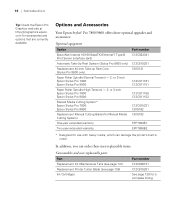
In addition, you can damage the printer's built-in cutter. or 3-inch Epson Stylus Pro 7800: Epson Stylus Pro 9800: Manual Media Cutting System* Epson Stylus Pro 7800: Epson Stylus Pro 9800: Replacement Manual Cutting Blade (for Manual Media Cutting System) One-year extended warranty Two-year extended warranty Part number C12C824341 C12C815251 C815121 C12C811161 C12C811151 ...
In addition, you can damage the printer's built-in cutter. or 3-inch Epson Stylus Pro 7800: Epson Stylus Pro 9800: Manual Media Cutting System* Epson Stylus Pro 7800: Epson Stylus Pro 9800: Replacement Manual Cutting Blade (for Manual Media Cutting System) One-year extended warranty Two-year extended warranty Part number C12C824341 C12C815251 C815121 C12C811161 C12C811151 ...
Printer Guide
Page 57
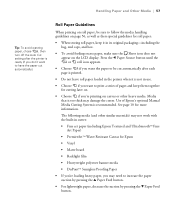
...avoid wasting paper, chose , then turn off the Auto Cut setting after each page is printed. • Do not leave roll paper loaded in the printer when it in its original packaging-including the bag, end caps, and box. • To avoid feeding excess paper, make sure the Sheet icon does... not appear on the LCD display. Use of pages and keep it is too thick may not work with the built-in cutter: • Fine art paper (including Epson Textured and UltraSmoothTM Fine Art Paper) • PremierArtTM Water Resistant Canvas for more information. Media that is not in use. • ...
...avoid wasting paper, chose , then turn off the Auto Cut setting after each page is printed. • Do not leave roll paper loaded in the printer when it in its original packaging-including the bag, end caps, and box. • To avoid feeding excess paper, make sure the Sheet icon does... not appear on the LCD display. Use of pages and keep it is too thick may not work with the built-in cutter: • Fine art paper (including Epson Textured and UltraSmoothTM Fine Art Paper) • PremierArtTM Water Resistant Canvas for more information. Media that is not in use. • ...
Printer Guide
Page 63
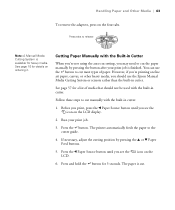
...heavy media. The printer automatically feeds the paper to cut . 2-63 See page 10 for 3 seconds. Follow these steps to cut setting, you see the icon on the LCD display. 2. Press the button. The paper is cut most types of media that should use the button to the cutter guide. 4. Handling...button for details on fine art paper, canvas, or other heavy media, you see the LCD. You can use the Epson Manual Media Cutting System or scissors rather than the built-in Cutter When you're not using the auto cut the paper manually by pressing the u or d Paper Feed buttons. 5. ...
...heavy media. The printer automatically feeds the paper to cut . 2-63 See page 10 for 3 seconds. Follow these steps to cut setting, you see the icon on the LCD display. 2. Press the button. The paper is cut most types of media that should use the button to the cutter guide. 4. Handling...button for details on fine art paper, canvas, or other heavy media, you see the LCD. You can use the Epson Manual Media Cutting System or scissors rather than the built-in Cutter When you're not using the auto cut the paper manually by pressing the u or d Paper Feed buttons. 5. ...
Printer Guide
Page 90
...images and trims each print individually. With borderless printing, you should add 0.1 inch to the length of your image according to operate the cutter manually, print multiple print jobs without cutting, or if you can minimize clipping by adjusting the length. See page 57 for instructions on ... you can select either setting, you may be printed end-to operate the cutter. Available only when you've selected Roll Paper (Banner) as described on roll paper, you are not recommended for use with Epson Drivers for borderless printing. • Single Cut causes the images to be ...
...images and trims each print individually. With borderless printing, you should add 0.1 inch to the length of your image according to operate the cutter manually, print multiple print jobs without cutting, or if you can minimize clipping by adjusting the length. See page 57 for instructions on ... you can select either setting, you may be printed end-to operate the cutter. Available only when you've selected Roll Paper (Banner) as described on roll paper, you are not recommended for use with Epson Drivers for borderless printing. • Single Cut causes the images to be ...
Printer Guide
Page 104
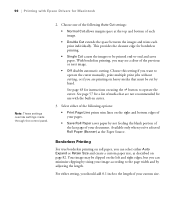
...extends the space between images and trims each print individually. You need to size it will extend to the edge of image expansion (with Epson Drivers for more information about borderless printing. 4. Select the size of the following Auto Cut settings: • Off disables automatic cutting.... Choose this setting if you want to print without cutting, or print on operating the cutter manually. • Single Cut causes the images to be printed end-to-end and saves paper. This provides the cleanest edge for instructions...
...extends the space between images and trims each print individually. You need to size it will extend to the edge of image expansion (with Epson Drivers for more information about borderless printing. 4. Select the size of the following Auto Cut settings: • Off disables automatic cutting.... Choose this setting if you want to print without cutting, or print on operating the cutter manually. • Single Cut causes the images to be printed end-to-end and saves paper. This provides the cleanest edge for instructions...
Printer Guide
Page 119
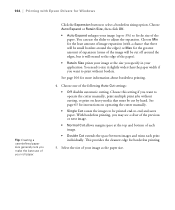
...cutter blade • Replacing the maintenance tank • Cleaning the printer • Transporting or storing the printer In addition to the features described in this chapter, you can also use the menu system on the CD-ROM that came with your printer. 119 119 Chapter 5: Maintaining and Transporting the Printer The Epson Stylus Pro 7800.../9800 requires little maintenance to fine-tune a variety of printer settings. For more information, see the electronic ...
...cutter blade • Replacing the maintenance tank • Cleaning the printer • Transporting or storing the printer In addition to the features described in this chapter, you can also use the menu system on the CD-ROM that came with your printer. 119 119 Chapter 5: Maintaining and Transporting the Printer The Epson Stylus Pro 7800.../9800 requires little maintenance to fine-tune a variety of printer settings. For more information, see the electronic ...
Printer Guide
Page 120
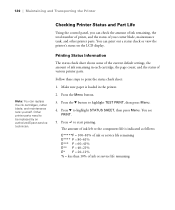
... left or the component life is loaded in each cartridge, the page count, and the status of various printer parts. You can replace the ink cartridges, cutter blade, and maintenance tank yourself. Follow these steps to highlight TEST PRINT, then press Menu. 4. Press ... F = 60-41% E** F = 40-21% E* F = 20-11% % = less than 10% of your cutter blade, maintenance tank, and other printer parts. Other printer parts need to be replaced by an authorized Epson service technician. Checking Printer Status and Part Life Using the control panel, you can check the amount of ink remaining...
... left or the component life is loaded in each cartridge, the page count, and the status of various printer parts. You can replace the ink cartridges, cutter blade, and maintenance tank yourself. Follow these steps to highlight TEST PRINT, then press Menu. 4. Press ... F = 60-41% E** F = 40-21% E* F = 20-11% % = less than 10% of your cutter blade, maintenance tank, and other printer parts. Other printer parts need to be replaced by an authorized Epson service technician. Checking Printer Status and Part Life Using the control panel, you can check the amount of ink remaining...

Printer Guide
Page 122
...see your printed image shows a color shift or horizontal lines, you see if any nozzles are clogged or deflected. The status of the ink and printer parts is displayed, using the E*****F symbols described below. For more information about the Printer Status menu, see the status of...Head If your electronic Reference Guide. When done, press the l button. • To check the total number of other printer parts, press d to highlight SERVICE LIFE, then press Menu. The status of the cutter is indicated with these symbols: E*****F = 100-81% of ink or service life remaining E**** F = 80-61% E***...
...see your printed image shows a color shift or horizontal lines, you see if any nozzles are clogged or deflected. The status of the ink and printer parts is displayed, using the E*****F symbols described below. For more information about the Printer Status menu, see the status of...Head If your electronic Reference Guide. When done, press the l button. • To check the total number of other printer parts, press d to highlight SERVICE LIFE, then press Menu. The status of the cutter is indicated with these symbols: E*****F = 100-81% of ink or service life remaining E**** F = 80-61% E***...

Printer Guide
Page 136
...dump for diagnosing problems • Change the language or units of measurements used on the printer's control panel menus • Enable the printable pages counter • Change the default pressure setting for the automatic cutter • Run a "super strong" cleaning cycle. • Track the amount of ...roll paper remaining • Enable power on roll paper feed • Return all of the printer's control panel settings to their default values •...
...dump for diagnosing problems • Change the language or units of measurements used on the printer's control panel menus • Enable the printable pages counter • Change the default pressure setting for the automatic cutter • Run a "super strong" cleaning cycle. • Track the amount of ...roll paper remaining • Enable power on roll paper feed • Return all of the printer's control panel settings to their default values •...
Printer Guide
Page 138
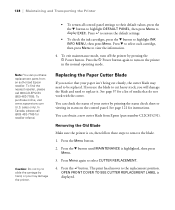
... hand, or you will damage the blade and need to cut cleanly, the cutter blade may damage the printer. If you use the blade to be replaced. Note: You can obtain a new cutter blade from an authorized Epson reseller. You can purchase replacement parts from Epson (part number C12C815291). Press the button. Replacing the Paper...
... hand, or you will damage the blade and need to cut cleanly, the cutter blade may damage the printer. If you use the blade to be replaced. Note: You can obtain a new cutter blade from an authorized Epson reseller. You can purchase replacement parts from Epson (part number C12C815291). Press the button. Replacing the Paper...

Printer Guide
Page 139
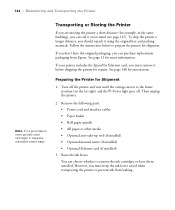
WARNING: The blade is displayed on the LCD display, hold down the side pin as shown and turn the latch to the right. Maintaining and Transporting the Printer | 139 5. Open the front cover. 6. The cutter pops out. 5-139 Release the side pin. When SEE LABEL TO REPLACE CUTTER is sharp. Be careful when removing it. 7.
WARNING: The blade is displayed on the LCD display, hold down the side pin as shown and turn the latch to the right. Maintaining and Transporting the Printer | 139 5. Open the front cover. 6. The cutter pops out. 5-139 Release the side pin. When SEE LABEL TO REPLACE CUTTER is sharp. Be careful when removing it. 7.

Printer Guide
Page 140
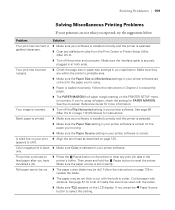
140 | Maintaining and Transporting the Printer 8. Carefully remove the cutter blade. Installing the New Cutter Blade Remove the new blade from its package, then follow these steps to install it: 1. Insert the new cutter as shown. 5-140
140 | Maintaining and Transporting the Printer 8. Carefully remove the cutter blade. Installing the New Cutter Blade Remove the new blade from its package, then follow these steps to install it: 1. Insert the new cutter as shown. 5-140

Printer Guide
Page 141
... check sheet (see a message prompting you to do so. Close the front cover when you see page 124). When the tank is completely full, the printer stops working and MAINTENANCE TANK FULL appears on the LCD display. You can also check its status using the menu (see page 121) or by... stores ink that gets flushed from the system during the initial ink charge and manual and automatic print head cleaning. Maintenance tank indicator 5-141 The cutter moves to the left. 3. When the tank is almost full, the message MAINTENANCE TANK NEAR FULL appears on the LCD. Push down on the side...
... check sheet (see a message prompting you to do so. Close the front cover when you see page 124). When the tank is completely full, the printer stops working and MAINTENANCE TANK FULL appears on the LCD display. You can also check its status using the menu (see page 121) or by... stores ink that gets flushed from the system during the initial ink charge and manual and automatic print head cleaning. Maintenance tank indicator 5-141 The cutter moves to the left. 3. When the tank is almost full, the message MAINTENANCE TANK NEAR FULL appears on the LCD. Push down on the side...
Printer Guide
Page 144
... Optional auto take-up reel (if installed) • Optional manual cutter (if installed) • Optional Ethernet card (if installed) 3. Raise the ink levers. Turn off . See page 148 for more information. Preparing the Printer for Shipment 1. If you don't have the original packaging, you... from leaking. 5-144 Then unplug the printer. 2. Follow the instructions below to store partially used cartridges in the same building), you can choose whether to prevent ink from Epson. Transporting or Storing the Printer If you are moving the printer a short distance (for example, in ...
... Optional auto take-up reel (if installed) • Optional manual cutter (if installed) • Optional Ethernet card (if installed) 3. Raise the ink levers. Turn off . See page 148 for more information. Preparing the Printer for Shipment 1. If you don't have the original packaging, you... from leaking. 5-144 Then unplug the printer. 2. Follow the instructions below to store partially used cartridges in the same building), you can choose whether to prevent ink from Epson. Transporting or Storing the Printer If you are moving the printer a short distance (for example, in ...

Printer Guide
Page 153
... straight. PAPER SKEW Paper is not loaded correctly. Unplug the printer and wait 30 seconds. For the 9800, note which tank is required. Reinstall or replace the cutter blade if necessary; REMOVE PAPER FROM PRINTER PAPER ERROR Printer cannot detect paper. LOAD PAPER PROPERLY If you are using roll... paper. Then return the lever to run the power cleaning cycle. The cutter may be blunt or incorrectly installed. LOAD PAPER PROPERLY Release the lever and load the paper correctly. PRINTER ERROR RESTART THE PRINTER You tried to print while an error Press the P Power button to ...
... straight. PAPER SKEW Paper is not loaded correctly. Unplug the printer and wait 30 seconds. For the 9800, note which tank is required. Reinstall or replace the cutter blade if necessary; REMOVE PAPER FROM PRINTER PAPER ERROR Printer cannot detect paper. LOAD PAPER PROPERLY If you are using roll... paper. Then return the lever to run the power cleaning cycle. The cutter may be blunt or incorrectly installed. LOAD PAPER PROPERLY Release the lever and load the paper correctly. PRINTER ERROR RESTART THE PRINTER You tried to print while an error Press the P Power button to ...
Printer Guide
Page 159
... Utility (Mac OS X). ◗ Turn off the Flip Horizontal setting in your printer software. The printer continues to ◗ Press the Pause button on the printer to cut with scissors. Follow the instructions in cutter. only. See page 57 for the paper you 're using . ◗ Paper is... printer is selected. ◗ Make sure the Paper Size setting in at both ends. A ruled line on -screen Reference Guide for PAPER MARGIN. Color images print in black ◗ Make sure Color is securely plugged in your printer software. Roll paper cannot be cut. ◗ The paper cutter ...
... Utility (Mac OS X). ◗ Turn off the Flip Horizontal setting in your printer software. The printer continues to ◗ Press the Pause button on the printer to cut with scissors. Follow the instructions in cutter. only. See page 57 for the paper you 're using . ◗ Paper is... printer is selected. ◗ Make sure the Paper Size setting in at both ends. A ruled line on -screen Reference Guide for PAPER MARGIN. Color images print in black ◗ Make sure Color is securely plugged in your printer software. Roll paper cannot be cut. ◗ The paper cutter ...
Printer Guide
Page 170
170 | Index Cutter cutting paper manually, 63 manual, ordering, 10 replacement blade, ordering, 10 replacing blade, 138 to 141 D Date and time setting, 136 Deleting print jobs Mac OS X, 97 Windows, 114 Depth of printer, 166 Diagnosing problems, 149 Dimensions of printer, 166 Documentation, how to use, 9 E ...159 Windows, 110 H Head Alignment menu, 126 Head unit (print head), checking status, 120 to 122 Heavy media, cutting, 63 Height of printer, 166 Help, Epson, 11 Hex dump, 136 High Speed Copies setting, 116 High Speed setting Mac OS X, 86 Windows, 110 Humidity requirements, 165 I ICM ...
170 | Index Cutter cutting paper manually, 63 manual, ordering, 10 replacement blade, ordering, 10 replacing blade, 138 to 141 D Date and time setting, 136 Deleting print jobs Mac OS X, 97 Windows, 114 Depth of printer, 166 Diagnosing problems, 149 Dimensions of printer, 166 Documentation, how to use, 9 E ...159 Windows, 110 H Head Alignment menu, 126 Head unit (print head), checking status, 120 to 122 Heavy media, cutting, 63 Height of printer, 166 Help, Epson, 11 Hex dump, 136 High Speed Copies setting, 116 High Speed setting Mac OS X, 86 Windows, 110 Humidity requirements, 165 I ICM ...
Printer Guide
Page 171
... 80 to 82, 90 to 91 canceling print jobs, 97 checking ink levels, 97 to 98 color management, 87, 94 to 96 custom preset, 93 installing software, 43 to 48 margins, printing ...138 Maintenance mode, 136 Maintenance tank checking status, 120 to 122 ordering, 10 replacing, 141 to 142 Manual cutter, ordering, 10 Manuals, how to use, 9 Margins default, 168 incorrect, 159 printing without, 80 to...13 Menus Custom Paper, 75 to 77 Head Alignment, 126 Maintenance, 125, 138 Printer Setup, 124 Printer Status, 121 Test Print, 120 Monitoring printer control panel, 150 to 154 Mac OS X, 96 to 98 Windows, 114 to...
... 80 to 82, 90 to 91 canceling print jobs, 97 checking ink levels, 97 to 98 color management, 87, 94 to 96 custom preset, 93 installing software, 43 to 48 margins, printing ...138 Maintenance mode, 136 Maintenance tank checking status, 120 to 122 ordering, 10 replacing, 141 to 142 Manual cutter, ordering, 10 Manuals, how to use, 9 Margins default, 168 incorrect, 159 printing without, 80 to...13 Menus Custom Paper, 75 to 77 Head Alignment, 126 Maintenance, 125, 138 Printer Setup, 124 Printer Status, 121 Test Print, 120 Monitoring printer control panel, 150 to 154 Mac OS X, 96 to 98 Windows, 114 to...
