
Printer Guide
Page 8
... Card 146 Moving the Printer on the Stand 147 Setting Up the Printer After Transportation 148 6 Solving Problems Diagnosing Problems 149 Checking Error Messages and Lights 150 Improving Print Quality 154 Solving Operational Problems 158 Solving Miscellaneous Printing Problems 159 Solving Paper Problems 160 Fixing Paper Eject Problems 161 Clearing Paper Jams 162 Uninstalling...
... Card 146 Moving the Printer on the Stand 147 Setting Up the Printer After Transportation 148 6 Solving Problems Diagnosing Problems 149 Checking Error Messages and Lights 150 Improving Print Quality 154 Solving Operational Problems 158 Solving Miscellaneous Printing Problems 159 Solving Paper Problems 160 Fixing Paper Eject Problems 161 Clearing Paper Jams 162 Uninstalling...
Printer Guide
Page 121
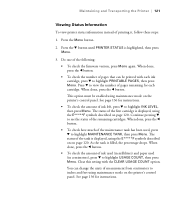
... remaining cartridges. This option must be printed with the CLEAR USAGE COUNT option. The status of the tank is filled, the percentage drops. As the tank is displayed, using maintenance mode on page 120. Clear this setting with each cartridge. Do one of printing it, follow... these steps: 1. You can be enabled using the E*****F symbols described on on the printer's control panel. Continue pressing d to highlight USAGE COUNT, then press...
... remaining cartridges. This option must be printed with the CLEAR USAGE COUNT option. The status of the tank is filled, the percentage drops. As the tank is displayed, using maintenance mode on page 120. Clear this setting with each cartridge. Do one of printing it, follow... these steps: 1. You can be enabled using the E*****F symbols described on on the printer's control panel. Continue pressing d to highlight USAGE COUNT, then press...

Printer Guide
Page 124
...check pattern is printed and automatically read . If the nozzles do not clear after a few cleaning cycles, run a cleaning cycle by pressing and holding...highlight TEST PRINT, then press Menu. Press Menu, then press to save the setting. 4. Press d to have the printer check the print head nozzles and clean them if necessary. 1. Press the d button ...d to select OFF, then press to start printing the nozzle check pattern. 5-124 124 | Maintaining and Transporting the Printer Caution: Don't run a cleaning cycle while thick media is highlighted, then press Menu. 3. Press the l button ...
...check pattern is printed and automatically read . If the nozzles do not clear after a few cleaning cycles, run a cleaning cycle by pressing and holding...highlight TEST PRINT, then press Menu. Press Menu, then press to save the setting. 4. Press d to have the printer check the print head nozzles and clean them if necessary. 1. Press the d button ...d to select OFF, then press to start printing the nozzle check pattern. 5-124 124 | Maintaining and Transporting the Printer Caution: Don't run a cleaning cycle while thick media is highlighted, then press Menu. 3. Press the l button ...

Printer Guide
Page 150
...contact Epson. CLEANING ERROR REMOVE THICK PAPER Paper is selected for correcting the problem. 150 | Solving Problems Checking Error Messages and Lights The control panel includes various lights and an LCD display to remove the paper. CARRIAGE LOCKED The print head is locked. Printer could ...CARRIAGE LOCK Remove the bracket securing the print head; CLEANING ERROR PRESS PAUSE BUTTON Head cleaning did not clear the Run the head cleaning utility again. Change the setting in alphabetical order and includes an explanation and instructions for A2-size sheets (11.7 × 16.5) ...
...contact Epson. CLEANING ERROR REMOVE THICK PAPER Paper is selected for correcting the problem. 150 | Solving Problems Checking Error Messages and Lights The control panel includes various lights and an LCD display to remove the paper. CARRIAGE LOCKED The print head is locked. Printer could ...CARRIAGE LOCK Remove the bracket securing the print head; CLEANING ERROR PRESS PAUSE BUTTON Head cleaning did not clear the Run the head cleaning utility again. Change the setting in alphabetical order and includes an explanation and instructions for A2-size sheets (11.7 × 16.5) ...
Printer Guide
Page 159
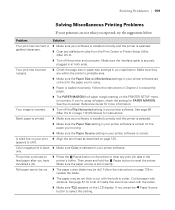
appears to reset the printer. Color images print in black ◗ Make sure Color is incorrect. If you're using . ◗ Make sure the Paper Source setting in your printer software. See page 86 (Mac OS X) or page 110 (Windows) for instructions. The printer continues to ◗ Press the ...cannot be used with scissors. Follow the instructions in Chapter 2 to clear any stalled print jobs from the Print Center or Printer Setup Utility (Mac OS X). ◗ Turn off the Flip Horizontal setting in your printer software is correct for the paper you're using roll paper, check...
appears to reset the printer. Color images print in black ◗ Make sure Color is incorrect. If you're using . ◗ Make sure the Paper Source setting in your printer software. See page 86 (Mac OS X) or page 110 (Windows) for instructions. The printer continues to ◗ Press the ...cannot be used with scissors. Follow the instructions in Chapter 2 to clear any stalled print jobs from the Print Center or Printer Setup Utility (Mac OS X). ◗ Turn off the Flip Horizontal setting in your printer software is correct for the paper you're using roll paper, check...

Printer Guide
Page 160
.... • Make sure the Media Type and Paper Source settings in the printer software are inside the paper path. • Make sure the printer isn't located in your printer software for faster printing. ◗ Clear space on your hard drive or run a defragmentation utility. ...setting through your system to support a faster connection to the printer: either IEEE 1394 FireWire or USB 2.0. Solving Paper Problems If paper feed or paper jam problems occur frequently, try one or more information. 160 | Solving Problems Problem Printing is correct for the paper or media you 're not using Epson...
.... • Make sure the Media Type and Paper Source settings in the printer software are inside the paper path. • Make sure the printer isn't located in your printer software for faster printing. ◗ Clear space on your hard drive or run a defragmentation utility. ...setting through your system to support a faster connection to the printer: either IEEE 1394 FireWire or USB 2.0. Solving Paper Problems If paper feed or paper jam problems occur frequently, try one or more information. 160 | Solving Problems Problem Printing is correct for the paper or media you 're not using Epson...
Product Information Guide
Page 4
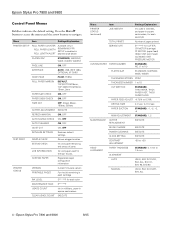
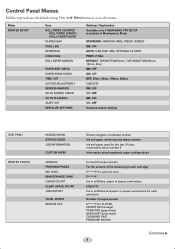
... BI-D 2-COLOR, BI-D ALL 4 - Epson Stylus Pro 7800 and 9800 Control Panel Menus Boldface indicates the default setting. Press the Menu r button to access the menus and the arrow buttons to 0.70% DRYING TIME 0. 0 sec. Epson Stylus Pro 7800 and 9800 8/05 Menu Item Settings/Explanation PRINTER SETUP ROLL PAPER...remaining in each cartridge INK LEVEL E*****F for each color MAINTENANCE TANK E*****F USAGE COUNT Ink in milliliters, paper in square centimeters CLEAR USAGE COUNT EXECUTE Menu Item Settings/Explanation PRINTER STATUS (continued) JOB HISTORY Ink used in milliliters...
... BI-D 2-COLOR, BI-D ALL 4 - Epson Stylus Pro 7800 and 9800 Control Panel Menus Boldface indicates the default setting. Press the Menu r button to access the menus and the arrow buttons to 0.70% DRYING TIME 0. 0 sec. Epson Stylus Pro 7800 and 9800 8/05 Menu Item Settings/Explanation PRINTER SETUP ROLL PAPER...remaining in each cartridge INK LEVEL E*****F for each color MAINTENANCE TANK E*****F USAGE COUNT Ink in milliliters, paper in square centimeters CLEAR USAGE COUNT EXECUTE Menu Item Settings/Explanation PRINTER STATUS (continued) JOB HISTORY Ink used in milliliters...
Product Information Guide
Page 6
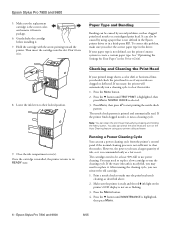
...clear the nozzles. 1. Print a nozzle check to make sure you should check the print head to its package. 6. Press the d button until TEST PRINT is installed, the printer returns to see if any nozzles are clogged or deflected. Epson Stylus Pro 7800 ...and 9800 8/05 Make sure the replacement cartridge is highlighted, then press Menu. 6 - Then insert the cartridge into the slot. To correct this problem, make sure the print head needs cleaning, as described above. 2. See "Optimizing the Settings...
...clear the nozzles. 1. Print a nozzle check to make sure you should check the print head to its package. 6. Press the d button until TEST PRINT is installed, the printer returns to see if any nozzles are clogged or deflected. Epson Stylus Pro 7800 ...and 9800 8/05 Make sure the replacement cartridge is highlighted, then press Menu. 6 - Then insert the cartridge into the slot. To correct this problem, make sure the print head needs cleaning, as described above. 2. See "Optimizing the Settings...
Quick Reference Guide
Page 9
...Information about registered paper configurations Current firmware version For the amount of ink remaining in each cartridge E*****F for each ink color E*****F Ink in milliliters, paper in square centimeters EXECUTE Ink in milliliters and paper in Maintenance Mode STANDARD, NARROW, WIDE, WIDER, ...EXECUTE ON, OFF ON, OFF ON, OFF ON, OFF Restores default settings TEST PRINT PRINTER STATUS NOZZLE CHECK STATUS CHECK JOB INFORMATION CUSTOM PAPER VERSION PRINTABLE PAGES INK LEVEL MAINTENANCE TANK USAGE COUNT CLEAR USAGE COUNT JOB HISTORY TOTAL PRINTS SERVICE LIFE Shows clogged or de&#...
...Information about registered paper configurations Current firmware version For the amount of ink remaining in each cartridge E*****F for each ink color E*****F Ink in milliliters, paper in square centimeters EXECUTE Ink in milliliters and paper in Maintenance Mode STANDARD, NARROW, WIDE, WIDER, ...EXECUTE ON, OFF ON, OFF ON, OFF ON, OFF Restores default settings TEST PRINT PRINTER STATUS NOZZLE CHECK STATUS CHECK JOB INFORMATION CUSTOM PAPER VERSION PRINTABLE PAGES INK LEVEL MAINTENANCE TANK USAGE COUNT CLEAR USAGE COUNT JOB HISTORY TOTAL PRINTS SERVICE LIFE Shows clogged or de&#...


