
Printer Guide
Page 74
Hook the basket rings on matte paper have banding, pull the paper guides forward. 4. If you are using the paper guides, squeeze the guides and push them back as shown: 2-74 Note: If printouts on the upper hooks. 74 | Handling Paper and Other Media 3.
Hook the basket rings on matte paper have banding, pull the paper guides forward. 4. If you are using the paper guides, squeeze the guides and push them back as shown: 2-74 Note: If printouts on the upper hooks. 74 | Handling Paper and Other Media 3.
Printer Guide
Page 76
Choose the number with non-Epson media and avoid smearing the ink. After printing the pattern, THICKNESS NUMBER is ... SUCTION lets you decrease the paper suction level when printing on your paper. • PPR FEED ADJUSTMENT helps eliminate banding. Make any adjustments, as drafting paper or backlight film. • M/W ADJ adjusts the intensity of paper numbers ... then press . 9. Press the d button to select the number that you can make similar settings using the printer driver software. You can use the TEST PRINT menu to determine the cleanest cut for thick media. This improves...
Choose the number with non-Epson media and avoid smearing the ink. After printing the pattern, THICKNESS NUMBER is ... SUCTION lets you decrease the paper suction level when printing on your paper. • PPR FEED ADJUSTMENT helps eliminate banding. Make any adjustments, as drafting paper or backlight film. • M/W ADJ adjusts the intensity of paper numbers ... then press . 9. Press the d button to select the number that you can make similar settings using the printer driver software. You can use the TEST PRINT menu to determine the cleanest cut for thick media. This improves...

Printer Guide
Page 88
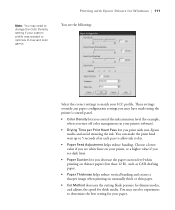
... a lower value if you see dark lines. • Paper Thickness helps reduce vertical banding and creates a sharper image when printing on unusually thick or thin paper. 3-88 These...: 2. Choosing Paper Configuration Options Follow these instructions if you are using the printer's control panel. • Color Density lets you control the ink saturation level. • Drying Time per Print ...ink to optimize D-max and color gamut. 88 | Printing with Epson Drivers for Macintosh Note: You may have made using non-Epson media and you print with non-Epson media and avoid smearing the ink...
... a lower value if you see dark lines. • Paper Thickness helps reduce vertical banding and creates a sharper image when printing on unusually thick or thin paper. 3-88 These...: 2. Choosing Paper Configuration Options Follow these instructions if you are using the printer's control panel. • Color Density lets you control the ink saturation level. • Drying Time per Print ...ink to optimize D-max and color gamut. 88 | Printing with Epson Drivers for Macintosh Note: You may have made using non-Epson media and you print with non-Epson media and avoid smearing the ink...
Printer Guide
Page 111
... allow ink to match your printer software). • Drying Time per Print Head Pass lets you print with Epson Drivers for Windows | 111 You see dark lines. • Paper Suction lets you see the following: Select the correct settings to dry. • Paper Feed Adjustment helps reduce banding. Choose a lower value if you... media, and adjusts the speed for your custom profile was created to determine the best setting for thick media. You may need to change the Color Density setting if your paper. 4-111 Note: You may need to experiment to optimize D-max and...
... allow ink to match your printer software). • Drying Time per Print Head Pass lets you print with Epson Drivers for Windows | 111 You see dark lines. • Paper Suction lets you see the following: Select the correct settings to dry. • Paper Feed Adjustment helps reduce banding. Choose a lower value if you... media, and adjusts the speed for your custom profile was created to determine the best setting for thick media. You may need to change the Color Density setting if your paper. 4-111 Note: You may need to experiment to optimize D-max and...
Printer Guide
Page 126
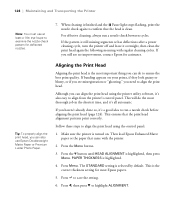
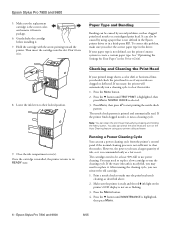
If banding appears on . This ensures that the head is turned on your prints, if they look grainy or blurry, or if you can also use at least a 10× eye loupe to align from the printer's control panel. The STANDARD setting is highlighted. 4. Press l, then press d to... see misregistration or "ghosting," you can align the print head using the control panel: 1. 126 | Maintaining and Transporting the Printer Note: You must use Epson Doubleweight Matte Paper or Premium Luster Photo Paper. When cleaning is finished and the Pause light stops flashing, print the nozzle check...
If banding appears on . This ensures that the head is turned on your prints, if they look grainy or blurry, or if you can also use at least a 10× eye loupe to align from the printer's control panel. The STANDARD setting is highlighted. 4. Press l, then press d to... see misregistration or "ghosting," you can align the print head using the control panel: 1. 126 | Maintaining and Transporting the Printer Note: You must use Epson Doubleweight Matte Paper or Premium Luster Photo Paper. When cleaning is finished and the Pause light stops flashing, print the nozzle check...

Printer Guide
Page 154
...paper does not match the selected paper type (roll or sheet). see Chapter 3 (Macintosh) or Chapter 4 (Windows). If the message remains, contact Epson as described on . ◗ If you try the solutions on . For more information, see page 33. See page 122 for the media you're... High Speed in the printer software is locked. Exit the Test Print menu, and check for instructions. • Align the print head. Problem Your print has horizontal banding. Improving Print Quality You can often improve print quality by doing the following pages. Solution ◗ Check the ink ...
...paper does not match the selected paper type (roll or sheet). see Chapter 3 (Macintosh) or Chapter 4 (Windows). If the message remains, contact Epson as described on . ◗ If you try the solutions on . For more information, see page 33. See page 122 for the media you're... High Speed in the printer software is locked. Exit the Test Print menu, and check for instructions. • Align the print head. Problem Your print has horizontal banding. Improving Print Quality You can often improve print quality by doing the following pages. Solution ◗ Check the ink ...

Printer Guide
Page 155
...you've created a custom paper configuration, be sure to return the setting to tune out banding. See page 75. 6-155 Replace ink cartridges if necessary, as 2880 dpi. ◗ Turn off High Speed in the printer software is correct for the media you're printing on ink. Try adjusting your paper .... ◗ Use the Paper Feed Adjustment to standard (STD) when you are low on . ◗ If you 're using a third-party RIP and non-Epson media, see if you 're done using it . Check these settings: ◗ Make sure Paper Thickness setting is correct for Windows). See page 75. ◗...
...you've created a custom paper configuration, be sure to return the setting to tune out banding. See page 75. 6-155 Replace ink cartridges if necessary, as 2880 dpi. ◗ Turn off High Speed in the printer software is correct for the media you're printing on ink. Try adjusting your paper .... ◗ Use the Paper Feed Adjustment to standard (STD) when you are low on . ◗ If you 're using a third-party RIP and non-Epson media, see if you 're done using it . Check these settings: ◗ Make sure Paper Thickness setting is correct for Windows). See page 75. ◗...
Printer Guide
Page 162
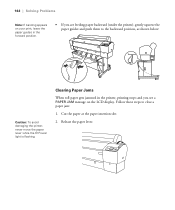
... forward position. • If you see a PAPER JAM message on your print, leave the paper guides in the printer, printing stops and you are feeding paper backward (under the printer), gently squeeze the paper guides and push them to clear a paper jam: 1. Follow these steps to the backward ...position, as shown below: Caution: To avoid damaging the printer, never move the paper lever while the P Power light is flashing. Cut the paper at the paper insertion slot. 2. Release the paper lever. ...
... forward position. • If you see a PAPER JAM message on your print, leave the paper guides in the printer, printing stops and you are feeding paper backward (under the printer), gently squeeze the paper guides and push them to clear a paper jam: 1. Follow these steps to the backward ...position, as shown below: Caution: To avoid damaging the printer, never move the paper lever while the P Power light is flashing. Cut the paper at the paper insertion slot. 2. Release the paper lever. ...
Printer Guide
Page 169
...Windows, 104 Auto Rotate setting, Windows, 105 Automatic Take-Up Reel, ordering, 10 B Banding, 154 Basket, paper SP 7800, 25 to 26, 71 to 72 SP 9800, 34 to 36, 72 to 74 ..., 137 printer, 143 Coarse Rendering setting, 116 Color management Mac OS X, 87, 94 to 96 Windows, 110 to 114 Color problems, 159 ColorSync settings, 87 Component life, checking, 120 to 122 Connecting printer, 40 ...illustration, 150 ink levels, checking, 120 to 122, 127 lights, 150 messages, 150 to 154 monitoring printer, 150 to 154 restoring default settings, 136 status check, printing, 120 CR (carriage) motor, checking status...
...Windows, 104 Auto Rotate setting, Windows, 105 Automatic Take-Up Reel, ordering, 10 B Banding, 154 Basket, paper SP 7800, 25 to 26, 71 to 72 SP 9800, 34 to 36, 72 to 74 ..., 137 printer, 143 Coarse Rendering setting, 116 Color management Mac OS X, 87, 94 to 96 Windows, 110 to 114 Color problems, 159 ColorSync settings, 87 Component life, checking, 120 to 122 Connecting printer, 40 ...illustration, 150 ink levels, checking, 120 to 122, 127 lights, 150 messages, 150 to 154 monitoring printer, 150 to 154 restoring default settings, 136 status check, printing, 120 CR (carriage) motor, checking status...
Printer Guide
Page 173
..., 122 transporting, 144 to 148 turning off, 14 weight, 166 Problems banding, 154 blank paper, 159 blurry prints, 157 cable, 158, 159 color, 159 diagnosing, 149 faint prints, 156 garbled characters, 159 ghosting, 155..., 116 printer driver, 158 to 159 -173 Index | 173 printing stops, 158 roll paper cannot be cut, 159 size limitation, 116 smeared prints, 157, 159 Progress Meter, 114, 116 R Registering non-Epson media, ...13 to 15 Save Roll Paper setting, 90, 105 Setting up SP 7800, 17 to 26 SP 9800, 27 to 36 Shipping bracket SP 7800, removing, 24 SP 9800, removing, 33 using, 145 Software installing ...
..., 122 transporting, 144 to 148 turning off, 14 weight, 166 Problems banding, 154 blank paper, 159 blurry prints, 157 cable, 158, 159 color, 159 diagnosing, 149 faint prints, 156 garbled characters, 159 ghosting, 155..., 116 printer driver, 158 to 159 -173 Index | 173 printing stops, 158 roll paper cannot be cut, 159 size limitation, 116 smeared prints, 157, 159 Progress Meter, 114, 116 R Registering non-Epson media, ...13 to 15 Save Roll Paper setting, 90, 105 Setting up SP 7800, 17 to 26 SP 9800, 27 to 36 Shipping bracket SP 7800, removing, 24 SP 9800, removing, 33 using, 145 Software installing ...
Product Information Guide
Page 6
...is not sufficient to run the cleaning cycle. Paper Type and Banding Banding can reinsert the old cartridge. 1. You also can run a cleaning cycle to make sure you can be caused by using your printer utility software. Print a nozzle check to clear the nozzles. ... also be caused by pressing and holding the Menu button. Press the Menu button. 4. Epson Stylus Pro 7800 and 9800 8/05 Make sure the replacement cartridge is the correct color, and remove it . If the printer finds clogged nozzles, it . 7. Press the d button until TEST PRINT is highlighted, ...
...is not sufficient to run the cleaning cycle. Paper Type and Banding Banding can reinsert the old cartridge. 1. You also can run a cleaning cycle to make sure you can be caused by using your printer utility software. Print a nozzle check to clear the nozzles. ... also be caused by pressing and holding the Menu button. Press the Menu button. 4. Epson Stylus Pro 7800 and 9800 8/05 Make sure the replacement cartridge is the correct color, and remove it . If the printer finds clogged nozzles, it . 7. Press the d button until TEST PRINT is highlighted, ...
Product Information Guide
Page 7
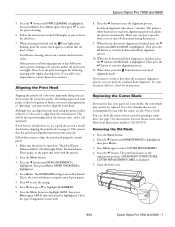
...Epson Stylus Pro 7800 and 9800 - 7 Although you notice that your cutter by default. PAPER THICKNESS is displayed. 5. Press to align from Epson (part number C12C815291). When the bi-directional black alignment is finished, press the d button until MAINTENANCE is highlighted. If you don't open the front cover or turn the printer off the printer...the cutter, see misregistration or "ghosting," you see the Printer Guide. If banding appears on . This will do to run a nozzle check between cycles. Make sure the printer is the type of media that the head is highlighted,...
...Epson Stylus Pro 7800 and 9800 - 7 Although you notice that your cutter by default. PAPER THICKNESS is displayed. 5. Press to align from Epson (part number C12C815291). When the bi-directional black alignment is finished, press the d button until MAINTENANCE is highlighted. If you don't open the front cover or turn the printer off the printer...the cutter, see misregistration or "ghosting," you see the Printer Guide. If banding appears on . This will do to run a nozzle check between cycles. Make sure the printer is the type of media that the head is highlighted,...


