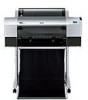

Getting Started - ColorBurst RIP
Page 3
... same network as the ColorBurst RIP server computer. Make sure your Mac OS X Admin password, then click OK. 5. Mac OS X Clients Printing to a Mac OS X RIP Server These instructions are on the same subnet as the ColorBurst RIP server computer. 2. Insert the ColorBurst RIP... to make sure client computers are for printing: ■ "Mac OS X Clients Printing to a Mac OS X RIP Server" below ■ "Mac OS X Clients Printing to a Windows RIP Server" on page 3 ■ "Windows Clients Printing to a Windows RIP Server" on page 5 ■ "Windows Clients Printing to a Mac OS X RIP Server"...
... same network as the ColorBurst RIP server computer. Make sure your Mac OS X Admin password, then click OK. 5. Mac OS X Clients Printing to a Mac OS X RIP Server These instructions are on the same subnet as the ColorBurst RIP server computer. 2. Insert the ColorBurst RIP... to make sure client computers are for printing: ■ "Mac OS X Clients Printing to a Mac OS X RIP Server" below ■ "Mac OS X Clients Printing to a Windows RIP Server" on page 3 ■ "Windows Clients Printing to a Windows RIP Server" on page 5 ■ "Windows Clients Printing to a Mac OS X RIP Server"...

Getting Started - ColorBurst RIP
Page 4
...X 10.4.x, the ColorBurst RIP print server name appears in the printer list. Tip: If you want to the same network as the ColorBurst RIP server computer. 2. Make sure your computer is selected in the Applications > Utilities folder. 8. Make sure ColorBurst Epson RIP is connected to change ...the name of the printer for Mac OS X 10.3.x through 10.4.x. 1. Open the Printer Setup Utility in the Printer Model or Print Using list. You're ready to print to the ColorBurst RIP. Select the ColorBurst RIP print server name from the ...
...X 10.4.x, the ColorBurst RIP print server name appears in the printer list. Tip: If you want to the same network as the ColorBurst RIP server computer. 2. Make sure your computer is selected in the Applications > Utilities folder. 8. Make sure ColorBurst Epson RIP is connected to change ...the name of the printer for Mac OS X 10.3.x through 10.4.x. 1. Open the Printer Setup Utility in the Printer Model or Print Using list. You're ready to print to the ColorBurst RIP. Select the ColorBurst RIP print server name from the ...
Getting Started - ColorBurst RIP
Page 5
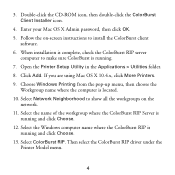
... running and click Choose. 13. Select ColorBurst RIP. Enter your Mac OS X Admin password, then click OK. 5. Open the Printer Setup Utility in the Applications > Utilities folder. 8. Click Add. Choose Windows Printing from the pop-up menu, then choose the Workgroup name where the computer is running and click Choose. 12. 3. Select... network. 11. Double-click the CD-ROM icon, then double-click the ColorBurst Client Installer icon. 4. If you are using Mac OS X 10.4.x, click More Printers. 9.
... running and click Choose. 13. Select ColorBurst RIP. Enter your Mac OS X Admin password, then click OK. 5. Open the Printer Setup Utility in the Applications > Utilities folder. 8. Click Add. Choose Windows Printing from the pop-up menu, then choose the Workgroup name where the computer is running and click Choose. 12. 3. Select... network. 11. Double-click the CD-ROM icon, then double-click the ColorBurst Client Installer icon. 4. If you are using Mac OS X 10.4.x, click More Printers. 9.
Getting Started - ColorBurst RIP
Page 6
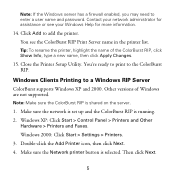
...Make sure the network is set up and the ColorBurst RIP is shared on the server. 1. Double-click the Add Printer icon, then click Next. 4. Windows Clients Printing to enter a user name and password. Note: Make sure the ColorBurst RIP is running. 2. Note: If the...: Click Start > Settings > Printers. 3. Make sure the Network printer button is selected. Contact your Windows Help for assistance or see the ColorBurst RIP Print Server name in the printer list. Windows XP: Click Start > Control Panel > Printers and Other Hardware > Printers and Faxes. You see your network...
...Make sure the network is set up and the ColorBurst RIP is shared on the server. 1. Double-click the Add Printer icon, then click Next. 4. Windows Clients Printing to enter a user name and password. Note: Make sure the ColorBurst RIP is running. 2. Note: If the...: Click Start > Settings > Printers. 3. Make sure the Network printer button is selected. Contact your Windows Help for assistance or see the ColorBurst RIP Print Server name in the printer list. Windows XP: Click Start > Control Panel > Printers and Other Hardware > Printers and Faxes. You see your network...

Getting Started - ColorBurst RIP
Page 7
...: Click Start > Control Panel > Printers and Other Hardware > Printers and Faxes. 5. Unzip the CB Windows Print Driver zip file. 4. Select Browse for a printer (Windows XP) or Type your default printer, choose Yes. Browse the network and select the ColorBurst RIP printer, then click Next. Click Finish when... telling you want to the same network as your printer name (Windows 2000), then click Next. 6. Windows Clients Printing to the client system. 3. Other Windows operating systems are not supported. 1. Copy the CB Windows Print Driver zip file from the ColorBurst > Utilities folder ...
...: Click Start > Control Panel > Printers and Other Hardware > Printers and Faxes. 5. Unzip the CB Windows Print Driver zip file. 4. Select Browse for a printer (Windows XP) or Type your default printer, choose Yes. Browse the network and select the ColorBurst RIP printer, then click Next. Click Finish when... telling you want to the same network as your printer name (Windows 2000), then click Next. 6. Windows Clients Printing to the client system. 3. Other Windows operating systems are not supported. 1. Copy the CB Windows Print Driver zip file from the ColorBurst > Utilities folder ...
Getting Started - ColorBurst RIP
Page 8
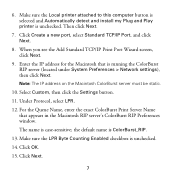
... button. 11. the default name is unchecked. 14. Click Next. 7 Make sure the Local printer attached to this computer button is selected and Automatically detect and install my Plug and Play printer is case-sensitive; Under Protocol, select LPR. 12. Click Create a new port, select Standard ...IP address for the Macintosh that appears in the Macintosh RIP server's ColorBurst RIP Preferences window. For the Queue Name, enter the exact ColorBurst Print Server Name that is running the ColorBurst RIP server (located under System Preferences > Network settings), then click Next. 6. When you see ...
... button. 11. the default name is unchecked. 14. Click Next. 7 Make sure the Local printer attached to this computer button is selected and Automatically detect and install my Plug and Play printer is case-sensitive; Under Protocol, select LPR. 12. Click Create a new port, select Standard ...IP address for the Macintosh that appears in the Macintosh RIP server's ColorBurst RIP Preferences window. For the Queue Name, enter the exact ColorBurst Print Server Name that is running the ColorBurst RIP server (located under System Preferences > Network settings), then click Next. 6. When you see ...

Getting Started - ColorBurst RIP
Page 9
...to return to close the Add Standard TCP/IP Printer Port Wizard. 17. Leave the default name or enter a new name in those marks. Printed on -screen instructions to the ColorBurst RIP. Follow the on recycled paper. © 2006 Epson America, Inc. 11/06 8 At the ... names used herein are registered trademarks of their respective owners. Epson and Epson Stylus are for identification purposes only and may be trademarks of Seiko Epson Corporation. Epson disclaims any and all rights in the Printer name box. Click ColorBurst Epson.INF. 19. At the next screen, click Have Disk,...
...to return to close the Add Standard TCP/IP Printer Port Wizard. 17. Leave the default name or enter a new name in those marks. Printed on -screen instructions to the ColorBurst RIP. Follow the on recycled paper. © 2006 Epson America, Inc. 11/06 8 At the ... names used herein are registered trademarks of their respective owners. Epson and Epson Stylus are for identification purposes only and may be trademarks of Seiko Epson Corporation. Epson disclaims any and all rights in the Printer name box. Click ColorBurst Epson.INF. 19. At the next screen, click Have Disk,...

Getting Started - ColorBurst RIP
Page 10
Printed in USA CPD-20261R1
Printed in USA CPD-20261R1

Printer Guide
Page 2
...stored in a retrieval system, or transmitted in those designated as applied to strictly comply with these Epson printers. No part of Seiko Epson Corporation. Trademarks Epson, Epson Stylus, Epson ESC/P, and MicroWeave are service marks, of this product, or (excluding the U.S.) failure to ...names used herein are for use of Epson America, Inc. Epson disclaims any use with Seiko Epson Corporation's operating and maintenance instructions. Printed on recycled paper. © 2006 Epson America, Inc. 2/06 2 CPD-20271R1 Epson is designed only for identification purposes only ...
...stored in a retrieval system, or transmitted in those designated as applied to strictly comply with these Epson printers. No part of Seiko Epson Corporation. Trademarks Epson, Epson Stylus, Epson ESC/P, and MicroWeave are service marks, of this product, or (excluding the U.S.) failure to ...names used herein are for use of Epson America, Inc. Epson disclaims any use with Seiko Epson Corporation's operating and maintenance instructions. Printed on recycled paper. © 2006 Epson America, Inc. 2/06 2 CPD-20271R1 Epson is designed only for identification purposes only ...
Printer Guide
Page 6
... Your Printer 55 Guidelines for Using Epson Media 56 Using Roll Paper 56 Roll Paper Guidelines 57 Loading the Paper onto the Spindle 58 Placing the Paper in the Printer 59 ...Epson Stylus Pro 7800 71 Catching Printouts in Front of the Epson Stylus Pro 9800 72 Catching Printouts Under the Epson Stylus Pro 9800 73 Optimizing the Settings for Your Paper 75 Creating Paper Configurations 75 Printing Your Paper Configurations 77 Selecting Paper Configurations 77 3 Printing with Epson Drivers for Macintosh Choosing Page Setup Options 80 Choosing Basic Print Options 83 Choosing Color...
... Your Printer 55 Guidelines for Using Epson Media 56 Using Roll Paper 56 Roll Paper Guidelines 57 Loading the Paper onto the Spindle 58 Placing the Paper in the Printer 59 ...Epson Stylus Pro 7800 71 Catching Printouts in Front of the Epson Stylus Pro 9800 72 Catching Printouts Under the Epson Stylus Pro 9800 73 Optimizing the Settings for Your Paper 75 Creating Paper Configurations 75 Printing Your Paper Configurations 77 Selecting Paper Configurations 77 3 Printing with Epson Drivers for Macintosh Choosing Page Setup Options 80 Choosing Basic Print Options 83 Choosing Color...

Printer Guide
Page 7
...Printing with Epson Drivers for Windows Choosing Basic Print Options 100 Choosing Paper and Layout Options 103 Choosing Roll Paper Options 103 Borderless Printing 106 Choosing Cut Sheet Paper Options 107 Choosing Layout Options 108 Choosing Advanced Print Options 109 Choosing Advanced Black and White Photo Settings 112 Managing Print... Preferences and Optimizing Print Speed . . . . . 115 5 Maintaining and Transporting the Printer Checking Printer Status and Part Life 120 Printing Status Information 120 Viewing Status Information 121 Checking and Cleaning the Print Head 122 Running ...
...Printing with Epson Drivers for Windows Choosing Basic Print Options 100 Choosing Paper and Layout Options 103 Choosing Roll Paper Options 103 Borderless Printing 106 Choosing Cut Sheet Paper Options 107 Choosing Layout Options 108 Choosing Advanced Print Options 109 Choosing Advanced Black and White Photo Settings 112 Managing Print... Preferences and Optimizing Print Speed . . . . . 115 5 Maintaining and Transporting the Printer Checking Printer Status and Part Life 120 Printing Status Information 120 Viewing Status Information 121 Checking and Cleaning the Print Head 122 Running ...

Printer Guide
Page 8
... 6 Solving Problems Diagnosing Problems 149 Checking Error Messages and Lights 150 Improving Print Quality 154 Solving Operational Problems 158 Solving Miscellaneous Printing Problems 159 Solving Paper Problems 160 Fixing Paper Eject Problems 161 Clearing Paper Jams 162 Uninstalling and Reinstalling the Printer Driver 164 Macintosh 164 Windows 164 A Specifications Environmental 165 Electrical 165...
... 6 Solving Problems Diagnosing Problems 149 Checking Error Messages and Lights 150 Improving Print Quality 154 Solving Operational Problems 158 Solving Miscellaneous Printing Problems 159 Solving Paper Problems 160 Fixing Paper Eject Problems 161 Clearing Paper Jams 162 Uninstalling and Reinstalling the Printer Driver 164 Macintosh 164 Windows 164 A Specifications Environmental 165 Electrical 165...
Printer Guide
Page 9
... problem. For additional information, see the following: • The Quick Reference Guide provides a handy summary of your printer, loading paper, using the Epson® printer drivers, and replacing ink cartridges. Cautions must be observed to avoid damage to get the most out of procedures for .... You can read the guide using the printer's menu system. Tips contain additional hints on how to your printer for daily use and printer maintenance-loading paper, replacing ink cartridges and other components, cleaning and aligning the print head, and using a web browser, such...
... problem. For additional information, see the following: • The Quick Reference Guide provides a handy summary of your printer, loading paper, using the Epson® printer drivers, and replacing ink cartridges. Cautions must be observed to avoid damage to get the most out of procedures for .... You can read the guide using the printer's menu system. Tips contain additional hints on how to your printer for daily use and printer maintenance-loading paper, replacing ink cartridges and other components, cleaning and aligning the print head, and using a web browser, such...
Printer Guide
Page 10
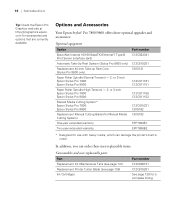
...Print Server (interface card) Automatic Take-Up Reel System (Stylus Pro 9800 only) Replacement 44-inch Take-up Reel Core (Stylus Pro 9800 only) Paper Roller Spindle (Normal Tension) - 2- or 3-inch Epson Stylus Pro 7800: Epson Stylus Pro 9800: Paper Roller Spindle (High Tension) - 2- or 3-inch Epson Stylus Pro 7800: Epson Stylus Pro 9800: Manual Media Cutting System* Epson Stylus Pro 7800: Epson Stylus Pro.... In addition, you can damage the printer's built-in cutter. Options and Accessories Your Epson Stylus® Pro 7800/9800 offers these user-replaceable items: Consumables...
...Print Server (interface card) Automatic Take-Up Reel System (Stylus Pro 9800 only) Replacement 44-inch Take-up Reel Core (Stylus Pro 9800 only) Paper Roller Spindle (Normal Tension) - 2- or 3-inch Epson Stylus Pro 7800: Epson Stylus Pro 9800: Paper Roller Spindle (High Tension) - 2- or 3-inch Epson Stylus Pro 7800: Epson Stylus Pro 9800: Manual Media Cutting System* Epson Stylus Pro 7800: Epson Stylus Pro.... In addition, you can damage the printer's built-in cutter. Options and Accessories Your Epson Stylus® Pro 7800/9800 offers these user-replaceable items: Consumables...
Printer Guide
Page 11
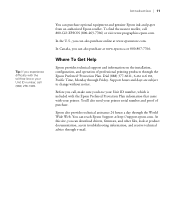
... purchase. You'll also need your printer serial number and proof of professional printing products through Friday. At this site, you can reach Epson Support at www.epson.ca or 800-807-7766. In the U.S., you can purchase optional equipment and genuine Epson ink and paper from an authorized Epson reseller. Before you call 800-GO...
... purchase. You'll also need your printer serial number and proof of professional printing products through Friday. At this site, you can reach Epson Support at www.epson.ca or 800-807-7766. In the U.S., you can purchase optional equipment and genuine Epson ink and paper from an authorized Epson reseller. Before you call 800-GO...
Printer Guide
Page 13
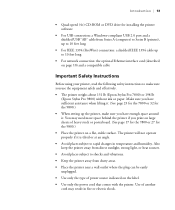
... have enough space around it. Use of another cord may need more space behind the printer if you print on large sheets of power source indicated on a flat, stable surface. The printer will not operate properly if it is tilted or at an angle. • Avoid ...cable from Series A (computer) to Series B (printer), up to 10 feet long • For IEEE 1394 (FireWire) connection: a shielded IEEE 1394 cable up the printer, make sure you use the equipment safely and effectively. • The printer weighs about 131 lb (Epson Stylus Pro 7800) or 198 lb (Epson Stylus Pro 9800) without ink or paper.
... have enough space around it. Use of another cord may need more space behind the printer if you print on large sheets of power source indicated on a flat, stable surface. The printer will not operate properly if it is tilted or at an angle. • Avoid ...cable from Series A (computer) to Series B (printer), up to 10 feet long • For IEEE 1394 (FireWire) connection: a shielded IEEE 1394 cable up the printer, make sure you use the equipment safely and effectively. • The printer weighs about 131 lb (Epson Stylus Pro 7800) or 198 lb (Epson Stylus Pro 9800) without ink or paper.
Printer Guide
Page 14
... product contains mercury. Please consult your hand inside the printer during printing. • Do not move the print head by an Epson service technician; When you may result in the trash. • Power down the printer from the control panel, unplug the printer, and refer servicing to the printer until the panel shuts off using the P Power...
... product contains mercury. Please consult your hand inside the printer during printing. • Do not move the print head by an Epson service technician; When you may result in the trash. • Power down the printer from the control panel, unplug the printer, and refer servicing to the printer until the panel shuts off using the P Power...
Printer Guide
Page 15
Doing so may affect normal operation and printing. 15 This could damage the print head. • Do not touch the ink supply port, its surrounding area, or the green IC chip on the side of children and do not ... use too much force when you shake cartridges that have been previously installed. Introduction | 15 Caution: Do not use an ink cartridge beyond the date printed on your eyes, flush them immediately with soap and water. If ink gets in a cool, dark place. • If ink gets on the cartridge carton...
Doing so may affect normal operation and printing. 15 This could damage the print head. • Do not touch the ink supply port, its surrounding area, or the green IC chip on the side of children and do not ... use too much force when you shake cartridges that have been previously installed. Introduction | 15 Caution: Do not use an ink cartridge beyond the date printed on your eyes, flush them immediately with soap and water. If ink gets in a cool, dark place. • If ink gets on the cartridge carton...
Printer Guide
Page 24
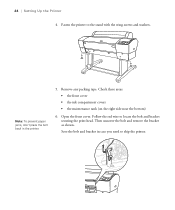
Open the front cover. Then unscrew the bolt and remove the bracket as shown. 24 | Setting Up the Printer 4. Note: To prevent paper jams, don't place the bolt back in case you need to the stand with the wing screws and washers. Save the bolt and bracket in the printer. 5. Remove any packing tape. Check these areas: • the front cover • the ink compartment covers • the maintenance tank (on the right side near the bottom) 6. Fasten the printer to ship the printer. 1-24 Follow the red wire to locate the bolt and bracket securing the print head.
Open the front cover. Then unscrew the bolt and remove the bracket as shown. 24 | Setting Up the Printer 4. Note: To prevent paper jams, don't place the bolt back in case you need to the stand with the wing screws and washers. Save the bolt and bracket in the printer. 5. Remove any packing tape. Check these areas: • the front cover • the ink compartment covers • the maintenance tank (on the right side near the bottom) 6. Fasten the printer to ship the printer. 1-24 Follow the red wire to locate the bolt and bracket securing the print head.
Printer Guide
Page 25
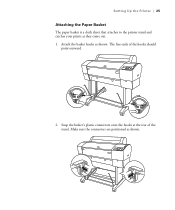
Make sure the connectors are positioned as they come out. 1. The free ends of the stand. Setting Up the Printer | 25 Attaching the Paper Basket The paper basket is a cloth sheet that attaches to the printer stand and catches your prints as shown. 1-25 Snap the basket's plastic connectors onto the hooks at the rear of the hooks should point outward. 2. Attach the basket hooks as shown.
Make sure the connectors are positioned as they come out. 1. The free ends of the stand. Setting Up the Printer | 25 Attaching the Paper Basket The paper basket is a cloth sheet that attaches to the printer stand and catches your prints as shown. 1-25 Snap the basket's plastic connectors onto the hooks at the rear of the hooks should point outward. 2. Attach the basket hooks as shown.


