
Installation Guide - Express Digital. Darkroom
Page 3
...Darkroom Core Edition for Epson software. Finishing the Installation Once you have finished configuring your printer, you need to finish setting up your printer in the list to select it, then click configure printer. 3. See the "Setting Up" chapter of the software window. 2. Click the...When you have finished selecting settings in "Configuring Your Printer" to reconfigure the printer for color printing. Make sure that the Darkroom Core Edition for Epson software is open the Epson printer driver and select Advanced B&W Photo under the Color setting. On the Advanced tab, select the Manual...
...Darkroom Core Edition for Epson software. Finishing the Installation Once you have finished configuring your printer, you need to finish setting up your printer in the list to select it, then click configure printer. 3. See the "Setting Up" chapter of the software window. 2. Click the...When you have finished selecting settings in "Configuring Your Printer" to reconfigure the printer for color printing. Make sure that the Darkroom Core Edition for Epson software is open the Epson printer driver and select Advanced B&W Photo under the Color setting. On the Advanced tab, select the Manual...
Getting Started - ColorBurst RIP installation
Page 6
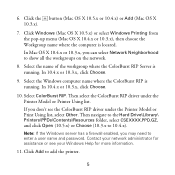
...Workgroup name where the computer is running . Select the Windows computer name where the ColorBurst RIP is located. If you don't see your Windows Help for assistance or see the ColorBurst RIP driver under the Printer Model or Printer Using list. Contact your network administrator for more information.... 11. Click Add to 10.4.x). Select the name of the workgroup where the ColorBurst RIP Server is running . Note: If the Windows server has a firewall ...
...Workgroup name where the computer is running . Select the Windows computer name where the ColorBurst RIP is located. If you don't see your Windows Help for assistance or see the ColorBurst RIP driver under the Printer Model or Printer Using list. Contact your network administrator for more information.... 11. Click Add to 10.4.x). Select the name of the workgroup where the ColorBurst RIP Server is running . Note: If the Windows server has a firewall ...
Getting Started - ColorBurst RIP installation
Page 8
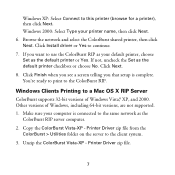
... ColorBurst RIP. You're ready to print to the client system. 3. Windows XP: Select Connect to continue. 7. Click Install driver or Yes to this printer (browse for a printer), then click Next. Click Next. 8. Printer Driver zip file. 7 Copy the ColorBurst Vista-XP - Windows 2000: Select Type your default printer, choose Set as the default printer checkbox or choose No.
... ColorBurst RIP. You're ready to print to the client system. 3. Windows XP: Select Connect to continue. 7. Click Install driver or Yes to this printer (browse for a printer), then click Next. Click Next. 8. Printer Driver zip file. 7 Copy the ColorBurst Vista-XP - Windows 2000: Select Type your default printer, choose Set as the default printer checkbox or choose No.
Getting Started - ColorBurst RIP installation
Page 9
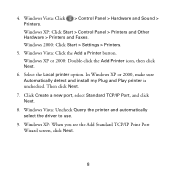
... TCP/IP Port, and click Next. 8. Windows Vista: Click the Add a Printer button. Then click Next. 7. Windows Vista: Uncheck Query the printer and automatically select the driver to use. 9. Windows 2000: Click Start > Settings > Printers. 5. 4. In Windows XP or 2000, make sure Automatically detect and install my Plug and Play printer is unchecked. Windows XP: When you see the Add...
... TCP/IP Port, and click Next. 8. Windows Vista: Click the Add a Printer button. Then click Next. 7. Windows Vista: Uncheck Query the printer and automatically select the driver to use. 9. Windows 2000: Click Start > Settings > Printers. 5. 4. In Windows XP or 2000, make sure Automatically detect and install my Plug and Play printer is unchecked. Windows XP: When you see the Add...
Printer Guide
Page 6
...Choosing Color Management and Paper Configuration Options . . . . . 55 Choosing Expansion Settings 57 Creating a Custom Preset and Printing 58 Choosing Advanced Black and White Photo Settings 59 Managing Print Jobs 61 Checking Ink and Maintenance Status 62 4 Printing with Epson Drivers for Windows ... the Progress Meter 76 Setting Monitoring Preferences and Optimizing Print Speed . . . . . 77 5 Maintaining and Transporting the Printer Checking Printer Status and Part Life 82 Printing Status Information 82 Viewing Status Information 83 Checking and Cleaning the Print Head 84 Running a...
...Choosing Color Management and Paper Configuration Options . . . . . 55 Choosing Expansion Settings 57 Creating a Custom Preset and Printing 58 Choosing Advanced Black and White Photo Settings 59 Managing Print Jobs 61 Checking Ink and Maintenance Status 62 4 Printing with Epson Drivers for Windows ... the Progress Meter 76 Setting Monitoring Preferences and Optimizing Print Speed . . . . . 77 5 Maintaining and Transporting the Printer Checking Printer Status and Part Life 82 Printing Status Information 82 Viewing Status Information 83 Checking and Cleaning the Print Head 84 Running a...
Printer Guide
Page 7
Contents | 7 Transporting or Storing the Printer 101 Preparing the Printer for Shipment 101 Setting Up the Printer After Transportation 101 Uninstalling and Reinstalling the Printer Driver 102 Macintosh 102 Windows 102 Updating Your Printer Firmware 103 Downloading the Firmware 103 Updating the Firmware 103 6 Solving Problems Diagnosing Problems 107 Checking...Feed or Paper Jam Problems 121 A Specifications Printing 125 Environmental 126 Electrical 126 Dimensions and Weight 126 Printer Interfaces 127 Safety Approvals 127 Media 127 Printable Area 128 Ink Cartridges 128 Index -7
Contents | 7 Transporting or Storing the Printer 101 Preparing the Printer for Shipment 101 Setting Up the Printer After Transportation 101 Uninstalling and Reinstalling the Printer Driver 102 Macintosh 102 Windows 102 Updating Your Printer Firmware 103 Downloading the Firmware 103 Updating the Firmware 103 6 Solving Problems Diagnosing Problems 107 Checking...Feed or Paper Jam Problems 121 A Specifications Printing 125 Environmental 126 Electrical 126 Dimensions and Weight 126 Printer Interfaces 127 Safety Approvals 127 Media 127 Printable Area 128 Ink Cartridges 128 Index -7

Printer Guide
Page 17
... press r. If necessary, double-click the Epson CD-ROM icon to highlight TEST PRINT, then press r. 17. The LCD displays the DEFAULT GATEWAY. 13. Turn the printer off then back on your Macintosh and your printer driver on page 22. Press d to open its window. 3. Press u or d to change... each octet value, then press r to exit the printer menu. 14. Setting Up the Printer On a Network | 17 12. When you have at epson.com/support. ...
... press r. If necessary, double-click the Epson CD-ROM icon to highlight TEST PRINT, then press r. 17. The LCD displays the DEFAULT GATEWAY. 13. Turn the printer off then back on your Macintosh and your printer driver on page 22. Press d to open its window. 3. Press u or d to change... each octet value, then press r to exit the printer menu. 14. Setting Up the Printer On a Network | 17 12. When you have at epson.com/support. ...

Printer Guide
Page 20
... the Printer in the Printer List window. 5. Then click the Add button. If you see your printer in the Printer Browser: Tip: If you want to rename the printer for easier identification, enter a new name for it in the Name field on this , click Add, then skip to step 4. 1-20 Note: If your Macintosh finds the printer driver...
... the Printer in the Printer List window. 5. Then click the Add button. If you see your printer in the Printer Browser: Tip: If you want to rename the printer for easier identification, enter a new name for it in the Name field on this , click Add, then skip to step 4. 1-20 Note: If your Macintosh finds the printer driver...

Printer Guide
Page 27
Insert the printer software CD-ROM. 2. Then double-click your CD-ROM icon to start the installer.) 3. The installer starts automatically. (If necessary, double-click My Computer or click Start, then My Computer. Double-click Stylus Pro 3800 Driver for Ethernet. 4. Setting Up the Printer On a Network | 27 Installing the Printer Software 1. When you see a window like this one, click Manual. 1-27
Insert the printer software CD-ROM. 2. Then double-click your CD-ROM icon to start the installer.) 3. The installer starts automatically. (If necessary, double-click My Computer or click Start, then My Computer. Double-click Stylus Pro 3800 Driver for Ethernet. 4. Setting Up the Printer On a Network | 27 Installing the Printer Software 1. When you see a window like this one, click Manual. 1-27
Printer Guide
Page 31
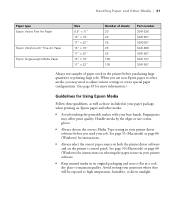
... S041747 S041907 Always test samples of paper stock in both the printer driver software and on Epson paper and other media, you send your printer driver software before purchasing large quantities or printing large jobs. See page 50 (Macintosh) or page 68 (Windows) for Using Epson Media Follow these guidelines, as well as those included in a cool...
... S041747 S041907 Always test samples of paper stock in both the printer driver software and on Epson paper and other media, you send your printer driver software before purchasing large quantities or printing large jobs. See page 50 (Macintosh) or page 68 (Windows) for Using Epson Media Follow these guidelines, as well as those included in a cool...
Printer Guide
Page 47
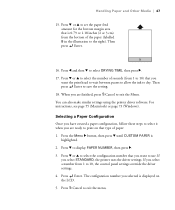
... to 10) that is 0.79 or 1.18 inches (2 or 3 cm) from 1 to use. For instructions, see page 55 (Macintosh) or page 73 (Windows). If you are finished, press + Cancel to dry. If you selected is highlighted. 2. The configuration number you select a number from the bottom of paper: 1.... illustration to print on the LCD. 5. Press + Cancel to save the setting. 18. You can also make similar settings using the printer driver software. Selecting a Paper Configuration Once you have created a paper configuration, follow these steps to select it when you select STANDARD, the...
... to 10) that is 0.79 or 1.18 inches (2 or 3 cm) from 1 to use. For instructions, see page 55 (Macintosh) or page 73 (Windows). If you are finished, press + Cancel to dry. If you selected is highlighted. 2. The configuration number you select a number from the bottom of paper: 1.... illustration to print on the LCD. 5. Press + Cancel to save the setting. 18. You can also make similar settings using the printer driver software. Selecting a Paper Configuration Once you have created a paper configuration, follow these steps to select it when you select STANDARD, the...

Printer Guide
Page 51
... centered on page 57. • Borderless (Retain Size) prints your application. Then continue with the instructions in . (20 mm) top and bottom margins. You see a window like this one: Click + to create a new paper size Tip: To ensure that the image is not listed, select Manage Custom Sizes to print without... prints with 0.12 in. (3.0 mm) left and right margins and 0.79 in the next section to fit the paper without borders. • Manual - Printing with Epson Drivers for printing. 3-51
... centered on page 57. • Borderless (Retain Size) prints your application. Then continue with the instructions in . (20 mm) top and bottom margins. You see a window like this one: Click + to create a new paper size Tip: To ensure that the image is not listed, select Manage Custom Sizes to print without... prints with 0.12 in. (3.0 mm) left and right margins and 0.79 in the next section to fit the paper without borders. • Manual - Printing with Epson Drivers for printing. 3-51
Printer Guide
Page 56
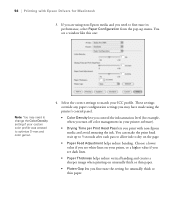
...on your prints, or a higher value if you see a window like this one: Note: You may have made using non-Epson media and you fine-tune the setting for Macintosh 3. If you are using the printer's control panel. • Color Density lets you control the ink saturation level (for example,...or thin paper. • Platen Gap lets you need to change the Color Density setting if your custom color profile was created to match your printer software). • Drying Time per Print Head Pass lets you print with Epson Drivers for unusually thick or thin paper. 3-56 You see dark lines. &#...
...on your prints, or a higher value if you see a window like this one: Note: You may have made using non-Epson media and you fine-tune the setting for Macintosh 3. If you are using the printer's control panel. • Color Density lets you control the ink saturation level (for example,...or thin paper. • Platen Gap lets you need to change the Color Density setting if your custom color profile was created to match your printer software). • Drying Time per Print Head Pass lets you print with Epson Drivers for unusually thick or thin paper. 3-56 You see dark lines. &#...

Printer Guide
Page 65
... for Windows Your Epson Stylus Pro 3800 comes with Epson Drivers for your own profiles if you have the required hardware and software, or you can have them created by a color specialist. You can create your operating system. Tip: Check the Epson Pro Graphics website at prographics.epson.com for color photos. For the best black-and-white photography output, the Epson Stylus Pro 3800 driver offers...
... for Windows Your Epson Stylus Pro 3800 comes with Epson Drivers for your own profiles if you have the required hardware and software, or you can have them created by a color specialist. You can create your operating system. Tip: Check the Epson Pro Graphics website at prographics.epson.com for color photos. For the best black-and-white photography output, the Epson Stylus Pro 3800 driver offers...
Printer Guide
Page 66
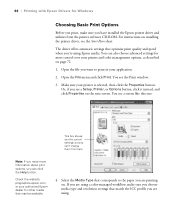
... screen. If you are using a color-managed workflow, make sure you see the Start Here sheet. For instructions on . You see the Print window. 3. Or, if you have installed the Epson printer driver and utilities from here Note: If you need more control over your application. 2. 66 | Printing with Epson Drivers for Windows Choosing Basic Print Options Before...
... screen. If you are using a color-managed workflow, make sure you see the Start Here sheet. For instructions on . You see the Print window. 3. Or, if you have installed the Epson printer driver and utilities from here Note: If you need more control over your application. 2. 66 | Printing with Epson Drivers for Windows Choosing Basic Print Options Before...

Printer Guide
Page 67
... photos with the paper, or check the Epson Pro Graphics website at the left . Use this...Epson Drivers for Windows | 67 If your paper is best for the media you're using non-Epson paper, choose the closest setting. EPSON Standard (sRGB) increases the contrast in printouts. For the Color setting, select Color for most color...printer driver analyze the contents of your image or file and make the appropriate printing adjustments. If a Quality/Speed slider appears in the Mode box, set it according to correct noise and other non-photographic images. 6. If you print at the left : EPSON...
... photos with the paper, or check the Epson Pro Graphics website at the left . Use this...Epson Drivers for Windows | 67 If your paper is best for the media you're using non-Epson paper, choose the closest setting. EPSON Standard (sRGB) increases the contrast in printouts. For the Color setting, select Color for most color...printer driver analyze the contents of your image or file and make the appropriate printing adjustments. If a Quality/Speed slider appears in the Mode box, set it according to correct noise and other non-photographic images. 6. If you print at the left : EPSON...
Printer Guide
Page 68
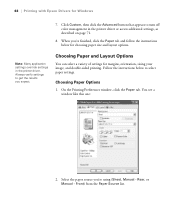
... you 're finished, click the Paper tab and follow the instructions below to turn off color management in the printer driver. Choosing Paper Options 1. On the Printing Preferences window, click the Paper tab. Follow the instructions below for choosing paper size and layout options....select a variety of settings for Windows 7. 68 | Printing with Epson Drivers for margins, orientation, sizing your image, and double-sided printing. Click Custom, then click the Advanced button that appears to select paper settings. When you expect. You see a window like this one: 2. Select...
... you 're finished, click the Paper tab and follow the instructions below to turn off color management in the printer driver. Choosing Paper Options 1. On the Printing Preferences window, click the Paper tab. Follow the instructions below for choosing paper size and layout options....select a variety of settings for Windows 7. 68 | Printing with Epson Drivers for margins, orientation, sizing your image, and double-sided printing. Click Custom, then click the Advanced button that appears to select paper settings. When you expect. You see a window like this one: 2. Select...

Printer Guide
Page 69
...you want to print to print without borders. If you loaded in your image up to 3% to create a custom paper size. You see a window like this one of your paper size is not available when using the front manual feed slot. If too much of the following: • ...See your image slightly larger than normal printing. Borderless printing takes longer than the paper if you specify in the printer. You need to print, click OK. 4-69 Printing with Epson Drivers for more information about double-sided printing. 7. Select the Paper Size you 're ready to size your on-screen...
...you want to print to print without borders. If you loaded in your image up to 3% to create a custom paper size. You see a window like this one of your paper size is not available when using the front manual feed slot. If too much of the following: • ...See your image slightly larger than normal printing. Borderless printing takes longer than the paper if you specify in the printer. You need to print, click OK. 4-69 Printing with Epson Drivers for more information about double-sided printing. 7. Select the Paper Size you 're ready to size your on-screen...

Printer Guide
Page 70
70 | Printing with Epson Drivers for Windows Choosing Layout Options Follow the instructions in this one: 2. For instructions ... to 400% and decrease the output resolution to have the driver resize your original image and the print size, you loaded in the print. 4-70 On the Printing Preferences window, click the Layout tab. Or select Custom and enter a...screen User's Guide. 1. You can select Fit to Page and select the paper size you may see a window like this section to reduce or enlarge an image to scale your application program, click Optimize Enlargement. Depending on the ...
70 | Printing with Epson Drivers for Windows Choosing Layout Options Follow the instructions in this one: 2. For instructions ... to 400% and decrease the output resolution to have the driver resize your original image and the print size, you loaded in the print. 4-70 On the Printing Preferences window, click the Layout tab. Or select Custom and enter a...screen User's Guide. 1. You can select Fit to Page and select the paper size you may see a window like this section to reduce or enlarge an image to scale your application program, click Optimize Enlargement. Depending on the ...

Printer Guide
Page 71
...Epson Drivers for Windows | 71 Choosing Advanced Print Options The advanced settings give you different options on the lower part of the screen 3. If you can also control the ink density by using color management settings in Photoshop or another application, it is very important to access the advanced settings and turn off color...printing environment. Click Custom, then click the Advanced button that appears. Access your printer driver and select your Media Type and Color settings. 4-71 You see a window like this one: These settings give you can change your basic options as ...
...Epson Drivers for Windows | 71 Choosing Advanced Print Options The advanced settings give you different options on the lower part of the screen 3. If you can also control the ink density by using color management settings in Photoshop or another application, it is very important to access the advanced settings and turn off color...printing environment. Click Custom, then click the Advanced button that appears. Access your printer driver and select your Media Type and Color settings. 4-71 You see a window like this one: These settings give you can change your basic options as ...


