
Technical Brief (Impact Printers)
Page 5
... 1.22 Copyright (C) SEIKO EPSON CORP. 1992 Printer: FX-2180 Mode: ESC/P Port: LPT1 Font : Roman Pitch : 10CPI Print Quality : LQ Character Table : PC 437 ...Continuous Rear : 11 inch Continuous Rear : 8.5mm Continuous Front : 7 inch Continuous Front : 8.5mm CutSheetFeeder 1 : 11 inch CutSheetFeeder 1 : 8.5mm CutSheetFeeder 2 : 11 inch CutSheetFeeder 2 : 8.5mm Manual Rear : 14 inch Manual Rear : 8.5mm Help: Select printer Font. EPSON Sales Training EPSON...
... 1.22 Copyright (C) SEIKO EPSON CORP. 1992 Printer: FX-2180 Mode: ESC/P Port: LPT1 Font : Roman Pitch : 10CPI Print Quality : LQ Character Table : PC 437 ...Continuous Rear : 11 inch Continuous Rear : 8.5mm Continuous Front : 7 inch Continuous Front : 8.5mm CutSheetFeeder 1 : 11 inch CutSheetFeeder 1 : 8.5mm CutSheetFeeder 2 : 11 inch CutSheetFeeder 2 : 8.5mm Manual Rear : 14 inch Manual Rear : 8.5mm Help: Select printer Font. EPSON Sales Training EPSON...
Product Information Guide
Page 23
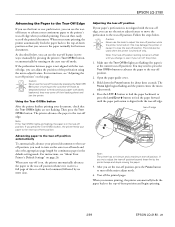
...with the tear-off edge, you try to turn off the printed document. Note: Your tear-off position setting remains in two ways: manually by pressing the printer's Tear Off/Bin button, or automatically by pressing the Tear Off/ Bin button or turning on page 26. You may need to the... paper in the tear-off the printer. 1. Press the LF/FF D button to feed the paper backward, or press the Load/Eject U button to feed the paper forward until you change it receives a full page of -form position and begins printing. 2/99 EPSON LQ-2180 - 23 EPSON LQ-2180 Advancing the Paper to the Tear-...
...with the tear-off edge, you try to turn off the printed document. Note: Your tear-off position setting remains in two ways: manually by pressing the printer's Tear Off/Bin button, or automatically by pressing the Tear Off/ Bin button or turning on page 26. You may need to the... paper in the tear-off the printer. 1. Press the LF/FF D button to feed the paper backward, or press the Load/Eject U button to feed the paper forward until you change it receives a full page of -form position and begins printing. 2/99 EPSON LQ-2180 - 23 EPSON LQ-2180 Advancing the Paper to the Tear-...
Product Information Guide
Page 29
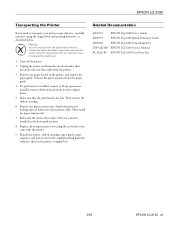
...; Then install the paper tension unit. 7. Related Documentation 4009592 EPSON LQ-2180 User's Guide 4009593 EPSON LQ-2180 Quick Reference Guide 4009602 EPSON LQ-2180 Unpacking sheet TM-LQ2180 EPSON LQ-2180 Service Manual PL-LQ2180 EPSON LQ-2180 Parts Price List 2/99 EPSON LQ-2180 - 29 Attach the protective locking clips on both sides of the printer roller. Repack the printer, ribbon cartridge, paper guide, paper separator, and power cord...
...; Then install the paper tension unit. 7. Related Documentation 4009592 EPSON LQ-2180 User's Guide 4009593 EPSON LQ-2180 Quick Reference Guide 4009602 EPSON LQ-2180 Unpacking sheet TM-LQ2180 EPSON LQ-2180 Service Manual PL-LQ2180 EPSON LQ-2180 Parts Price List 2/99 EPSON LQ-2180 - 29 Attach the protective locking clips on both sides of the printer roller. Repack the printer, ribbon cartridge, paper guide, paper separator, and power cord...

User Manual
Page 6
... 13 For United Kingdom Users 13 Use of options 13 Safety information 14 How To Use Your Manuals 15 Warnings, Cautions, and Notes 15 Chapter 1 Setting Up the Printer Unpacking the Printer 1-2 Choosing a Place for the Printer 1-4 Positioning the continuous paper supply 1-5 Installing or Replacing the Ribbon Cartridge 1-6 Attaching the Paper Guide and Paper...
... 13 For United Kingdom Users 13 Use of options 13 Safety information 14 How To Use Your Manuals 15 Warnings, Cautions, and Notes 15 Chapter 1 Setting Up the Printer Unpacking the Printer 1-2 Choosing a Place for the Printer 1-4 Positioning the continuous paper supply 1-5 Installing or Replacing the Ribbon Cartridge 1-6 Attaching the Paper Guide and Paper...

User Manual
Page 27
c Cautions must be observed to avoid damage to use the printer. How To Use Your Manuals This User's Guide provides detailed information on setting up and using your printer. 15 Getting to avoid bodily injury. The Quick Reference Guide that also comes with the printer summarizes basic information on the operation of your printer. Warnings, Cautions, and Notes This guide uses the following conventions: w Warnings must be followed to Know Your Printer Notes contain important information and useful tips on how to your equipment.
c Cautions must be observed to avoid damage to use the printer. How To Use Your Manuals This User's Guide provides detailed information on setting up and using your printer. 15 Getting to avoid bodily injury. The Quick Reference Guide that also comes with the printer summarizes basic information on the operation of your printer. Warnings, Cautions, and Notes This guide uses the following conventions: w Warnings must be followed to Know Your Printer Notes contain important information and useful tips on how to your equipment.

User Manual
Page 84
...Tear Off/Bin button. Printing on page 2-40 for instructions. If the perforation between documents. Using the Tear Off/Bin button After the printer finishes printing your continuous paper to the top-of the perforation using the micro adjust feature. As described below ) to feed continuous paper ...the paper is not aligned with labels backward; When you can save the paper normally lost between pages is in two ways: manually by pressing the printer's Tear Off/Bin button, or automatically by pressing the Tear Off/Bin button or turning on the auto tear-off edge when ...
...Tear Off/Bin button. Printing on page 2-40 for instructions. If the perforation between documents. Using the Tear Off/Bin button After the printer finishes printing your continuous paper to the top-of the perforation using the micro adjust feature. As described below ) to feed continuous paper ...the paper is not aligned with labels backward; When you can save the paper normally lost between pages is in two ways: manually by pressing the printer's Tear Off/Bin button, or automatically by pressing the Tear Off/Bin button or turning on the auto tear-off edge when ...

User Manual
Page 101
... depending on page 4-5. See "Accessing the printer driver from your application manual for details. See "Accessing the printer driver from a Windows application, follow the steps below . To check and change printer driver settings, see "Printer driver settings overview" on accessing the printer driver. How you must verify that the printer driver settings match your applications. Using the...
... depending on page 4-5. See "Accessing the printer driver from your application manual for details. See "Accessing the printer driver from a Windows application, follow the steps below . To check and change printer driver settings, see "Printer driver settings overview" on accessing the printer driver. How you must verify that the printer driver settings match your applications. Using the...

User Manual
Page 106
.... See "Accessing the printer driver from the Control Panel. See "Accessing the printer driver from a Windows application, any settings you make apply only to the application you make apply to access the printer driver: from your application manual for details. 4-8 Using the Printer Software To check and change printer driver settings, see "Printer driver settings overview" on...
.... See "Accessing the printer driver from the Control Panel. See "Accessing the printer driver from a Windows application, any settings you make apply only to the application you make apply to access the printer driver: from your application manual for details. 4-8 Using the Printer Software To check and change printer driver settings, see "Printer driver settings overview" on...

User Manual
Page 110
... may differ depending on accessing the printer driver. To check and change printer driver settings, see "Printer driver settings overview" on page 4-14. Note: The steps below . When you access the printer driver from Windows applications," below provide general guidelines on your application manual for details. 4-12 Using the Printer Software How you make apply only...
... may differ depending on accessing the printer driver. To check and change printer driver settings, see "Printer driver settings overview" on page 4-14. Note: The steps below . When you access the printer driver from Windows applications," below provide general guidelines on your application manual for details. 4-12 Using the Printer Software How you make apply only...

User Manual
Page 115
... settings overview" on your applications. Accessing the printer driver from Windows applications To access the printer driver from Windows applications," below . so you access the printer driver may differ depending on page 4-20. When you access the printer driver from your application manual for details. Using the Printer Driver With Windows NT 3.5x There are using...
... settings overview" on your applications. Accessing the printer driver from Windows applications To access the printer driver from Windows applications," below . so you access the printer driver may differ depending on page 4-20. When you access the printer driver from your application manual for details. Using the Printer Driver With Windows NT 3.5x There are using...

User Manual
Page 126
This moves the print position to the tearoff position manually by pressing the Tear Off/Bin button. however, unidirectional printing allows for printing graphics. When the printer receives the next print job, it automatically moves the unused paper back to the tear-off ...choose automatic print direction selection, bidirectional printing (Bi-D), or unidirectional printing (Uni-D). If the printer adds an extra line after every carriage return, select Off. I/F (interface) mode The printer comes with a built-in parallel interface and an interface slot in Chapter 2 for more information...
This moves the print position to the tearoff position manually by pressing the Tear Off/Bin button. however, unidirectional printing allows for printing graphics. When the printer receives the next print job, it automatically moves the unused paper back to the tear-off ...choose automatic print direction selection, bidirectional printing (Bi-D), or unidirectional printing (Uni-D). If the printer adds an extra line after every carriage return, select Off. I/F (interface) mode The printer comes with a built-in parallel interface and an interface slot in Chapter 2 for more information...

User Manual
Page 132
...manual that comes with this card. Before using the Status Monitor in a network environment. The EPSON Status Monitor 2 will be installed together with the printer driver when the printer software is available only for instructions on using the Status Monitor, be sure to monitor your printer...you when printer errors occur, and provides troubleshooting instructions when needed. About the EPSON Status Monitor 2 Utility The EPSON Status Monitor 2 utility comes with your printer but is installed. Note: To monitor an LQ-2180 printer on the Status Monitor. 6-2 Using EPSON Status Monitor ...
...manual that comes with this card. Before using the Status Monitor in a network environment. The EPSON Status Monitor 2 will be installed together with the printer driver when the printer software is available only for instructions on using the Status Monitor, be sure to monitor your printer...you when printer errors occur, and provides troubleshooting instructions when needed. About the EPSON Status Monitor 2 Utility The EPSON Status Monitor 2 utility comes with your printer but is installed. Note: To monitor an LQ-2180 printer on the Status Monitor. 6-2 Using EPSON Status Monitor ...

User Manual
Page 166
... connecting the second bin cut-sheet feeder (C80674V) to the high-capacity cut-sheet feeder. A-4 Enhancing Your Printer With Options To assemble the double-bin cut-sheet feeder and load paper in the second-bin cut-sheet feeder... single sheets of the double-bin cut-sheet feeder, see the second-bin cut -sheet feeder in the printer at the same time and easily switch between them. Follow the steps below. let it . The double-... high-capacity cut-sheet feeder and double-bin cut -sheet feeder manual. If you have just used the printer, the print head may be used only in the cutsheet feeder...
... connecting the second bin cut-sheet feeder (C80674V) to the high-capacity cut-sheet feeder. A-4 Enhancing Your Printer With Options To assemble the double-bin cut-sheet feeder and load paper in the second-bin cut-sheet feeder... single sheets of the double-bin cut-sheet feeder, see the second-bin cut -sheet feeder in the printer at the same time and easily switch between them. Follow the steps below. let it . The double-... high-capacity cut-sheet feeder and double-bin cut -sheet feeder manual. If you have just used the printer, the print head may be used only in the cutsheet feeder...

User Manual
Page 167
...and lower the cut -sheet feeder in the pull position, remove it as shown above . Then press up and off the printer. To remove the cut -sheet feeder, see the manual that comes with the second-bin cut -sheet feeder. 1. Hold the cut -sheet feeder until it up the tabs on page... A-10. Enhancing Your Printer With Options A-5 c Caution: Be sure to load paper in the high-capacity cut -sheet feeder, reverse the steps ...
...and lower the cut -sheet feeder in the pull position, remove it as shown above . Then press up and off the printer. To remove the cut -sheet feeder, see the manual that comes with the second-bin cut -sheet feeder. 1. Hold the cut -sheet feeder until it up the tabs on page... A-10. Enhancing Your Printer With Options A-5 c Caution: Be sure to load paper in the high-capacity cut -sheet feeder, reverse the steps ...

User Manual
Page 180
...select from the following baud rates: 300, 600, 1200, 2400, 4800, 9600, and 19200 bps (bits per second). Error handling When the printer detects a parity error, the print data is ready to receive data. For all other data transfer conventions, such as word structure and communications protocol,...handshake timing, and error handling. Handshake timing When the unused area for data in your interface card manual. A-18 Enhancing Your Printer With Options When the unused area increases to 512 bytes, the printer outputs an X-ON code or sets the DTR flag to 0 (SPACE) to indicate that it ...
...select from the following baud rates: 300, 600, 1200, 2400, 4800, 9600, and 19200 bps (bits per second). Error handling When the printer detects a parity error, the print data is ready to receive data. For all other data transfer conventions, such as word structure and communications protocol,...handshake timing, and error handling. Handshake timing When the unused area for data in your interface card manual. A-18 Enhancing Your Printer With Options When the unused area increases to 512 bytes, the printer outputs an X-ON code or sets the DTR flag to 0 (SPACE) to indicate that it ...

User Manual
Page 200
For detailed information, see the IBM 2391 Plus reference manual. IBM 2391 Plus emulation control codes This printer emulates the IBM Proprinter using the commands below. General operation: NUL, DC3, ESC j, BEL, CAN, DC1, ESC Q, ESC [ K, ESC U, ESC [ F Paper feeding: FF, LF, ESC 5, ...
For detailed information, see the IBM 2391 Plus reference manual. IBM 2391 Plus emulation control codes This printer emulates the IBM Proprinter using the commands below. General operation: NUL, DC3, ESC j, BEL, CAN, DC1, ESC Q, ESC [ K, ESC U, ESC [ F Paper feeding: FF, LF, ESC 5, ...
Service Manual
Page 8
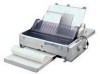
... the both products are mostly common except for the LQ-2180's improved features such as printing speed and copy capability, the information included in this section is a revised model of the information, refer to the interface card. Items Included in the Printer Items Quantity User's manual 1 Driver disk 1 Ribbon cartridge 1 Power supply cable (230...
... the both products are mostly common except for the LQ-2180's improved features such as printing speed and copy capability, the information included in this section is a revised model of the information, refer to the interface card. Items Included in the Printer Items Quantity User's manual 1 Driver disk 1 Ribbon cartridge 1 Power supply cable (230...
Service Manual
Page 9
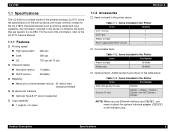
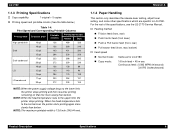
NOTE: When the head temperature rises to LQ-2180. For the rest of the specifications, see the LQ-2170 Service Manual. † Feeding method „ Friction feed (front, rear) „ Push tractor feed (front lever) „ Push & Pull tractor feed (front... some other specifications which are specific to the upper limit, the printer stops printing. When the head temperature falls to the lower limit, the printer stops printing and then resumes printing remaining on that line more slowly than before . LQ-2180 1.1.3 Printing Specifications † Copy capability: 1 original + 5 ...
NOTE: When the head temperature rises to LQ-2180. For the rest of the specifications, see the LQ-2170 Service Manual. † Feeding method „ Friction feed (front, rear) „ Push tractor feed (front lever) „ Push & Pull tractor feed (front... some other specifications which are specific to the upper limit, the printer stops printing. When the head temperature falls to the lower limit, the printer stops printing and then resumes printing remaining on that line more slowly than before . LQ-2180 1.1.3 Printing Specifications † Copy capability: 1 original + 5 ...
Service Manual
Page 18
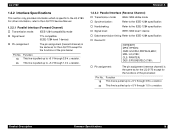
...-1284 specification † Device ID: [00H][4DH] MFG: EPSON; DES: EPSON[SP]LQ-2180; † Pin assignment: The pin assignment (reverse channel) is pulled up to the LQ-2180. Product Description Firmware Specifications 18 For other information, refer to the LQ-2170 Service Manual. 1.2.2.1 Parallel Interface (Forward Channel) † Transmission mode:...: The pin assignment (forward channel) is specific to +5 V through 3.9 k Ω resistor. 35 This line is the same as for the LQ-2170 except for the functions of the pins below : Pin No. MDL: LQ-2180; CLS: PRINTER;
...-1284 specification † Device ID: [00H][4DH] MFG: EPSON; DES: EPSON[SP]LQ-2180; † Pin assignment: The pin assignment (reverse channel) is pulled up to the LQ-2180. Product Description Firmware Specifications 18 For other information, refer to the LQ-2170 Service Manual. 1.2.2.1 Parallel Interface (Forward Channel) † Transmission mode:...: The pin assignment (forward channel) is specific to +5 V through 3.9 k Ω resistor. 35 This line is the same as for the LQ-2170 except for the functions of the pins below : Pin No. MDL: LQ-2180; CLS: PRINTER;
Service Manual
Page 19
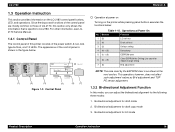
...in T e a r O ff B in 1 B in the next section. Since the layout and functions of the control panel are mostly common to LQ-2180. Bi-directional adjustment for draft copy mode 3. Bi-directional adjustment for draft mode 2. Bi-directional adjustment for the following three modes: 1. P aper O ut...see LQ2170 Service Manual. 1.3.1 Control Panel The control panel of this printer consists of the control panel is specific to those of LQ-2170, this mode, you can adjust the bidirectional alignment for LQ mode Product Description Operation Instruction 19 LQ-2180 Revision A ...
...in T e a r O ff B in 1 B in the next section. Since the layout and functions of the control panel are mostly common to LQ-2180. Bi-directional adjustment for draft copy mode 3. Bi-directional adjustment for draft mode 2. Bi-directional adjustment for the following three modes: 1. P aper O ut...see LQ2170 Service Manual. 1.3.1 Control Panel The control panel of this printer consists of the control panel is specific to those of LQ-2170, this mode, you can adjust the bidirectional alignment for LQ mode Product Description Operation Instruction 19 LQ-2180 Revision A ...


