Technical Brief (Impact Printers)
Page 4
... Microsoft Windows® 3.1x, Windows NT 3.51/4.0, Windows 95 and Windows 98 drivers guarantees ease of use right out of -form position. L For optional connectivity, most EPSON impact printers. Paper from one path is loaded into printing position Microfeed adjustments Can set a ...torn off Can be automatic or activated by pressing a button on pre-printed forms. LL L Versatility-Flexible interfacing Most EPSON impact printers offer both standard bidirectional parallel and serial interfaces which help you to add: Interface card 32KB Serial Serial Coax Twinax ...
... Microsoft Windows® 3.1x, Windows NT 3.51/4.0, Windows 95 and Windows 98 drivers guarantees ease of use right out of -form position. L For optional connectivity, most EPSON impact printers. Paper from one path is loaded into printing position Microfeed adjustments Can set a ...torn off Can be automatic or activated by pressing a button on pre-printed forms. LL L Versatility-Flexible interfacing Most EPSON impact printers offer both standard bidirectional parallel and serial interfaces which help you to add: Interface card 32KB Serial Serial Coax Twinax ...

Product Brochure
Page 1
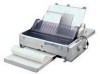
... million strokes/wire rating. In fact, the EPSON LQ-2180 is an impressive 10,000 Power-On-Hours (POH) and its zero tear-off paper handling Eliminates paper waste of 10,000 POH with most popular industry Windows 95 and standard software. Popular Windows® printer drivers are completed faster cps high speed draft than...
... million strokes/wire rating. In fact, the EPSON LQ-2180 is an impressive 10,000 Power-On-Hours (POH) and its zero tear-off paper handling Eliminates paper waste of 10,000 POH with most popular industry Windows 95 and standard software. Popular Windows® printer drivers are completed faster cps high speed draft than...

Product Information Guide
Page 14
...lose the top-of -Form Position" on ; this may damage the printer or cause it to the tear-off position. EPSON LQ-2180 2/99 Make sure that your printed document. After you can be used when the printer is at the current tear-off position.) You may need to press ... printer driver settings. When the printer receives data, it along the printer's mounting slots as described in the next section to the middle of the printer. When you can be used when the printer is turned on page 22. Slide the edge guides to tear off your paper is turned off only. 3. EPSON LQ-2180 ...
...lose the top-of -Form Position" on ; this may damage the printer or cause it to the tear-off position. EPSON LQ-2180 2/99 Make sure that your printed document. After you can be used when the printer is at the current tear-off position.) You may need to press ... printer driver settings. When the printer receives data, it along the printer's mounting slots as described in the next section to the middle of the printer. When you can be used when the printer is turned on page 22. Slide the edge guides to tear off your paper is turned off only. 3. EPSON LQ-2180 ...
Product Information Guide
Page 16
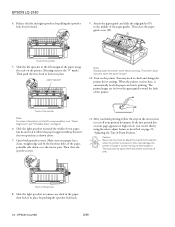
...the lever back to match the width of -form position. then lock it in the paper; front of the paper guides. EPSON LQ-2180 2/99 You may damage the printer or cause it automatically loads the paper and starts printing. The printed pages are fed over the tractor pins. If the ...edge guides (c) to remove any slack in place by pulling the sprocket lock levers forward. 9. Slide the left sprocket to check and change the printer driver settings. Then close the paper guide cover (d). Turn on page 22, "Adjusting the Top-of the paper using the micro adjust feature as ...
...the lever back to match the width of -form position. then lock it in the paper; front of the paper guides. EPSON LQ-2180 2/99 You may damage the printer or cause it automatically loads the paper and starts printing. The printed pages are fed over the tractor pins. If the ...edge guides (c) to remove any slack in place by pulling the sprocket lock levers forward. 9. Slide the left sprocket to check and change the printer driver settings. Then close the paper guide cover (d). Turn on page 22, "Adjusting the Top-of the paper using the micro adjust feature as ...

Product Information Guide
Page 19
EPSON LQ-2180 8. Then close the paper guide cover. Before you use the knob to remove slack in the middle of -form position. Slide the right sprocket to check and change the printer driver settings. Turn on page 22.) The printer will start printing) by pushing the sprocket lock back. Always ...paper in the paper and adjust the top-of-form position (the position where the printer will start printing at the current position without advancing the paper. Fit four holes of the printer. 2/99 EPSON LQ-2180 - 19 Note: Always close the sprocket covers. 10. If you load paper in ...
EPSON LQ-2180 8. Then close the paper guide cover. Before you use the knob to remove slack in the middle of -form position. Slide the right sprocket to check and change the printer driver settings. Turn on page 22.) The printer will start printing) by pushing the sprocket lock back. Always ...paper in the paper and adjust the top-of-form position (the position where the printer will start printing at the current position without advancing the paper. Fit four holes of the printer. 2/99 EPSON LQ-2180 - 19 Note: Always close the sprocket covers. 10. If you load paper in ...

Product Information Guide
Page 21
... pull tractor. 2. Note: If continuous paper with the front or rear push tractor to check and change the printer driver settings. Reverse feeding several pages at the perforation nearest the paper exit slot. If a tractor is on continuous ...printer. After you finish printing, open the paper guide cover; Store the tractor in a safe place, or install it off your printed document before switching to single-sheet printing. You may need to printing on page 20. 1. Load single sheets in the front push position. 6. See "Removing paper from printing on ; EPSON LQ-2180...
... pull tractor. 2. Note: If continuous paper with the front or rear push tractor to check and change the printer driver settings. Reverse feeding several pages at the perforation nearest the paper exit slot. If a tractor is on continuous ...printer. After you finish printing, open the paper guide cover; Store the tractor in a safe place, or install it off your printed document before switching to single-sheet printing. You may need to printing on page 20. 1. Load single sheets in the front push position. 6. See "Removing paper from printing on ; EPSON LQ-2180...
Product Information Guide
Page 26
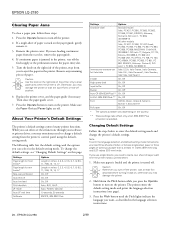
...following table lists the default settings and the options you may damage the printer. 2. EPSON LQ-2180 2/99 Press the Operate button to clear paper jams when the printer is selected. Replace the printer cover, and the paper guide if necessary. Then close the paper guide ...8, 8.5, 11, 70/6, 12, 14, 17 Length in the language selection instructions. 26 - EPSON LQ-2180 Clearing Paper Jams To clear a paper jam, follow these functions through your software or printer driver, you may damage the printer or lose the top-of-form or tear-off . Caution: Use the knob on the country...
...following table lists the default settings and the options you may damage the printer. 2. EPSON LQ-2180 2/99 Press the Operate button to clear paper jams when the printer is selected. Replace the printer cover, and the paper guide if necessary. Then close the paper guide ...8, 8.5, 11, 70/6, 12, 14, 17 Length in the language selection instructions. 26 - EPSON LQ-2180 Clearing Paper Jams To clear a paper jam, follow these functions through your software or printer driver, you may damage the printer or lose the top-of-form or tear-off . Caution: Use the knob on the country...
Product Information Guide
Page 27
...: 1. While holding down the LF/FF button while you turn off the printer. 2/99 EPSON LQ-2180 - 27 To run the test using the buttons on the instruction sheets indicate the printer's current settings. 5. The printer enters the bidirectional adjustment mode and then prints instructions and the first set .... begins printing the self test. To resume the test, press the Pause button again. See "Problems and Solutions" in your printer driver settings, application settings, computer, or interface cable. (Be sure to use single sheets, you finish making your settings, press the...
...: 1. While holding down the LF/FF button while you turn off the printer. 2/99 EPSON LQ-2180 - 27 To run the test using the buttons on the instruction sheets indicate the printer's current settings. 5. The printer enters the bidirectional adjustment mode and then prints instructions and the first set .... begins printing the self test. To resume the test, press the Pause button again. See "Problems and Solutions" in your printer driver settings, application settings, computer, or interface cable. (Be sure to use single sheets, you finish making your settings, press the...

User Manual
Page 8
... Printer driver settings overview 4-10 Using the Printer Driver With Windows NT 4.0 4-12 Accessing the printer driver from Windows applications . 4-12 Accessing the printer driver from the Start menu 4-14 Printer driver settings overview 4-14 Using the Printer Driver With Windows NT 3.5x 4-17 Accessing the printer driver from Windows applications . 4-17 Accessing the printer driver from the Control Panel . . . . . 4-19 Printer driver settings overview 4-20 Using the EPSON...
... Printer driver settings overview 4-10 Using the Printer Driver With Windows NT 4.0 4-12 Accessing the printer driver from Windows applications . 4-12 Accessing the printer driver from the Start menu 4-14 Printer driver settings overview 4-14 Using the Printer Driver With Windows NT 3.5x 4-17 Accessing the printer driver from Windows applications . 4-17 Accessing the printer driver from the Control Panel . . . . . 4-19 Printer driver settings overview 4-20 Using the EPSON...

User Manual
Page 11
... Desk D-4 Customer Support D-4 Faxon EPSON D-5 EPtec - Appendix C Specifications Printer Specifications C-2 Mechanical C-2 Electrical C-4 Environmental C-5 Paper C-5 ...Paper alignment C-8 Printable area C-9 Safety approvals C-11 CE marking C-11 Command Lists C-12 EPSON ESC/P2 control codes C-12 IBM 2391 Plus emulation control codes C-16 Character Tables C-17 International character sets for latest drivers and utilities D-5 World Wide Web D-5 For Australian Users D-6 EPSON FAXBACK D-6 EPSON...
... Desk D-4 Customer Support D-4 Faxon EPSON D-5 EPtec - Appendix C Specifications Printer Specifications C-2 Mechanical C-2 Electrical C-4 Environmental C-5 Paper C-5 ...Paper alignment C-8 Printable area C-9 Safety approvals C-11 CE marking C-11 Command Lists C-12 EPSON ESC/P2 control codes C-12 IBM 2391 Plus emulation control codes C-16 Character Tables C-17 International character sets for latest drivers and utilities D-5 World Wide Web D-5 For Australian Users D-6 EPSON FAXBACK D-6 EPSON...

User Manual
Page 13
In addition, several options are available to help suit your printer quickly and easily, and other software. Getting to Know Your Printer Features include: t a variety of paper paths to suit your printing needs t the ability to handle a wide range of paper types,...at 10 characters per inch Your printer also comes with printer driver software, the EPSON Status Monitor 2 utility for Microsoft® Windows® 95/98 that lets you check the status of your individual needs. 1 Getting to Know Your Printer Your EPSON® LQ-2180 24-pin dot matrix printer provides high-quality printing and ...
In addition, several options are available to help suit your printer quickly and easily, and other software. Getting to Know Your Printer Features include: t a variety of paper paths to suit your printing needs t the ability to handle a wide range of paper types,...at 10 characters per inch Your printer also comes with printer driver software, the EPSON Status Monitor 2 utility for Microsoft® Windows® 95/98 that lets you check the status of your individual needs. 1 Getting to Know Your Printer Your EPSON® LQ-2180 24-pin dot matrix printer provides high-quality printing and ...

User Manual
Page 42
... you are using DOS, see page 4-22. Setting Up the Printer 1-15 Installing the Printer Software After connecting the printer to the ground connector at the back of printer errors and displays printer status information. t EPSON Remote! (Dos-based printer setup utility) The EPSON Remote! Utility with your printer. Plug the other end of the cable into the computer...
... you are using DOS, see page 4-22. Setting Up the Printer 1-15 Installing the Printer Software After connecting the printer to the ground connector at the back of printer errors and displays printer status information. t EPSON Remote! (Dos-based printer setup utility) The EPSON Remote! Utility with your printer. Plug the other end of the cable into the computer...

User Manual
Page 43
..., or Windows NT 4.0: Note: Installing the printer software for more information. 1. Click Install to make a floppy disk version of the printer software on the CD. If you can use the Driver disk creation utility included on your printer in Chapter 6. 1-16 Setting Up the Printer See also "Using EPSON Status Monitor 2" in the CD-ROM drive...
..., or Windows NT 4.0: Note: Installing the printer software for more information. 1. Click Install to make a floppy disk version of the printer software on the CD. If you can use the Driver disk creation utility included on your printer in Chapter 6. 1-16 Setting Up the Printer See also "Using EPSON Status Monitor 2" in the CD-ROM drive...

User Manual
Page 44
...drive.) 3. Choose Run from the File menu. Ask your CD-ROM, type EPSETUP instead of the printer software included on -screen instruction. 4. When the installation is open. 2. Setting Up the Printer 1-17 Note: If you wish to make a floppy disk version of SETUP. The installation program ...Windows NT 3.5x: 1 Note: Installing the printer software for more information. 1. Make sure Windows is running and the Program Manager window is complete, click OK to exit the installation program. In the dialog box that appears, click the Driver disk creation utility button and follow the on...
...drive.) 3. Choose Run from the File menu. Ask your CD-ROM, type EPSETUP instead of the printer software included on -screen instruction. 4. When the installation is open. 2. Setting Up the Printer 1-17 Note: If you wish to make a floppy disk version of SETUP. The installation program ...Windows NT 3.5x: 1 Note: Installing the printer software for more information. 1. Make sure Windows is running and the Program Manager window is complete, click OK to exit the installation program. In the dialog box that appears, click the Driver disk creation utility button and follow the on...

User Manual
Page 58
..., follow the steps in the next section to tear off your paper is on Continuous Paper 2-13 When the printer receives data, it to the tear-off position. this using the micro adjust feature as described in "Adjusting the... You may need to press the Tear Off/Bin button to advance the paper to lose the top-of the printer. 2 11. If the first printed line on page 2-36. Make sure the Tear/Off Bin lights are fed...printing, follow these steps: 1. c Caution: Never use the knob to check and change the printer driver settings as described in Chapter 4. Printing on .
..., follow the steps in the next section to tear off your paper is on Continuous Paper 2-13 When the printer receives data, it to the tear-off position. this using the micro adjust feature as described in "Adjusting the... You may need to press the Tear Off/Bin button to advance the paper to lose the top-of the printer. 2 11. If the first printed line on page 2-36. Make sure the Tear/Off Bin lights are fed...printing, follow these steps: 1. c Caution: Never use the knob to check and change the printer driver settings as described in Chapter 4. Printing on .

User Manual
Page 64
...to check and change the printer driver settings as described in "Adjusting the Topof-Form Position" on your page appears too high or low, you finish printing, follow the steps in Chapter 4. Attach the paper guide as described on Continuous Paper 2-19 Make sure the printer is open. 10. Printing...the paper guide toward the back of the paper guide. Then close the paper guide cover. 2 Note: Always close the printer cover before printing. You may damage the printer or cause it automatically loads the paper and starts printing. If the first printed line on page 2-36. c Caution: ...
...to check and change the printer driver settings as described in "Adjusting the Topof-Form Position" on your page appears too high or low, you finish printing, follow the steps in Chapter 4. Attach the paper guide as described on Continuous Paper 2-19 Make sure the printer is open. 10. Printing...the paper guide toward the back of the paper guide. Then close the paper guide cover. 2 Note: Always close the printer cover before printing. You may damage the printer or cause it automatically loads the paper and starts printing. If the first printed line on page 2-36. c Caution: ...

User Manual
Page 73
... print when the cover is open the paper guide cover; The printed pages are fed over the paper guide toward the back of the printer. 17. then tear off the printed document at the perforation nearest the paper exit slot. 2-28 Printing on Continuous Paper Note: Always... close the paper guide cover. The printer starts printing from the current position without advancing the paper. Send a print job to check and change the printer driver settings as described in Chapter 4. Attach the...
... print when the cover is open the paper guide cover; The printed pages are fed over the paper guide toward the back of the printer. 17. then tear off the printed document at the perforation nearest the paper exit slot. 2-28 Printing on Continuous Paper Note: Always... close the paper guide cover. The printer starts printing from the current position without advancing the paper. Send a print job to check and change the printer driver settings as described in Chapter 4. Attach the...

User Manual
Page 76
... paper guide. 10. Printing on page 2-29. c Caution t Never use the knob to remove slack in Chapter 4. You may need to check and change the printer driver settings as described in the paper or to lose the top-of -form position; Send a print job to the middle of the... paper from the tractors, follow the steps under "Removing paper from the pull tractor" on Continuous Paper 2-31 Then slide the edge guides to the printer. The printer starts printing from the paper; Note: Always close the paper guide cover. After you finish printing, open . 11. this may be reduced. 9. Attach the...
... paper guide. 10. Printing on page 2-29. c Caution t Never use the knob to remove slack in Chapter 4. You may need to check and change the printer driver settings as described in the paper or to lose the top-of -form position; Send a print job to the middle of the... paper from the tractors, follow the steps under "Removing paper from the pull tractor" on Continuous Paper 2-31 Then slide the edge guides to the printer. The printer starts printing from the paper; Note: Always close the paper guide cover. After you finish printing, open . 11. this may be reduced. 9. Attach the...

User Manual
Page 96
Check and change the printer driver settings as described on ; To continue printing your page appears too high or low, you need to lose the top-of -form position or eject a sheet when the printer is installed properly. If you can fix this may damage the printer or cause it to eject a sheet, ...your document, remove the printed page and insert a new sheet of -Form Position" on Single Sheets See "Adjusting the Top-of paper. 7. When the printer receives data, it prints the page and ejects it as described in the front paper slot, follow these steps: 1. Then send a print job to ...
Check and change the printer driver settings as described on ; To continue printing your page appears too high or low, you need to lose the top-of -form position or eject a sheet when the printer is installed properly. If you can fix this may damage the printer or cause it to eject a sheet, ...your document, remove the printed page and insert a new sheet of -Form Position" on Single Sheets See "Adjusting the Top-of paper. 7. When the printer receives data, it prints the page and ejects it as described in the front paper slot, follow these steps: 1. Then send a print job to ...

User Manual
Page 98
...guides until it onto the paper guide on top of -Form Position" on Single Sheets The printer feeds the paper automatically and is open. 7. c Caution: Never use the knob to check and change the printer driver settings as described in the front paper guide. Then send a print job to print. If... the first printed line on your document, remove the printed page and insert a new sheet of -form position or eject a sheet when the printer is on; this using ...
...guides until it onto the paper guide on top of -Form Position" on Single Sheets The printer feeds the paper automatically and is open. 7. c Caution: Never use the knob to check and change the printer driver settings as described in the front paper guide. Then send a print job to print. If... the first printed line on your document, remove the printed page and insert a new sheet of -form position or eject a sheet when the printer is on; this using ...


