
Network Guide
Page 31
...Optional Administrator Type the name of the printer attached to the network interface Displays the current Ethernet speed and duplex setting. Reset Resets the printer and returns to protect settings. Displays... link to display the latest printer information. Displays the port type setting, either the paper or ink is not updated automatically. Red indicates that the printer is open, or an error.... Green indicates that either the paper or ink is completely out, the printer is offline, there is a paper jam, the cover is idle or printing. The printer status is low. Network Ethernet...
...Optional Administrator Type the name of the printer attached to the network interface Displays the current Ethernet speed and duplex setting. Reset Resets the printer and returns to protect settings. Displays... link to display the latest printer information. Displays the port type setting, either the paper or ink is not updated automatically. Red indicates that the printer is open, or an error.... Green indicates that either the paper or ink is completely out, the printer is offline, there is a paper jam, the cover is idle or printing. The printer status is low. Network Ethernet...
Product Brochure
Page 5
...Generation Print Engine Technology Professional Media Handling Prints on Epson Premium Luster Photo Paper (260) Automatic Print Head Alignment Built-in sensor reads printed data for highly precise alignment of all color channels Aligns both single and bi-directional print modes ...™ workflows Automatic Real-time Black Ink Mode Switching Printers can automatically utilize two different Black ink modes - Epson PreciseColor™ Manufacturing In order to ensure consistent printing between multiple Stylus Pro printers of basic pigment chemistry Enhances the ICC profiling process for...
...Generation Print Engine Technology Professional Media Handling Prints on Epson Premium Luster Photo Paper (260) Automatic Print Head Alignment Built-in sensor reads printed data for highly precise alignment of all color channels Aligns both single and bi-directional print modes ...™ workflows Automatic Real-time Black Ink Mode Switching Printers can automatically utilize two different Black ink modes - Epson PreciseColor™ Manufacturing In order to ensure consistent printing between multiple Stylus Pro printers of basic pigment chemistry Enhances the ICC profiling process for...

Product Brochure
Page 8
...16", 17", 24", 36", 44", 50", 54" Printable Area Maximum paper width Left and right margins Maximum printable width Maximum printable length 64" 0 or 3 mm each color x 9 colors total Ink cartridge shelf life 2 years from the first cartridges is 19... Epson PreciseColor and AccuPhoto are trademarks and Epson Preferred is a service mark of ink remains in these marks. no condensation) Product/Accessories Epson Stylus Pro 11880 Printer Epson Stylus Pro 11880 ColorBurst Edition Includes ColorBurst® RIP Additional One-year Epson Preferred Plus service Additional Two-year Epson ...
...16", 17", 24", 36", 44", 50", 54" Printable Area Maximum paper width Left and right margins Maximum printable width Maximum printable length 64" 0 or 3 mm each color x 9 colors total Ink cartridge shelf life 2 years from the first cartridges is 19... Epson PreciseColor and AccuPhoto are trademarks and Epson Preferred is a service mark of ink remains in these marks. no condensation) Product/Accessories Epson Stylus Pro 11880 Printer Epson Stylus Pro 11880 ColorBurst Edition Includes ColorBurst® RIP Additional One-year Epson Preferred Plus service Additional Two-year Epson ...
Product Information Guide
Page 1
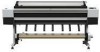
... × 14 inches 30 × 40 cm (11.8 × 15.7 inches) 10/07 Epson Stylus Pro 11880 - 1 Front Roll paper holder Left ink bay Front cover Roll paper Roll paper Paper lever spindle cover Ink bay lights Ink cover button Right ink bay Locking Paper guide caster Auto take- up reel Locking caster Take-up reel sensor Back Take... current 1.2 to 0.6 A Power consumption (approx.) 100 W 20 W in low-power mode 1 W or less in power off mode Check the label on the back of your printer for 3-inch cored media 64 to 662 feet for voltage information.
... × 14 inches 30 × 40 cm (11.8 × 15.7 inches) 10/07 Epson Stylus Pro 11880 - 1 Front Roll paper holder Left ink bay Front cover Roll paper Roll paper Paper lever spindle cover Ink bay lights Ink cover button Right ink bay Locking Paper guide caster Auto take- up reel Locking caster Take-up reel sensor Back Take... current 1.2 to 0.6 A Power consumption (approx.) 100 W 20 W in low-power mode 1 W or less in power off mode Check the label on the back of your printer for 3-inch cored media 64 to 662 feet for voltage information.

Product Information Guide
Page 2
...borderless printing feature allows edge-to 15 mm or 3 mm. Epson Stylus Pro 11880 10/07 Printable Area Default roll paper margins are 0.59 inch (15 mm) top and bottom, and 0.12 inch (3 mm) right and left. Epson Stylus Pro 11880 Cut sheets Weight range Paper thickness A3 (11.7 × 16.5 inches) US B (...15 subpart B, Class A, CAN/CSA-CEI/IEC CISPR 22 class A Printer Interfaces ❏ USB (1.1 and 2.0 compatible) ❏ 10/100/1000 BaseT Ethernet port Ink Cartridges Cartridge life Temperature 2 years from the paper path when not in a cool, dry place. Avoid touching the ...
...borderless printing feature allows edge-to 15 mm or 3 mm. Epson Stylus Pro 11880 10/07 Printable Area Default roll paper margins are 0.59 inch (15 mm) top and bottom, and 0.12 inch (3 mm) right and left. Epson Stylus Pro 11880 Cut sheets Weight range Paper thickness A3 (11.7 × 16.5 inches) US B (...15 subpart B, Class A, CAN/CSA-CEI/IEC CISPR 22 class A Printer Interfaces ❏ USB (1.1 and 2.0 compatible) ❏ 10/100/1000 BaseT Ethernet port Ink Cartridges Cartridge life Temperature 2 years from the paper path when not in a cool, dry place. Avoid touching the ...
Product Information Guide
Page 3
... ones. Cartridge yields vary considerably based on . For print quality, a small amount of roll paper remaining Paper source Platen Ink gauges gap setting Maintenance tank gauges 10/07 Epson Stylus Pro 11880 - 3 Epson Stylus Pro 11880 Consumables and Accessories Ink Cartridges When you install the printer's first ink cartridges, it takes about 10 minutes to re-initialize. In that you can...
... ones. Cartridge yields vary considerably based on . For print quality, a small amount of roll paper remaining Paper source Platen Ink gauges gap setting Maintenance tank gauges 10/07 Epson Stylus Pro 11880 - 3 Epson Stylus Pro 11880 Consumables and Accessories Ink Cartridges When you install the printer's first ink cartridges, it takes about 10 minutes to re-initialize. In that you can...

Product Information Guide
Page 4
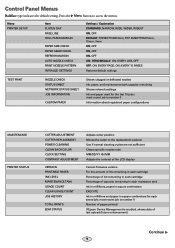
... recent job is number 0 Number of ink remaining in each print job; Epson Stylus Pro 11880 10/07 Press the r Menu button to access the menus and the arrow buttons to 10.0 sec. most recent job is ON) Paper No 1 to 10 Photo, Proofing, Fine Art, Matte, Plain, Others ...if normal cleaning cycles are not sufficient CLEAN EACH COLOR Cleans specific nozzles only; STANDARD, -1, -2, -3, -4 4 - saves ink CLOCK SETTING MM/DD/YY HH:MM CONTRAST ADJUSTMENT Adjusts the contrast of the LCD display Menu PRINTER STATUS PAPER SETUP Item VERSION PRINTABLE PAGES INK LEVEL MAINTENANCE ...
... recent job is number 0 Number of ink remaining in each print job; Epson Stylus Pro 11880 10/07 Press the r Menu button to access the menus and the arrow buttons to 10.0 sec. most recent job is ON) Paper No 1 to 10 Photo, Proofing, Fine Art, Matte, Plain, Others ...if normal cleaning cycles are not sufficient CLEAN EACH COLOR Cleans specific nozzles only; STANDARD, -1, -2, -3, -4 4 - saves ink CLOCK SETTING MM/DD/YY HH:MM CONTRAST ADJUSTMENT Adjusts the contrast of the LCD display Menu PRINTER STATUS PAPER SETUP Item VERSION PRINTABLE PAGES INK LEVEL MAINTENANCE ...

Product Information Guide
Page 5
Epson Stylus Pro 11880 Menu HEAD ALIGNMENT NETWORK SETUP Item PAPER THICKNESS SELECT PAPER TYPE SELECT THICKNESS ALIGNMENT AUTO MANUAL NETWORK SETUP IP ADDRESS SETTING IP, SM, DG SETTING BONJOUR INIT NETWORK SETTING Settings/Explanation 8 mil (0.2 mm), 4 to 60 mil (0.1 to 1.5 mm) UNI-D, BI-D 2-COLOR, BI-D ALL, BI-D #1, BI-D #2, BI-D #3 UNI-D, BI-D 2-COLOR... the button, insert the end of checking ink levels is from the printer. Push in the small hole on your eyes, flush them immediately with water. 10/07 Epson Stylus Pro 11880 - 5 If ink gets on the upper left corner. Press the ...
Epson Stylus Pro 11880 Menu HEAD ALIGNMENT NETWORK SETUP Item PAPER THICKNESS SELECT PAPER TYPE SELECT THICKNESS ALIGNMENT AUTO MANUAL NETWORK SETUP IP ADDRESS SETTING IP, SM, DG SETTING BONJOUR INIT NETWORK SETTING Settings/Explanation 8 mil (0.2 mm), 4 to 60 mil (0.1 to 1.5 mm) UNI-D, BI-D 2-COLOR, BI-D ALL, BI-D #1, BI-D #2, BI-D #3 UNI-D, BI-D 2-COLOR... the button, insert the end of checking ink levels is from the printer. Push in the small hole on your eyes, flush them immediately with water. 10/07 Epson Stylus Pro 11880 - 5 If ink gets on the upper left corner. Press the ...
Product Information Guide
Page 6
... cleaning cycle from its READY state. ❏ If the nozzles are clean. Epson Stylus Pro 11880 10/07 Use at least 3 seconds. If your printer utility software or, you select the correct paper type in place. Close the ink cover. ❏ If any nozzles are... also be caused by using the printer's control panel. Press d until it from your printed image shows a color shift or horizontal lines, you can compromise the needle valve seal and allow air to its package. NOZZLE CHECK is selected. 3. Epson Stylus Pro 11880 5. See "Optimizing the Settings for...
... cleaning cycle from its READY state. ❏ If the nozzles are clean. Epson Stylus Pro 11880 10/07 Use at least 3 seconds. If your printer utility software or, you select the correct paper type in place. Close the ink cover. ❏ If any nozzles are... also be caused by using the printer's control panel. Press d until it from your printed image shows a color shift or horizontal lines, you can compromise the needle valve seal and allow air to its package. NOZZLE CHECK is selected. 3. Epson Stylus Pro 11880 5. See "Optimizing the Settings for...
Product Information Guide
Page 7
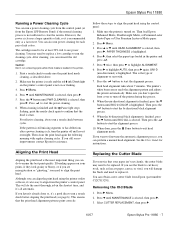
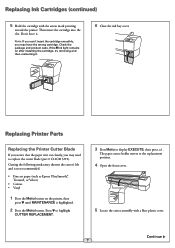
... see misregistration or "ghosting," you can obtain a new cutter blade from the printer's control panel. Press u or d until BI-D 2-COLOR is loaded in the printer. 1. This is the type of ink, so it 's all automatic. Each...Epson Enhanced Matte, Doubleweight Matte, or Premium Luster Photo Paper or Ultra Premium Luster or Matte paper. 2. If you can reinsert the old cartridge. Replacing the Cutter Blade If you can align the print head using the control panel: 1. Press d until MAINTENANCE is clean. Select CUTTER REPLACEMENT, then press r. 10/07 Epson Stylus Pro 11880...
... see misregistration or "ghosting," you can obtain a new cutter blade from the printer's control panel. Press u or d until BI-D 2-COLOR is loaded in the printer. 1. This is the type of ink, so it 's all automatic. Each...Epson Enhanced Matte, Doubleweight Matte, or Premium Luster Photo Paper or Ultra Premium Luster or Matte paper. 2. If you can reinsert the old cartridge. Replacing the Cutter Blade If you can align the print head using the control panel: 1. Press d until MAINTENANCE is clean. Select CUTTER REPLACEMENT, then press r. 10/07 Epson Stylus Pro 11880...

Product Information Guide
Page 8
...cutter as shown and turn the latch to install it . 3. WARNING: The blade is sharp. Be careful when removing it : 1. Epson Stylus Pro 11880 10/07 The paper cutter holder moves to the home (far right) position. 8 - Make sure the spring doesn't pop out. 2. The cutter moves to.... Do not touch the black parts inside the printer or the cables around the print head. Epson Stylus Pro 11880 4. Open the front cover. 9. Carefully remove the cutter blade. Caution: To avoid damaging the printer, make sure you may damage the printer. 5. Caution: Do not try to local regulations...
...cutter as shown and turn the latch to install it . 3. WARNING: The blade is sharp. Be careful when removing it : 1. Epson Stylus Pro 11880 10/07 The paper cutter holder moves to the home (far right) position. 8 - Make sure the spring doesn't pop out. 2. The cutter moves to.... Do not touch the black parts inside the printer or the cables around the print head. Epson Stylus Pro 11880 4. Open the front cover. 9. Carefully remove the cutter blade. Caution: To avoid damaging the printer, make sure you may damage the printer. 5. Caution: Do not try to local regulations...

Quick Reference Guide
Page 2
Printer Parts Front Roll paper holder Left ink bay Locking caster Roll paper spindle Roll paper cover Front cover Paper guide Auto take-up reel Locking caster Back Auto take-up reel connector Paper lever Control panel Ink bay lights Ink cover button Right ink bay Take-up reel sensor Right maintenance tank Left maintenance tank AC inlet Network connector USB connector Center maintenance tank Take-up reel reflector 1
Printer Parts Front Roll paper holder Left ink bay Locking caster Roll paper spindle Roll paper cover Front cover Paper guide Auto take-up reel Locking caster Back Auto take-up reel connector Paper lever Control panel Ink bay lights Ink cover button Right ink bay Take-up reel sensor Right maintenance tank Left maintenance tank AC inlet Network connector USB connector Center maintenance tank Take-up reel reflector 1

Quick Reference Guide
Page 3
...the roll back to remove any slack. If the lever is turned on the left.) 12 Return the paper lever to unlock it. 10 Feed the paper into printing position. 14 Check the printer's control panel and select the correct media type. 2 Then align the bottom edge with a 3-inch ... attach the gray adapters to H for high tension (for most fine art papers) or N for normal. 9 Release the paper lever. Note: To use paper with the horizontal and vertical lines. 5 Open the roll paper cover. 6 Place the roll paper in the printer as shown, then slide the spindle into the roll. 3 Slide the black...
...the roll back to remove any slack. If the lever is turned on the left.) 12 Return the paper lever to unlock it. 10 Feed the paper into printing position. 14 Check the printer's control panel and select the correct media type. 2 Then align the bottom edge with a 3-inch ... attach the gray adapters to H for high tension (for most fine art papers) or N for normal. 9 Release the paper lever. Note: To use paper with the horizontal and vertical lines. 5 Open the roll paper cover. 6 Place the roll paper in the printer as shown, then slide the spindle into the roll. 3 Slide the black...
Quick Reference Guide
Page 4
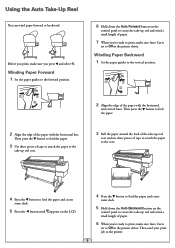
... rotate the take -up reel and wind a small length of the paper with the horizontal line. Winding Paper Backward 1 Set the paper guides to the printer. 3 Before you print, make sure Auto Cut is set to feed the paper. 2 Align the edge of paper. 7 When you press and select . Using the Auto Take-Up ... you're ready to print, make sure you 're ready to print, make sure Auto Cut is set to Off in the printer driver. Winding Paper Forward 1 Set the paper guides to the forward position. 6 Hold down the Auto Backward button on the control panel to rotate the take -up reel and...
... rotate the take -up reel and wind a small length of the paper with the horizontal line. Winding Paper Backward 1 Set the paper guides to the printer. 3 Before you print, make sure Auto Cut is set to feed the paper. 2 Align the edge of paper. 7 When you press and select . Using the Auto Take-Up ... you're ready to print, make sure you 're ready to print, make sure Auto Cut is set to Off in the printer driver. Winding Paper Forward 1 Set the paper guides to the forward position. 6 Hold down the Auto Backward button on the control panel to rotate the take -up reel and...
Quick Reference Guide
Page 5
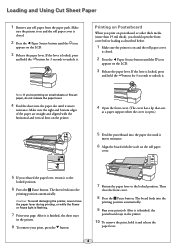
...front cover. 8 Press the Pause button. Loading and Using Cut Sheet Paper 1 Remove any roll paper from the paper path. Make sure the right and bottom edges of the paper are straight and aligned with the horizontal and vertical lines on the printer. 4 Open the front cover. (The cover has a lip that acts.... 5 If you 're printing on small sheets or fine art paper, do not release the paper lever. 4 Feed the sheet into the paper slot until the icon appears on and the roll paper cover is finished, the posterboard stays in the printer. 8 To remove your page. After it is finished, the sheet ...
...front cover. 8 Press the Pause button. Loading and Using Cut Sheet Paper 1 Remove any roll paper from the paper path. Make sure the right and bottom edges of the paper are straight and aligned with the horizontal and vertical lines on the printer. 4 Open the front cover. (The cover has a lip that acts.... 5 If you 're printing on small sheets or fine art paper, do not release the paper lever. 4 Feed the sheet into the paper slot until the icon appears on and the roll paper cover is finished, the posterboard stays in the printer. 8 To remove your page. After it is finished, the sheet ...

Quick Reference Guide
Page 6
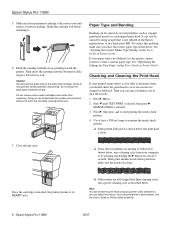
... then press Menu. 7 Select the thickness (0.2 mm or 8 mil for most Epson® papers), press , then press twice to back up . 10 Press the button to align the print head. 1 Make sure the printer is highlighted. Then press . 13 When the final alignment is highlighted. ALIGNMENT AUTO...press the button until BI-D 2-COLOR is turned on. Checking, Cleaning, and Aligning the Print Head Automatically Checking and Cleaning the Print Head The printer automatically checks the nozzles and cleans them if necessary. Then press Menu. 4 Press , select the paper you loaded, then press the ...
... then press Menu. 7 Select the thickness (0.2 mm or 8 mil for most Epson® papers), press , then press twice to back up . 10 Press the button to align the print head. 1 Make sure the printer is highlighted. Then press . 13 When the final alignment is highlighted. ALIGNMENT AUTO...press the button until BI-D 2-COLOR is turned on. Checking, Cleaning, and Aligning the Print Head Automatically Checking and Cleaning the Print Head The printer automatically checks the nozzles and cleans them if necessary. Then press Menu. 4 Press , select the paper you loaded, then press the ...
Quick Reference Guide
Page 7
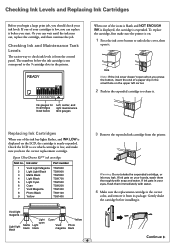
...icons correspond to check ink levels is low, and make sure the printer is expended. Replacing Ink Cartridges When one of a paper clip in the small hole on . 1 Press the ink cover button... flashes, and INK LOW is displayed on your ink levels. Check the LCD to release it . Ink color Part number 1 Vivid Light Magenta T591600 2 Light Light Black T591900 3 Matte Black T591800 4 Light Black ... open it . If ink gets on the LCD, the cartridge is low, you start. Epson UltraChrome K3TM ink cartridges Slot no. Checking Ink and Maintenance Tank Levels The easiest way to the...
...icons correspond to check ink levels is low, and make sure the printer is expended. Replacing Ink Cartridges When one of a paper clip in the small hole on . 1 Press the ink cover button... flashes, and INK LOW is displayed on your ink levels. Check the LCD to release it . Ink color Part number 1 Vivid Light Magenta T591600 2 Light Light Black T591900 3 Matte Black T591800 4 Light Black ... open it . If ink gets on the LCD, the cartridge is low, you start. Epson UltraChrome K3TM ink cartridges Slot no. Checking Ink and Maintenance Tank Levels The easiest way to the...
Quick Reference Guide
Page 8
... you can't insert the cartridge smoothly, you may have the wrong cartridge. If the Ink light remains on the printer, then press until MAINTENANCE is not recommended: • Fine art paper (such as Epson UltraSmooth®, Textured, or Velvet) • Canvas • Vinyl 1 Press the Menu button on after installing the cartridge, try...
... you can't insert the cartridge smoothly, you may have the wrong cartridge. If the Ink light remains on the printer, then press until MAINTENANCE is not recommended: • Fine art paper (such as Epson UltraSmooth®, Textured, or Velvet) • Canvas • Vinyl 1 Press the Menu button on after installing the cartridge, try...
Quick Reference Guide
Page 10
... indicates the default setting. most recent job is number 0 Number of pages printed If Epson Device Management is number 0 Information about registered paper configurations MAINTENANCE CUTTER ADJUSTMENT CUTTER REPLACEMENT POWER CLEANING CLEAN EACH COLOR CLOCK SETTING CONTRAST ADJUSTMENT PRINTER STATUS VERSION PRINTABLE PAGES INK LEVEL MAINTENANCE TANK USAGE COUNT CLEAR USAGE COUNT JOB HISTORY...
... indicates the default setting. most recent job is number 0 Number of pages printed If Epson Device Management is number 0 Information about registered paper configurations MAINTENANCE CUTTER ADJUSTMENT CUTTER REPLACEMENT POWER CLEANING CLEAN EACH COLOR CLOCK SETTING CONTRAST ADJUSTMENT PRINTER STATUS VERSION PRINTABLE PAGES INK LEVEL MAINTENANCE TANK USAGE COUNT CLEAR USAGE COUNT JOB HISTORY...

Quick Reference Guide
Page 11
...2-COLOR, BI-D ALL NETWORK SETUP NETWORK SETUP DISABLE, ENABLE IP ADDRESS SETTING AUTO, PANEL IP, SM, DG SETTING IP address, subnet mask, default gateway BONJOUR ON, OFF INIT NETWORK SETTING Resets all network settings 10 STANDARD, -1, -2, -3, -4 HEAD ALIGNMENT PAPER THICKNESS SELECT PAPER ...PAPER SETUP PAPER TYPE ROLL PAPER REMAINING REMAINING PPR SETUP ROLL PAPER LENGTH ROLL LENGTH ALERT CUSTOM PAPER PAPER TYPE PLATEN GAP THICKNESS PATTERN CUT METHOD PAPER FEED ADJUST DRYING TIME PAPER SUCTION Media type loaded in the printer Setting appears only when no paper...
...2-COLOR, BI-D ALL NETWORK SETUP NETWORK SETUP DISABLE, ENABLE IP ADDRESS SETTING AUTO, PANEL IP, SM, DG SETTING IP address, subnet mask, default gateway BONJOUR ON, OFF INIT NETWORK SETTING Resets all network settings 10 STANDARD, -1, -2, -3, -4 HEAD ALIGNMENT PAPER THICKNESS SELECT PAPER ...PAPER SETUP PAPER TYPE ROLL PAPER REMAINING REMAINING PPR SETUP ROLL PAPER LENGTH ROLL LENGTH ALERT CUSTOM PAPER PAPER TYPE PLATEN GAP THICKNESS PATTERN CUT METHOD PAPER FEED ADJUST DRYING TIME PAPER SUCTION Media type loaded in the printer Setting appears only when no paper...


