Complete Owner's Guide (English)
Page 2
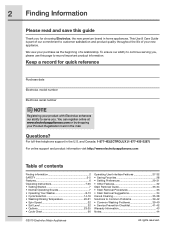
...;2010 Electrolux Major Appliances All rights reserved. Questions? This Use & Care Guide is part of our commitment to customer satisfaction and product quality throughout the life of your purchase as the beginning of contents Finding information 2 SAFETY 3-5 Features 6 Operating Instructions 7-26 • Getting Started 7 • Normal Operating Sounds 7 • Operating Your Washer 8-13 • Cycle Selection 14-19 • Washing/Rinsing Temperature 20-21 • Spin Speed 22 • Soil Level...
...;2010 Electrolux Major Appliances All rights reserved. Questions? This Use & Care Guide is part of our commitment to customer satisfaction and product quality throughout the life of your purchase as the beginning of contents Finding information 2 SAFETY 3-5 Features 6 Operating Instructions 7-26 • Getting Started 7 • Normal Operating Sounds 7 • Operating Your Washer 8-13 • Cycle Selection 14-19 • Washing/Rinsing Temperature 20-21 • Spin Speed 22 • Soil Level...
Complete Owner's Guide (English)
Page 5
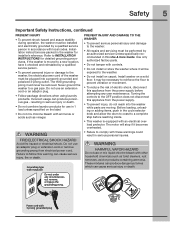
..., under any user maintenance. Never ground the washer to INSTALLATION INSTRUCTIONS for use or mix liquid chlorine bleach with controls. • Do not install or store the washer where it becomes overheated. Install washer on carpet. Do not use an extension cord or an adaptor plug. • Follow package directions when using laundry products. Refer to a gas pipe. Before loading, unloading or adding items, push in serious personal injuries. Turning the controls to comply...
..., under any user maintenance. Never ground the washer to INSTALLATION INSTRUCTIONS for use or mix liquid chlorine bleach with controls. • Do not install or store the washer where it becomes overheated. Install washer on carpet. Do not use an extension cord or an adaptor plug. • Follow package directions when using laundry products. Refer to a gas pipe. Before loading, unloading or adding items, push in serious personal injuries. Turning the controls to comply...
Complete Owner's Guide (English)
Page 11
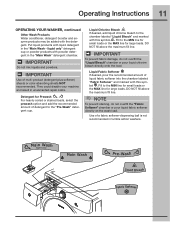
... multi-product (detergent plus softener) sheets or color-absorbing sheets NOT recommended. They could disable your machine and result in tumble action washers. Liquid Fabric Softener If desired, pour the recommended amount of a fabric softener-dispensing ball is not recommended in unwarranted repair costs. NOTE To prevent staining, do not over fill the "Fabric Softener" chamber or pour liquid fabric softener directly on the wash load. Detergent for large loads. Put liquid products with powder detergent in...
... multi-product (detergent plus softener) sheets or color-absorbing sheets NOT recommended. They could disable your machine and result in tumble action washers. Liquid Fabric Softener If desired, pour the recommended amount of a fabric softener-dispensing ball is not recommended in unwarranted repair costs. NOTE To prevent staining, do not over fill the "Fabric Softener" chamber or pour liquid fabric softener directly on the wash load. Detergent for large loads. Put liquid products with powder detergent in...
Complete Owner's Guide (English)
Page 15
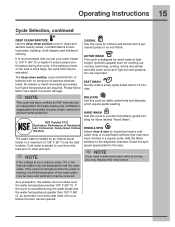
... deselect the rinse option. Operating Instructions 15 Cycle Selection, continued DEEP CLEAN SANITIZE Use the deep clean sanitize cycle to the dispenser chamber. Cold water is locked once the water temperature reaches 130° F (55° C). It is recommended that may be extended. FAST WASH Quickly wash a small, lightly soiled load in a regular cycle. NSF Protolcol P172 Sanitization Performance of the wash water may be lower and sanitation may be opened. NOTE If...
... deselect the rinse option. Operating Instructions 15 Cycle Selection, continued DEEP CLEAN SANITIZE Use the deep clean sanitize cycle to the dispenser chamber. Cold water is locked once the water temperature reaches 130° F (55° C). It is recommended that may be extended. FAST WASH Quickly wash a small, lightly soiled load in a regular cycle. NSF Protolcol P172 Sanitization Performance of the wash water may be lower and sanitation may be opened. NOTE If...
Complete Owner's Guide (English)
Page 17
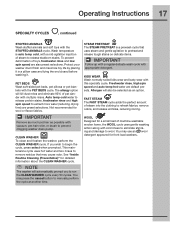
... fabrics, remove odors, and release wrinkles, reducing ironing. Freshwater rinse, high spin speed and auto temp hot water are also preset selections. Allergen will automatically prompt you wish to extract more water (reducing drying time) are preset selections. KIDS WEAR Wash normally-soiled kids wear and baby wear with the STUFFED ANIMALS cycle. You may press the cancel button to prevent clogging washer drain pump. Protect your washer drum...
... fabrics, remove odors, and release wrinkles, reducing ironing. Freshwater rinse, high spin speed and auto temp hot water are also preset selections. Allergen will automatically prompt you wish to extract more water (reducing drying time) are preset selections. KIDS WEAR Wash normally-soiled kids wear and baby wear with the STUFFED ANIMALS cycle. You may press the cancel button to prevent clogging washer drain pump. Protect your washer drum...

Complete Owner's Guide (English)
Page 27
... OF SAVED FAVORITES CUSTOM MODE INSTALL CYCLE RESET CONTRAST BRIGHTNESS VOLUME LANGUAGE CYCLE DESC ON CYCLES GUIDE SETTINGS GUIDE OPTIONS GUIDE SET PREFS GUIDE LIST OF STAIN TYPES & SUGGESTED TREATMENTS CONTROL LOCK ON CONTROL LOCK OFF See save as favorite in "Operating User Interface Preferences" for descriptions of the display, reset settings, clean the washer, and run the installation cycle. See SET PREFS in this feature to 3 custom cycles each custom user. STAIN GUIDES Scroll through this option for the CYCLES GUIDE, SETTINGS GUIDE, OPTIONS GUIDE, and SET PREFS GUIDE for more...
... OF SAVED FAVORITES CUSTOM MODE INSTALL CYCLE RESET CONTRAST BRIGHTNESS VOLUME LANGUAGE CYCLE DESC ON CYCLES GUIDE SETTINGS GUIDE OPTIONS GUIDE SET PREFS GUIDE LIST OF STAIN TYPES & SUGGESTED TREATMENTS CONTROL LOCK ON CONTROL LOCK OFF See save as favorite in "Operating User Interface Preferences" for descriptions of the display, reset settings, clean the washer, and run the installation cycle. See SET PREFS in this feature to 3 custom cycles each custom user. STAIN GUIDES Scroll through this option for the CYCLES GUIDE, SETTINGS GUIDE, OPTIONS GUIDE, and SET PREFS GUIDE for more...
Complete Owner's Guide (English)
Page 38
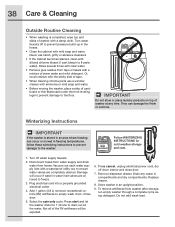
... becomes stained, clean with a waterproof utility vac to the floor. Press start and let the washer drain for cold weather storage and care. 1. Remove dispenser drawer. Turn water faucets off water supply faucets. 2. Press cancel, unplug electrical power cord, dry off drum interior and close door. 7. To remove antifreeze from washer after storage, run empty washer through a complete cycle using detergent. Vacuum out each water supply inlet with diluted chlorine bleach (1 part bleach to freeze. 3. Close door. 5. Or, touch...
... becomes stained, clean with a waterproof utility vac to the floor. Press start and let the washer drain for cold weather storage and care. 1. Remove dispenser drawer. Turn water faucets off water supply faucets. 2. Press cancel, unplug electrical power cord, dry off drum interior and close door. 7. To remove antifreeze from washer after storage, run empty washer through a complete cycle using detergent. Vacuum out each water supply inlet with diluted chlorine bleach (1 part bleach to freeze. 3. Close door. 5. Or, touch...
Complete Owner's Guide (English)
Page 39
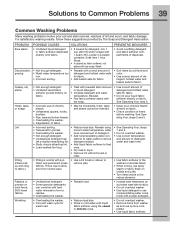
... Washing Problems Many washing problems involve poor soil and stain removal, residues of dispenser. PROBLEM POSSIBLE CAUSES SOLUTIONS PREVENTIVE MEASURES Blue stains • Undiluted liquid detergent or fabric softener dispensed directly onto fabric. • If caused by The Soap and Detergent Association. Solutions to fabric.) Residue or powder on dark items; See Operating Your, step 5. • Incorrect use nonprecipitating water conditioner with liquid fabric softener using the casual or delicate cycle. • Do not overload washer. • Remove...
... Washing Problems Many washing problems involve poor soil and stain removal, residues of dispenser. PROBLEM POSSIBLE CAUSES SOLUTIONS PREVENTIVE MEASURES Blue stains • Undiluted liquid detergent or fabric softener dispensed directly onto fabric. • If caused by The Soap and Detergent Association. Solutions to fabric.) Residue or powder on dark items; See Operating Your, step 5. • Incorrect use nonprecipitating water conditioner with liquid fabric softener using the casual or delicate cycle. • Do not overload washer. • Remove...

Complete Owner's Guide (English)
Page 40
... gasket after use or whenever washer is not in standpipe; let remain a day and flush with recommended dosage. • Remove wash load immediately upon cycle completion. • Run dehumidifier in laundry room. • Avoid over filling detergent and fabric softener compartments of dispenser. • Leave door and dispenser drawer open for a few minutes to clear lines. • Drain water heater occasionally. • For an ongoing problem, install...
... gasket after use or whenever washer is not in standpipe; let remain a day and flush with recommended dosage. • Remove wash load immediately upon cycle completion. • Run dehumidifier in laundry room. • Avoid over filling detergent and fabric softener compartments of dispenser. • Leave door and dispenser drawer open for a few minutes to clear lines. • Drain water heater occasionally. • For an ongoing problem, install...

Complete Owner's Guide (English)
Page 41
... turned on water supply faucets. Stop washer and check drum. Call your authorized servicer. To prevent unnecessary noise and damage to help balance the load. Heavy wash loads may save both time and expense. This is a power outage, call local electric company. Stop washer and redistribute wash load. Move washer so it becomes overheated. Adjust leveling legs. been removed during the spin cycle. ping bolts and foam block. Wash load unevenly distributed in drum. Stop washer and rearrange wash load. OPERATING Washer does not start. Water...
... turned on water supply faucets. Stop washer and check drum. Call your authorized servicer. To prevent unnecessary noise and damage to help balance the load. Heavy wash loads may save both time and expense. This is a power outage, call local electric company. Stop washer and redistribute wash load. Move washer so it becomes overheated. Adjust leveling legs. been removed during the spin cycle. ping bolts and foam block. Wash load unevenly distributed in drum. Stop washer and rearrange wash load. OPERATING Washer does not start. Water...
Complete Owner's Guide (English)
Page 42
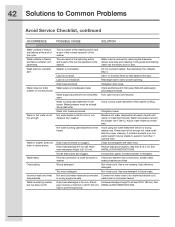
... washer. Load is part of the normal operation of the washer. Water is not adequate in bleach and fabric softener compartments. See INSTALLATION INSTRUCTIONS. Unclog drain pipes. Contact plumber if necessary. sealing washers provided. Run rinse cycle. water hose to help balance the load. Water collects in area. Incorrect wash and rinse temperatures. Washer is kinked or clogged. See Operating Your Washer, step 4. Add 1 or 2 similar items to cold water faucet. Water supply is being used elsewhere in washer does not drain or drains slowly. Water...
... washer. Load is part of the normal operation of the washer. Water is not adequate in bleach and fabric softener compartments. See INSTALLATION INSTRUCTIONS. Unclog drain pipes. Contact plumber if necessary. sealing washers provided. Run rinse cycle. water hose to help balance the load. Water collects in area. Incorrect wash and rinse temperatures. Washer is kinked or clogged. See Operating Your Washer, step 4. Add 1 or 2 similar items to cold water faucet. Water supply is being used elsewhere in washer does not drain or drains slowly. Water...
Product Specifications Sheet (English)
Page 1
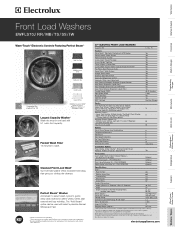
... Controls with LCD Display Perfect Steam™ Wash System Perfect Balance™ System Luxury-Quiet™ Sound Package Luxury-Design® Lighting Touch-2-Open™/ (Close) Door Luxury-Glide® Touch-2-Open™/ (Close) Dispenser Drawer Full Fabric Stain Removal Guide Expert Care™ Wash System Integral Water Heater Stainless Steel Wash Drum Automatic Temperature Control Automatic Water Level Adjustment Auto Prewash Detergent Dispenser (Liquid / Powder) Auto Bleach Dispenser (Liquid Only) Auto Detergent Dispenser (Liquid / Powder) Auto Fabric Softener Dispenser (Liquid...
... Controls with LCD Display Perfect Steam™ Wash System Perfect Balance™ System Luxury-Quiet™ Sound Package Luxury-Design® Lighting Touch-2-Open™/ (Close) Door Luxury-Glide® Touch-2-Open™/ (Close) Dispenser Drawer Full Fabric Stain Removal Guide Expert Care™ Wash System Integral Water Heater Stainless Steel Wash Drum Automatic Temperature Control Automatic Water Level Adjustment Auto Prewash Detergent Dispenser (Liquid / Powder) Auto Bleach Dispenser (Liquid Only) Auto Detergent Dispenser (Liquid / Powder) Auto Fabric Softener Dispenser (Liquid...
Product Specifications Sheet (English)
Page 2
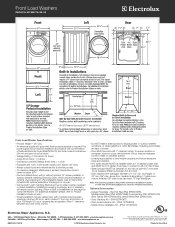
... door. Red Hot Red (PN # EPWD15RR), Mediterranean Blue (PN # EPWD15MB),Turquoise Sky (PN # EPWD15TS), Silver Sands (PN # EPWD15SS), Island White (PN # EPWD15IW). • Dryer Stacking Kit - (PN # ESTACKIT). • Drain Hose Extension Kit - (PN # 137098000). • Mobile Home Installation Kit - (PN # 137067200). High standards of 1-1/4" min. We reserve the right to change specifications or discontinue models without optional 15" drawer pedestal, or stacked beneath matching Electrolux Dryer, which requires installation...
... door. Red Hot Red (PN # EPWD15RR), Mediterranean Blue (PN # EPWD15MB),Turquoise Sky (PN # EPWD15TS), Silver Sands (PN # EPWD15SS), Island White (PN # EPWD15IW). • Dryer Stacking Kit - (PN # ESTACKIT). • Drain Hose Extension Kit - (PN # 137098000). • Mobile Home Installation Kit - (PN # 137067200). High standards of 1-1/4" min. We reserve the right to change specifications or discontinue models without optional 15" drawer pedestal, or stacked beneath matching Electrolux Dryer, which requires installation...
Wiring Diagram (All Languages)
Page 2
... start position. Turn the program knob (9) clicks from the washer drum). Exiting Diagnostic Mode To return the washer to normal operation: a) Unplug the power cord, wait 5-8 seconds, then reconnect the power cord OR b) Turn the program knob clockwise back to the "hand wash" cycle. 3. FACTORY RESET 1. 1¼"x2" display models, wake machine, push the spin speed and soil selection keys simultaneously and hold the "my favorite" and "eco friendly" buttons for proper installation...
... start position. Turn the program knob (9) clicks from the washer drum). Exiting Diagnostic Mode To return the washer to normal operation: a) Unplug the power cord, wait 5-8 seconds, then reconnect the power cord OR b) Turn the program knob clockwise back to the "hand wash" cycle. 3. FACTORY RESET 1. 1¼"x2" display models, wake machine, push the spin speed and soil selection keys simultaneously and hold the "my favorite" and "eco friendly" buttons for proper installation...
Wiring Diagram (All Languages)
Page 3
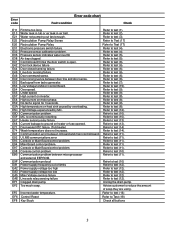
... to test (6). Refer to test (10) Refer to test (7). Refer to test (12). Main Board control problem. Advise customer to ground on motor phase. Door command sense. UI_MB communications error Console or Main Board control problem. Refer to test (12). Refer to test (6). Refer to test (2). No tacho signal for 3 seconds. Drum water NTC failure. (Tub heater) Wash temperature does not increase. Refer to test (12). Refer to Motor Control Board. Error code Error code chart Fault condition Check...
... to test (6). Refer to test (10) Refer to test (7). Refer to test (12). Main Board control problem. Advise customer to ground on motor phase. Door command sense. UI_MB communications error Console or Main Board control problem. Refer to test (12). Refer to test (6). Refer to test (2). No tacho signal for 3 seconds. Drum water NTC failure. (Tub heater) Wash temperature does not increase. Refer to test (12). Refer to Motor Control Board. Error code Error code chart Fault condition Check...
Wiring Diagram (All Languages)
Page 4
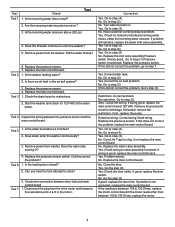
..., if not, replace the pump. Replace the water valve assembly. No. No. Test 2. Is the washer leaking water? 2. Remove power from the washer. Correction Yes. Yes. Go to step (7).Pressure switch checks bad. Yes. Does the fill water continue to step (3). Remove power from washer. Replace the main control board. Is there an air leak in the motor. Replace the pressure sensor. 4. Test 3 1. Check the drain hose for blockage. Start the washer and check for shorts. Test 5 1. Replace the pressure sensor switch. No. Turn water faucets on...
..., if not, replace the pump. Replace the water valve assembly. No. No. Test 2. Is the washer leaking water? 2. Remove power from the washer. Correction Yes. Yes. Go to step (7).Pressure switch checks bad. Yes. Does the fill water continue to step (3). Remove power from washer. Replace the main control board. Is there an air leak in the motor. Replace the pressure sensor. 4. Test 3 1. Check the drain hose for blockage. Start the washer and check for shorts. Test 5 1. Replace the pressure sensor switch. No. Turn water faucets on...
Wiring Diagram (All Languages)
Page 5
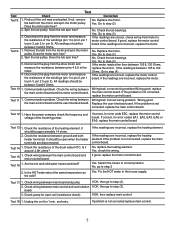
... be open coil (resistance check). Communication problem. Is the HOT water about the same temperature as the cold? Check wiring between 3 and 6 Ohms. Yes. If problem is between Wiring bad, correct wiring problem.Wiring good, replace the main control board and the motor control board. Disconnect the plug from the motor and measure the resistance of the windings (pin 1 to pin 2, pin 1 to pin 3, pin 2 to step 2 2. Replace the motor. Does the tub spin free...
... be open coil (resistance check). Communication problem. Is the HOT water about the same temperature as the cold? Check wiring between 3 and 6 Ohms. Yes. If problem is between Wiring bad, correct wiring problem.Wiring good, replace the main control board and the motor control board. Disconnect the plug from the motor and measure the resistance of the windings (pin 1 to pin 2, pin 1 to pin 3, pin 2 to step 2 2. Replace the motor. Does the tub spin free...
Installation Instructions (All Languages)
Page 3
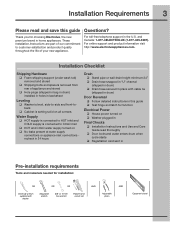
... COLD inlet ‰ HOT and COLD water supply turned on ‰ Washer plugged in Final Checks ‰ Installation Instructions and Use and Care Guide read and save this guide ‰ Test hinge and latch for function Electrical Power ‰ House power turned on ‰ No leaks present at water supply connections or appliance inlet connections recheck in 24 hours Drain ‰ Stand pipe or wall drain height minimum 24" ‰ Drain hose snapped in "U" channel (shipped in drum) ‰ Drain hose...
... COLD inlet ‰ HOT and COLD water supply turned on ‰ Washer plugged in Final Checks ‰ Installation Instructions and Use and Care Guide read and save this guide ‰ Test hinge and latch for function Electrical Power ‰ House power turned on ‰ No leaks present at water supply connections or appliance inlet connections recheck in 24 hours Drain ‰ Stand pipe or wall drain height minimum 24" ‰ Drain hose snapped in "U" channel (shipped in drum) ‰ Drain hose...
Installation Instructions (All Languages)
Page 4
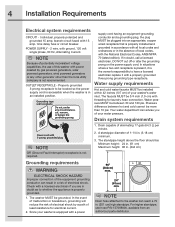
...) with the National Electrical Codes, ANSI/NFPA 70 (latest edition). Water supply requirements Hot and cold water faucets MUST be located so the power supply cord is accessible when the washer is not recommended. Your water department can advise you are in doubt as to the washer can result in an installed position. Drain system requirements Power cord with 3-prong grounded plug NOTE GFI (Ground Fault Interrupter) receptacle...
...) with the National Electrical Codes, ANSI/NFPA 70 (latest edition). Water supply requirements Hot and cold water faucets MUST be located so the power supply cord is accessible when the washer is not recommended. Your water department can advise you are in doubt as to the washer can result in an installed position. Drain system requirements Power cord with 3-prong grounded plug NOTE GFI (Ground Fault Interrupter) receptacle...
Installation Instructions (All Languages)
Page 9
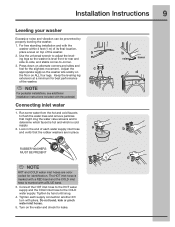
... corner-to flush the water lines and remove particles that the rubber washers are color coded for best performance of the washer. NOTE For pedestal installations, see additional installation instructions included with pliers. Press down on top of the washer. Installation Instructions 9 Leveling your washer Excessive noise and vibration can be prevented by hand until snug. 4. For free standing installation and with a RED band and the COLD inlet hose is cold supply. 2.
... corner-to flush the water lines and remove particles that the rubber washers are color coded for best performance of the washer. NOTE For pedestal installations, see additional installation instructions included with pliers. Press down on top of the washer. Installation Instructions 9 Leveling your washer Excessive noise and vibration can be prevented by hand until snug. 4. For free standing installation and with a RED band and the COLD inlet hose is cold supply. 2.


