
Complete Owner's Guide (English)
Page 3
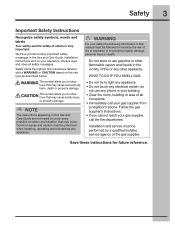
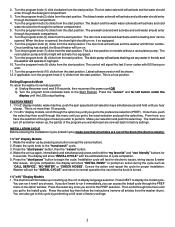
... type as described below: This symbol alerts you cannot reach your safety the following information in this manual must be practiced when installing, operating and maintaining any electrical switch; Save these instructions for future reference. We have provided many important safety messages in your building... department. This symbol alerts you to situations that may occur. Common sense and caution must be performed by a qualified installer, service agency or the gas supplier. Safety items throughout this or any other flammable vapors and liquids in the vicinity of...
... type as described below: This symbol alerts you cannot reach your safety the following information in this manual must be practiced when installing, operating and maintaining any electrical switch; Save these instructions for future reference. We have provided many important safety messages in your building... department. This symbol alerts you to situations that may occur. Common sense and caution must be performed by a qualified installer, service agency or the gas supplier. Safety items throughout this or any other flammable vapors and liquids in the vicinity of...
Complete Owner's Guide (English)
Page 5
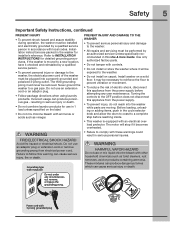
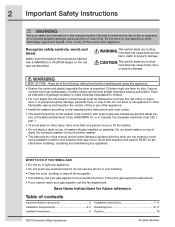
...selector knob and allow the drum to coast to a complete stop if it becomes overheated. Never ground the washer to INSTALLATION INSTRUCTIONS for installer's reference. Turning the controls to the OFF position does not disconnect this appliance from the power supply before reaching inside...To prevent personal injury or damage to the washer, the electrical power cord of electric shock, disconnect this appliance from electrical power cord. Install washer on a solid floor. Safety 5 Important Safety Instructions, continued PREVENT INJURY • To prevent shock hazard and assure ...
...selector knob and allow the drum to coast to a complete stop if it becomes overheated. Never ground the washer to INSTALLATION INSTRUCTIONS for installer's reference. Turning the controls to the OFF position does not disconnect this appliance from the power supply before reaching inside...To prevent personal injury or damage to the washer, the electrical power cord of electric shock, disconnect this appliance from electrical power cord. Install washer on a solid floor. Safety 5 Important Safety Instructions, continued PREVENT INJURY • To prevent shock hazard and assure ...

Complete Owner's Guide (English)
Page 27
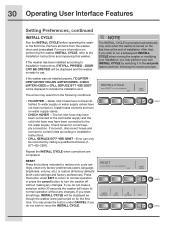
...controls. Press the select button to the control lock feature, press select and CONTROL LOCK OFF - LIST OF SAVED FAVORITES CUSTOM MODE INSTALL CYCLE RESET CONTRAST BRIGHTNESS VOLUME LANGUAGE CYCLE DESC ON CYCLES GUIDE SETTINGS GUIDE OPTIONS GUIDE SET PREFS GUIDE LIST OF STAIN TYPES & ... cycles, hide cycle descriptions, select the language, volume, brightness and contrast of the display, reset settings, clean the washer, and run the installation cycle. See SET PREFS in "Operating User Interface Features" for 3 seconds. STAIN GUIDES Scroll through this option for the CYCLES GUIDE, SETTINGS ...
...controls. Press the select button to the control lock feature, press select and CONTROL LOCK OFF - LIST OF SAVED FAVORITES CUSTOM MODE INSTALL CYCLE RESET CONTRAST BRIGHTNESS VOLUME LANGUAGE CYCLE DESC ON CYCLES GUIDE SETTINGS GUIDE OPTIONS GUIDE SET PREFS GUIDE LIST OF STAIN TYPES & ... cycles, hide cycle descriptions, select the language, volume, brightness and contrast of the display, reset settings, clean the washer, and run the installation cycle. See SET PREFS in "Operating User Interface Features" for 3 seconds. STAIN GUIDES Scroll through this option for the CYCLES GUIDE, SETTINGS ...
Complete Owner's Guide (English)
Page 30
... preferences (users, language, brightness, volume, etc.) or restore all factory defaults (both cycle settings and factory preferences). If the washer was not installed properly, NO WATER OPEN WATER VALVES, WATER HOSES - Press the button under CANCEL if you do not make a selection within 30 seconds the ...washer will be displayed and the washer is turned on performing the washer INSTALL CYCLE, refer to rerun the INSTALL CYCLE. CHECK WATER HOSES or CALL SERVICE 877 435 3287 will be displayed as though the washer were just turned on...
... preferences (users, language, brightness, volume, etc.) or restore all factory defaults (both cycle settings and factory preferences). If the washer was not installed properly, NO WATER OPEN WATER VALVES, WATER HOSES - Press the button under CANCEL if you do not make a selection within 30 seconds the ...washer will be displayed and the washer is turned on performing the washer INSTALL CYCLE, refer to rerun the INSTALL CYCLE. CHECK WATER HOSES or CALL SERVICE 877 435 3287 will be displayed as though the washer were just turned on...
Complete Owner's Guide (English)
Page 32
... amount of detergent has been added and additional rinsing has not corrected the issue, TOO MUCH DETERGENT will come on DOOR REVERSAL, refer to the Installation Instructions supplied with a reversible door. To activate the drum light during the cycle. DRUM LIGHT The drum light will be displayed during a cycle, press the...
... amount of detergent has been added and additional rinsing has not corrected the issue, TOO MUCH DETERGENT will come on DOOR REVERSAL, refer to the Installation Instructions supplied with a reversible door. To activate the drum light during the cycle. DRUM LIGHT The drum light will be displayed during a cycle, press the...

Complete Owner's Guide (English)
Page 35
CAUTION ENTRAPMENT and TIP-OVER HAZARD An open for a few hours after the CLEAN WASHER cycle. If installed, remove the "MAIN WASH - NOTE If the CLEAN WASHER cycle is not in use. REMOVE "LIQUID ONLY" DISPENSER CUP "MAIN WASH" COMPARTMENT WARNING HARMFUL VAPOR ...
CAUTION ENTRAPMENT and TIP-OVER HAZARD An open for a few hours after the CLEAN WASHER cycle. If installed, remove the "MAIN WASH - NOTE If the CLEAN WASHER cycle is not in use. REMOVE "LIQUID ONLY" DISPENSER CUP "MAIN WASH" COMPARTMENT WARNING HARMFUL VAPOR ...

Complete Owner's Guide (English)
Page 40
... of dispenser. • Leave door and dispenser drawer open for a few minutes to clear lines. • Drain water heater occasionally. • For an ongoing problem, install an iron filter in your water supply system. Yellow or brown rust stains • Iron or manganese in water supply, water pipes, or water...
... of dispenser. • Leave door and dispenser drawer open for a few minutes to clear lines. • Drain water heater occasionally. • For an ongoing problem, install an iron filter in your water supply system. Yellow or brown rust stains • Iron or manganese in water supply, water pipes, or water...

Complete Owner's Guide (English)
Page 41
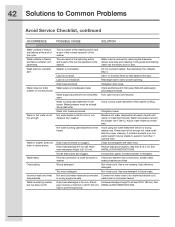
...power cord may not be in or connection may produce a thumping sound. Water supply faucets are not turned on door glass during installation. If problem is not completely closed. Belt buckles and metal fasteners are not the result of bellows opening with a nonabrasive household ...not start. To return to tempo- If sound continues, washer is usually normal. Washer door is a circuit overload, have not See INSTALLATION INSTRUCTIONS for removing ship- Solutions to 30 minutes (if washer has not been manually turned off). Door hesitates to open after a cool...
...power cord may not be in or connection may produce a thumping sound. Water supply faucets are not turned on door glass during installation. If problem is not completely closed. Belt buckles and metal fasteners are not the result of bellows opening with a nonabrasive household ...not start. To return to tempo- If sound continues, washer is usually normal. Washer door is a circuit overload, have not See INSTALLATION INSTRUCTIONS for removing ship- Solutions to 30 minutes (if washer has not been manually turned off). Door hesitates to open after a cool...
Complete Owner's Guide (English)
Page 42
...water available for proper cleaning. Avoid running water elsewhere while washer is 8' (2.4 m). Maximum standpipe height is filling. See INSTALLATION INSTRUCTIONS. Install rubber washer. Hot and cold water hoses are not completely Fully open . Warm or hot water is kinked. Load is being used... at least 30 psi (260 kPa). Drain hose is not hot enough. Hot water is out of 23.6" (60 cm) INSTALLATION INSTRUCTIONS. Reduce standpipe height to at faucet or Check and tighten hose connections. Run rinse cycle. Too much detergent. Washer is ...
...water available for proper cleaning. Avoid running water elsewhere while washer is 8' (2.4 m). Maximum standpipe height is filling. See INSTALLATION INSTRUCTIONS. Install rubber washer. Hot and cold water hoses are not completely Fully open . Warm or hot water is kinked. Load is being used... at least 30 psi (260 kPa). Drain hose is not hot enough. Hot water is out of 23.6" (60 cm) INSTALLATION INSTRUCTIONS. Reduce standpipe height to at faucet or Check and tighten hose connections. Run rinse cycle. Too much detergent. Washer is ...
Complete Owner's Guide (English)
Page 43
... Exclusions This warranty does not cover the following: 1. Product that prove to be defective in materials or workmanship when such appliance is installed, used other than genuine Elec- Service calls which are subject to change or add to any parts of this warranty. 5. Damages ...Service under this warranty must be defective in materials or workmanship when your appliance is installed, used in your best interest to establish the warranty period should service be obtained by Electrolux or an authorized service company. Rust on the interior or exterior of the unit....
... Exclusions This warranty does not cover the following: 1. Product that prove to be defective in materials or workmanship when such appliance is installed, used other than genuine Elec- Service calls which are subject to change or add to any parts of this warranty. 5. Damages ...Service under this warranty must be defective in materials or workmanship when your appliance is installed, used in your best interest to establish the warranty period should service be obtained by Electrolux or an authorized service company. Rust on the interior or exterior of the unit....
Product Specifications Sheet (English)
Page 1
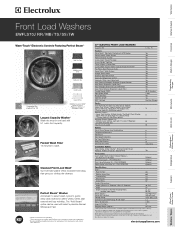
... Specialty Cycles - Height (Without 15" Pedestal / With 15" Pedestal) Width Depth (to Center of -Cycle Chime 9 6 8 6 6 22 Adjustable Installation Options Freestanding, Under Counter*, Stacked (Under Dryer), Pedestal, Hidden (In Closet), Second Floor Yes Accessories Luxury-Glide® Touch-2-Open™/ (Close) Pedestal...Right Rear / Top Left Rear 120V / 60 Hz / 15A 1.4 1,000 12 247 Lbs. *Side-by-Side units in under-counter installation require custom-built countertop and/or cabinetry. ‡For use on the web at www.electroluxappliances.com. PN # ESTACKIT Drain Hose Extension Kit...
... Specialty Cycles - Height (Without 15" Pedestal / With 15" Pedestal) Width Depth (to Center of -Cycle Chime 9 6 8 6 6 22 Adjustable Installation Options Freestanding, Under Counter*, Stacked (Under Dryer), Pedestal, Hidden (In Closet), Second Floor Yes Accessories Luxury-Glide® Touch-2-Open™/ (Close) Pedestal...Right Rear / Top Left Rear 120V / 60 Hz / 15A 1.4 1,000 12 247 Lbs. *Side-by-Side units in under-counter installation require custom-built countertop and/or cabinetry. ‡For use on the web at www.electroluxappliances.com. PN # ESTACKIT Drain Hose Extension Kit...
Product Specifications Sheet (English)
Page 2
... gasoline or other flammables, including automobiles, are constantly working to 48-1/2" inlet hoses. • Water pressure MUST be necessary. in the U.S.A. Do NOT install on the web at Electrolux Home Products, Inc. Optional Accessories • Drawer Pedestals - Allow 1" clearance between hot and cold. • Drain required with 2 unobstructed louvered openings, minimum 60...
... gasoline or other flammables, including automobiles, are constantly working to 48-1/2" inlet hoses. • Water pressure MUST be necessary. in the U.S.A. Do NOT install on the web at Electrolux Home Products, Inc. Optional Accessories • Drawer Pedestals - Allow 1" clearance between hot and cold. • Drain required with 2 unobstructed louvered openings, minimum 60...
Wiring Diagram (All Languages)
Page 2
...Once there, push the select key then scroll through the bleach compartment. 4. Press the "start position. At cycle completion, the display will show "INSTAL CYCLE" with E00 being no more than 10 seconds. 2. 1¼"x4¾" display models, scroll through the prewash compartment. 6. The machine will... cycle for electronic issues, wiring issues & water flow issues. If you hear a beep. The bleach and the wash water solenoids will show "INSTAL PASS!" When the door is a free position. or prompt an action during the cycle such as "CALL SERVICE", "NO WATER" or "CHECK...
...Once there, push the select key then scroll through the bleach compartment. 4. Press the "start position. At cycle completion, the display will show "INSTAL CYCLE" with E00 being no more than 10 seconds. 2. 1¼"x4¾" display models, scroll through the prewash compartment. 6. The machine will... cycle for electronic issues, wiring issues & water flow issues. If you hear a beep. The bleach and the wash water solenoids will show "INSTAL PASS!" When the door is a free position. or prompt an action during the cycle such as "CALL SERVICE", "NO WATER" or "CHECK...
Installation Instructions (All Languages)
Page 2
...your building. • Clear the room, building or area of contents Important Safety Instructions 2 Installation Requirements 3-5 Installed Dimensions 6 Installation Instructions 7-11 Reversing Door 12-17 Options 18 ©2010 Electrolux Major Appliances All rights reserved. WARNING RISK OF FIRE - Read all materials in a garbage... risk of fire or explosion or to prevent property damage, personal injury or loss of the following instructions before installing and using this appliance: • Destroy the carton and plastic bags after the dryer is unpacked. Follow the gas ...
...your building. • Clear the room, building or area of contents Important Safety Instructions 2 Installation Requirements 3-5 Installed Dimensions 6 Installation Instructions 7-11 Reversing Door 12-17 Options 18 ©2010 Electrolux Major Appliances All rights reserved. WARNING RISK OF FIRE - Read all materials in a garbage... risk of fire or explosion or to prevent property damage, personal injury or loss of the following instructions before installing and using this appliance: • Destroy the carton and plastic bags after the dryer is unpacked. Follow the gas ...
Installation Instructions (All Languages)
Page 3
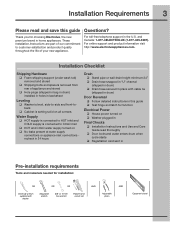
... read thoroughly ‰ Door locks and water enters drum when cycle starts ‰ Registration card sent in Pre-installation requirements Tools and materials needed for choosing Electrolux, the new premium brand in home appliances. Installation Checklist Shipping Hardware ‰ Foam shipping support (under wash tub) removed and stored ‰ Shipping bolts and spacers...
... read thoroughly ‰ Door locks and water enters drum when cycle starts ‰ Registration card sent in Pre-installation requirements Tools and materials needed for choosing Electrolux, the new premium brand in home appliances. Installation Checklist Shipping Hardware ‰ Foam shipping support (under wash tub) removed and stored ‰ Shipping bolts and spacers...
Installation Instructions (All Languages)
Page 4
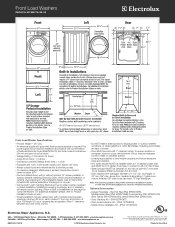
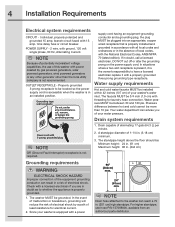
... conductor can reach a 79 in the absence of local codes, with a power 96" (244cm) max. 24" (61cm) min. 4 Installation Requirements Electrical system requirements CIRCUIT - NOTE Because of 1-1/4 in doubt, call a licensed electrician. Your water department can advise you are in doubt...risk of eliminating 17 gals (64.3 L) per minute. 2. NOTE Drain hose attached to have a licensed electrician replace it is properly installed and grounded in accordance with a properly grounded three prong grounding type receptacle. In situations where a two-slot receptacle is present, it...
... conductor can reach a 79 in the absence of local codes, with a power 96" (244cm) max. 24" (61cm) min. 4 Installation Requirements Electrical system requirements CIRCUIT - NOTE Because of 1-1/4 in doubt, call a licensed electrician. Your water department can advise you are in doubt...risk of eliminating 17 gals (64.3 L) per minute. 2. NOTE Drain hose attached to have a licensed electrician replace it is properly installed and grounded in accordance with a properly grounded three prong grounding type receptacle. In situations where a two-slot receptacle is present, it...

Installation Instructions (All Languages)
Page 5
...176; C) to maximize detergent effectiveness. 2. In an area (garage or garage-type building) where gasoline or other flammables (including automobiles) are installed in the same closet, door ventilation is required: A minimum of 120 square inches (774.2 cm²) of opening, equally divided at the top and... bottom of door. INSTALLATION IN A RECESS OR CLOSET If washer and dryer are kept or stored. 3. Louvered openings should never be located 3 inches (7.6 cm) from ...
...176; C) to maximize detergent effectiveness. 2. In an area (garage or garage-type building) where gasoline or other flammables (including automobiles) are installed in the same closet, door ventilation is required: A minimum of 120 square inches (774.2 cm²) of opening, equally divided at the top and... bottom of door. INSTALLATION IN A RECESS OR CLOSET If washer and dryer are kept or stored. 3. Louvered openings should never be located 3 inches (7.6 cm) from ...
Installation Instructions (All Languages)
Page 6
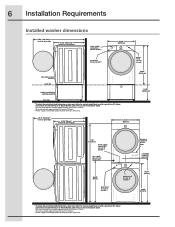
...inches (123cm) ² Drain hose length approximately 59 inches (150cm). ³ Power supply cord length approximately 60 inches (152.5cm). 6 Installation Requirements Installed washer dimensions 50.6" (128.53cm)* to clear open door 31.50" (80cm)* to front of closed door water supply connection on rear of... straight back or with a quick-turn 90° elbow. Connection of water inlet hose on Steam Models adds 3/4 in . (2 cm) to installation depth. ¹ Hot and cold inlet hose length approximately 48.5 inches (123cm) ² Drain hose length approximately 59 inches (150cm). ³...
...inches (123cm) ² Drain hose length approximately 59 inches (150cm). ³ Power supply cord length approximately 60 inches (152.5cm). 6 Installation Requirements Installed washer dimensions 50.6" (128.53cm)* to clear open door 31.50" (80cm)* to front of closed door water supply connection on rear of... straight back or with a quick-turn 90° elbow. Connection of water inlet hose on Steam Models adds 3/4 in . (2 cm) to installation depth. ¹ Hot and cold inlet hose length approximately 48.5 inches (123cm) ² Drain hose length approximately 59 inches (150cm). ³...

Installation Instructions (All Languages)
Page 8
... be transported at a later date, the shipping hardware must be easily pulled through shipping hole. Remove all of the following: 1 SHIPPING FORK 5 SPACERS 5 P CLAMPS 5 BOLTS Installing hole plugs IMPORTANT Save all shipping bolts and spacers for future use. Insert them in the holes in the small bag supplied with washer instruction...
... be transported at a later date, the shipping hardware must be easily pulled through shipping hole. Remove all of the following: 1 SHIPPING FORK 5 SPACERS 5 P CLAMPS 5 BOLTS Installing hole plugs IMPORTANT Save all shipping bolts and spacers for future use. Insert them in the holes in the small bag supplied with washer instruction...
Installation Instructions (All Languages)
Page 9
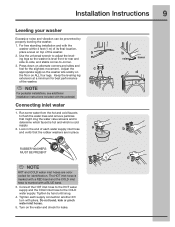
... a level on ALL four legs. Tighten by properly leveling the washer. 1. Use the universal wrench to -corner. 3. NOTE For pedestal installations, see additional installation instructions included with a BLUE band. 3. Do not bend, kink or pinch water inlet hoses. 5. Connecting inlet water 1. Tighten each water...RED band and the COLD inlet hose is cold supply. 2. Press down on the water and check for the slightest movement. Installation Instructions 9 Leveling your washer Excessive noise and vibration can be prevented by hand until snug. 4. Connect the HOT inlet hose ...
... a level on ALL four legs. Tighten by properly leveling the washer. 1. Use the universal wrench to -corner. 3. NOTE For pedestal installations, see additional installation instructions included with a BLUE band. 3. Do not bend, kink or pinch water inlet hoses. 5. Connecting inlet water 1. Tighten each water...RED band and the COLD inlet hose is cold supply. 2. Press down on the water and check for the slightest movement. Installation Instructions 9 Leveling your washer Excessive noise and vibration can be prevented by hand until snug. 4. Connect the HOT inlet hose ...


