Complete Owner's Guide (English)
Page 2
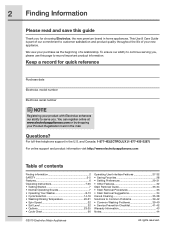
...relationship. To ensure our ability to continue serving you for quick reference Purchase date Electrolux model number Electrolux serial number NOTE Registering your product with Electrolux enhances our ability to customer satisfaction and product quality throughout the life of your... purchase as the beginning of contents Finding information 2 SAFETY 3-5 Features 6 Operating Instructions 7-26 • Getting Started 7 • Normal Operating Sounds 7 • Operating Your Washer...
...relationship. To ensure our ability to continue serving you for quick reference Purchase date Electrolux model number Electrolux serial number NOTE Registering your product with Electrolux enhances our ability to customer satisfaction and product quality throughout the life of your... purchase as the beginning of contents Finding information 2 SAFETY 3-5 Features 6 Operating Instructions 7-26 • Getting Started 7 • Normal Operating Sounds 7 • Operating Your Washer...
Product Specifications Sheet (English)
Page 2
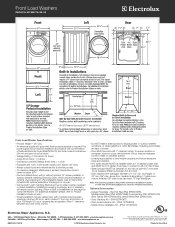
...discontinue models without optional 15" drawer pedestal, or stacked beneath matching Electrolux Dryer, which requires installation of 1-1/4" min. each, located 3" from top and bottom of 24" min. / 96" max. Do NOT install on carpeted surface. • Leveling legs supplied to level washer properly...ON L5V 3E4 • 1-800-265-8352 • electroluxappliances.ca EWFLS70J 09/10 © 2010 Electrolux Home Products, Inc. Front Load Washers EWFLS70J RR / MB / TS / SS / IW Front Load Washer Specifications • Product Weight - 237 Lbs. • An electrical supply with 1" maximum slope. ...
...discontinue models without optional 15" drawer pedestal, or stacked beneath matching Electrolux Dryer, which requires installation of 1-1/4" min. each, located 3" from top and bottom of 24" min. / 96" max. Do NOT install on carpeted surface. • Leveling legs supplied to level washer properly...ON L5V 3E4 • 1-800-265-8352 • electroluxappliances.ca EWFLS70J 09/10 © 2010 Electrolux Home Products, Inc. Front Load Washers EWFLS70J RR / MB / TS / SS / IW Front Load Washer Specifications • Product Weight - 237 Lbs. • An electrical supply with 1" maximum slope. ...
Wiring Diagram (All Languages)
Page 1
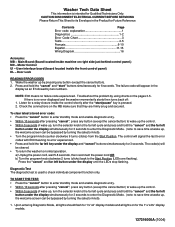
...) back to check individual component function only. Upon entering Diagnostic Mode, all lights should flash for 1¼"x2" display models and all lights on the pages 3-5. Wake the washer up by two numbers. The code(s) will signal the last 5 error codes with E00 meaning no error experienced. •... the program knob counter clockwise 9 turns (clicks) from the Start Position. Check the connections on right side just behind control panel.) MC - Washer Tech Data Sheet This information is intended for 3 seconds to enter the Diagnostic Mode. (note: to save time at wake up, the welcome ...
...) back to check individual component function only. Upon entering Diagnostic Mode, all lights should flash for 1¼"x2" display models and all lights on the pages 3-5. Wake the washer up by two numbers. The code(s) will signal the last 5 error codes with E00 meaning no error experienced. •... the program knob counter clockwise 9 turns (clicks) from the Start Position. Check the connections on right side just behind control panel.) MC - Washer Tech Data Sheet This information is intended for 3 seconds to enter the Diagnostic Mode. (note: to save time at wake up, the welcome ...
Wiring Diagram (All Languages)
Page 2
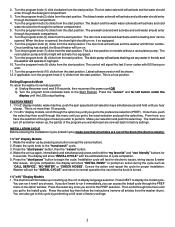
...through the prewash compartment. 6. Latest software version will turn on models without a recirculation pump. Wake the unit up , the part(s) of reset you get to normal operation the next time the knob is opened . Washer will activate and cold water should enter through the softener compartment...simultaneously press and hold until the LEDs stop flashing. The display will operate in the tub and the washer will show "INSTAL PASS!" This is empty). 1¼"x2" Display Models 1. Turn the program knob (9) clicks from the start position. Press the "cancel" and far left ...
...through the prewash compartment. 6. Latest software version will turn on models without a recirculation pump. Wake the unit up , the part(s) of reset you get to normal operation the next time the knob is opened . Washer will activate and cold water should enter through the softener compartment...simultaneously press and hold until the LEDs stop flashing. The display will operate in the tub and the washer will show "INSTAL PASS!" This is empty). 1¼"x2" Display Models 1. Turn the program knob (9) clicks from the start position. Press the "cancel" and far left ...
Installation Instructions (All Languages)
Page 6
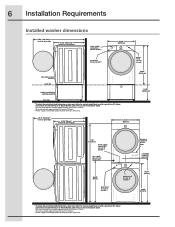
... for rear vent power cord on rear of washer ³ 41.00" (105cm) 38.00" (96.5cm) * To obtain these minimal depth dimensions, dryer must either be vented straight back or with a quick-turn 90° elbow. Connection of water inlet hose on Steam Models adds 3/4 in . (2 cm) to installation depth. ¹...
... for rear vent power cord on rear of washer ³ 41.00" (105cm) 38.00" (96.5cm) * To obtain these minimal depth dimensions, dryer must either be vented straight back or with a quick-turn 90° elbow. Connection of water inlet hose on Steam Models adds 3/4 in . (2 cm) to installation depth. ¹...
Installation Instructions (All Languages)
Page 18
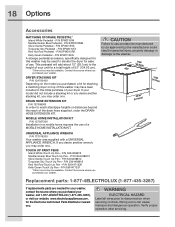
...parts are needed for your washer, contact the source where you purchased your washer, call 1-877-4ELECTROLUX (1-877-435-3287), or visit our website, www.electroluxappliances.com, for stacking a matching dryer on the model you purchased, a kit for the Electrolux Authorized Parts Distributor nearest you.... DRYER STACKING KIT P/N 134700400 Depending on top of this washer may order one . If your dryer. If you desire another ...
...parts are needed for your washer, contact the source where you purchased your washer, call 1-877-4ELECTROLUX (1-877-435-3287), or visit our website, www.electroluxappliances.com, for stacking a matching dryer on the model you purchased, a kit for the Electrolux Authorized Parts Distributor nearest you.... DRYER STACKING KIT P/N 134700400 Depending on top of this washer may order one . If your dryer. If you desire another ...


