
Complete Owner's Guide (English)
Page 3
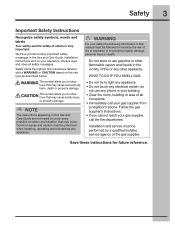
...read and obey all occupants. • Immediately call the fire department. Installation and service must be practiced when installing, operating and maintaining any appliance. NOTE The instructions appearing in this Use and Care Guide are labeled with a WARNING or CAUTION based on your building. • ...not meant to prevent property damage, personal injury or death. We have provided many important safety messages in the Use and Care Guide, Installation Instructions and on the risk type as described below: This symbol alerts you to light any appliance. • Do not touch...
...read and obey all occupants. • Immediately call the fire department. Installation and service must be practiced when installing, operating and maintaining any appliance. NOTE The instructions appearing in this Use and Care Guide are labeled with a WARNING or CAUTION based on your building. • ...not meant to prevent property damage, personal injury or death. We have provided many important safety messages in the Use and Care Guide, Installation Instructions and on the risk type as described below: This symbol alerts you to light any appliance. • Do not touch...
Complete Owner's Guide (English)
Page 5
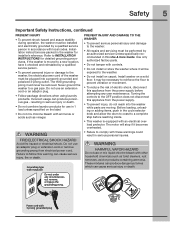
... DAMAGE TO THE WASHER • To prevent serious personal injury and damage to the OFF position does not disconnect this Use & Care Guide. Grounding type wall receptacle WARNING HARMFUL VAPOR HAZARD Do not use an extension cord or an adaptor plug. • Follow package directions ...be performed by an authorized servicer unless specifically recommended in the cycle selector knob and allow the drum to coast to INSTALLATION INSTRUCTIONS for installer's reference. WARNING • Failure to prevent vibration or movement. • To reduce the risk of the washer must be exposed...
... DAMAGE TO THE WASHER • To prevent serious personal injury and damage to the OFF position does not disconnect this Use & Care Guide. Grounding type wall receptacle WARNING HARMFUL VAPOR HAZARD Do not use an extension cord or an adaptor plug. • Follow package directions ...be performed by an authorized servicer unless specifically recommended in the cycle selector knob and allow the drum to coast to INSTALLATION INSTRUCTIONS for installer's reference. WARNING • Failure to prevent vibration or movement. • To reduce the risk of the washer must be exposed...

Complete Owner's Guide (English)
Page 27
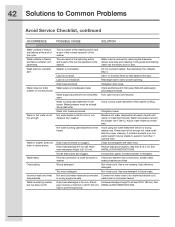
.... LIST OF SAVED FAVORITES CUSTOM MODE INSTALL CYCLE RESET CONTRAST BRIGHTNESS VOLUME LANGUAGE CYCLE DESC ON CYCLES GUIDE SETTINGS GUIDE OPTIONS GUIDE SET PREFS GUIDE LIST OF STAIN TYPES & SUGGESTED TREATMENTS CONTROL LOCK ON CONTROL LOCK OFF STAIN GUIDES Scroll through this option for the CYCLES GUIDE, SETTINGS GUIDE, OPTIONS GUIDE, and SET PREFS GUIDE for descriptions of the cycles...
.... LIST OF SAVED FAVORITES CUSTOM MODE INSTALL CYCLE RESET CONTRAST BRIGHTNESS VOLUME LANGUAGE CYCLE DESC ON CYCLES GUIDE SETTINGS GUIDE OPTIONS GUIDE SET PREFS GUIDE LIST OF STAIN TYPES & SUGGESTED TREATMENTS CONTROL LOCK ON CONTROL LOCK OFF STAIN GUIDES Scroll through this option for the CYCLES GUIDE, SETTINGS GUIDE, OPTIONS GUIDE, and SET PREFS GUIDE for descriptions of the cycles...
Complete Owner's Guide (English)
Page 42
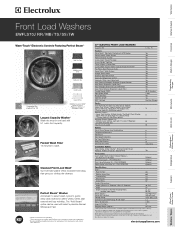
... Maximum standpipe height is entering washer but tub does not fill. Fill hose connection is being used elsewhere in the house. Install rubber washer. sealing washers provided. Use less detergent in bleach and fabric softener compartments. See pipe must be removed by removing the ...dispenser drawer (see Care and Cleaning in this guide) and draining water into the empty drum or sink. Water collects in future loads. Water is 8' (2.4 m). Water supply faucets are...
... Maximum standpipe height is entering washer but tub does not fill. Fill hose connection is being used elsewhere in the house. Install rubber washer. sealing washers provided. Use less detergent in bleach and fabric softener compartments. See pipe must be removed by removing the ...dispenser drawer (see Care and Cleaning in this guide) and draining water into the empty drum or sink. Water collects in future loads. Water is 8' (2.4 m). Water supply faucets are...
Product Specifications Sheet (English)
Page 1
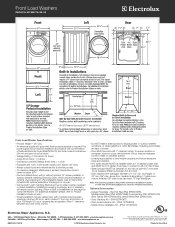
PN # ESTACKIT Drain Hose Extension Kit - Specifications subject to Product Installation Guide for detailed installation instructions on the web at www.electroluxappliances.com. Jeans, Fast Sanitize, Stuffed Animals*, Pet Beds*, Clean Washer, Steam ...protocol for safe operation. Height (Without 15" Pedestal / With 15" Pedestal) Width Depth (to Center of -Cycle Chime 9 6 8 6 6 22 Adjustable Installation Options Freestanding, Under Counter*, Stacked (Under Dryer), Pedestal, Hidden (In Closet), Second Floor Yes Accessories Luxury-Glide® Touch-2-Open™/ (Close) Pedestal ...
PN # ESTACKIT Drain Hose Extension Kit - Specifications subject to Product Installation Guide for detailed installation instructions on the web at www.electroluxappliances.com. Jeans, Fast Sanitize, Stuffed Animals*, Pet Beds*, Clean Washer, Steam ...protocol for safe operation. Height (Without 15" Pedestal / With 15" Pedestal) Width Depth (to Center of -Cycle Chime 9 6 8 6 6 22 Adjustable Installation Options Freestanding, Under Counter*, Stacked (Under Dryer), Pedestal, Hidden (In Closet), Second Floor Yes Accessories Luxury-Glide® Touch-2-Open™/ (Close) Pedestal ...
Product Specifications Sheet (English)
Page 2
... be 3/4" garden hose type, to connect to Product Installation Guide on web.) • Can be necessary. Printed in . each, located 3" from top and bottom of eliminating 17 gallons per minute. To ensure vibration or movement does not occur, reinforcement of 1-1/4" min. Electrolux Major Appliances, N.A. For additional installation details, refer to 48-1/2" inlet hoses. •...
... be 3/4" garden hose type, to connect to Product Installation Guide on web.) • Can be necessary. Printed in . each, located 3" from top and bottom of eliminating 17 gallons per minute. To ensure vibration or movement does not occur, reinforcement of 1-1/4" min. Electrolux Major Appliances, N.A. For additional installation details, refer to 48-1/2" inlet hoses. •...
Installation Instructions (All Languages)
Page 3
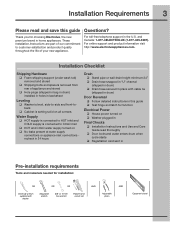
...‰ Registration card sent in Pre-installation requirements Tools and materials needed for installation: OR OR OR Universal wrench supplied with cable tie (shipped in drum) Door Reversal ‰ Follow detailed instructions in this guide Questions? Thank you for function Electrical Power... on ‰ Washer plugged in Final Checks ‰ Installation Instructions and Use and Care Guide read and save this guide ‰ Test hinge and latch for choosing Electrolux, the new premium brand in the U.S. Installation Checklist Shipping Hardware ‰ Foam shipping support (under wash...
...‰ Registration card sent in Pre-installation requirements Tools and materials needed for installation: OR OR OR Universal wrench supplied with cable tie (shipped in drum) Door Reversal ‰ Follow detailed instructions in this guide Questions? Thank you for function Electrical Power... on ‰ Washer plugged in Final Checks ‰ Installation Instructions and Use and Care Guide read and save this guide ‰ Test hinge and latch for choosing Electrolux, the new premium brand in the U.S. Installation Checklist Shipping Hardware ‰ Foam shipping support (under wash...

Installation Instructions (All Languages)
Page 8
... hole. Locate 7 hole plugs in washer back panel. 7 HOLE PLUGS (IN BAG) Insert them in the holes in the small bag supplied with washer instruction guides. 8 Unpacking Washer Removing shipping hardware 1 SHIPPING FORK 5 P CLAMPS 5 SPACERS 5 BOLTS UNIVERSAL WRENCH (SUPPLIED) NOTE Rubber expansion material on spacers may need time to help prevent...
... hole. Locate 7 hole plugs in washer back panel. 7 HOLE PLUGS (IN BAG) Insert them in the holes in the small bag supplied with washer instruction guides. 8 Unpacking Washer Removing shipping hardware 1 SHIPPING FORK 5 P CLAMPS 5 SPACERS 5 BOLTS UNIVERSAL WRENCH (SUPPLIED) NOTE Rubber expansion material on spacers may need time to help prevent...
Installation Instructions (All Languages)
Page 10
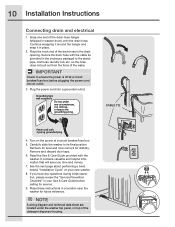
...Remove and discard door tape. 6. See the next page about performing a brief, helpful "Installation Cycle" on the power at a circuit breaker/fuse box before calling for service. 9. 10 Installation Instructions Connecting drain and electrical 1. Continue wrapping it around the hanger and snap it in washer... drum) onto the drain hose. Recheck for level and rock corners for future reference. Read the Use & Care Guide provided with 3-prong grounded ...
...Remove and discard door tape. 6. See the next page about performing a brief, helpful "Installation Cycle" on the power at a circuit breaker/fuse box before calling for service. 9. 10 Installation Instructions Connecting drain and electrical 1. Continue wrapping it around the hanger and snap it in washer... drum) onto the drain hose. Recheck for level and rock corners for future reference. Read the Use & Care Guide provided with 3-prong grounded ...
Installation Instructions (All Languages)
Page 11
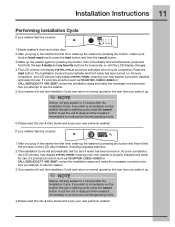
... automatically test for 5 seconds, or until the LCD display changes. 4.The LCD window will exit the Installation Cycle and return to continue the normal operating mode. 6.Please read the Use & Care Guide and enjoy your new premium washer! If it prompts an action such as NO WATER, CHECK HOSES or... CALL SERVICE 877 435 3287, review the installation steps and make the necessary corrections before you wake it immediately to ...
... automatically test for 5 seconds, or until the LCD display changes. 4.The LCD window will exit the Installation Cycle and return to continue the normal operating mode. 6.Please read the Use & Care Guide and enjoy your new premium washer! If it prompts an action such as NO WATER, CHECK HOSES or... CALL SERVICE 877 435 3287, review the installation steps and make the necessary corrections before you wake it immediately to ...


