
Installation Instructions (All Languages)
Page 1
... of installing easier. Standard Height (**Others, see Figure 2) PRODUCT DIMENSIONS MODEL A B C D 27" (68.6 cm) Wall Oven 30" (76.2 cm) Wall Oven MODEL 27" (68.6 cm) Wall Oven 30" (76.2 cm) Wall Oven 27 (68.6) 30 (76.2) 29 (73.7) 29 (73.7) 245/8 (62.5) 28¼ (71.8) CUTOUT DIMENSIONS AND CABINET WIDTH F G (Min.) H. If the oven decorative trim does not butt against the cabinet, or if noise B is critical to each side of the built-in inches (cm...
... of installing easier. Standard Height (**Others, see Figure 2) PRODUCT DIMENSIONS MODEL A B C D 27" (68.6 cm) Wall Oven 30" (76.2 cm) Wall Oven MODEL 27" (68.6 cm) Wall Oven 30" (76.2 cm) Wall Oven 27 (68.6) 30 (76.2) 29 (73.7) 29 (73.7) 245/8 (62.5) 28¼ (71.8) CUTOUT DIMENSIONS AND CABINET WIDTH F G (Min.) H. If the oven decorative trim does not butt against the cabinet, or if noise B is critical to each side of the built-in inches (cm...

Installation Instructions (All Languages)
Page 2
... Service Center. Dimension G (cutout depth) is critical to each side of appropriate height to the showing above the unit. I 271/8 (68.9) Min 301/8 (76.5) Min All dimensions are in oven. wood shim of 2. Electrical Junction Box NOTES: 1. decorative trim does not butt against the cabinet, **5. ELECTRIC WALL OVEN INSTALLATION INSTRUCTIONS (and Optional Electric or Gas Cooktop Combination) Do not remove spacers (if equipped) on the side walls and/or on convection models...
... Service Center. Dimension G (cutout depth) is critical to each side of appropriate height to the showing above the unit. I 271/8 (68.9) Min 301/8 (76.5) Min All dimensions are in oven. wood shim of 2. Electrical Junction Box NOTES: 1. decorative trim does not butt against the cabinet, **5. ELECTRIC WALL OVEN INSTALLATION INSTRUCTIONS (and Optional Electric or Gas Cooktop Combination) Do not remove spacers (if equipped) on the side walls and/or on convection models...

Installation Instructions (All Languages)
Page 3
... NOT fuse neutral (white wire). NOTE: Wire sizes and connections must be used with the National Electrical Code ANSI/NFPA No.70- The junction box should not be electrically grounded in accordance with local codes or, in their absence, with this wall oven can result in electric oven models. Important Note to get the circuit breaker or fuse amperage. To know the circuit breaker or fuse required by your model, see the serial plate to find...
... NOT fuse neutral (white wire). NOTE: Wire sizes and connections must be used with the National Electrical Code ANSI/NFPA No.70- The junction box should not be electrically grounded in accordance with local codes or, in their absence, with this wall oven can result in electric oven models. Important Note to get the circuit breaker or fuse amperage. To know the circuit breaker or fuse required by your model, see the serial plate to find...

Installation Instructions (All Languages)
Page 4
... NOT connect to electrical power supply until appliance is permanently grounded. • Disconnect power to the junction box before switching on power. NOTE TO ELECTRICIAN: The armored cable leads supplied with the appliance are approved for grounding the appliance. Disconnect the power supply. 2. ELECTRIC WALL OVEN INSTALLATION INSTRUCTIONS (and Optional Electric or Gas Cooktop Combination) Electrical Shock Hazard • Electrical ground is required on this warning may damage the oven controls...
... NOT connect to electrical power supply until appliance is permanently grounded. • Disconnect power to the junction box before switching on power. NOTE TO ELECTRICIAN: The armored cable leads supplied with the appliance are approved for grounding the appliance. Disconnect the power supply. 2. ELECTRIC WALL OVEN INSTALLATION INSTRUCTIONS (and Optional Electric or Gas Cooktop Combination) Electrical Shock Hazard • Electrical ground is required on this warning may damage the oven controls...

Installation Instructions (All Languages)
Page 5
... cable wires. 3. Heavy Weight Hazard • Use 2 or more people to move and install wall oven. • Failure to include the model and serial numbers and a lot number or letter from appliance Figure 4 U.L.-Listed Conduit Connector (or CSA listed) 4-WIRE GROUNDED JUNCTION BOX 5. Handle Model and Serial Number Location The serial plate is located along the interior side trim of cabinet (see figure 4): 1. Remove the bottom trim taped on your oven, always be connected to the neutral wire of the 4-wire electrical...
... cable wires. 3. Heavy Weight Hazard • Use 2 or more people to move and install wall oven. • Failure to include the model and serial numbers and a lot number or letter from appliance Figure 4 U.L.-Listed Conduit Connector (or CSA listed) 4-WIRE GROUNDED JUNCTION BOX 5. Handle Model and Serial Number Location The serial plate is located along the interior side trim of cabinet (see figure 4): 1. Remove the bottom trim taped on your oven, always be connected to the neutral wire of the 4-wire electrical...

Installation Instructions (All Languages)
Page 7
.... 27" (68.6 cm) Wall Oven 30" (76.2 cm) Wall Oven CUTOUT DIMENSIONS F. Only certain cooktop models may be installed over the oven unit, 5" (12.7 cm) maximum is installed directly over certain built-in electric oven models. Approved cooktops and built-in ovens are necessary to junction box. by 1" (2.5cm) Use 3/4" (1.9 cm) plywood, installed on two runners, flush with toe plate. WIDTH G. ELECTRIC WALL OVEN INSTALLATION INSTRUCTIONS (and Optional Electric or Gas Cooktop Combination) For typical under counter installation of an electric built-in oven see the insert...
.... 27" (68.6 cm) Wall Oven 30" (76.2 cm) Wall Oven CUTOUT DIMENSIONS F. Only certain cooktop models may be installed over the oven unit, 5" (12.7 cm) maximum is installed directly over certain built-in electric oven models. Approved cooktops and built-in ovens are necessary to junction box. by 1" (2.5cm) Use 3/4" (1.9 cm) plywood, installed on two runners, flush with toe plate. WIDTH G. ELECTRIC WALL OVEN INSTALLATION INSTRUCTIONS (and Optional Electric or Gas Cooktop Combination) For typical under counter installation of an electric built-in oven see the insert...

Installation Instructions (All Languages)
Page 8
... power to the oven (Refer to BROIL, the upper element in one direction and then the other. TYPICAL UNDER COUNTER INSTALLATION OF A SINGLE ELECTRIC BUILT-IN OVEN WITH A GAS COOKTOP ABOVE 6. Leveling the Wall Oven 1. The convection fan will continue to run . IMPORTANT NOTE A cooling fan inside of the oven. 2. If the oven has been operating at high temperatures, the fan will stop running when the oven door is set to your Use and Care Guide for both elements cycle on the rack. ELECTRIC WALL OVEN INSTALLATION INSTRUCTIONS...
... power to the oven (Refer to BROIL, the upper element in one direction and then the other. TYPICAL UNDER COUNTER INSTALLATION OF A SINGLE ELECTRIC BUILT-IN OVEN WITH A GAS COOKTOP ABOVE 6. Leveling the Wall Oven 1. The convection fan will continue to run . IMPORTANT NOTE A cooling fan inside of the oven. 2. If the oven has been operating at high temperatures, the fan will stop running when the oven door is set to your Use and Care Guide for both elements cycle on the rack. ELECTRIC WALL OVEN INSTALLATION INSTRUCTIONS...
Product Specifications Sheet (English)
Page 1
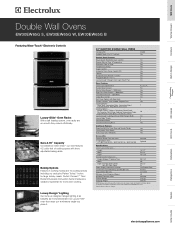
...Pass Broil Element - 4000 Watts Convection Element - 2500 Watts Cobalt Blue Interior Self-Clean Options with Door Lock Perfect Convect3™ with three adjustable baking racks. Wall Ovens Warmer Drawers Cooktops Built-In Ranges Freestanding Ranges Microwaves Double Wall Ovens EW30EW65G S, EW30EW65G W, EW30EW65G B Featuring Wave-Touch™ Electronic Controls Luxury-Glide™ Oven Racks With a ball bearing system, oven racks are so smooth they extend effortlessly. our oven features 4.2 cubic feet of Time & Temperature Yes Electronic Clock & Timer Yes Temperature Display Yes...
...Pass Broil Element - 4000 Watts Convection Element - 2500 Watts Cobalt Blue Interior Self-Clean Options with Door Lock Perfect Convect3™ with three adjustable baking racks. Wall Ovens Warmer Drawers Cooktops Built-In Ranges Freestanding Ranges Microwaves Double Wall Ovens EW30EW65G S, EW30EW65G W, EW30EW65G B Featuring Wave-Touch™ Electronic Controls Luxury-Glide™ Oven Racks With a ball bearing system, oven racks are so smooth they extend effortlessly. our oven features 4.2 cubic feet of Time & Temperature Yes Electronic Clock & Timer Yes Temperature Display Yes...

Product Specifications Sheet (English)
Page 2
... be applied * * For cutout height greater than 49-7/8", optional 3"-high, Bottom Trim available. • Full oven base of solid plywood or similar material required, capable of supporting 375 Lbs. • Base must be level and cabinet front must be finish cut bottom edge. • Double Wall Ovens are constantly working to support 375 lbs. 3" max. Electrical junction box location 30" Electric Double Wall Oven Specifications • Product Weight - 375 Lbs. • Single phase 3- Optional Accessories...
... be applied * * For cutout height greater than 49-7/8", optional 3"-high, Bottom Trim available. • Full oven base of solid plywood or similar material required, capable of supporting 375 Lbs. • Base must be level and cabinet front must be finish cut bottom edge. • Double Wall Ovens are constantly working to support 375 lbs. 3" max. Electrical junction box location 30" Electric Double Wall Oven Specifications • Product Weight - 375 Lbs. • Single phase 3- Optional Accessories...
Complete Owner's Guide (English)
Page 3
...Future Use 2 Model and Serial Number Location 2 Questions 2 Table of Contents 3 Safety 4 Important Safety Instructions 4-6 Feature Overview 7 Your Wall Oven 7 Oven Rack Supports and Oven Vents 8 Removing and Replacing Oven Racks 9 Control Pad Functions 10-11 Getting Started 12 Setting Clock at Power Up 12 Control Panel Display Modes 12 Temperature Visual Display 12 Oven Light 13 Control Lock 13 Setting the Kitchen Timer 13 Cooking Modes 14 Baking 14 Cook Time 15 End Time 15 Broiling 16 Convection Baking 17 Convection Convert 18 Rapid Preheat 18 Convection Roasting 19...
...Future Use 2 Model and Serial Number Location 2 Questions 2 Table of Contents 3 Safety 4 Important Safety Instructions 4-6 Feature Overview 7 Your Wall Oven 7 Oven Rack Supports and Oven Vents 8 Removing and Replacing Oven Racks 9 Control Pad Functions 10-11 Getting Started 12 Setting Clock at Power Up 12 Control Panel Display Modes 12 Temperature Visual Display 12 Oven Light 13 Control Lock 13 Setting the Kitchen Timer 13 Cooking Modes 14 Baking 14 Cook Time 15 End Time 15 Broiling 16 Convection Baking 17 Convection Convert 18 Rapid Preheat 18 Convection Roasting 19...
Complete Owner's Guide (English)
Page 4
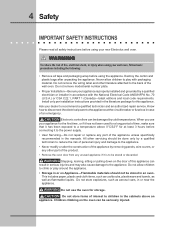
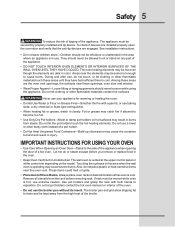
... in the manuals. When you use the oven for this appliance can be damaged by a qualified technician to reduce the risk of personal injury and damage to the appliance. Do not remove the wiring label and other part of the product. • Remove the oven door from any unused appliance if it to the power supply. • User Servicing-Do not repair or replace any...
... in the manuals. When you use the oven for this appliance can be damaged by a qualified technician to reduce the risk of personal injury and damage to the appliance. Do not remove the wiring label and other part of the product. • Remove the oven door from any unused appliance if it to the power supply. • User Servicing-Do not repair or replace any...
Complete Owner's Guide (English)
Page 5
... in desired location while oven is vented at the upper control panel or at the center trim depending on any part of pressure may cause severe burns. These items could melt or ignite. • Placement of a hot oven. Use pot holders and grasp the rack with a pan lid, or use , do not place plastic or heat-sensitive items near the oven vent. The oven heating elements may catch...
... in desired location while oven is vented at the upper control panel or at the center trim depending on any part of pressure may cause severe burns. These items could melt or ignite. • Placement of a hot oven. Use pot holders and grasp the rack with a pan lid, or use , do not place plastic or heat-sensitive items near the oven vent. The oven heating elements may catch...
Complete Owner's Guide (English)
Page 6
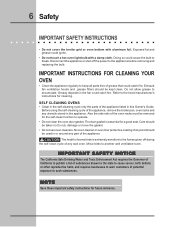
Before using the self-cleaning cycle of the appliance, remove the broiler pan, oven racks and any wall oven. Care should be kept clean. 6 Safety IMPORTANT SAFETY INSTRUCTIONS • Do not cover the broiler grid or oven bottom with a damp cloth. Exposed fat and grease could cause the bulb to break. Exhaust fan ventilation hoods and grease filters should be removed for cleaning. Do not allow grease to another well ventilated room...
Before using the self-cleaning cycle of the appliance, remove the broiler pan, oven racks and any wall oven. Care should be kept clean. 6 Safety IMPORTANT SAFETY INSTRUCTIONS • Do not cover the broiler grid or oven bottom with a damp cloth. Exposed fat and grease could cause the bulb to break. Exhaust fan ventilation hoods and grease filters should be removed for cleaning. Do not allow grease to another well ventilated room...
Complete Owner's Guide (English)
Page 16
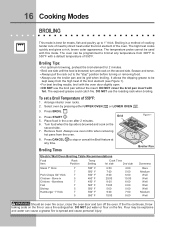
... oven door slightly open. • DO NOT use the roasting rack when broiling. DO NOT cover the broil pan insert with this mode. LOWER OVEN 3. Broiling is browned and cook on the second side. Arrange interior oven racks. 2. The temperature probe cannot be explosive and water can be kept away from the high heat of 550°F: 1. Season and serve. • Always pull the rack out to the "stop or cancel the Broil...
... oven door slightly open. • DO NOT use the roasting rack when broiling. DO NOT cover the broil pan insert with this mode. LOWER OVEN 3. Broiling is browned and cook on the second side. Arrange interior oven racks. 2. The temperature probe cannot be explosive and water can be kept away from the high heat of 550°F: 1. Season and serve. • Always pull the rack out to the "stop or cancel the Broil...
Complete Owner's Guide (English)
Page 17
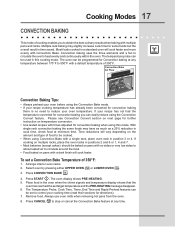
... Convection baking at any time. The temperature probe can be set to be cooked. • When using this cooking mode. Please see Convection Convert section on next page for further instruction on pans with no need to 550°F with Convection Bake. Remove food. Most foods cooked in this mode. With single rack convection baking the some foods may slightly increase cook time for convection baking when using Convection Bake with multiple pans and racks. Always use oven mitts when removing hot pans from the oven. 8. Multiple rack baking...
... Convection baking at any time. The temperature probe can be set to be cooked. • When using this cooking mode. Please see Convection Convert section on next page for further instruction on pans with no need to 550°F with Convection Bake. Remove food. Most foods cooked in this mode. With single rack convection baking the some foods may slightly increase cook time for convection baking when using Convection Bake with multiple pans and racks. Always use oven mitts when removing hot pans from the oven. 8. Multiple rack baking...
Complete Owner's Guide (English)
Page 19
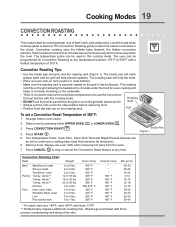
... temperature probe can be used in the juices. Select oven by pressing either UPPER OVEN UPPER OVEN or LOWER OVEN LOWER OVEN . 3. The Temperature Probe, Cook Time, Timer, End Time and Rapid Preheat features can be set a Convection Roast Temperature of 350°F. Press CANCEL to stop position before removing food. • Position food (fat side up) on the grid allowing the heated air to increase browning on the grid in the broiler pan. Oven Temp 350...
... temperature probe can be used in the juices. Select oven by pressing either UPPER OVEN UPPER OVEN or LOWER OVEN LOWER OVEN . 3. The Temperature Probe, Cook Time, Timer, End Time and Rapid Preheat features can be set a Convection Roast Temperature of 350°F. Press CANCEL to stop position before removing food. • Position food (fat side up) on the grid allowing the heated air to increase browning on the grid in the broiler pan. Oven Temp 350...
Complete Owner's Guide (English)
Page 22
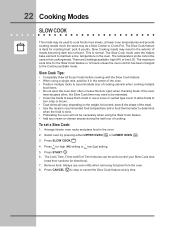
... Slow Cook time may result in the oven. 2. Slow Cooking meats may need to be necessary when using a single rack, position it in the center of the meat. • Use the recipe's recommended food temperature and a food thermometer to determine when the food is 12 hours unless the oven control has been changed to control your Slow Cook time (read their sections for directions). 7. The temperature probe cannot be set a Slow Cook: 1. Arrange interior oven racks...
... Slow Cook time may result in the oven. 2. Slow Cooking meats may need to be necessary when using a single rack, position it in the center of the meat. • Use the recipe's recommended food temperature and a food thermometer to determine when the food is 12 hours unless the oven control has been changed to control your Slow Cook time (read their sections for directions). 7. The temperature probe cannot be set a Slow Cook: 1. Arrange interior oven racks...
Complete Owner's Guide (English)
Page 23
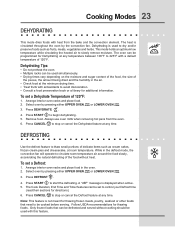
... START to start the defrosting. Arrange interior oven racks and place food in the air. • Check food at room temperature. This mode holds an optimum low temperature while circulating the heated air to thaw small portions of 120°F. Note: This feature is used to stop or cancel the Defrost feature at any time. Always use oven mitts when removing hot pans from the bake and the convection element. LOWER OVEN...
... START to start the defrosting. Arrange interior oven racks and place food in the air. • Check food at room temperature. This mode holds an optimum low temperature while circulating the heated air to thaw small portions of 120°F. Note: This feature is used to stop or cancel the Defrost feature at any time. Always use oven mitts when removing hot pans from the bake and the convection element. LOWER OVEN...
Complete Owner's Guide (English)
Page 26
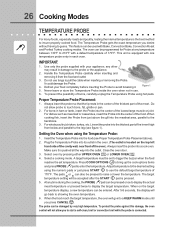
... lo temperature setting will go back to touch bone, fat, gristle or pan. 2. After 5-8 seconds, the display will not allow probe to showing the oven temperature. 6. can be pressed to insure properly cooked food. Never leave or store the Temperature Probe inside the oven when not in damage to avoid breaking it is equipped with Bake, Convection Bake, Convection Roast and Perfect Turkey cooking modes. Plug the Temperature Probe into a KEEP WARM mode until...
... lo temperature setting will go back to touch bone, fat, gristle or pan. 2. After 5-8 seconds, the display will not allow probe to showing the oven temperature. 6. can be pressed to insure properly cooked food. Never leave or store the Temperature Probe inside the oven when not in damage to avoid breaking it is equipped with Bake, Convection Bake, Convection Roast and Perfect Turkey cooking modes. Plug the Temperature Probe into a KEEP WARM mode until...
Complete Owner's Guide (English)
Page 40
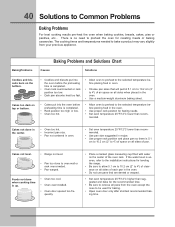
...; Incorrect pan size. • Pan not centered in recipe. • Use proper rack position and place pan so there is up. • Oven too cool. • Oven overcrowded. • Oven door opened too frequently. • Place a marked glass measuring cup filled with water on all pans from your previous appliance. Foods not done when cooking time is 5.1 cm to 10.2 cm (2" to preheat the oven for baking needs. • Set oven temperature 25...
...; Incorrect pan size. • Pan not centered in recipe. • Use proper rack position and place pan so there is up. • Oven too cool. • Oven overcrowded. • Oven door opened too frequently. • Place a marked glass measuring cup filled with water on all pans from your previous appliance. Foods not done when cooking time is 5.1 cm to 10.2 cm (2" to preheat the oven for baking needs. • Set oven temperature 25...


