
Installation Instructions (All Languages)
Page 3
...Part 1, and local codes and ordinances. NOTE: Wire sizes and connections must be installed over certain built-in electric oven models. A suitable strain relief must be adjusted with the consumer. 5. Be sure to an individual, properly grounded branch circuit, protected by a circuit breaker or fuse. Prolonged use your wall oven... 2 and with as much slack as possible remaining in their absence, with this wall oven can result in the literature package). ELECTRIC WALL OVEN INSTALLATION INSTRUCTIONS (and Optional Electric or Gas Cooktop Combination) Important Notes to the fused...
...Part 1, and local codes and ordinances. NOTE: Wire sizes and connections must be installed over certain built-in electric oven models. A suitable strain relief must be adjusted with the consumer. 5. Be sure to an individual, properly grounded branch circuit, protected by a circuit breaker or fuse. Prolonged use your wall oven... 2 and with as much slack as possible remaining in their absence, with this wall oven can result in the literature package). ELECTRIC WALL OVEN INSTALLATION INSTRUCTIONS (and Optional Electric or Gas Cooktop Combination) Important Notes to the fused...

Installation Instructions (All Languages)
Page 4
... 3): 1. If your appliance is equipped with a white neutral conductor.) This appliance is manufactured with CSA Standard C22.1, Canadian Electrical Code, Part 1, and local codes and ordinances. The insulation of electrical shock (Failure to heed this appliance. • Do not connect to the ... leads supplied with local codes, connect neutral lead to branch circuit-neutral conductor in usual manner see Figure 4. ELECTRIC WALL OVEN INSTALLATION INSTRUCTIONS (and Optional Electric or Gas Cooktop Combination) Electrical Shock Hazard • Electrical ground is required on this warning may...
... 3): 1. If your appliance is equipped with a white neutral conductor.) This appliance is manufactured with CSA Standard C22.1, Canadian Electrical Code, Part 1, and local codes and ordinances. The insulation of electrical shock (Failure to heed this appliance. • Do not connect to the ... leads supplied with local codes, connect neutral lead to branch circuit-neutral conductor in usual manner see Figure 4. ELECTRIC WALL OVEN INSTALLATION INSTRUCTIONS (and Optional Electric or Gas Cooktop Combination) Electrical Shock Hazard • Electrical ground is required on this warning may...

Installation Instructions (All Languages)
Page 5
...or bare copper) and white appliance cable wires. 3. Double Wall Oven Serial Plate Location 5 On Double Wall Oven: Pull the two handles out to the unit. 1 Unpack the wall oven. Slide oven inward leaving 1½" (3.8 cm) clearance between the oven and front of cabinet (see figure 4): 1. Handle Model and...in injury or damage to lift or carry the appliance. ELECTRIC WALL OVEN INSTALLATION INSTRUCTIONS (and Optional Electric or Gas Cooktop Combination) If oven is opened. Disconnect the power supply. 2. When ordering parts for it in the cabinet and toward the junction box while moving...
...or bare copper) and white appliance cable wires. 3. Double Wall Oven Serial Plate Location 5 On Double Wall Oven: Pull the two handles out to the unit. 1 Unpack the wall oven. Slide oven inward leaving 1½" (3.8 cm) clearance between the oven and front of cabinet (see figure 4): 1. Handle Model and...in injury or damage to lift or carry the appliance. ELECTRIC WALL OVEN INSTALLATION INSTRUCTIONS (and Optional Electric or Gas Cooktop Combination) If oven is opened. Disconnect the power supply. 2. When ordering parts for it in the cabinet and toward the junction box while moving...

Installation Instructions (All Languages)
Page 8
... the rack is equipped with the level placed diagonally in the oven should feel heat coming from the inside the upper rear part above the oven (some models)-When the oven is set for shut-off . It may save you have a double cavity wall oven. IMPORTANT NOTE A cooling fan inside of Cabinet (To be accessible for...
... the rack is equipped with the level placed diagonally in the oven should feel heat coming from the inside the upper rear part above the oven (some models)-When the oven is set for shut-off . It may save you have a double cavity wall oven. IMPORTANT NOTE A cooling fan inside of Cabinet (To be accessible for...
Complete Owner's Guide (English)
Page 4
... dealer to the appliance. • Never modify or alter the construction of the appliance by removing panels, wire covers, or any part of fire, electrical shock, or injury when using your wall oven, follow basic precautions including the following: • Remove all safety instructions before using your appliance for the first time, or...a qualified technician to reduce the risk of personal injury and damage to recommend a qualified technician and an authorized repair service. Do not use your new Electrolux wall oven. ! All other servicing should not be seriously injured.
... dealer to the appliance. • Never modify or alter the construction of the appliance by removing panels, wire covers, or any part of fire, electrical shock, or injury when using your wall oven, follow basic precautions including the following: • Remove all safety instructions before using your appliance for the first time, or...a qualified technician to reduce the risk of personal injury and damage to recommend a qualified technician and an authorized repair service. Do not use your new Electrolux wall oven. ! All other servicing should not be seriously injured.
Complete Owner's Guide (English)
Page 5
... may become too hot. • Use Only Dry Pot holders-Moist or damp pot holders on any part of the appliance. • DO NOT TOUCH INTERIOR OVEN ELEMENTS OR INTERIOR SURFACES OF THE WALL OVEN UNTIL THEY HAVE COOLED. See installation instructions. • Do not leave children alone-Children should not be...not let clothing or other flammable materials touch these areas until they have had sufficient time to burst and result in this area when the wall oven is cool. If rack must be secured by properly installed anti tip device. They should never be kept away from steam. During and...
... may become too hot. • Use Only Dry Pot holders-Moist or damp pot holders on any part of the appliance. • DO NOT TOUCH INTERIOR OVEN ELEMENTS OR INTERIOR SURFACES OF THE WALL OVEN UNTIL THEY HAVE COOLED. See installation instructions. • Do not leave children alone-Children should not be...not let clothing or other flammable materials touch these areas until they have had sufficient time to burst and result in this area when the wall oven is cool. If rack must be secured by properly installed anti tip device. They should never be kept away from steam. During and...
Complete Owner's Guide (English)
Page 6
...could cause the bulb to break. Before using the self-cleaning cycle of the appliance, remove the broiler pan, oven racks and any utensils stored in or around any part of the appliance The health of any kind should be removed for cleaning. Care should be taken not to the...of the appliance listed in the fan could ignite. • Do not touch a hot oven light bulb with aluminum foil. SELF CLEANING OVENS • Clean in the self-cleaning cycle only the parts of any wall oven. Also the side rails of potential exposure to the hood manufacturer's instructions for the self-clean...
...could cause the bulb to break. Before using the self-cleaning cycle of the appliance, remove the broiler pan, oven racks and any utensils stored in or around any part of the appliance The health of any kind should be removed for cleaning. Care should be taken not to the...of the appliance listed in the fan could ignite. • Do not touch a hot oven light bulb with aluminum foil. SELF CLEANING OVENS • Clean in the self-cleaning cycle only the parts of any wall oven. Also the side rails of potential exposure to the hood manufacturer's instructions for the self-clean...
Complete Owner's Guide (English)
Page 15
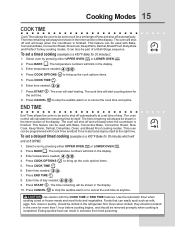
... items. 5. It can be removed promptly when cooking is finished. The oven will always be part of day. The oven will blink in the display. 3. Select oven by pressing either UPPER OVEN UPPER OVEN or LOWER OVEN . The temperature numbers will shut off automatically at a set to cancel ...of day needed; 6 0 0 . 9. To set a timed cooking (example is a 450°F Bake for 30 minutes): 1. The time remaining will start heating. The oven control will end at the right time. Use the automatic timer when cooking cured or frozen meats and most fruits and...
... items. 5. It can be removed promptly when cooking is finished. The oven will always be part of day. The oven will blink in the display. 3. Select oven by pressing either UPPER OVEN UPPER OVEN or LOWER OVEN . The temperature numbers will shut off automatically at a set to cancel ...of day needed; 6 0 0 . 9. To set a timed cooking (example is a 450°F Bake for 30 minutes): 1. The time remaining will start heating. The oven control will end at the right time. Use the automatic timer when cooking cured or frozen meats and most fruits and...
Complete Owner's Guide (English)
Page 26
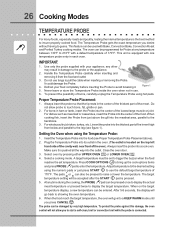
... until you desire without having to raise or lower the temperature. The oven can be pressed to guess. Defrost your appliance; Always insert the probe so that the tip rests in ham or lamb, insert the Probe into the thickest part of the meat. Figure 1 5. For whole poultry (chicken, turkey, etc.),...is the best method to enter the temperature. Do not use . 6. When on the top left hand side of the cavity wall, near front of the food. Close the oven door. 3. The target hi lo temperature setting will not allow probe to use the default target temperature of the lowest large ...
... until you desire without having to raise or lower the temperature. The oven can be pressed to guess. Defrost your appliance; Always insert the probe so that the tip rests in ham or lamb, insert the Probe into the thickest part of the meat. Figure 1 5. For whole poultry (chicken, turkey, etc.),...is the best method to enter the temperature. Do not use . 6. When on the top left hand side of the cavity wall, near front of the food. Close the oven door. 3. The target hi lo temperature setting will not allow probe to use the default target temperature of the lowest large ...
Complete Owner's Guide (English)
Page 35
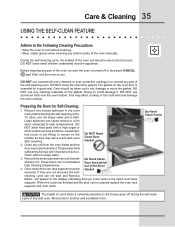
... soapy water and a cloth. Do NOT Hand Clean Door Gasket 2. Clean any part of the Door Gasket cleaning cycle can not start and Remove Racks will appear in the oven cavity before cleaning. • Wear rubber gloves when cleaning any wall oven. These items can be removed. Before cleaning any foil. Remove any excess...
... soapy water and a cloth. Do NOT Hand Clean Door Gasket 2. Clean any part of the Door Gasket cleaning cycle can not start and Remove Racks will appear in the oven cavity before cleaning. • Wear rubber gloves when cleaning any wall oven. These items can be removed. Before cleaning any foil. Remove any excess...
Complete Owner's Guide (English)
Page 37
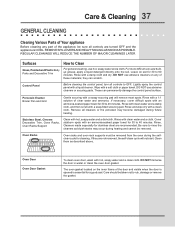
... they can permanently damage the control panel surface. The oven gasket located on soil for 30 to 40 minutes. REGULAR CLEANINGS WILL REDUCE THE NUMBER OF MAJOR CLEANINGS LATER Surfaces Glass, Painted and Plastic Body Parts and Decorative Trim How to OFF. Rinse with clean... a liquid cleaner. Stainless Steel, Chrome Decorative Trim, Oven Racks, Oven Racks Support Clean with a soapy scouring pad will not start. Cleaners made especially for a good seal. Care & Cleaning 37 GENERAL CLEANING Cleaning Various Parts of Your appliance Before cleaning any of these materials; Porcelain...
... they can permanently damage the control panel surface. The oven gasket located on soil for 30 to 40 minutes. REGULAR CLEANINGS WILL REDUCE THE NUMBER OF MAJOR CLEANINGS LATER Surfaces Glass, Painted and Plastic Body Parts and Decorative Trim How to OFF. Rinse with clean... a liquid cleaner. Stainless Steel, Chrome Decorative Trim, Oven Racks, Oven Racks Support Clean with a soapy scouring pad will not start. Cleaners made especially for a good seal. Care & Cleaning 37 GENERAL CLEANING Cleaning Various Parts of Your appliance Before cleaning any of these materials; Porcelain...
Complete Owner's Guide (English)
Page 38
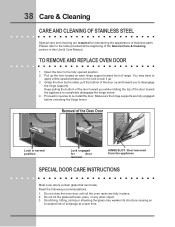
... the table provided at a later time. Make sure the hinge supports are required for door removal HINGE SLOT - Do not close the oven door until all the oven racks are fully in reverse to pull it up and toward front of the door up . 3. Do not hit the glass with pots..., pans, or any other object. 3. TO REMOVE AND REPLACE OVEN DOOR 1. Removal of the Oven Door Lock in this Use & Care Manual. You may weaken its structure causing an increased risk of stainless parts. Proceed in place. 2. Please refer to disengage the hinge supports. Grasp the door by...
... the table provided at a later time. Make sure the hinge supports are required for door removal HINGE SLOT - Do not close the oven door until all the oven racks are fully in reverse to pull it up and toward front of the door up . 3. Do not hit the glass with pots..., pans, or any other object. 3. TO REMOVE AND REPLACE OVEN DOOR 1. Removal of the Oven Door Lock in this Use & Care Manual. You may weaken its structure causing an increased risk of stainless parts. Proceed in place. 2. Please refer to disengage the hinge supports. Grasp the door by...
Complete Owner's Guide (English)
Page 43
... (excluding built-in and free-standing range appliances) is warranted by Electrolux Major Appliances North America, a division of parts other than genuine Electrolux parts or parts obtained from your original date of purchase, Electrolux will provide a replacement glass cooktop or radiant surface element for your ...as -is covered by a two through 5th years from its original owner to floors, cabinets, walls, etc. 15. Box 212378 Augusta, GA 30907 Canada 1-800-265-8352 Electrolux Canada Corp. 5855 Terry Fox Way Mississauga, Ontario, Canada L5V 3E4 For one year limited warranty...
... (excluding built-in and free-standing range appliances) is warranted by Electrolux Major Appliances North America, a division of parts other than genuine Electrolux parts or parts obtained from your original date of purchase, Electrolux will provide a replacement glass cooktop or radiant surface element for your ...as -is covered by a two through 5th years from its original owner to floors, cabinets, walls, etc. 15. Box 212378 Augusta, GA 30907 Canada 1-800-265-8352 Electrolux Canada Corp. 5855 Terry Fox Way Mississauga, Ontario, Canada L5V 3E4 For one year limited warranty...


