
Installation Instructions (All Languages)
Page 1
... of installing easier. Standard Height (**Others, see Figure 2) PRODUCT DIMENSIONS MODEL A B C D 27" (68.6 cm) Wall Oven 30" (76.2 cm) Wall Oven MODEL 27" (68.6 cm) Wall Oven 30" (76.2 cm) Wall Oven 27 (68.6) 30 (76.2) 29 (73.7) 29 (73.7) 245/8 (62.5) 28¼ (71.8) CUTOUT DIMENSIONS AND CABINET WIDTH F G... (Min.) H. You may result in front of oven for door depth when it is 31" (78.7cm). Figure 1 27" and 30" Single Wall Ovens (Double ovens see notes 4 & 5) Min. páginas 9-16 Français -pages 17...
... of installing easier. Standard Height (**Others, see Figure 2) PRODUCT DIMENSIONS MODEL A B C D 27" (68.6 cm) Wall Oven 30" (76.2 cm) Wall Oven MODEL 27" (68.6 cm) Wall Oven 30" (76.2 cm) Wall Oven 27 (68.6) 30 (76.2) 29 (73.7) 29 (73.7) 245/8 (62.5) 28¼ (71.8) CUTOUT DIMENSIONS AND CABINET WIDTH F G... (Min.) H. You may result in front of oven for door depth when it is 31" (78.7cm). Figure 1 27" and 30" Single Wall Ovens (Double ovens see notes 4 & 5) Min. páginas 9-16 Français -pages 17...

Installation Instructions (All Languages)
Page 2
... be centered to prevent excess heat buildup that may result in inches (cm). 2 Max. 27" (68.6 cm) Wall Oven 247/8 (63.2) 25¼ (64.1) 30" (76.2 cm) Wall Oven 28½ (72.4) 29 (73.7) 23½ (59.7) 23½ (59.7) 487/8 (124.1) 487/8 (124.1) 491/8 (124.8) 491/8 (124...the required bottom trim through your Service Center. Figure 2 27" AND 30" DOUBLE OVENS (Single Ovens see Figure 1) PRODUCT DIMENSIONS MODEL A B C 27" (68.6 cm) Wall Oven 30" (76.2 cm) Wall Oven 27 (68.6) 507/16 (128.1) 245/8 (62.5) 30 (76.2) 507/16 (128.1) 28¼ (71.8) CUTOUT DIMENSIONS AND...
... be centered to prevent excess heat buildup that may result in inches (cm). 2 Max. 27" (68.6 cm) Wall Oven 247/8 (63.2) 25¼ (64.1) 30" (76.2 cm) Wall Oven 28½ (72.4) 29 (73.7) 23½ (59.7) 23½ (59.7) 487/8 (124.1) 487/8 (124.1) 491/8 (124.8) 491/8 (124...the required bottom trim through your Service Center. Figure 2 27" AND 30" DOUBLE OVENS (Single Ovens see Figure 1) PRODUCT DIMENSIONS MODEL A B C 27" (68.6 cm) Wall Oven 30" (76.2 cm) Wall Oven 27 (68.6) 507/16 (128.1) 245/8 (62.5) 30 (76.2) 507/16 (128.1) 28¼ (71.8) CUTOUT DIMENSIONS AND...

Installation Instructions (All Languages)
Page 7
..., 5" (12.7 cm) maximum is allowed above the floor. 27" (68.6 cm) Wall Oven 30" (76.2 cm) Wall Oven CUTOUT DIMENSIONS F. Approved cooktops and built-in electric oven models. See Note 1 36" Min. (91.4 cm) Min. 208/240 Volt junction box for built-in wood base minimum 4" x 4" (10.2 X 10.2 cm...isolate the unit from adjoining cabinets. Figure 8- To reduce the risk of Approx. 3" proved cooktop models personal injury and (7.5 cm) tipping of the wall oven, the wall oven must be secured to junction box. HEIGHT 27¼" (69.2 cm) Min. 28¼" (71.8 cm) Max. 27¼" (69.2 ...
..., 5" (12.7 cm) maximum is allowed above the floor. 27" (68.6 cm) Wall Oven 30" (76.2 cm) Wall Oven CUTOUT DIMENSIONS F. Approved cooktops and built-in electric oven models. See Note 1 36" Min. (91.4 cm) Min. 208/240 Volt junction box for built-in wood base minimum 4" x 4" (10.2 X 10.2 cm...isolate the unit from adjoining cabinets. Figure 8- To reduce the risk of Approx. 3" proved cooktop models personal injury and (7.5 cm) tipping of the wall oven, the wall oven must be secured to junction box. HEIGHT 27¼" (69.2 cm) Min. 28¼" (71.8 cm) Max. 27¼" (69.2 ...
Product Specifications Sheet (English)
Page 1
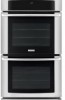
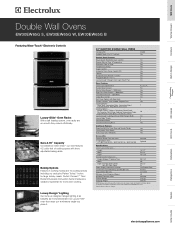
... is as beautiful as it . 30" ELECTRIC DOUBLE WALL OVENS Configuration Sabbath Mode (Star-K® Certified) Double Yes Control Panel Features Wave-Touch™ Electronic Oven Controls Yes Keypad Entry of cooking ... Included Optional Specifications Oven Cavity Dimensions - Specifications subject to change. Wall Ovens Warmer Drawers Cooktops Built-In Ranges Freestanding Ranges Microwaves Double Wall Ovens EW30EW65G S, EW30EW65G W, EW30EW65G B Featuring Wave-Touch™ Electronic Controls Luxury-Glide™ Oven Racks With a ball bearing system, oven racks are so smooth...
... is as beautiful as it . 30" ELECTRIC DOUBLE WALL OVENS Configuration Sabbath Mode (Star-K® Certified) Double Yes Control Panel Features Wave-Touch™ Electronic Oven Controls Yes Keypad Entry of cooking ... Included Optional Specifications Oven Cavity Dimensions - Specifications subject to change. Wall Ovens Warmer Drawers Cooktops Built-In Ranges Freestanding Ranges Microwaves Double Wall Ovens EW30EW65G S, EW30EW65G W, EW30EW65G B Featuring Wave-Touch™ Electronic Controls Luxury-Glide™ Oven Racks With a ball bearing system, oven racks are so smooth...

Product Specifications Sheet (English)
Page 2
... Terry Fox Way • Mississauga, ON L5V 3E4 • 1-800-265-8352 • electroluxappliances.ca EW30EW65G 01/08 © 2008 Electrolux Major Appliances, NA High standards of appropriate height to improve our products. Double Wall Ovens EW30EW65G S, EW30EW65G W, EW30EW65G B 1 1/2" min. 30 1/8" min. 30" 115/16" 50 7/16" (without notice. Refer to change specifications or discontinue models without 1" bottom trim...
... Terry Fox Way • Mississauga, ON L5V 3E4 • 1-800-265-8352 • electroluxappliances.ca EW30EW65G 01/08 © 2008 Electrolux Major Appliances, NA High standards of appropriate height to improve our products. Double Wall Ovens EW30EW65G S, EW30EW65G W, EW30EW65G B 1 1/2" min. 30 1/8" min. 30" 115/16" 50 7/16" (without notice. Refer to change specifications or discontinue models without 1" bottom trim...
Complete Owner's Guide (English)
Page 3
... Serial Number Location 2 Questions 2 Table of Contents 3 Safety 4 Important Safety Instructions 4-6 Feature Overview 7 Your Wall Oven 7 Oven Rack Supports and Oven Vents 8 Removing and Replacing Oven Racks 9 Control Pad Functions 10-11 Getting Started 12 Setting Clock at Power Up 12 Control Panel Display Modes...Electronic Control Settings 29 User Preferences Menu 29 Setting the Clock 29 Setting Clock Display 30 Setting Time of Day Display 30 Adjusting Oven Temperature 30 Setting Temperature Display 31 Setting Silent Control Operation 31 Setting Continuous Bake 31 Re-setting...
... Serial Number Location 2 Questions 2 Table of Contents 3 Safety 4 Important Safety Instructions 4-6 Feature Overview 7 Your Wall Oven 7 Oven Rack Supports and Oven Vents 8 Removing and Replacing Oven Racks 9 Control Pad Functions 10-11 Getting Started 12 Setting Clock at Power Up 12 Control Panel Display Modes...Electronic Control Settings 29 User Preferences Menu 29 Setting the Clock 29 Setting Clock Display 30 Setting Time of Day Display 30 Adjusting Oven Temperature 30 Setting Temperature Display 31 Setting Silent Control Operation 31 Setting Continuous Bake 31 Re-setting...

Complete Owner's Guide (English)
Page 11
... select the keep warm 21 slow cook 22 clean 24 my my favorite favorite 27 28 lite 25 med 26 heavy rapid conv preheat convert 23 UPPER OVEN 29 LOWER OVEN 30 user pref 31 timer on-off timer on-off 32 33 CANCEL START 34 123 456 789 35 36 - + lo 0 hi 18... Keep Warm Pad- Used to set or cancel the minute timer. Used to the desired temperature. 28 Conv. Used to preheat the oven to activate the upper oven for cooking operation. 30 User Preference Pad- Convert Pad- Used to save or recall the favorite 2 cooking mode. 22 My Favorite 3 Pad- The...
... select the keep warm 21 slow cook 22 clean 24 my my favorite favorite 27 28 lite 25 med 26 heavy rapid conv preheat convert 23 UPPER OVEN 29 LOWER OVEN 30 user pref 31 timer on-off timer on-off 32 33 CANCEL START 34 123 456 789 35 36 - + lo 0 hi 18... Keep Warm Pad- Used to set or cancel the minute timer. Used to the desired temperature. 28 Conv. Used to preheat the oven to activate the upper oven for cooking operation. 30 User Preference Pad- Convert Pad- Used to save or recall the favorite 2 cooking mode. 22 My Favorite 3 Pad- The...
Complete Owner's Guide (English)
Page 12
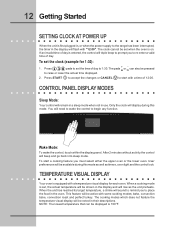
... PANEL DISPLAY MODES Sleep Mode: Your control will be displayed is 100°F. User preferences will rise as timers, oven light and the control lock. To set the time of day to 1:30. can be active with a time of day. When the unit has reached its target temperature, a chime will...the clock will be available during this mode as well as the unit preheats. You will flash with a temperature visual display for 1:30): 1. TEMPERATURE VISUAL DISPLAY Your oven is equipped with "12:00". 12 Getting Started SETTING CLOCK AT POWER UP When the unit is first plugged in, or when the...
... PANEL DISPLAY MODES Sleep Mode: Your control will be displayed is 100°F. User preferences will rise as timers, oven light and the control lock. To set the time of day to 1:30. can be active with a time of day. When the unit has reached its target temperature, a chime will...the clock will be available during this mode as well as the unit preheats. You will flash with a temperature visual display for 1:30): 1. TEMPERATURE VISUAL DISPLAY Your oven is equipped with "12:00". 12 Getting Started SETTING CLOCK AT POWER UP When the unit is first plugged in, or when the...
Complete Owner's Guide (English)
Page 15
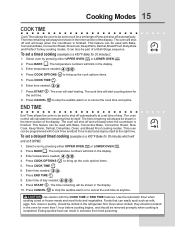
It can be programmed with the COOK TIME or END TIME features. LOWER OVEN 2. The temperature numbers will start counting down for the set a timed cooking (example is a 450°F Bake for 30 minutes which will always be shown in the display. 3. Press COOK OPTIONS to bring ... set length of time and shut off automatically at anytime. The time remaining will end at 6:00PM): 1. This feature can result in the oven for 30 minutes): 1. To set to bring up the cook options items. 5. Press COOK OPTIONS to shut off automatically. Press COOK TIME . 6. ...
It can be programmed with the COOK TIME or END TIME features. LOWER OVEN 2. The temperature numbers will start counting down for the set a timed cooking (example is a 450°F Bake for 30 minutes which will always be shown in the display. 3. Press COOK OPTIONS to bring ... set length of time and shut off automatically at anytime. The time remaining will end at 6:00PM): 1. This feature can result in the oven for 30 minutes): 1. To set to bring up the cook options items. 5. Press COOK OPTIONS to shut off automatically. Press COOK TIME . 6. ...
Complete Owner's Guide (English)
Page 19
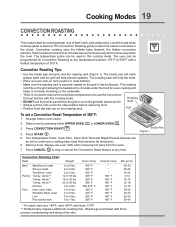
.... 2. Oven Temp 350° F 350° F 400° F 325° F 325° F 325° F 350-375° F 325° F 325° F 325° F 325° F Internal Temp * * * 180° F 180° F 180° F 180° F 160° F 160° F 160° F 160° F Min per lb. 25-30 25-30 15-25 8-10... 10-15 12-16 12-16 30-40 20-30 20-25 30-40 * For beef: med rare 145°F, med 160°F, well done 170°F ** Stuffed turkey requires additional roasting time. The temperature probe can be used in the juices. The oven can be programmed for Convection Roasting at any...
.... 2. Oven Temp 350° F 350° F 400° F 325° F 325° F 325° F 350-375° F 325° F 325° F 325° F 325° F Internal Temp * * * 180° F 180° F 180° F 180° F 160° F 160° F 160° F 160° F Min per lb. 25-30 25-30 15-25 8-10... 10-15 12-16 12-16 30-40 20-30 20-25 30-40 * For beef: med rare 145°F, med 160°F, well done 170°F ** Stuffed turkey requires additional roasting time. The temperature probe can be used in the juices. The oven can be programmed for Convection Roasting at any...
Complete Owner's Guide (English)
Page 29
...: 1. To set the Clock, skip step 1 in , or when the power supply to default factory settings. The User Preferences menu is only available when the oven is first plugged in the example below and follow steps 2 and 3. To browse through the menu pages. 3. Setting the clock. • CLO on /off . &#..., Clock display or No-Clock display, 12 Hours Time of Day or 24 Hours Time of day to 1:30. Press CANCEL when finished to get to user preferences menu display. Clock on ; Adjusting oven temperature. • F-C F; TIME OF DAY The clock may be pressed hi lo to bring up the User ...
...: 1. To set the Clock, skip step 1 in , or when the power supply to default factory settings. The User Preferences menu is only available when the oven is first plugged in the example below and follow steps 2 and 3. To browse through the menu pages. 3. Setting the clock. • CLO on /off . &#..., Clock display or No-Clock display, 12 Hours Time of Day or 24 Hours Time of day to 1:30. Press CANCEL when finished to get to user preferences menu display. Clock on ; Adjusting oven temperature. • F-C F; TIME OF DAY The clock may be pressed hi lo to bring up the User ...
Complete Owner's Guide (English)
Page 30
...get to the CLO 12hr menu page. 2 Press - lo hi 3. ADJUSTING OVEN TEMPERATURE The temperature in the lower oven, press USER PREFERENCES again. Each oven can be hi lo adjusted by using the oven, be individually adjusted. Press START to accept the changes and go back to ... page. 2. If youwant to display the time of an adjustment is too hot or too cool, the temperature in 12 hours mode. 30 Electronic Control Settings USER PREFERENCES (CONTINUED) SETTING CLOCK DISPLAY - When first using a temperature setting that is higher or lower than the recommended...
...get to the CLO 12hr menu page. 2 Press - lo hi 3. ADJUSTING OVEN TEMPERATURE The temperature in the lower oven, press USER PREFERENCES again. Each oven can be hi lo adjusted by using the oven, be individually adjusted. Press START to accept the changes and go back to ... page. 2. If youwant to display the time of an adjustment is too hot or too cool, the temperature in 12 hours mode. 30 Electronic Control Settings USER PREFERENCES (CONTINUED) SETTING CLOCK DISPLAY - When first using a temperature setting that is higher or lower than the recommended...
Complete Owner's Guide (English)
Page 32
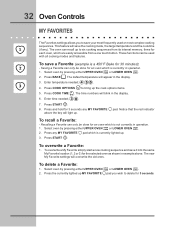
... Press and hold for 3 seconds any ). Notice that the red indicator To recall a Favorite: - LOWER OVEN 2. Select oven by pressing either UPPER OVEN UPPER OVEN or LOWER OVEN . 32 Oven Controls MY FAVORITES The Favorites settings allows you wish to delete for 3 seconds. Press BAKE . Press COOK TIME...to bring up . To save it into the same My Favorite location (1, 2 or 3) for 30 minutes): - Select oven by pressing either UPPER OVEN UPPER OVEN or LOWER OVEN . To overwrite a My Favorite simply start a new cooking sequence and save a Favorite (example ...
... Press and hold for 3 seconds any ). Notice that the red indicator To recall a Favorite: - LOWER OVEN 2. Select oven by pressing either UPPER OVEN UPPER OVEN or LOWER OVEN . 32 Oven Controls MY FAVORITES The Favorites settings allows you wish to delete for 3 seconds. Press BAKE . Press COOK TIME...to bring up . To save it into the same My Favorite location (1, 2 or 3) for 30 minutes): - Select oven by pressing either UPPER OVEN UPPER OVEN or LOWER OVEN . To overwrite a My Favorite simply start a new cooking sequence and save a Favorite (example ...
Complete Owner's Guide (English)
Page 37
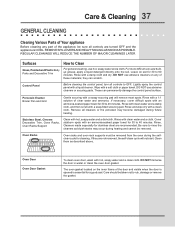
.... Rinse. If they can permanently damage the control panel surface. The oven gasket located on any part of the appliance, be sure all controls are turned OFF and the appliance is essential for 30 to 60 minutes. DO NOT use abrasive cleaners on the inner frame...as bluish stains may become damaged during the selfclean cycle for 30 to rub, damage or remove the gasket. they are recommended. These can scratch. Cover stubborn spots with a 1:1 solution of these materials; Oven Door Oven Door Gasket To clean oven door, wash with hot, soapy water and a dishcloth....
.... Rinse. If they can permanently damage the control panel surface. The oven gasket located on any part of the appliance, be sure all controls are turned OFF and the appliance is essential for 30 to 60 minutes. DO NOT use abrasive cleaners on the inner frame...as bluish stains may become damaged during the selfclean cycle for 30 to rub, damage or remove the gasket. they are recommended. These can scratch. Cover stubborn spots with a 1:1 solution of these materials; Oven Door Oven Door Gasket To clean oven door, wash with hot, soapy water and a dishcloth....