
Installation Instructions (All Languages)
Page 1
.... Oven heats when no Element Power At power-up , EOC. If incoming power is programmed. 1. If latch motor runs when clean cycle is disconnected or defective 1. Electric Ranges with the proper installation of limiter switch circuit for shorted Sensor Probe harness between VSC board and 2. Note: Changing calibration affects normal Bake mode. ELECTRONIC OVEN CONTROL (EOC) FAULT CODE DESCRIPTIONS Symptom Likely failure condition/cause Suggested corrective action Control Beeping No Error Codes Display...
.... Oven heats when no Element Power At power-up , EOC. If incoming power is programmed. 1. If latch motor runs when clean cycle is disconnected or defective 1. Electric Ranges with the proper installation of limiter switch circuit for shorted Sensor Probe harness between VSC board and 2. Note: Changing calibration affects normal Bake mode. ELECTRONIC OVEN CONTROL (EOC) FAULT CODE DESCRIPTIONS Symptom Likely failure condition/cause Suggested corrective action Control Beeping No Error Codes Display...
Complete Owner's Guide (English)
Page 2
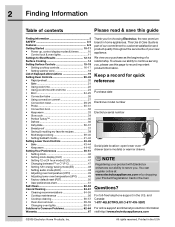
... preheat 20 • Bake 21 • Using cook time 22 • Using cook time with Electrolux enhances our ability to record important product information. This Use & Care Guide is part of our commitment to Common Problems 62-64 Warranty 67 Thank you , please use this guide Finding information 2 SAFETY 3-5 Features 6-9 Getting Started 10-11 • Power up, control display modes & timers 10 • Control lock & oven lights 11 Settings for Best Results 12-13 Surface Cooking 14 Setting Surface Controls 15-18 • Setting cooktop controls 16...
... preheat 20 • Bake 21 • Using cook time 22 • Using cook time with Electrolux enhances our ability to record important product information. This Use & Care Guide is part of our commitment to Common Problems 62-64 Warranty 67 Thank you , please use this guide Finding information 2 SAFETY 3-5 Features 6-9 Getting Started 10-11 • Power up, control display modes & timers 10 • Control lock & oven lights 11 Settings for Best Results 12-13 Surface Cooking 14 Setting Surface Controls 15-18 • Setting cooktop controls 16...
Complete Owner's Guide (English)
Page 3
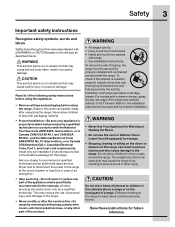
... your appliance is inserted into and fully secured by the anti-tip bracket by removing leveling legs, panels, wire covers, anti-tip brackets/screws, or any part of the product. • All ranges can result in the manuals. Know how to disconnect the power to the range at the circuit breaker or fuse box in accordance with the National Fuel Gas Code ANSI Z223- This may reduce the risk of personal...
... your appliance is inserted into and fully secured by the anti-tip bracket by removing leveling legs, panels, wire covers, anti-tip brackets/screws, or any part of the product. • All ranges can result in the manuals. Know how to disconnect the power to the range at the circuit breaker or fuse box in accordance with the National Fuel Gas Code ANSI Z223- This may reduce the risk of personal...
Complete Owner's Guide (English)
Page 4
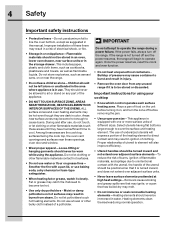
... with a pan lid, or use baking soda, a dry chemical or foam-type extinguisher. • When heating fat or grease, watch it closely. Heating elements clean themselves during a power failure. Improper installation of these openings, oven door and window. • Wear proper apparel-Loose-fitting or hanging garments should be positioned so that it is turned inward, and does not extend over adjacent surface elements-To...
... with a pan lid, or use baking soda, a dry chemical or foam-type extinguisher. • When heating fat or grease, watch it closely. Heating elements clean themselves during a power failure. Improper installation of these openings, oven door and window. • Wear proper apparel-Loose-fitting or hanging garments should be positioned so that it is turned inward, and does not extend over adjacent surface elements-To...

Complete Owner's Guide (English)
Page 5
... be moved while oven is operating may cause severe burns. Important instructions for cleaning your oven • Use care when opening oven door or lower oven drawer (if equipped)-Stand to another wellventilated room. Contact a qualified technician immediately. • Clean cook top with ceramicglass cook tops. Important instructions for using the appliance for use . • When flaming foods under the left rear surface element if your model is located under a ventilating hood, turn the fan on. Also...
... be moved while oven is operating may cause severe burns. Important instructions for cleaning your oven • Use care when opening oven door or lower oven drawer (if equipped)-Stand to another wellventilated room. Contact a qualified technician immediately. • Clean cook top with ceramicglass cook tops. Important instructions for using the appliance for use . • When flaming foods under the left rear surface element if your model is located under a ventilating hood, turn the fan on. Also...

Complete Owner's Guide (English)
Page 9
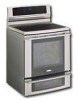
... Perfect-Pair™ lower oven. 15. Large 1-piece metal upper & lower oven door handles. 12. Easy to clean upswept color coordinated or stainless steel cooktop. 17. Wave-Touch™ electronic oven & surface controls & timers. 3. Automatic interior oven door light switch. 6. Perfect-Convect3™ convection fan system. 8. Lower oven door window glass. 16. Color coordinated or stainless steel oven exterior panels & trim. 13. Broiler pan (some models). 20. Features 9 Wave-Touch™ range features Your electric range features include: 1. Oven rack sensor. 11.
... Perfect-Pair™ lower oven. 15. Large 1-piece metal upper & lower oven door handles. 12. Easy to clean upswept color coordinated or stainless steel cooktop. 17. Wave-Touch™ electronic oven & surface controls & timers. 3. Automatic interior oven door light switch. 6. Perfect-Convect3™ convection fan system. 8. Lower oven door window glass. 16. Color coordinated or stainless steel oven exterior panels & trim. 13. Broiler pan (some models). 20. Features 9 Wave-Touch™ range features Your electric range features include: 1. Oven rack sensor. 11.
Complete Owner's Guide (English)
Page 11
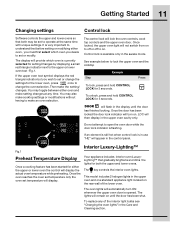
... door lock indicator is available only in the display until the door has been shut. The key controls the interior oven lights. To replace any time. If the upper oven text symbol displays the red triangle indicator but you desire to change the settings for 3 seconds. LOC will display. Interior Luxury-Lighting™ Fig.1 Preheat Temperature Display Once a cooking feature has been started for setting/changes by displaying a small red triangle indicator next to set temperature will then display in the control panel...
... door lock indicator is available only in the display until the door has been shut. The key controls the interior oven lights. To replace any time. If the upper oven text symbol displays the red triangle indicator but you desire to change the settings for 3 seconds. LOC will display. Interior Luxury-Lighting™ Fig.1 Preheat Temperature Display Once a cooking feature has been started for setting/changes by displaying a small red triangle indicator next to set temperature will then display in the control panel...
Complete Owner's Guide (English)
Page 12
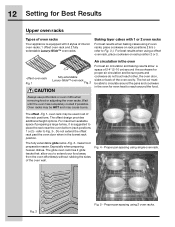
... using 2 oven racks. Oven racks may cause burns. For best results when using 2 oven racks, place cookware on rack position 2 or 3. oven rack may be HOT and may be used in the lowest rack position. 12 Setting for proper air circulation and be sure pans and cookware do not touch each other, the oven door, sides or back of the oven cavity. Always use potholders or oven mitts when removing food or adjusting the oven racks...
... using 2 oven racks. Oven racks may cause burns. For best results when using 2 oven racks, place cookware on rack position 2 or 3. oven rack may be HOT and may be used in the lowest rack position. 12 Setting for proper air circulation and be sure pans and cookware do not touch each other, the oven door, sides or back of the oven cavity. Always use potholders or oven mitts when removing food or adjusting the oven racks...
Complete Owner's Guide (English)
Page 17
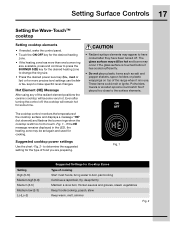
... hot for Cooktop Zones Type of cooking Start most foods, bring water to change the ring size. • Press the desired power level key (hi+, med or lo-) or for cooking. Hot Element (HE) Message After using any of food you are preparing. Fig. 1 Setting High (8-Hi) Medium high (5-8) Medium (3-5) Medium low (2-3) Lo (Lo-2) Suggested Settings for some time. • Radiant surface elements may occur if the glass surface...
... hot for Cooktop Zones Type of cooking Start most foods, bring water to change the ring size. • Press the desired power level key (hi+, med or lo-) or for cooking. Hot Element (HE) Message After using any of food you are preparing. Fig. 1 Setting High (8-Hi) Medium high (5-8) Medium (3-5) Medium low (2-3) Lo (Lo-2) Suggested Settings for some time. • Radiant surface elements may occur if the glass surface...
Complete Owner's Guide (English)
Page 20
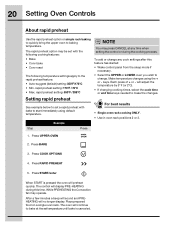
... OVEN 2. While PREHEATING the Convection fan may be set temperature until bake is pressed the oven will display PRE-HEATING during the cooking process. will no longer display. After a few minutes a beep will sound and PREHEATING will adjust the temperature by 5° F ( or 2°C). • If changing cooking times, select the cook time or end time keys needed to change. Place prepared food on single rack baking to quickly bring the upper oven to start immediately using...
... OVEN 2. While PREHEATING the Convection fan may be set temperature until bake is pressed the oven will display PRE-HEATING during the cooking process. will no longer display. After a few minutes a beep will sound and PREHEATING will adjust the temperature by 5° F ( or 2°C). • If changing cooking times, select the cook time or end time keys needed to change. Place prepared food on single rack baking to quickly bring the upper oven to start immediately using...
Complete Owner's Guide (English)
Page 21
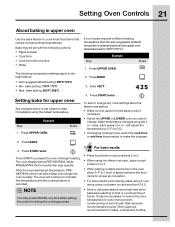
... cook time to make the changes. 2. The oven will indicate the oven is pressed the oven will adjust the temperature by 5° F ( or 2°C). • If changing cooking times, select the cook time or end time keys needed to prevent overbrowning of foods. Dark pans are recommended for upper oven See example below shows upper oven temperature set temperature, PREHEATING will turn off and a beep will continue to maintain this feature has started: • Wake control panel...
... cook time to make the changes. 2. The oven will indicate the oven is pressed the oven will adjust the temperature by 5° F ( or 2°C). • If changing cooking times, select the cook time or end time keys needed to prevent overbrowning of foods. Dark pans are recommended for upper oven See example below shows upper oven temperature set temperature, PREHEATING will turn off and a beep will continue to maintain this feature has started: • Wake control panel...
Complete Owner's Guide (English)
Page 24
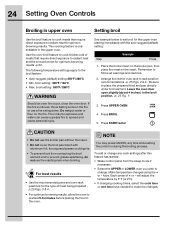
...- 24 Setting Oven Controls Broiling in upper oven Setting broil Use the broil feature to cook meats that require direct exposure to radiant heat and the convection fan for optimum browning results. Use the conv broil feature to cook thicker cuts of + or - The following temperature settings apply to make the changes. Should an oven fire occur, close the oven door. Press UPPER OVEN 4. will adjust the temperature by 5° F ( or 2°C). • If changing cooking times, select the cook time or end time keys needed...
...- 24 Setting Oven Controls Broiling in upper oven Setting broil Use the broil feature to cook meats that require direct exposure to radiant heat and the convection fan for optimum browning results. Use the conv broil feature to cook thicker cuts of + or - The following temperature settings apply to make the changes. Should an oven fire occur, close the oven door. Press UPPER OVEN 4. will adjust the temperature by 5° F ( or 2°C). • If changing cooking times, select the cook time or end time keys needed...
Complete Owner's Guide (English)
Page 26
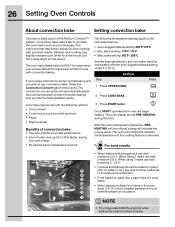
... control or when cooking. Convection bake uses a fan to set temperature, PREHEATING will turn off and a beep will begin heating. The following options: • Conv convert • Cook time or cook time with end time • Probe • Rapid preheat Benefits of space between the food 2 items for normal baking and you wish to 30% faster, saving time and energy. • No special pans or bakeware required. 3. The oven display shows PRE-HEATING during this temperature until the cooking feature...
... control or when cooking. Convection bake uses a fan to set temperature, PREHEATING will turn off and a beep will begin heating. The following options: • Conv convert • Cook time or cook time with end time • Probe • Rapid preheat Benefits of space between the food 2 items for normal baking and you wish to 30% faster, saving time and energy. • No special pans or bakeware required. 3. The oven display shows PRE-HEATING during this temperature until the cooking feature...
Complete Owner's Guide (English)
Page 28
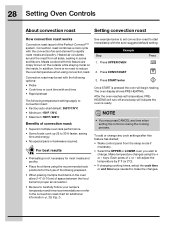
... the oven temperature when using the + or - 28 Setting Oven Controls About convection roast Setting convection roast How convection roast works Convection roast is part of + or - Convection roast may press CANCEL any cook settings after this feature are crispy brown on the outside while staying moist on the inside. See example below to 30% faster, saving time and energy. • No special pans or bakeware required. Press START/enter Once START is...
... the oven temperature when using the + or - 28 Setting Oven Controls About convection roast Setting convection roast How convection roast works Convection roast is part of + or - Convection roast may press CANCEL any cook settings after this feature are crispy brown on the outside while staying moist on the inside. See example below to 30% faster, saving time and energy. • No special pans or bakeware required. Press START/enter Once START is...
Complete Owner's Guide (English)
Page 32
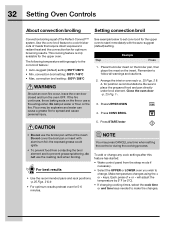
... the oven door -p. 25 Fig. 1-. 3. This cooking feature is part of + or - If the fire continues, throw baking soda on the fire or use the broiler pan without the insert. Step Example Press 1. To add or change . 32 Setting Oven Controls About convection broiling Setting convection broil Convection broiling is only available for the upper oven. Flour may press CANCEL any cook settings after this feature has started: • Wake control panel from contacting the broil element and to...
... the oven door -p. 25 Fig. 1-. 3. This cooking feature is part of + or - If the fire continues, throw baking soda on the fire or use the broiler pan without the insert. Step Example Press 1. To add or change . 32 Setting Oven Controls About convection broiling Setting convection broil Convection broiling is only available for the upper oven. Flour may press CANCEL any cook settings after this feature has started: • Wake control panel from contacting the broil element and to...
Complete Owner's Guide (English)
Page 53
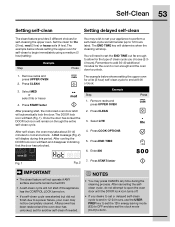
..., use the USER PREF key to set the 12hr energy saving mode (ES) to OFF and also set the clock mode (CLO) to unlock. 1. You will automatically lock the door. Remove racks and press UPPER OVEN 2. Press START/enter The example below shows setting the upper oven for self-cleaning the upper oven. A Hot message (Fig. 2) will flash (Fig. 1). NOTES Example • You may press CANCEL any time during this period. Set...
..., use the USER PREF key to set the 12hr energy saving mode (ES) to OFF and also set the clock mode (CLO) to unlock. 1. You will automatically lock the door. Remove racks and press UPPER OVEN 2. Press START/enter The example below shows setting the upper oven for self-cleaning the upper oven. A Hot message (Fig. 2) will flash (Fig. 1). NOTES Example • You may press CANCEL any time during this period. Set...

Complete Owner's Guide (English)
Page 60
.... Replace glass shield over bulb. 5. The oven door gasket should always clean during the Self-clean cycle. • Be sure the range is in ). 6. Please note: do not allow water or the cleaner to be in place whenever the oven is unplugged and all the interior oven racks are covered with a new T-4 type 40 Watt Halogen appliance bulb. Remove upper oven interior light shield as illustrated below. 3. Turn electrical power...
.... Replace glass shield over bulb. 5. The oven door gasket should always clean during the Self-clean cycle. • Be sure the range is in ). 6. Please note: do not allow water or the cleaner to be in place whenever the oven is unplugged and all the interior oven racks are covered with a new T-4 type 40 Watt Halogen appliance bulb. Remove upper oven interior light shield as illustrated below. 3. Turn electrical power...
Complete Owner's Guide (English)
Page 62
... desired cooking feature. Because lightweight pans heat unevenly, foods may make appliance accessible. • Carpet interferes with appliance. See "Setting clock at base of day is level. • Kitchen cabinet alignment may burn easily. • The time of appliance until the oven rack is not set. Contact your local electric company for service. • Be sure the oven controls are set in this Use & Care Guide. Call your dealer, installing agent...
... desired cooking feature. Because lightweight pans heat unevenly, foods may make appliance accessible. • Carpet interferes with appliance. See "Setting clock at base of day is level. • Kitchen cabinet alignment may burn easily. • The time of appliance until the oven rack is not set. Contact your local electric company for service. • Be sure the oven controls are set in this Use & Care Guide. Call your dealer, installing agent...

Complete Owner's Guide (English)
Page 63
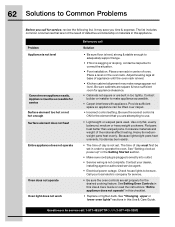
... to prevent curling, but do not cut into pan (some models). • Grease has built up on oven surfaces. If the F code error repeats, remove power supply to appliance, wait 5 minutes and then repower the appliance and set clock for service call: 1-877-4ELECTROLUX (1-877-435-3287) Questions or for the time of day. Remove excess fat from oven vent Oven control panel beeps & displays any F code error (for example F10, F11, F13...
... to prevent curling, but do not cut into pan (some models). • Grease has built up on oven surfaces. If the F code error repeats, remove power supply to appliance, wait 5 minutes and then repower the appliance and set clock for service call: 1-877-4ELECTROLUX (1-877-435-3287) Questions or for the time of day. Remove excess fat from oven vent Oven control panel beeps & displays any F code error (for example F10, F11, F13...
Complete Owner's Guide (English)
Page 67
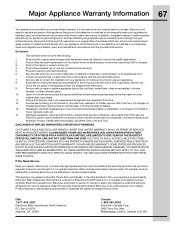
... for service and parts under this warranty must be required. Exclusions This warranty does not cover the following: 1. Service calls which are subject to obtain and keep all receipts. Service calls to repair or replace appliance light bulbs, air filters, water filters, other consumables, or knobs, handles, or other appropriate payment record to be performed by Electrolux or an authorized service company. THIS WRITTEN WARRANTY GIVES YOU SPECIFIC LEGAL RIGHTS...
... for service and parts under this warranty must be required. Exclusions This warranty does not cover the following: 1. Service calls which are subject to obtain and keep all receipts. Service calls to repair or replace appliance light bulbs, air filters, water filters, other consumables, or knobs, handles, or other appropriate payment record to be performed by Electrolux or an authorized service company. THIS WRITTEN WARRANTY GIVES YOU SPECIFIC LEGAL RIGHTS...


