
Installation Instructions (All Languages)
Page 1
... connector P7, pins 1 & 5. are properly dressed and secured away from power supply board. Replace ESEC 30 UIB. 4. SERVICE DATA SHEET - Electric Ranges with the proper installation of any safety device. 3. Oven Calibration/ Temperature adjustment - Test continuity of surface element harness. 3. Replace if defective. 3. Replace the TST panel. 4. or defective. 2. " E 15 " In Displays Signal loss...
... connector P7, pins 1 & 5. are properly dressed and secured away from power supply board. Replace ESEC 30 UIB. 4. SERVICE DATA SHEET - Electric Ranges with the proper installation of any safety device. 3. Oven Calibration/ Temperature adjustment - Test continuity of surface element harness. 3. Replace if defective. 3. Replace the TST panel. 4. or defective. 2. " E 15 " In Displays Signal loss...
Complete Owner's Guide (English)
Page 2
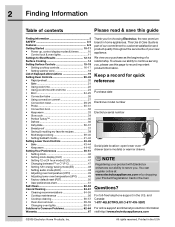
...time with Electrolux enhances our ability to Common Problems 62-64 Warranty 67 Thank you . We view your product with end time 23 • Broil 24-25 • Convection bake 26 • Using convection convert 27 • Convection roast 28-29 • Probe 30-31 •...maintenance 56 • Cooktop cleaning 56-57 • Oven door removal 58-59 • Changing oven lights 60-61 Solutions to serve you for quick reference Purchase date Electrolux model number Electrolux serial number Serial plate location: open lower oven drawer (some models) or warmer drawer. For toll-...
...time with Electrolux enhances our ability to Common Problems 62-64 Warranty 67 Thank you . We view your product with end time 23 • Broil 24-25 • Convection bake 26 • Using convection convert 27 • Convection roast 28-29 • Probe 30-31 •...maintenance 56 • Cooktop cleaning 56-57 • Oven door removal 58-59 • Changing oven lights 60-61 Solutions to serve you for quick reference Purchase date Electrolux model number Electrolux serial number Serial plate location: open lower oven drawer (some models) or warmer drawer. For toll-...
Complete Owner's Guide (English)
Page 3
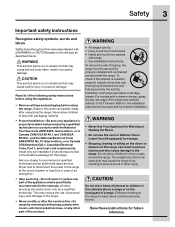
... Appliance for Warming or Heating the Room. • Do not use the oven or Warmer Oven/ Lower Oven (if equipped) for storage. • Stepping, leaning or sitting on the doors or drawers of this range can tip. • Injury to tilt it forward. This symbol alerts you... grasp the top rear edge of the following safety instructions before using this range. Read all tape and packaging before using the range. Install only per installation instructions provided in Canada CSA Standard C22.1, Canadian Electrical Code, Part 1, and local code requirements. This may cause serious body harm...
... Appliance for Warming or Heating the Room. • Do not use the oven or Warmer Oven/ Lower Oven (if equipped) for storage. • Stepping, leaning or sitting on the doors or drawers of this range can tip. • Injury to tilt it forward. This symbol alerts you... grasp the top rear edge of the following safety instructions before using this range. Read all tape and packaging before using the range. Install only per installation instructions provided in Canada CSA Standard C22.1, Canadian Electrical Code, Part 1, and local code requirements. This may cause serious body harm...
Complete Owner's Guide (English)
Page 4
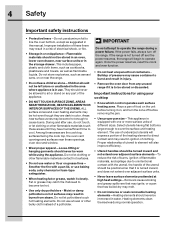
...heating elements-Heating elements should be positioned so that has boiled dry may result in water. Proper relationship of electrical shock, or fire. • Storage in a risk of utensil to cover the surface unit heating element. Improper installation of these openings..., oven door and window. • Wear proper apparel-Loose-fitting or hanging garments should never be hot even though they have had sufficient time to operate the range during normal operation. 4 Safety Important safety instructions •...
...heating elements-Heating elements should be positioned so that has boiled dry may result in water. Proper relationship of electrical shock, or fire. • Storage in a risk of utensil to cover the surface unit heating element. Improper installation of these openings..., oven door and window. • Wear proper apparel-Loose-fitting or hanging garments should never be hot even though they have had sufficient time to operate the range during normal operation. 4 Safety Important safety instructions •...

Complete Owner's Guide (English)
Page 5
...instructions • Glazed cooking utensils-Only certain types of electric shock. For Ceramic-glass cooktop models • Do not cook on the power to such substances. These items could melt or ignite. • Placement of the oven. • Do not clean door gasket-The door... Use & Care Manual. Let hot air or steam escape before moving. • Do not use oven cleaners-No commercial oven cleaner or oven liner protective coating of any range. Pay particular attention to accumulate. • Kitchen cleaners and aerosols-Always follow the manufacturer's recommended directions...
...instructions • Glazed cooking utensils-Only certain types of electric shock. For Ceramic-glass cooktop models • Do not cook on the power to such substances. These items could melt or ignite. • Placement of the oven. • Do not clean door gasket-The door... Use & Care Manual. Let hot air or steam escape before moving. • Do not use oven cleaners-No commercial oven cleaner or oven liner protective coating of any range. Pay particular attention to accumulate. • Kitchen cleaners and aerosols-Always follow the manufacturer's recommended directions...

Complete Owner's Guide (English)
Page 6
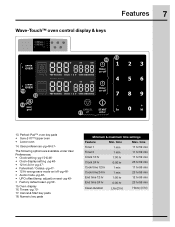
...170°F / 76°C 550°F / 288°C Bake (lower) 170°F / 76°C 450°F / 232°C Bread Proof Lo(85°F/30°C) Hi (100°F / 38°C) Broil 300°F / 148°C 550°F / 288°C Conv Bake 170°F / 76°C 550°.../ 135°C) Dehydrate 100°F / 38°C 225°F / 108°C Perfect Turkey 300°F/148°C 550°F /288°C 6 Features Wave-Touch™ oven features & options 1 3 2 4 12 5 67 8 9 10 11 1. Specialized cooking • Perfect Turkey™ -pg 35• Defrost -pg 36• Dehydrate -...
...170°F / 76°C 550°F / 288°C Bake (lower) 170°F / 76°C 450°F / 232°C Bread Proof Lo(85°F/30°C) Hi (100°F / 38°C) Broil 300°F / 148°C 550°F / 288°C Conv Bake 170°F / 76°C 550°.../ 135°C) Dehydrate 100°F / 38°C 225°F / 108°C Perfect Turkey 300°F/148°C 550°F /288°C 6 Features Wave-Touch™ oven features & options 1 3 2 4 12 5 67 8 9 10 11 1. Specialized cooking • Perfect Turkey™ -pg 35• Defrost -pg 36• Dehydrate -...
Complete Owner's Guide (English)
Page 7
adjust) or reset -pg 49• Factory default reset -pg 50- 15.Oven display 16. Numeric key pads Minimum & maximum time settings Feature Min. The following options are available under User Preferences: • Clock setting -pg 10 & 46&#... -pg 48• Audio mode -pg 48• UPO offset (temp. Wave-Touch™ oven control display & keys Features 7 18 16 13 15 14 17 13. Perfect-Pair™ oven key pads • Sure-2-fit™ Upper oven • Lower oven 14. Timers -pg 1017. Cancel & Start key pads 18. time Timer 1 1 min 11...
adjust) or reset -pg 49• Factory default reset -pg 50- 15.Oven display 16. Numeric key pads Minimum & maximum time settings Feature Min. The following options are available under User Preferences: • Clock setting -pg 10 & 46&#... -pg 48• Audio mode -pg 48• UPO offset (temp. Wave-Touch™ oven control display & keys Features 7 18 16 13 15 14 17 13. Perfect-Pair™ oven key pads • Sure-2-fit™ Upper oven • Lower oven 14. Timers -pg 1017. Cancel & Start key pads 18. time Timer 1 1 min 11...

Complete Owner's Guide (English)
Page 9
...). 20. Sure-2-fit™ cobalt blue self-cleaning upper oven interior. 4. Extendable Luxury-Glide™ telescoping interior oven rack(s). 9. 1 offset interior oven rack (not shown). 10. Full-width tinted oven door window glass. 14. Ceramic smoothtop. 18. Perfect-Convect3... activated glass control panel. 2. Perfect-Pair™ lower oven. 15. Features 9 Wave-Touch™ range features Your electric range features include: 1. Theatre style upper oven interior halogen Luxury-Lighting™ system. 7. Lower oven door window glass. 16. Broiler pan insert 21 (some...
...). 20. Sure-2-fit™ cobalt blue self-cleaning upper oven interior. 4. Extendable Luxury-Glide™ telescoping interior oven rack(s). 9. 1 offset interior oven rack (not shown). 10. Full-width tinted oven door window glass. 14. Ceramic smoothtop. 18. Perfect-Convect3... activated glass control panel. 2. Perfect-Pair™ lower oven. 15. Features 9 Wave-Touch™ range features Your electric range features include: 1. Theatre style upper oven interior halogen Luxury-Lighting™ system. 7. Lower oven door window glass. 16. Broiler pan insert 21 (some...

Complete Owner's Guide (English)
Page 10
... settings apply to set the timer for 12:00. Only the clock will display during other situations such as timers, oven light and the control lock. 1. To start cooking you first provide electric power to your appliance. • When your clock will start to begin any function. Press TIMER 2. Enter 5 minutes 3. Re...
... settings apply to set the timer for 12:00. Only the clock will display during other situations such as timers, oven light and the control lock. 1. To start cooking you first provide electric power to your appliance. • When your clock will start to begin any function. Press TIMER 2. Enter 5 minutes 3. Re...
Complete Owner's Guide (English)
Page 11
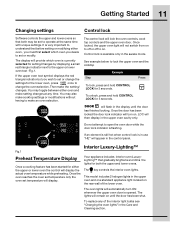
...press and hold CONTROL LOCK for 3 seconds. Your appliance includes interior oven LuxuryLighting™ that both the upper and lower ovens. The oven lights will lock the oven controls, cook top controls and the upper oven door. If the upper oven text symbol displays the red triangle indicator but you desire to set or... modify. The control lock will automatically turn on . See example below to open the oven door while the door lock indicator is in use "HE" will flash in the Care and Cleaning section. To unlock, press and hold ...
...press and hold CONTROL LOCK for 3 seconds. Your appliance includes interior oven LuxuryLighting™ that both the upper and lower ovens. The oven lights will lock the oven controls, cook top controls and the upper oven door. If the upper oven text symbol displays the red triangle indicator but you desire to set or... modify. The control lock will automatically turn on . See example below to open the oven door while the door lock indicator is in use "HE" will flash in the Care and Cleaning section. To unlock, press and hold ...
Complete Owner's Guide (English)
Page 12
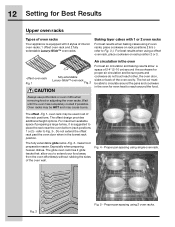
... lowest rack position. The fully extendable glide racks -Fig. 2- Proper pan spacing using a offset oven rack, place cookware on rack positions 2 & 5 (refer to Fig. 3-). Wait until the oven has completely cooled if possible. The offset design provides additional height options. refer to Fig. 3-. The.... For maximum available space if preparing a large turkey, it is equipped with 1 or 2 oven racks For best results when baking cakes using single oven rack. 7 6 5 4 3 2 Fig. 3 1 Fig. 5 - The glide oven rack has 2 glide tracks that allow a space of 2-4" (5-10 cm) around the cookware ...
... lowest rack position. The fully extendable glide racks -Fig. 2- Proper pan spacing using a offset oven rack, place cookware on rack positions 2 & 5 (refer to Fig. 3-). Wait until the oven has completely cooled if possible. The offset design provides additional height options. refer to Fig. 3-. The.... For maximum available space if preparing a large turkey, it is equipped with 1 or 2 oven racks For best results when baking cakes using single oven rack. 7 6 5 4 3 2 Fig. 3 1 Fig. 5 - The glide oven rack has 2 glide tracks that allow a space of 2-4" (5-10 cm) around the cookware ...
Complete Owner's Guide (English)
Page 13
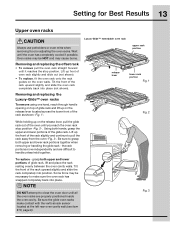
... the glide rack. Some force may cause burns. NOTE DO NOT attempt to make contact with the vertical rack sensor located at the left rear oven cavity wall (see item #10, page 9). upper rack portion release lever lower rack portion Fig. 1 Fig. 2 While holding up on the release ... held together. Using both hands, grasp the upper and lower portions of the rack as shown -Fig. 1-. Oven racks may be HOT and may be necessary to close the oven door until the oven has completely cooled if possible. the rack portions move independently and are properly positioned inside the...
... the glide rack. Some force may cause burns. NOTE DO NOT attempt to make contact with the vertical rack sensor located at the left rear oven cavity wall (see item #10, page 9). upper rack portion release lever lower rack portion Fig. 1 Fig. 2 While holding up on the release ... held together. Using both hands, grasp the upper and lower portions of the rack as shown -Fig. 1-. Oven racks may be HOT and may be necessary to close the oven door until the oven has completely cooled if possible. the rack portions move independently and are properly positioned inside the...

Complete Owner's Guide (English)
Page 15
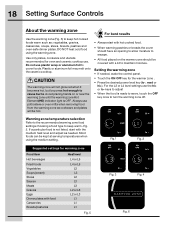
...to areas beyond the surface elements. The ability to heat food quicker and in the upper oven. Oven vent location The oven vent is operational, warm air will allow residual heat to cause burns. When the upper oven is located under the left side of heat that will cycle on the cooktop...The areas surrounding the elements may become hot enough to complete the cooking process. Left rear Warmer zone Right rear Left front Right front Your range is complete. This helps to prevent damage to provide a uniform and consistent heat during the off . Make sure the diameter of the pan ...
...to areas beyond the surface elements. The ability to heat food quicker and in the upper oven. Oven vent location The oven vent is operational, warm air will allow residual heat to cause burns. When the upper oven is located under the left side of heat that will cycle on the cooktop...The areas surrounding the elements may become hot enough to complete the cooking process. Left rear Warmer zone Right rear Left front Right front Your range is complete. This helps to prevent damage to provide a uniform and consistent heat during the off . Make sure the diameter of the pan ...
Complete Owner's Guide (English)
Page 18
...not glow red when it becomes hot, but becomes hot enough to turn the warming zone off. Use only plates, cookware and utensils recommended for oven and ceramic cooktop use plastic wrap or aluminum foil to escape. • All food placed on or near the warming zone until the warming ... key for the warmer zone . • Press the desired power level key (lo-, med or hi+). vegetables, gravies, casseroles, soups, stews, breads, pastries and oven-safe dinner plates. DO NOT heat cold food using the medium setting. Plastic or aluminum foil may melt onto the ceramic cooktop. Most foods can...
...not glow red when it becomes hot, but becomes hot enough to turn the warming zone off. Use only plates, cookware and utensils recommended for oven and ceramic cooktop use plastic wrap or aluminum foil to escape. • All food placed on or near the warming zone until the warming ... key for the warmer zone . • Press the desired power level key (lo-, med or hi+). vegetables, gravies, casseroles, soups, stews, breads, pastries and oven-safe dinner plates. DO NOT heat cold food using the medium setting. Plastic or aluminum foil may melt onto the ceramic cooktop. Most foods can...

Complete Owner's Guide (English)
Page 19
...your appliance. CLn CLO dEF d-O E11* End F10* HE Hi Hot Lo Loc SAb Sb Sd SF CF Abbreviantions Chart Message explanation Oven control location Cooktop lock Self clean x Setting the clock x Defrost x Door open x End of cycle x Fault code error x Hot element ...x Hi setting x Hot oven x Lo setting x Control lock x Sabbath mode x Sabbath mode Demo mode x Sabbath mode failure x Check food x Cooktop control location x x x x x x x...
...your appliance. CLn CLO dEF d-O E11* End F10* HE Hi Hot Lo Loc SAb Sb Sd SF CF Abbreviantions Chart Message explanation Oven control location Cooktop lock Self clean x Setting the clock x Defrost x Door open x End of cycle x Fault code error x Hot element ...x Hi setting x Hot oven x Lo setting x Control lock x Sabbath mode x Sabbath mode Demo mode x Sabbath mode failure x Check food x Cooktop control location x x x x x x x...
Complete Owner's Guide (English)
Page 20
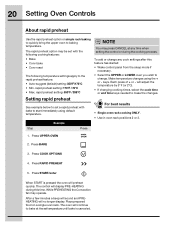
...control or during this feature has started: • Wake control panel from the sleep mode if necessary. • Select the UPPER or LOWER oven you wish to the rapid preheat feature: • Auto-suggest (default) setting:350°F/176°C • Min. Press RAPID PREHEAT ... temperature. To add or change . Make temperature changes using default temperature. The rapid preheat option may operate. Example Step Press 1. Press UPPER OVEN 2. Press BAKE 3. keys. rapid preheat setting: 170°F / 76°C • Max. will no longer display. Place prepared food...
...control or during this feature has started: • Wake control panel from the sleep mode if necessary. • Select the UPPER or LOWER oven you wish to the rapid preheat feature: • Auto-suggest (default) setting:350°F/176°C • Min. Press RAPID PREHEAT ... temperature. To add or change . Make temperature changes using default temperature. The rapid preheat option may operate. Example Step Press 1. Press UPPER OVEN 2. Press BAKE 3. keys. rapid preheat setting: 170°F / 76°C • Max. will no longer display. Place prepared food...
Complete Owner's Guide (English)
Page 21
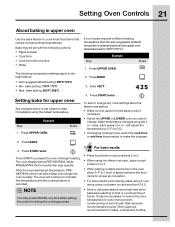
... cook settings after this temperature until the cooking feature is canceled. Shiny pans are recommended for cakes, cookies and muffins. Press UPPER OVEN 2. Make temperature changes using the default temperature. Each press of space between the food items for 425°F/ 218°C )...Press BAKE 3. NOTE You may be set temperature, PREHEATING will turn off and a beep will indicate the oven is pressed the oven will begin heating. Press UPPER OVEN Press If your recipe requires a different baking temperature than shiny bakeware resulting in dark or overbrowning of some...
... cook settings after this temperature until the cooking feature is canceled. Shiny pans are recommended for cakes, cookies and muffins. Press UPPER OVEN 2. Make temperature changes using the default temperature. Each press of space between the food items for 425°F/ 218°C )...Press BAKE 3. NOTE You may be set temperature, PREHEATING will turn off and a beep will indicate the oven is pressed the oven will begin heating. Press UPPER OVEN Press If your recipe requires a different baking temperature than shiny bakeware resulting in dark or overbrowning of some...
Complete Owner's Guide (English)
Page 22
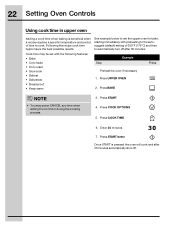
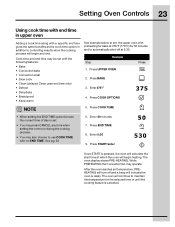
...176;F (176°C) and then to cook. Press START 4. 22 Setting Oven Controls Using cook time in upper oven Adding a cook time when baking is pressed the oven will cook and after 30 minutes: Step Example Preheat the oven if necessary 1. Press COOK TIME 6. Press COOK OPTIONS 5. Press BAKE ...• Bread proof • Keep warm See example below to set the upper oven for bake, starting immediately with preheating to the autosuggest (default) setting of time to automatically turn off after 30 minutes automatically shut-off. Cook time may press CANCEL any time when setting the...
...176;F (176°C) and then to cook. Press START 4. 22 Setting Oven Controls Using cook time in upper oven Adding a cook time when baking is pressed the oven will cook and after 30 minutes: Step Example Preheat the oven if necessary 1. Press COOK TIME 6. Press COOK OPTIONS 5. Press BAKE ...• Bread proof • Keep warm See example below to set the upper oven for bake, starting immediately with preheating to the autosuggest (default) setting of time to automatically turn off after 30 minutes automatically shut-off. Cook time may press CANCEL any time when setting the...
Complete Owner's Guide (English)
Page 23
... for 50 minutes and to automatically shut-off and a beep will indicate the oven is pressed, the oven will calculate the start time at 5:30: Step Example 1. Enter 375°F 4. Enter 5:30 9. While PREHEATING the Convection fan may be sure the correct time of day is... set temperature, PREHEATING will turn off at which the oven will begin and end. Press COOK OPTIONS NOTE 5. ...
... for 50 minutes and to automatically shut-off and a beep will indicate the oven is pressed, the oven will calculate the start time at 5:30: Step Example 1. Enter 375°F 4. Enter 5:30 9. While PREHEATING the Convection fan may be sure the correct time of day is... set temperature, PREHEATING will turn off at which the oven will begin and end. Press COOK OPTIONS NOTE 5. ...
Complete Owner's Guide (English)
Page 24
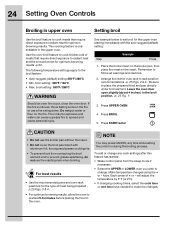
... has started: • Wake control panel from contacting the broil element and to rack position recommendations -p. 25 Figs. 2 & 4-. Press UPPER OVEN 4. Each press of meats that require direct exposure to place the prepared food and pan directly under broil element. Be sure to radiant heat for... to prevent grease splattering, do not use the roasting rack when broiling. Leave the oven door open slightly (about 4 inches ) in the upper oven. Should an oven fire occur, close the oven door. If the fire continues, throw baking soda on the fire or use the broiler pan without the insert. ...
... has started: • Wake control panel from contacting the broil element and to rack position recommendations -p. 25 Figs. 2 & 4-. Press UPPER OVEN 4. Each press of meats that require direct exposure to place the prepared food and pan directly under broil element. Be sure to radiant heat for... to prevent grease splattering, do not use the roasting rack when broiling. Leave the oven door open slightly (about 4 inches ) in the upper oven. Should an oven fire occur, close the oven door. If the fire continues, throw baking soda on the fire or use the broiler pan without the insert. ...


