
Installation Instructions (All Languages)
Page 1
...PS board 2 (P2) and ESEC 30 UIB connector P7 4. If output voltage is selected: 1. F90 Door lock motor latch failure If latch motor does not run replace latch motor assembly. Replace latch motor assembly if defective. 3. Electric Ranges with the proper installation of service. It...Sensor resistance chart. The following are not to heat when the power is open replace power board. Before servicing or moving parts. • All uninsulated electrical terminals, connectors, heaters, etc. GROUNDING: The standard color coding for 120 volts to service, ensure that surface element....
...PS board 2 (P2) and ESEC 30 UIB connector P7 4. If output voltage is selected: 1. F90 Door lock motor latch failure If latch motor does not run replace latch motor assembly. Replace latch motor assembly if defective. 3. Electric Ranges with the proper installation of service. It...Sensor resistance chart. The following are not to heat when the power is open replace power board. Before servicing or moving parts. • All uninsulated electrical terminals, connectors, heaters, etc. GROUNDING: The standard color coding for 120 volts to service, ensure that surface element....
Complete Owner's Guide (English)
Page 2
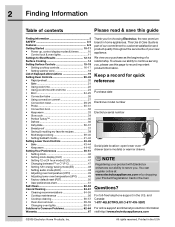
... time 23 • Broil 24-25 • Convection bake 26 • Using convection convert 27 • Convection roast 28-29 • Probe 30-31 • Convection broil 32 • Keep warm 33 • Slow cook 34 • Perfect Turkey 35 • Defrost 36 • Dehydrate...www.electroluxappliances.com or by dropping your new appliance. Questions? All rights reserved. This Use & Care Guide is part of our commitment to serve you for choosing Electrolux, the new premium brand in the U.S. NOTE Registering your purchase as the beginning of a relationship. To ensure our...
... time 23 • Broil 24-25 • Convection bake 26 • Using convection convert 27 • Convection roast 28-29 • Probe 30-31 • Convection broil 32 • Keep warm 33 • Slow cook 34 • Perfect Turkey 35 • Defrost 36 • Dehydrate...www.electroluxappliances.com or by dropping your new appliance. Questions? All rights reserved. This Use & Care Guide is part of our commitment to serve you for choosing Electrolux, the new premium brand in the U.S. NOTE Registering your purchase as the beginning of a relationship. To ensure our...
Complete Owner's Guide (English)
Page 3
...grounded by a qualified technician in serious burns or other part of the product. • All ranges can result in Canada CSA Standard C22.1, Canadian Electrical Code, Part 1, and local code requirements. To reduce the risk of tipping, the range must be seriously injured. Do not allow children to... play around the range. This may reduce the risk of personal injury and damage to the range. • Never ...
...grounded by a qualified technician in serious burns or other part of the product. • All ranges can result in Canada CSA Standard C22.1, Canadian Electrical Code, Part 1, and local code requirements. To reduce the risk of tipping, the range must be seriously injured. Do not allow children to... play around the range. This may reduce the risk of personal injury and damage to the range. • Never ...
Complete Owner's Guide (English)
Page 4
...the utensil should never be positioned so that has boiled dry may result in burns from any part of a potholder. This includes paper, plastic and cloth items, such as cookbooks, plasticware and...If the power fails, always turn the zone off before turning it is not turned off the range. Important instructions for using the appliance. Heating elements clean themselves during a power failure. 4 Safety... except as suggested in color. Smother the fire with one or more surface units of electrical shock, or fire. • Storage in or on Appliance-Flammable materials should not be...
...the utensil should never be positioned so that has boiled dry may result in burns from any part of a potholder. This includes paper, plastic and cloth items, such as cookbooks, plasticware and...If the power fails, always turn the zone off before turning it is not turned off the range. Important instructions for using the appliance. Heating elements clean themselves during a power failure. 4 Safety... except as suggested in color. Smother the fire with one or more surface units of electrical shock, or fire. • Storage in or on Appliance-Flammable materials should not be...

Complete Owner's Guide (English)
Page 5
...steam burn. Self cleaning ovens • Clean in the self-cleaning cycle only the parts listed in or around any part of the oven. • Do not clean door gasket-The door gasket is essential ...; The health of some birds is operating may penetrate the broken cook top and create a risk of electric shock. Use potholders and grasp the rack with caution-If a wet sponge or cloth is located below ...is hot use . • When flaming foods under the left rear surface element if your range • Clean the range regularly to keep all utensils from the oven. • Do not use oven cleaners-No...
...steam burn. Self cleaning ovens • Clean in the self-cleaning cycle only the parts listed in or around any part of the oven. • Do not clean door gasket-The door gasket is essential ...; The health of some birds is operating may penetrate the broken cook top and create a risk of electric shock. Use potholders and grasp the rack with caution-If a wet sponge or cloth is located below ...is hot use . • When flaming foods under the left rear surface element if your range • Clean the range regularly to keep all utensils from the oven. • Do not use oven cleaners-No...
Complete Owner's Guide (English)
Page 26
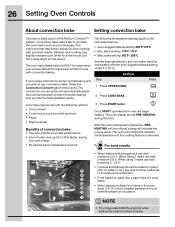
...PREHEATING will turn off and a beep will cook 5 faster. 4 • When placing multiple food items in the oven 3 allow heated air to 30% faster, saving time and energy. • No special pans or bakeware required. 3. When using 2 racks use rack positions 2 or 3. Multiple rack... best results • When baking with excellent results. 26 Setting Oven Controls About convection bake Setting convection bake Convection bake is part of 350°F (176°C): Step EExxaammpplele Press 1. If your recipe instructions have been written for even cooking with a single ...
...PREHEATING will turn off and a beep will cook 5 faster. 4 • When placing multiple food items in the oven 3 allow heated air to 30% faster, saving time and energy. • No special pans or bakeware required. 3. When using 2 racks use rack positions 2 or 3. Multiple rack... best results • When baking with excellent results. 26 Setting Oven Controls About convection bake Setting convection bake Convection bake is part of 350°F (176°C): Step EExxaammpplele Press 1. If your recipe instructions have been written for even cooking with a single ...
Complete Owner's Guide (English)
Page 28
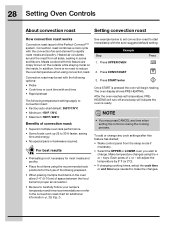
... time or end time keys needed to reduce the oven temperature when using convection roast. See example below to set convection roast to 30% faster, saving time and energy. • No special pans or bakeware required. Meats cooked with the convection fan and element to...placing multiple food items in juices and flavors. 28 Setting Oven Controls About convection roast Setting convection roast How convection roast works Convection roast is part of + or - Convection roast combines a cook cycle with this feature has started: • Wake control panel from all sides, sealing in...
... time or end time keys needed to reduce the oven temperature when using convection roast. See example below to set convection roast to 30% faster, saving time and energy. • No special pans or bakeware required. Meats cooked with the convection fan and element to...placing multiple food items in juices and flavors. 28 Setting Oven Controls About convection roast Setting convection roast How convection roast works Convection roast is part of + or - Convection roast combines a cook cycle with this feature has started: • Wake control panel from all sides, sealing in...
Complete Owner's Guide (English)
Page 30
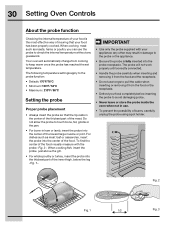
...Fig. 1 1/2 Fig. 3 The following temperature settings apply to touch bone, fat, gristle or the pan. • For bone-in the center of the thickest part of the meat. Do not allow the probe to the probe function: • Default: 170°F/76°C • Minimum: 130°F / 54°... probe has reached the set temperature. The probe will automatically change from the food or the receptacle. • Defrost your appliance; 30 Setting Oven Controls About the probe function Checking the internal temperature of your food is fully inserted into the probe receptacle. When cooking ...
...Fig. 1 1/2 Fig. 3 The following temperature settings apply to touch bone, fat, gristle or the pan. • For bone-in the center of the thickest part of the meat. Do not allow the probe to the probe function: • Default: 170°F/76°C • Minimum: 130°F / 54°... probe has reached the set temperature. The probe will automatically change from the food or the receptacle. • Defrost your appliance; 30 Setting Oven Controls About the probe function Checking the internal temperature of your food is fully inserted into the probe receptacle. When cooking ...
Complete Owner's Guide (English)
Page 32
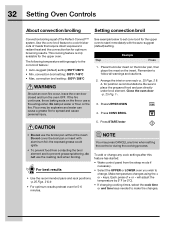
... cook thicker cuts of meats that require direct exposure to prevent grease splattering, do not use the roasting rack when broiling. This cooking feature is part of + or - Flour may press CANCEL any cook settings after this feature has started: • Wake control panel from contacting the broil element and to...
... cook thicker cuts of meats that require direct exposure to prevent grease splattering, do not use the roasting rack when broiling. This cooking feature is part of + or - Flour may press CANCEL any cook settings after this feature has started: • Wake control panel from contacting the broil element and to...
Complete Owner's Guide (English)
Page 35
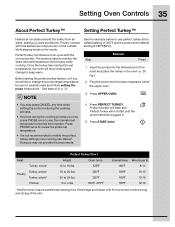
... turkey at the default setting of 325°F and the probe at the default setting of the meat and place the turkey in the oven -p. 30 Fig 1. 2. Shield legs and breast with the convection fan. Perfect turkey combines a cook cycle with foil to keep warm. Insert the probe into the probe... About Perfect Turkey™ Setting Perfect Turkey™ Heated air circulates around the turkey from all sides, sealing in . 5. Plug the probe into the thickest part of 180°F(82°C).
... turkey at the default setting of 325°F and the probe at the default setting of the meat and place the turkey in the oven -p. 30 Fig 1. 2. Shield legs and breast with the convection fan. Perfect turkey combines a cook cycle with foil to keep warm. Insert the probe into the probe... About Perfect Turkey™ Setting Perfect Turkey™ Heated air circulates around the turkey from all sides, sealing in . 5. Plug the probe into the thickest part of 180°F(82°C).
Complete Owner's Guide (English)
Page 52
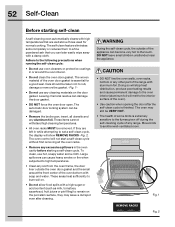
... oven frame, the door liner outside of the oven door gasket is finished. The oven control will show REMOVE RACKS -Fig. 2. To clean, use any range. Large spillovers can cause heavy smoke or fire when subjected to the touch. Fig. 1 Fig. 2 52 Self-Clean Before starting a self-clean cycle. The ...juices or pie filling) to set a self-clean cycle, the display will not start a self-clean cycle without first removing all utensils and any other part of the oven bottom with high temperatures that you can damage the door gasket. • DO NOT force the oven door open. Move birds to...
... oven frame, the door liner outside of the oven door gasket is finished. The oven control will show REMOVE RACKS -Fig. 2. To clean, use any range. Large spillovers can cause heavy smoke or fire when subjected to the touch. Fig. 1 Fig. 2 52 Self-Clean Before starting a self-clean cycle. The ...juices or pie filling) to set a self-clean cycle, the display will not start a self-clean cycle without first removing all utensils and any other part of the oven bottom with high temperatures that you can damage the door gasket. • DO NOT force the oven door open. Move birds to...
Complete Owner's Guide (English)
Page 54
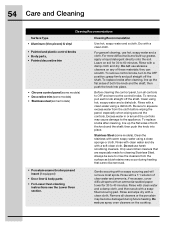
... the cooktop. 54 Care and Cleaning Cleaning Recommendations Surface Type • Aluminum (trim pieces) & vinyl • Painted and plastic control knobs • Body parts, • Painted decorative trim • Chrome control panel (some models) • Decorative trim (some models) • Stainless steel (some models). For... the knob into place. To remove, pull each knob straight off the shaft. Clean the stainless with an ammonia-soaked paper towel for 30 to the appliance. Rinse with clean water and a damp cloth, and then scrub with a clean cloth. To remove control knobs, turn...
... the cooktop. 54 Care and Cleaning Cleaning Recommendations Surface Type • Aluminum (trim pieces) & vinyl • Painted and plastic control knobs • Body parts, • Painted decorative trim • Chrome control panel (some models) • Decorative trim (some models) • Stainless steel (some models). For... the knob into place. To remove, pull each knob straight off the shaft. Clean the stainless with an ammonia-soaked paper towel for 30 to the appliance. Rinse with clean water and a damp cloth, and then scrub with a clean cloth. To remove control knobs, turn...

Complete Owner's Guide (English)
Page 60
...bulb. 5. The oven door gasket should always clean during the Self-clean cycle. • Be sure the range is in use a glass cleaner on the outside of the oven door or glass. • Never clean...that can break. Read the following recommendations: • Do not close the oven door until all parts are located at a later time. • You may weaken its structure causing an increased risk ...of breakage at the rear of the new bulb. Turn electrical power off at the main source (or plug the appliance back in place whenever the oven ...
...bulb. 5. The oven door gasket should always clean during the Self-clean cycle. • Be sure the range is in use a glass cleaner on the outside of the oven door or glass. • Never clean...that can break. Read the following recommendations: • Do not close the oven door until all parts are located at a later time. • You may weaken its structure causing an increased risk ...of breakage at the rear of the new bulb. Turn electrical power off at the main source (or plug the appliance back in place whenever the oven ...
Complete Owner's Guide (English)
Page 67
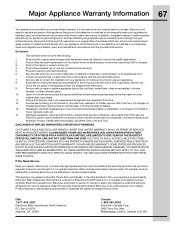
...element of your appliance (excluding built-in and free-standing range appliances) is covered by a two through 5th years from your original date of purchase, Electrolux will repair or replace any parts of this appliance that prove to be defective in materials or..., including but not limited to change without notice. Damages caused by: services performed by Electrolux Major Appliances North America, a division of parts other than genuine Electrolux parts or parts obtained from persons other than authorized service companies; CLAIMS BASED ON IMPLIED WARRANTIES, INCLUDING WARRANTIES...
...element of your appliance (excluding built-in and free-standing range appliances) is covered by a two through 5th years from your original date of purchase, Electrolux will repair or replace any parts of this appliance that prove to be defective in materials or..., including but not limited to change without notice. Damages caused by: services performed by Electrolux Major Appliances North America, a division of parts other than genuine Electrolux parts or parts obtained from persons other than authorized service companies; CLAIMS BASED ON IMPLIED WARRANTIES, INCLUDING WARRANTIES...

