Complete Owner's Guide (English)
Page 2
...purchase as the beginning of contents Finding information 2 SAFETY 3-5 Features 6 Operating Instructions 7-18 • Getting Started 7 • Normal Operating Sounds 7 • Operating Your Dryer 8-9 • Cycle Selection 10-12 • Drying Temperature 13 • Dryness Level 14 • ...can register online at www.electroluxappliances.com or by dropping your product with Electrolux enhances our ability to serve you for quick reference Purchase date Electrolux model number Electrolux serial number NOTE Registering your Product Registration Card in the U.S. Questions?...
...purchase as the beginning of contents Finding information 2 SAFETY 3-5 Features 6 Operating Instructions 7-18 • Getting Started 7 • Normal Operating Sounds 7 • Operating Your Dryer 8-9 • Cycle Selection 10-12 • Drying Temperature 13 • Dryness Level 14 • ...can register online at www.electroluxappliances.com or by dropping your product with Electrolux enhances our ability to serve you for quick reference Purchase date Electrolux model number Electrolux serial number NOTE Registering your Product Registration Card in the U.S. Questions?...

Complete Owner's Guide (English)
Page 7
...system. B. At times there may be sounds generated as the dryer operates and the flat spot on every model. This is controlled by electric solenoids. C. Your model may not hear the following sounds from your dryer, follow these basic steps: 1. Select the desired cycle. ...models only.) The flow of water is operating, there may be a thumping or rolling sound when the dryer starts. Console shown above for an extended period, creating a temporary flat spots smooth out. Start the dryer. (See page 9.) Normal Operating Sounds You may or may differ.
...system. B. At times there may be sounds generated as the dryer operates and the flat spot on every model. This is controlled by electric solenoids. C. Your model may not hear the following sounds from your dryer, follow these basic steps: 1. Select the desired cycle. ...models only.) The flow of water is operating, there may be a thumping or rolling sound when the dryer starts. Console shown above for an extended period, creating a temporary flat spots smooth out. Start the dryer. (See page 9.) Normal Operating Sounds You may or may differ.
Complete Owner's Guide (English)
Page 9
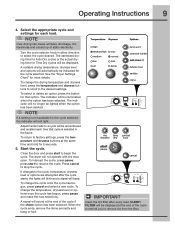
... setting is selected in either direction to factory settings, press the temperature and dryness buttons at the end of static electricity. To return to select the cycle desired. The dryer will not light. To interrupt the cycle, press pause; If changes to the cycle, temperature, dryness level or ...illuminated when the option has been selected. Adjustments made to remove lint from the filter. Close the door and press start to begin the cycle. Start the cycle. To change the temperature, dryness level or options once the cycle has begun, press pause and make the new ...
... setting is selected in either direction to factory settings, press the temperature and dryness buttons at the end of static electricity. To return to select the cycle desired. The dryer will not light. To interrupt the cycle, press pause; If changes to the cycle, temperature, dryness level or ...illuminated when the option has been selected. Adjustments made to remove lint from the filter. Close the door and press start to begin the cycle. Start the cycle. To change the temperature, dryness level or options once the cycle has begun, press pause and make the new ...

Complete Owner's Guide (English)
Page 13
... for the cycle will be dried. To change the Temperature once the cycle has begun, press the pause button, make the new selection and press start again. To protect your fabrics, not all temperatures are available with a time dry cycle to dry items containing feathers, down, foam rubber, plastics or rubber...
... for the cycle will be dried. To change the Temperature once the cycle has begun, press the pause button, make the new selection and press start again. To protect your fabrics, not all temperatures are available with a time dry cycle to dry items containing feathers, down, foam rubber, plastics or rubber...

Complete Owner's Guide (English)
Page 14
... the end of drying time. To change the dryness level once the cycle has begun, press the pause button, make the new selection and press start again. If a dryness level is selected. Select damp for most Auto Dry cycles. Select the normal dryness level for items you press the time dry...
... the end of drying time. To change the dryness level once the cycle has begun, press the pause button, make the new selection and press start again. If a dryness level is selected. Select damp for most Auto Dry cycles. Select the normal dryness level for items you press the time dry...
Complete Owner's Guide (English)
Page 15
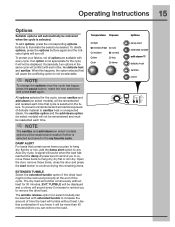
...(on select models), will be remembered and recalled each time that contain some items you to remove those items, close the door and press the start again. The wrinkle release option (on select models) will tumble without heat for 30 minutes. Open the door, remove those items to any Auto...;at or iron dry. NOTE To change the options once the cycle has begun, press the pause button, make the new selections and press start button to not be retained and recalled if either is selected in the future. Occasionally, two options in the my favorite cycle. To prevent ...
...(on select models), will be remembered and recalled each time that contain some items you to remove those items, close the door and press the start again. The wrinkle release option (on select models) will tumble without heat for 30 minutes. Open the door, remove those items to any Auto...;at or iron dry. NOTE To change the options once the cycle has begun, press the pause button, make the new selections and press start button to not be retained and recalled if either is selected in the future. Occasionally, two options in the my favorite cycle. To prevent ...

Complete Owner's Guide (English)
Page 20
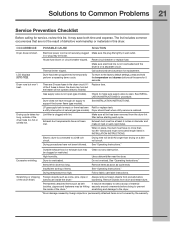
... Some "silk-like" fabrics should be air dried. • Use proper drying temperature. • Place fabric softener sheet on top of load before starting the dryer. • Reduce load size and rewash using liquid fabric softener in the final rinse. • Or, add a fabric softener sheet and ...tumble without heat. • Use lint brush or roller to remove lint. • Do not overload dryer. • Use fabric softener in washer or dryer to reduce static electricity. • Remove items when they are slightly damp to avoid overdrying. • Check that lint filter is...
... Some "silk-like" fabrics should be air dried. • Use proper drying temperature. • Place fabric softener sheet on top of load before starting the dryer. • Reduce load size and rewash using liquid fabric softener in the final rinse. • Or, add a fabric softener sheet and ...tumble without heat. • Use lint brush or roller to remove lint. • Do not overload dryer. • Use fabric softener in washer or dryer to reduce static electricity. • Remove items when they are slightly damp to avoid overdrying. • Check that lint filter is...
Complete Owner's Guide (English)
Page 21
...the same for 5 seconds. Make sure electrical line is not overloaded and the dryer is open (gas models). Check to make sure supply valve is on a 240 volt circuit. Dryer should heat when utility service is clogged with lint. Electric dryer is blown, the drum may turn ... for replacement. High humidity. Drying temperature too high. buttons are 2 house fuses in INSTALLATION INSTRUCTIONS. OCCURRENCE POSSIBLE CAUSE SOLUTION Dryer does not start. To return to the factory default settings, press and hold the temperature and dryness buttons at least 4 inches in or plug...
...the same for 5 seconds. Make sure electrical line is not overloaded and the dryer is open (gas models). Check to make sure supply valve is on a 240 volt circuit. Dryer should heat when utility service is clogged with lint. Electric dryer is blown, the drum may turn ... for replacement. High humidity. Drying temperature too high. buttons are 2 house fuses in INSTALLATION INSTRUCTIONS. OCCURRENCE POSSIBLE CAUSE SOLUTION Dryer does not start. To return to the factory default settings, press and hold the temperature and dryness buttons at least 4 inches in or plug...

Installation Instructions (All Languages)
Page 3
...Use and Care Guide read thoroughly ‰ Door latches and drum tumbles when cycle starts ‰ Registration card sent in Pre-installation requirements Tools and materials needed for ...supplied with matching washer Pipe wrench for gas supply LP-resistant thread tape (for choosing Electrolux, the new premium brand in home appliances. These Installation Instructions are part of our ...setting solid on all connections - check with soapy water, NEVER check with flame 240v Electric Supply (Electric Dryer) ‰ Approved NEMA 10-30R or 14-30R service cord with all screws tight on ...
...Use and Care Guide read thoroughly ‰ Door latches and drum tumbles when cycle starts ‰ Registration card sent in Pre-installation requirements Tools and materials needed for ...supplied with matching washer Pipe wrench for gas supply LP-resistant thread tape (for choosing Electrolux, the new premium brand in home appliances. These Installation Instructions are part of our ...setting solid on all connections - check with soapy water, NEVER check with flame 240v Electric Supply (Electric Dryer) ‰ Approved NEMA 10-30R or 14-30R service cord with all screws tight on ...
Installation Instructions (All Languages)
Page 7
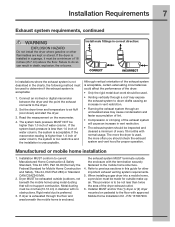
...dryer is to down ) and start the dryer. 3. Manufactured or mobile home installation 1. Installer MUST anchor this guide for proper operation. Failure to do so can result in a garage, it must be made for Mobile Home Construction and Safety, Title 24, HUD Part 280) or Standard CAN/CSAZ240 MH. 2. Set the dryer...direction: CORRECT INCORRECT In installations where the exhaust system is acceptable. Read the measurement on pedestal to the dryer. 2. If dryer is exhausted through a roof may cause condensation and faster accumulation of lint. • Compression or crimping...
...dryer is to down ) and start the dryer. 3. Manufactured or mobile home installation 1. Installer MUST anchor this guide for proper operation. Failure to do so can result in a garage, it must be made for Mobile Home Construction and Safety, Title 24, HUD Part 280) or Standard CAN/CSAZ240 MH. 2. Set the dryer...direction: CORRECT INCORRECT In installations where the exhaust system is acceptable. Read the measurement on pedestal to the dryer. 2. If dryer is exhausted through a roof may cause condensation and faster accumulation of lint. • Compression or crimping...

Installation Instructions (All Languages)
Page 18
...minutes after the Installation Cycle. Press the start button and then the cancel button. 3.Wake up the dryer again by pressing any button, rotate cycle knob to touch up cycle, press the start button. If your dryer has this console: NOTE On gas dryers, before the burner will light, it ...the next time you wake it up. At cycle completion, the LCD window may display INSTAL PASS!, meaning your new dryer is necessary for correct cord connection (on electric models), presence of gas supply (on the LCD User Interface, including language selection. 2.The Installation Cycle will stay ...
...minutes after the Installation Cycle. Press the start button and then the cancel button. 3.Wake up the dryer again by pressing any button, rotate cycle knob to touch up cycle, press the start button. If your dryer has this console: NOTE On gas dryers, before the burner will light, it ...the next time you wake it up. At cycle completion, the LCD window may display INSTAL PASS!, meaning your new dryer is necessary for correct cord connection (on electric models), presence of gas supply (on the LCD User Interface, including language selection. 2.The Installation Cycle will stay ...


