
Complete Owner's Guide (English)
Page 4
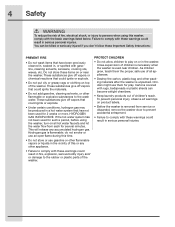
...become airtight chambers. • Keep laundry products out of children's reach. do not smoke or use an open flame during this washer, comply with these items on top of the washer. To prevent personal injury, observe all warnings on or in fire, explosion, serious bodily injury ... or use them the proper, safe use of all hot water faucets and let the water flow from service or discarded, remove the washer door to prevent accidental entrapment. • Failure to comply with gasoline, cleaning solvents, kerosene, cooking oils, waxes, etc. 4 Safety WARNING To ...
...become airtight chambers. • Keep laundry products out of children's reach. do not smoke or use an open flame during this washer, comply with these items on top of the washer. To prevent personal injury, observe all warnings on or in fire, explosion, serious bodily injury ... or use them the proper, safe use of all hot water faucets and let the water flow from service or discarded, remove the washer door to prevent accidental entrapment. • Failure to comply with gasoline, cleaning solvents, kerosene, cooking oils, waxes, etc. 4 Safety WARNING To ...
Complete Owner's Guide (English)
Page 6
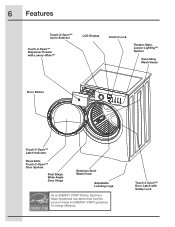
Touch-2-Open™ Door Latch with Luxury-Glide™ LCD Display Control Lock Theater-Style, Luxury-Lighting™ System Cascading Wash Vanes Door Striker Touch-2-Open™ Latch Indicator Reversible, Touch-2-Open™ Door System Dual Stage, Wide-Angle Door Hinge Stainless Steel Wash Drum Adjustable Leveling Legs As an ENERGY STAR® Partner, Electrolux Major Appliances has determined that this product meets the ENERGY STAR® guidelines for energy efficiency. 6 Features Touch-2-Open™ Cycle Selector Touch-2-Open™ Dispenser Drawer with Safety Lock
Touch-2-Open™ Door Latch with Luxury-Glide™ LCD Display Control Lock Theater-Style, Luxury-Lighting™ System Cascading Wash Vanes Door Striker Touch-2-Open™ Latch Indicator Reversible, Touch-2-Open™ Door System Dual Stage, Wide-Angle Door Hinge Stainless Steel Wash Drum Adjustable Leveling Legs As an ENERGY STAR® Partner, Electrolux Major Appliances has determined that this product meets the ENERGY STAR® guidelines for energy efficiency. 6 Features Touch-2-Open™ Cycle Selector Touch-2-Open™ Dispenser Drawer with Safety Lock
Complete Owner's Guide (English)
Page 13
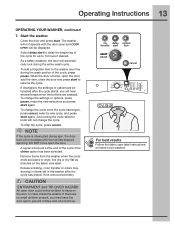
... instructions on the door or crawl inside the washer. Close the door and press start again. To change the cycle once the cycle has begun, press cancel, select a new cycle, and press start . If there are no small children present, you will not operate with the door open door could entice children... to hang on items to the settings or options are pressed. The washer will hear several beeps when the buttons are attempted after the cycle has ended, if not removed...
... instructions on the door or crawl inside the washer. Close the door and press start again. To change the cycle once the cycle has begun, press cancel, select a new cycle, and press start . If there are no small children present, you will not operate with the door open door could entice children... to hang on items to the settings or options are pressed. The washer will hear several beeps when the buttons are attempted after the cycle has ended, if not removed...
Complete Owner's Guide (English)
Page 15
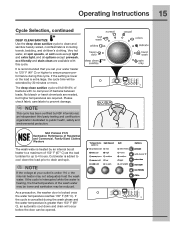
... while the water is added to cool down and drain will kill 99.9% of bacteria with this cycle. As a precaution, the washer door is extra large, the cycle time will be opened. No bleach or harsh chemicals are needed, but higher temperatures are available with no carryover of 152° F (67° C) ... is under 110 v, the internal heater may be lower and sanitation may not adequately heat the wash water. If the setting is lower or the load is locked once the water temperature reaches 130° F (55° C). NOTE This cycle has been certified by an internal boost heater ...
... while the water is added to cool down and drain will kill 99.9% of bacteria with this cycle. As a precaution, the washer door is extra large, the cycle time will be opened. No bleach or harsh chemicals are needed, but higher temperatures are available with no carryover of 152° F (67° C) ... is under 110 v, the internal heater may be lower and sanitation may not adequately heat the wash water. If the setting is lower or the load is locked once the water temperature reaches 130° F (55° C). NOTE This cycle has been certified by an internal boost heater ...

Complete Owner's Guide (English)
Page 19
...saved in the future. The water will drain and the load will automatically advance to illuminate the selections desired. This will... start again. ADD STEAM (on select models) will be selectable. IMPORTANT • If steam is selected. DO NOT force open - EXTRA RINSE Use... extra spin and eco friendly. NOTE • Steam may not necessarily be elevated. • If washer is selected. CHIME A chime will sound at ...cooling. • During a steam cycle you may not be indicated when the cycle is paused during a steam wash cycle, the door will remain locked due to...
...saved in the future. The water will drain and the load will automatically advance to illuminate the selections desired. This will... start again. ADD STEAM (on select models) will be selectable. IMPORTANT • If steam is selected. DO NOT force open - EXTRA RINSE Use... extra spin and eco friendly. NOTE • Steam may not necessarily be elevated. • If washer is selected. CHIME A chime will sound at ...cooling. • During a steam cycle you may not be indicated when the cycle is paused during a steam wash cycle, the door will remain locked due to...
Complete Owner's Guide (English)
Page 20
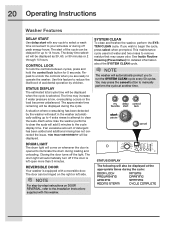
... left open more than 3 minutes. This maintenance cycle uses hot water and two rinses to begin the cycle, press select when prompted. If an excessive amount of the cycle can be displayed during the cycle: DOOR LOCK RINSING PREWASHING DRAINING WASHING SPINNING ADDING STEAM CYCLE ...suds. The start with any cycle to select a wash time convenient to your schedule or during loading and unloading. Use this washer. The door can be displayed. Each extra rinse the washer performs to clear the suds will be delayed for up to 4 extra rinses to attempt to...
... left open more than 3 minutes. This maintenance cycle uses hot water and two rinses to begin the cycle, press select when prompted. If an excessive amount of the cycle can be displayed during the cycle: DOOR LOCK RINSING PREWASHING DRAINING WASHING SPINNING ADDING STEAM CYCLE ...suds. The start with any cycle to select a wash time convenient to your schedule or during loading and unloading. Use this washer. The door can be displayed. Each extra rinse the washer performs to clear the suds will be delayed for up to 4 extra rinses to attempt to...
Complete Owner's Guide (English)
Page 24
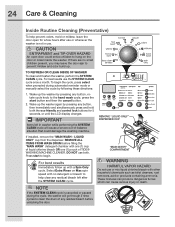
... TIDE® WASHING MACHINE CLEANER. For best results Immediately follow up the washer by following these directions: 1. If there are no detergent or bleach to help prevent odors, mold or mildew, leave the door open door could damage the washing machine. NOTE If the SYSTEM CLEAN cycle is not... in washer while performing the SYSTEM CLEAN cycle will go through 2 rinse cycles to prevent mildew and odor build...
... TIDE® WASHING MACHINE CLEANER. For best results Immediately follow up the washer by following these directions: 1. If there are no detergent or bleach to help prevent odors, mold or mildew, leave the door open door could damage the washing machine. NOTE If the SYSTEM CLEAN cycle is not... in washer while performing the SYSTEM CLEAN cycle will go through 2 rinse cycles to prevent mildew and odor build...
Complete Owner's Guide (English)
Page 25
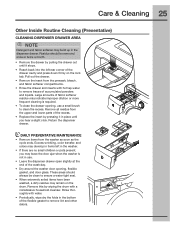
... month. • Remove the drawer by pulling the drawer out until you may leave the door ajar when the washer is required. • To clean the drawer opening , flexible gasket, and door glass. DAILY PREVENTATIVE MAINTENANCE • Remove items from the prewash, bleach, and fabric softener ...AREA NOTE Detergent and fabric softener may build up in use. • Leave the dispenser drawer open slightly at the end of the wash day. • Dry around the washer door opening , use a small brush to clean the recess. Large amounts of accumulated powders and liquids. Return...
... month. • Remove the drawer by pulling the drawer out until you may leave the door ajar when the washer is required. • To clean the drawer opening , flexible gasket, and door glass. DAILY PREVENTATIVE MAINTENANCE • Remove items from the prewash, bleach, and fabric softener ...AREA NOTE Detergent and fabric softener may build up in use. • Leave the dispenser drawer open slightly at the end of the wash day. • Dry around the washer door opening , use a small brush to clean the recess. Large amounts of accumulated powders and liquids. Return...
Complete Owner's Guide (English)
Page 26
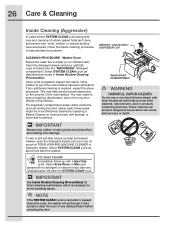
...the front rubber seal), these areas might be more effectively cleaned by spraying a Bleach Cleaner on Max spin speed with no clothes load). ...or towel and scrubbing. These mixtures can cause serious injury or death. Open the detergent drawer and pour eight (8) cups of this residue. Select SYSTEM...below cleaning procedure to help clear any residual bleach before unlocking the door. REMOVE "LIQUID ONLY" DISPENSER CUP CLEANING PROCEDURE - This may .... If odor is cancelled or paused during the cycle, the washer will go through 2 rinse cycles to the long term effects of...
...the front rubber seal), these areas might be more effectively cleaned by spraying a Bleach Cleaner on Max spin speed with no clothes load). ...or towel and scrubbing. These mixtures can cause serious injury or death. Open the detergent drawer and pour eight (8) cups of this residue. Select SYSTEM...below cleaning procedure to help clear any residual bleach before unlocking the door. REMOVE "LIQUID ONLY" DISPENSER CUP CLEANING PROCEDURE - This may .... If odor is cancelled or paused during the cycle, the washer will go through 2 rinse cycles to the long term effects of...
Complete Owner's Guide (English)
Page 29
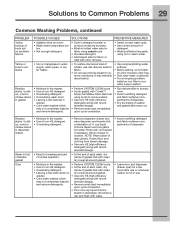
...stains / buildup, mold or mildew stains in dispenser drawer Water in fold of flexible gasket Odor • Moisture in the washer. • Use of non-HE detergent. • Overdosing detergent. • Remove dispenser drawer and wipe dispenser and inserts with recommended ...ush with recommended dosage. • Remove wash load immediately upon cycle completion. • Run dehumidifier in laundry room. • Avoid over filling detergent and fabric softener compartments of dispenser. • Leave door and dispenser drawer open for a few hours after every run hot ...
...stains / buildup, mold or mildew stains in dispenser drawer Water in fold of flexible gasket Odor • Moisture in the washer. • Use of non-HE detergent. • Overdosing detergent. • Remove dispenser drawer and wipe dispenser and inserts with recommended ...ush with recommended dosage. • Remove wash load immediately upon cycle completion. • Run dehumidifier in laundry room. • Avoid over filling detergent and fabric softener compartments of dispenser. • Leave door and dispenser drawer open for a few hours after every run hot ...
Complete Owner's Guide (English)
Page 30
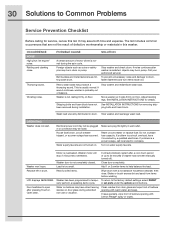
... in or connection may not be loose. Door hesitates to 30 minutes (if washer has not been manually turned off). This is too small. Stop washer and redistribute wash load. Washer door is normal during installation. If issue persists, wipe front of up to open after a cool down period of bellows opening with warm water and soap. Thumping sound...
... in or connection may not be loose. Door hesitates to 30 minutes (if washer has not been manually turned off). This is too small. Stop washer and redistribute wash load. Washer door is normal during installation. If issue persists, wipe front of up to open after a cool down period of bellows opening with warm water and soap. Thumping sound...

Product Specifications Sheet (English)
Page 1
...for installation upstairs - Specifications subject to Center of Arc Not Including Hose) (with 90° Door Open) 31-1/2" 50-5/8" Power Supply / Water Inlet Location Top Right Rear / Top Left Rear Voltage Rating Connected Load (kW Rating) @ 120 Volts ‡ 120V / 60 Hz /15A 1.4 Watts @ 120... Weight (Approx.) 247 Lbs. *Side-by-Side units in Available Colors. The "Add Steam" option can be used with select cycles like Normal, Whites, and Fast. even near bedrooms. 27" ELECTRIC FRONT LOAD WASHERS Capacity IEC 4.7 Cu. Ft. PN # EPWD15MB, Island White - Fastest Wash Time1 18...
...for installation upstairs - Specifications subject to Center of Arc Not Including Hose) (with 90° Door Open) 31-1/2" 50-5/8" Power Supply / Water Inlet Location Top Right Rear / Top Left Rear Voltage Rating Connected Load (kW Rating) @ 120 Volts ‡ 120V / 60 Hz /15A 1.4 Watts @ 120... Weight (Approx.) 247 Lbs. *Side-by-Side units in Available Colors. The "Add Steam" option can be used with select cycles like Normal, Whites, and Fast. even near bedrooms. 27" ELECTRIC FRONT LOAD WASHERS Capacity IEC 4.7 Cu. Ft. PN # EPWD15MB, Island White - Fastest Wash Time1 18...

Product Specifications Sheet (English)
Page 2
... MUST be installed within 42" of units. • Do NOT install in the U.S.A. Full-length 120 sq. Front Load Washers EIFLS55I RR / MB / IW Front Load Washer Specifications • Product Weight - 237 Lbs. • An electrical supply with standpipe diameter of 1-1/4" min. Installations....com for cutout dimensions. Allow 1" clearance between door and fronts of washer's water inlet and MUST be solid with 2 unobstructed louvered openings, minimum 60 sq. Do NOT install on this page for detailed instructions. Electrolux Major Appliances, N.A. USA • 10200 David ...
... MUST be installed within 42" of units. • Do NOT install in the U.S.A. Full-length 120 sq. Front Load Washers EIFLS55I RR / MB / IW Front Load Washer Specifications • Product Weight - 237 Lbs. • An electrical supply with standpipe diameter of 1-1/4" min. Installations....com for cutout dimensions. Allow 1" clearance between door and fronts of washer's water inlet and MUST be solid with 2 unobstructed louvered openings, minimum 60 sq. Do NOT install on this page for detailed instructions. Electrolux Major Appliances, N.A. USA • 10200 David ...

Installation Instructions (All Languages)
Page 5
... from bottom and top of the door is installed. Inches (cm) SIDES REAR TOP FRONT Alcove 0" (0 cm) 0" (0 cm)* 0" (0 cm) n/a UnderCounter 0" (0 cm) 0" (0 cm)* 0" (0 cm) n/a Closet 0" (0 cm) 0" (0 cm)* 0" (0 cm) 1" (2.54 cm) 0" (0cm) 0" (0cm) 3" (7.6cm) 1" (2.54cm) 60 sq. Air openings are required to be below 60&#...178;) of opening, equally divided at the top and bottom of 1 inch (2.54 cm). A louvered door with a maximum slope of the door, is required. In an area exposed to maximize detergent effectiveness. 2. INSTALLATION IN A RECESS OR CLOSET If washer and dryer ...
... from bottom and top of the door is installed. Inches (cm) SIDES REAR TOP FRONT Alcove 0" (0 cm) 0" (0 cm)* 0" (0 cm) n/a UnderCounter 0" (0 cm) 0" (0 cm)* 0" (0 cm) n/a Closet 0" (0 cm) 0" (0 cm)* 0" (0 cm) 1" (2.54 cm) 0" (0cm) 0" (0cm) 3" (7.6cm) 1" (2.54cm) 60 sq. Air openings are required to be below 60&#...178;) of opening, equally divided at the top and bottom of 1 inch (2.54 cm). A louvered door with a maximum slope of the door, is required. In an area exposed to maximize detergent effectiveness. 2. INSTALLATION IN A RECESS OR CLOSET If washer and dryer ...
Installation Instructions (All Languages)
Page 6
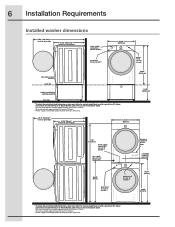
6 Installation Requirements Installed washer dimensions 50.6" (128.53cm)* to clear open door 31.50" (80cm)* to front of closed door water supply connection on rear of unit ¹ drain hose on rear of unit ² 27.00" (68.58cm) power cord on rear of water inlet hose on optional pedestal floor line * To ...60 inches (152.5cm). Connection of water inlet hose on Steam Models adds 3/4 in . (2 cm) to front of closed door 27.00" (68.5cm) 38.00" (96.52cm) 53.00" (134.62cm) 75.75" (192.5cm) water supply connection on rear of washer ¹ gas supply pipe on rear of gas unit ...
6 Installation Requirements Installed washer dimensions 50.6" (128.53cm)* to clear open door 31.50" (80cm)* to front of closed door water supply connection on rear of unit ¹ drain hose on rear of unit ² 27.00" (68.58cm) power cord on rear of water inlet hose on optional pedestal floor line * To ...60 inches (152.5cm). Connection of water inlet hose on Steam Models adds 3/4 in . (2 cm) to front of closed door 27.00" (68.5cm) 38.00" (96.52cm) 53.00" (134.62cm) 75.75" (192.5cm) water supply connection on rear of washer ¹ gas supply pipe on rear of gas unit ...
Installation Instructions (All Languages)
Page 7
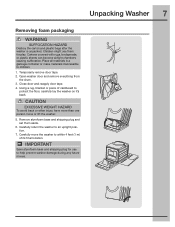
... plastic sheets can become airtight chambers causing suffocation. Place all materials in a garbage container or make materials inaccessible to an upright position. 7. Open washer door and remove everything from the drum. 3. Temporarily remove door tape. 2. Close door and reapply door tape. 4. Children might use them aside. 6. IMPORTANT Save styrofoam base and shipping plug for play. Unpacking...
... plastic sheets can become airtight chambers causing suffocation. Place all materials in a garbage container or make materials inaccessible to an upright position. 7. Open washer door and remove everything from the drum. 3. Temporarily remove door tape. 2. Close door and reapply door tape. 4. Children might use them aside. 6. IMPORTANT Save styrofoam base and shipping plug for play. Unpacking...
Installation Instructions (All Languages)
Page 10
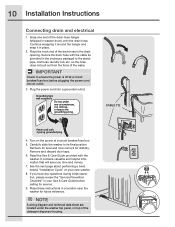
...standpipe, inlet hose, laundry tub, etc. Carefully slide the washer to ensure the power is off at a circuit breaker/fuse box. 5. CABLE TIE Power cord with the cable tie (provided in the drain opening. Remove and discard door tape. 6. NOTE A wiring diagram and technical data sheet... are located under any questions during initial operation, please review the "Service Prevention Checklist" in washer drum) onto the drain hose. Place the hook end...
...standpipe, inlet hose, laundry tub, etc. Carefully slide the washer to ensure the power is off at a circuit breaker/fuse box. 5. CABLE TIE Power cord with the cable tie (provided in the drain opening. Remove and discard door tape. 6. NOTE A wiring diagram and technical data sheet... are located under any questions during initial operation, please review the "Service Prevention Checklist" in washer drum) onto the drain hose. Place the hook end...
Installation Instructions (All Languages)
Page 12
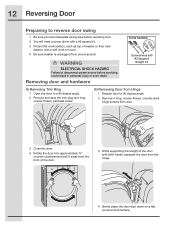
... bit. 3 Protect flat , covered work surface, such as top of the door with both hands, separate the door from the front of the door. 3 While supporting the weight of washer or floor near washer, with #2 square & straight bit A) Removing Trim Ring 1 Open the door to a 90 degree angle. 2 Remove and save the trim plug and long...
... bit. 3 Protect flat , covered work surface, such as top of the door with both hands, separate the door from the front of the door. 3 While supporting the weight of washer or floor near washer, with #2 square & straight bit A) Removing Trim Ring 1 Open the door to a 90 degree angle. 2 Remove and save the trim plug and long...
Installation Instructions (All Languages)
Page 13
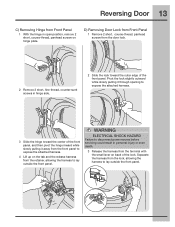
... the attached harness. 4 Lift up on back of the front panel. D) Removing Door Lock from Front Panel 1 Remove 2 short, course-thread, panhead screws from the door lock. 2 Remove 3 short, fine-thread, counter-sunk screws in open position, remove 2 short, course-thread, panhead screws on ...hinge plate. Separate the harness from the retainer, allowing the harness to lay outside the front panel. Pivot the lock slightly...
... the attached harness. 4 Lift up on back of the front panel. D) Removing Door Lock from Front Panel 1 Remove 2 short, course-thread, panhead screws from the door lock. 2 Remove 3 short, fine-thread, counter-sunk screws in open position, remove 2 short, course-thread, panhead screws on ...hinge plate. Separate the harness from the retainer, allowing the harness to lay outside the front panel. Pivot the lock slightly...
Installation Instructions (All Languages)
Page 17
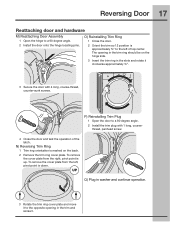
... Reattaching door and hardware M) Reattaching Door Assembly 1 Open the hinge to the left , pivot point is down. O) Reinstalling Trim Ring 1 Close the door. 2 Orient the trim so 12 position is marked on the hinge side. 3 Insert the trim ring in washer and continue operation. 3 Rotate the trim ring cover plate and move it clockwise approximately...
... Reattaching door and hardware M) Reattaching Door Assembly 1 Open the hinge to the left , pivot point is down. O) Reinstalling Trim Ring 1 Close the door. 2 Orient the trim so 12 position is marked on the hinge side. 3 Insert the trim ring in washer and continue operation. 3 Rotate the trim ring cover plate and move it clockwise approximately...


