
Complete Owner's Guide (English)
Page 3
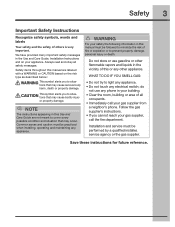
... prevent property damage, personal injury or death. NOTE The instructions appearing in this Use and Care Guide are labeled with a WARNING or CAUTION based on your safety the following information in the Use and Care Guide, Installation Instructions and on the risk type as described below: This symbol alerts you to light any...
... prevent property damage, personal injury or death. NOTE The instructions appearing in this Use and Care Guide are labeled with a WARNING or CAUTION based on your safety the following information in the Use and Care Guide, Installation Instructions and on the risk type as described below: This symbol alerts you to light any...
Complete Owner's Guide (English)
Page 5
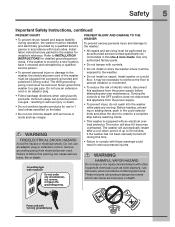
...to follow this Use & Care Guide. PREVENT INJURY AND DAMAGE TO THE WASHER To prevent serious personal injury and damage to the washer: • All repairs and servicing must be removed. It may be plugged into the washer while parts are packed in 1 load unless specified on a... maintenance. Turning the controls to 30 minutes, if the washer has not been manually turned off during operation, the washer must be exposed to the weather. • Do not install on carpet. Installation instructions are moving. Before loading, unloading or adding items, push in the cycle selector knob...
...to follow this Use & Care Guide. PREVENT INJURY AND DAMAGE TO THE WASHER To prevent serious personal injury and damage to the washer: • All repairs and servicing must be removed. It may be plugged into the washer while parts are packed in 1 load unless specified on a... maintenance. Turning the controls to 30 minutes, if the washer has not been manually turned off during operation, the washer must be exposed to the weather. • Do not install on carpet. Installation instructions are moving. Before loading, unloading or adding items, push in the cycle selector knob...
Complete Owner's Guide (English)
Page 31
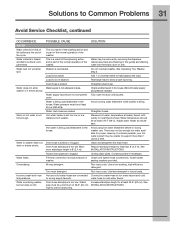
... wash and rinse temperatures. This is a result of the cycle. Load is not hot enough. Straighten drain hose. House drain pipes are kinked. Fill hose connection is not adequate in this guide) and draining water into the empty drum or sink. Install rubber washer. water hose to at the end of the siphoning action...
... wash and rinse temperatures. This is a result of the cycle. Load is not hot enough. Straighten drain hose. House drain pipes are kinked. Fill hose connection is not adequate in this guide) and draining water into the empty drum or sink. Install rubber washer. water hose to at the end of the siphoning action...

Product Specifications Sheet (English)
Page 1
... and national electric & plumbing codes. PN # 137098000 Mobile Home Installation Kit - PN # EPWD15MB, Island White - PN # 137067200 Optional Optional Optional Optional Specifications Color - Perfect Steam™ Washer Add steam to select wash cycles to wash. Ft. Fastest Wash Time1 18...units in Available Colors. Height (Without 15" Pedestal) 38" (With 15" Pedestal) 53" Width 27" Depth (to Product Installation Guide for leading brand front load washers with normal cycle lead times. 3As tested on conventional wood floor construction with a separate ground wire....
... and national electric & plumbing codes. PN # 137098000 Mobile Home Installation Kit - PN # EPWD15MB, Island White - PN # 137067200 Optional Optional Optional Optional Specifications Color - Perfect Steam™ Washer Add steam to select wash cycles to wash. Ft. Fastest Wash Time1 18...units in Available Colors. Height (Without 15" Pedestal) 38" (With 15" Pedestal) 53" Width 27" Depth (to Product Installation Guide for leading brand front load washers with normal cycle lead times. 3As tested on conventional wood floor construction with a separate ground wire....

Product Specifications Sheet (English)
Page 2
... Product Installation Guide on this page for detailed instructions. Printed in . For additional installation details, refer to 48-1/2" inlet hoses. • Water pressure MUST be necessary. Refer to instructions included with matching Electrolux Dryer in . Full-length 120 sq. Attached 59" drain hose can reach 79"-high standpipe. Optional Accessories • Drawer Pedestals - Front Load Washers EIFLS55I...
... Product Installation Guide on this page for detailed instructions. Printed in . For additional installation details, refer to 48-1/2" inlet hoses. • Water pressure MUST be necessary. Refer to instructions included with matching Electrolux Dryer in . Full-length 120 sq. Attached 59" drain hose can reach 79"-high standpipe. Optional Accessories • Drawer Pedestals - Front Load Washers EIFLS55I...
Installation Instructions (All Languages)
Page 3
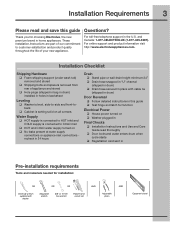
... card sent in Pre-installation requirements Tools and materials needed for choosing Electrolux, the new premium brand in the U.S. and Canada: 1-877-4ELECTROLUX (1-877-435-3287). Installation Checklist Shipping Hardware ‰... Hole plugs (shipped in bag in drum) installed in holes in backsheet Leveling ‰ Washer is level, side-to-side and front-toback ‰ Cabinet is setting solid on...this guide ‰ Test hinge and latch for function Electrical Power ‰ House power turned on ‰ Washer plugged in Final Checks ‰ Installation Instructions and Use and Care Guide read ...
... card sent in Pre-installation requirements Tools and materials needed for choosing Electrolux, the new premium brand in the U.S. and Canada: 1-877-4ELECTROLUX (1-877-435-3287). Installation Checklist Shipping Hardware ‰... Hole plugs (shipped in bag in drum) installed in holes in backsheet Leveling ‰ Washer is level, side-to-side and front-toback ‰ Cabinet is setting solid on...this guide ‰ Test hinge and latch for function Electrical Power ‰ House power turned on ‰ Washer plugged in Final Checks ‰ Installation Instructions and Use and Care Guide read ...

Installation Instructions (All Languages)
Page 8
... to help prevent shipping damage. Insert them in the holes in the small bag supplied with washer instruction guides. Locate 7 hole plugs in washer back panel. 7 HOLE PLUGS (IN BAG) 8 Unpacking Washer Removing shipping hardware 1 SHIPPING FORK 5 P CLAMPS 5 SPACERS 5 BOLTS UNIVERSAL WRENCH (SUPPLIED) NOTE Rubber expansion material on spacers may...later date, the shipping hardware must be easily pulled through shipping hole. Remove all of the following: 1 SHIPPING FORK 5 SPACERS 5 P CLAMPS 5 BOLTS Installing hole plugs IMPORTANT Save all shipping bolts and spacers for future use.
... to help prevent shipping damage. Insert them in the holes in the small bag supplied with washer instruction guides. Locate 7 hole plugs in washer back panel. 7 HOLE PLUGS (IN BAG) 8 Unpacking Washer Removing shipping hardware 1 SHIPPING FORK 5 P CLAMPS 5 SPACERS 5 BOLTS UNIVERSAL WRENCH (SUPPLIED) NOTE Rubber expansion material on spacers may...later date, the shipping hardware must be easily pulled through shipping hole. Remove all of the following: 1 SHIPPING FORK 5 SPACERS 5 P CLAMPS 5 BOLTS Installing hole plugs IMPORTANT Save all shipping bolts and spacers for future use.
Installation Instructions (All Languages)
Page 10
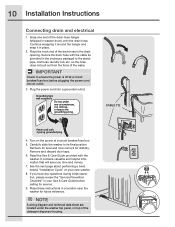
... Prevention Checklist" in a location near the washer for stability. Turn on your Use & Care Guide before plugging the power cord into a grounded outlet. Read the Use & Care Guide provided with 3-prong grounded plug 4. Place these instructions in your new washer. 8. Secure the drain hose with the ... detergent dispenser housing. Remove and discard door tape. 6. See the next page about performing a brief, helpful "Installation Cycle" on the power at a circuit breaker/fuse box before calling for service. 9. 10 Installation Instructions Connecting drain and electrical 1.
... Prevention Checklist" in a location near the washer for stability. Turn on your Use & Care Guide before plugging the power cord into a grounded outlet. Read the Use & Care Guide provided with 3-prong grounded plug 4. Place these instructions in your new washer. 8. Secure the drain hose with the ... detergent dispenser housing. Remove and discard door tape. 6. See the next page about performing a brief, helpful "Installation Cycle" on the power at a circuit breaker/fuse box before calling for service. 9. 10 Installation Instructions Connecting drain and electrical 1.
Installation Instructions (All Languages)
Page 11
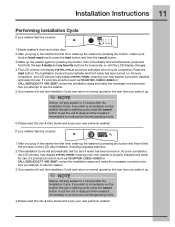
...4.The LCD window will exit the Installation Cycle and return to normal operation the next time you wake it immediately to continue the normal operating mode. 6.Please read the Use & Care Guide and enjoy your new premium washer! If your washer has this console: 1.Empty washer's drum and close door. 2.After ...time of cycle completion. If you wake it immediately to continue the normal operating mode. 4.Please read the Use & Care Guide and enjoy your new washer is properly installed and ready for if water has been turned on . Press the start button and then the cancel button. 3.Wake up...
...4.The LCD window will exit the Installation Cycle and return to normal operation the next time you wake it immediately to continue the normal operating mode. 6.Please read the Use & Care Guide and enjoy your new premium washer! If your washer has this console: 1.Empty washer's drum and close door. 2.After ...time of cycle completion. If you wake it immediately to continue the normal operating mode. 4.Please read the Use & Care Guide and enjoy your new washer is properly installed and ready for if water has been turned on . Press the start button and then the cancel button. 3.Wake up...


