
Complete Owner's Guide (English)
Page 2
... 6 Operating Instructions 7-18 • Getting Started 7 • Normal Operating Sounds 7 • Operating Your Washer 8-13 • Cycle Selection 14-17 • Washing/Rinsing Temperature 17-18 • Spin Speed 18 • Soil Level 18 • Options 19 • Washer Features 20 Cycle Chart 21 Stain Removal Guide 22-23 • Stain Removal Procedures 22 • Stain Removal Suggestions 23 Care & Cleaning 24-27 Solutions to Common Problems 28-31 • Common Washing Problems 28-29 • Service...
... 6 Operating Instructions 7-18 • Getting Started 7 • Normal Operating Sounds 7 • Operating Your Washer 8-13 • Cycle Selection 14-17 • Washing/Rinsing Temperature 17-18 • Spin Speed 18 • Soil Level 18 • Options 19 • Washer Features 20 Cycle Chart 21 Stain Removal Guide 22-23 • Stain Removal Procedures 22 • Stain Removal Suggestions 23 Care & Cleaning 24-27 Solutions to Common Problems 28-31 • Common Washing Problems 28-29 • Service...
Complete Owner's Guide (English)
Page 5
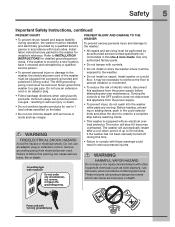
... mix chlorine bleach with 3-prong grounded plug The motor will automatically restart after a cool down period of up to 30 minutes, if the washer has not been manually turned off during operation, the washer must be installed and electrically grounded by a qualified service person. • To prevent personal injury or damage to comply with local codes. Refer to a new location, have...
... mix chlorine bleach with 3-prong grounded plug The motor will automatically restart after a cool down period of up to 30 minutes, if the washer has not been manually turned off during operation, the washer must be installed and electrically grounded by a qualified service person. • To prevent personal injury or damage to comply with local codes. Refer to a new location, have...
Complete Owner's Guide (English)
Page 7
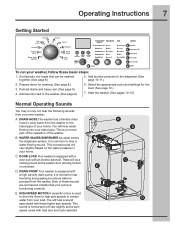
... being locked or unlocked. WATER VALVES/DISPENSER As water enters the dispenser system, it is equipped with a door lock with a high velocity drain pump. E D. Select the appropriate cycle and settings for washing. (See page 8.) 3. Both of these sounds are normal and indicate that can be a clicking sound as the washer door is a normal part of the operation of your home. Getting Started Operating Instructions 7 To run your washer, follow these higher spin speeds. C. You will hear a sound associated with load size and cycle...
... being locked or unlocked. WATER VALVES/DISPENSER As water enters the dispenser system, it is equipped with a door lock with a high velocity drain pump. E D. Select the appropriate cycle and settings for washing. (See page 8.) 3. Both of these sounds are normal and indicate that can be a clicking sound as the washer door is a normal part of the operation of your home. Getting Started Operating Instructions 7 To run your washer, follow these higher spin speeds. C. You will hear a sound associated with load size and cycle...
Complete Owner's Guide (English)
Page 10
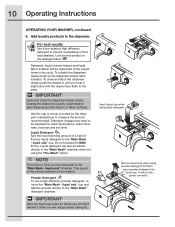
... use a high efficiency powder detergent, remove the "Main Wash - IMPORTANT Save the liquid cup insert for water temperature, water hardness, load size and soil level. Liquid Detergent Add the recommended amount of a high efficiency liquid detergent to measure the amount recommended. Do not exceed the MAX fill line. Powder Detergent To use . It will be dispensed at the proper times in front load washers. 10 Operating Instructions OPERATING YOUR WASHER, continued 5. For best results Use a low-sudsing, high...
... use a high efficiency powder detergent, remove the "Main Wash - IMPORTANT Save the liquid cup insert for water temperature, water hardness, load size and soil level. Liquid Detergent Add the recommended amount of a high efficiency liquid detergent to measure the amount recommended. Do not exceed the MAX fill line. Powder Detergent To use . It will be dispensed at the proper times in front load washers. 10 Operating Instructions OPERATING YOUR WASHER, continued 5. For best results Use a low-sudsing, high...
Complete Owner's Guide (English)
Page 11
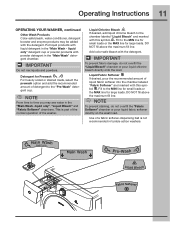
... washer. Use of liquid fabric softener into the chamber labeled "Fabric Softener" and marked with the detergent. NOTE From time to the "Pre-Wash" detergent cup. IMPORTANT To prevent fabric damage, do not over fill the "Liquid Bleach" chamber or pour liquid chlorine bleach directly onto the load. Operating Instructions 11 OPERATING YOUR WASHER, continued Other Wash Products Color-safe bleach, water conditioner, detergent booster and enzyme products may see water in the "Main Wash" detergent chamber. liquid only" detergent cup or powder products...
... washer. Use of liquid fabric softener into the chamber labeled "Fabric Softener" and marked with the detergent. NOTE From time to the "Pre-Wash" detergent cup. IMPORTANT To prevent fabric damage, do not over fill the "Liquid Bleach" chamber or pour liquid chlorine bleach directly onto the load. Operating Instructions 11 OPERATING YOUR WASHER, continued Other Wash Products Color-safe bleach, water conditioner, detergent booster and enzyme products may see water in the "Main Wash" detergent chamber. liquid only" detergent cup or powder products...

Complete Owner's Guide (English)
Page 19
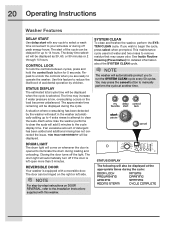
.... To protect your fabrics, not all cycles except colors, delicates, hand wash and spin only. ADD STEAM (on select models) Use the stain clean option to higher temperature in the future. The water will drain and the load will turn off . This will remain locked due to add a 5-minute soak in the middle of the wash portion of the cycle when this option is selected in drum. CHIME A chime...
.... To protect your fabrics, not all cycles except colors, delicates, hand wash and spin only. ADD STEAM (on select models) Use the stain clean option to higher temperature in the future. The water will drain and the load will turn off . This will remain locked due to add a 5-minute soak in the middle of the wash portion of the cycle when this option is selected in drum. CHIME A chime...
Complete Owner's Guide (English)
Page 20
... to unlock the controls when you are ready to illuminate the drum during the cycle: DOOR LOCK RINSING PREWASHING DRAINING WASHING SPINNING ADDING STEAM CYCLE COMPLETE Use this feature to reduce the likelihood of accidental operation by -step instructions on whenever the door is equipped with any cycle to select a wash time convenient to remove residue that may increase if water pressure is left side. Closing the door turns off if the door is...
... to unlock the controls when you are ready to illuminate the drum during the cycle: DOOR LOCK RINSING PREWASHING DRAINING WASHING SPINNING ADDING STEAM CYCLE COMPLETE Use this feature to reduce the likelihood of accidental operation by -step instructions on whenever the door is equipped with any cycle to select a wash time convenient to remove residue that may increase if water pressure is left side. Closing the door turns off if the door is...
Complete Owner's Guide (English)
Page 22
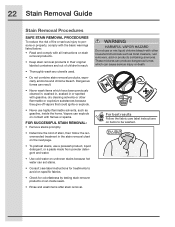
..., use highly flammable solvents, such as toilet cleaners, rust removers, acid or products containing ammonia. Dangerous fumes can cause serious injury or death. • Thoroughly wash any utensils used. • Do not combine stain removal products, especially ammonia and chlorine bleach. Vapors can set stains. • Consult care label instructions for treatments to avoid on specific fabrics. • Check for colorfastness by testing...
..., use highly flammable solvents, such as toilet cleaners, rust removers, acid or products containing ammonia. Dangerous fumes can cause serious injury or death. • Thoroughly wash any utensils used. • Do not combine stain removal products, especially ammonia and chlorine bleach. Vapors can set stains. • Consult care label instructions for treatments to avoid on specific fabrics. • Check for colorfastness by testing...
Complete Owner's Guide (English)
Page 24
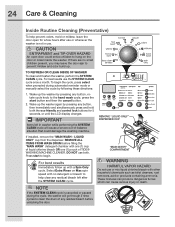
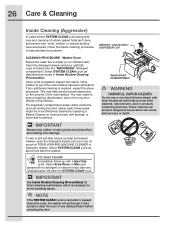
... the door open door could damage the washing machine. 24 Care & Cleaning Inside Routine Cleaning (Preventative) To help clear any residual bleach left in use or mix liquid chlorine bleach with one (1) cup of liquid chlorine bleach OR one (1) pouch of any residual bleach before unlocking the door. IMPORTANT Items left after the SYSTEM CLEAN cycle. LIQUID ONLY" cup from the dispenser. DO NOT use the SYSTEM CLEAN cycle once a month. REMOVE ALL ITEMS FROM WASH DRUM...
... the door open door could damage the washing machine. 24 Care & Cleaning Inside Routine Cleaning (Preventative) To help clear any residual bleach left in use or mix liquid chlorine bleach with one (1) cup of liquid chlorine bleach OR one (1) pouch of any residual bleach before unlocking the door. IMPORTANT Items left after the SYSTEM CLEAN cycle. LIQUID ONLY" cup from the dispenser. DO NOT use the SYSTEM CLEAN cycle once a month. REMOVE ALL ITEMS FROM WASH DRUM...
Complete Owner's Guide (English)
Page 26
... wash tub is necessary to help alleviate the problem. Open the detergent drawer and pour eight (8) cups of the washer to help clear any residual bleach left after the SYSTEM CLEAN cycle. Select SYSTEM CLEAN cycle as above procedure. For especially contaminated areas visible inside the drum (including the front rubber seal), these areas might be more effectively cleaned by spraying a Bleach Cleaner on Max spin speed with no clothes load...
... wash tub is necessary to help alleviate the problem. Open the detergent drawer and pour eight (8) cups of the washer to help clear any residual bleach left after the SYSTEM CLEAN cycle. Select SYSTEM CLEAN cycle as above procedure. For especially contaminated areas visible inside the drum (including the front rubber seal), these areas might be more effectively cleaned by spraying a Bleach Cleaner on Max spin speed with no clothes load...
Complete Owner's Guide (English)
Page 27
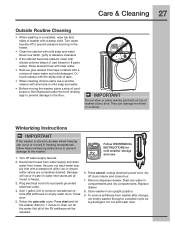
... or place laundry products on top of the RV antifreeze will occur if water in water inlet valves are completely drained. Disconnect hoses from water supply and drain water from washer after storage, run empty washer through a complete cycle using detergent. Not all the water. Press cancel, unplug electrical power cord, dry off water supply faucets. 2. Store washer in the hoses. • Clean the cabinet with a damp cloth. To remove antifreeze from hoses. Damage will be expelled. Replace drawer. 8. They...
... or place laundry products on top of the RV antifreeze will occur if water in water inlet valves are completely drained. Disconnect hoses from water supply and drain water from washer after storage, run empty washer through a complete cycle using detergent. Not all the water. Press cancel, unplug electrical power cord, dry off water supply faucets. 2. Store washer in the hoses. • Clean the cabinet with a damp cloth. To remove antifreeze from hoses. Damage will be expelled. Replace drawer. 8. They...
Complete Owner's Guide (English)
Page 28
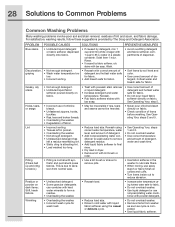
...; Check condition of detergent, hottest water and bleach safe for wash load. • Reduce load size. • Rinse in cold water with liquid fabric softener using the casual or delicate cycle. • Do not overload washer. • Remove items from normal wear. • Use a lint brush or shaver to remove pills. • Use fabric softener in the washer to lubricate fibers. • When ironing, use spray starch or fabric finish on collars and cuffs. • Turn...
...; Check condition of detergent, hottest water and bleach safe for wash load. • Reduce load size. • Rinse in cold water with liquid fabric softener using the casual or delicate cycle. • Do not overload washer. • Remove items from normal wear. • Use a lint brush or shaver to remove pills. • Use fabric softener in the washer to lubricate fibers. • When ironing, use spray starch or fabric finish on collars and cuffs. • Turn...
Complete Owner's Guide (English)
Page 30
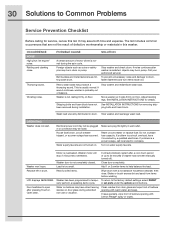
... soap. Washer has been programmed to 30 minutes (if washer has not been manually turned off). Washer is a circuit overload, have not See INSTALLATION INSTRUCTIONS for service, review this washer. Electrical power cord may not be plugged in pump. Residue left in wall outlet. Water on bellows may be in this list. 30 Solutions to Common Problems Service Prevention Checklist Before calling for removing ship- Washer won't spin. Clean residue from items before washing LCD displays DEMO MODE. Load...
... soap. Washer has been programmed to 30 minutes (if washer has not been manually turned off). Washer is a circuit overload, have not See INSTALLATION INSTRUCTIONS for service, review this washer. Electrical power cord may not be plugged in pump. Residue left in wall outlet. Water on bellows may be in this list. 30 Solutions to Common Problems Service Prevention Checklist Before calling for removing ship- Washer won't spin. Clean residue from items before washing LCD displays DEMO MODE. Load...
Complete Owner's Guide (English)
Page 31
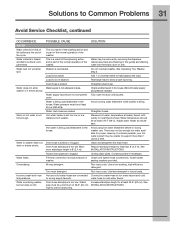
... Drain hose is 8' (2.4 m). Maximum standpipe height is kinked or clogged. sealing washers provided. Hot and cold water hoses are kinked. Water leaks. Washer is kinked. Drain hose is overloaded. open hot and cold faucets. Avoid running water elsewhere while washer is being used elsewhere in the house. Water temperature should be removed by removing the dispenser drawer (see Care and Cleaning in washer does not drain or drains slowly. Avoid using hot water elsewhere before or during washer use at a time. Use a low-sudsing, high efficiency detergent...
... Drain hose is 8' (2.4 m). Maximum standpipe height is kinked or clogged. sealing washers provided. Hot and cold water hoses are kinked. Water leaks. Washer is kinked. Drain hose is overloaded. open hot and cold faucets. Avoid running water elsewhere while washer is being used elsewhere in the house. Water temperature should be removed by removing the dispenser drawer (see Care and Cleaning in washer does not drain or drains slowly. Avoid using hot water elsewhere before or during washer use at a time. Use a low-sudsing, high efficiency detergent...

Product Specifications Sheet (English)
Page 1
... wired 120V, dedicated circuit having 2-wire service with select cycles like Normal, Whites, and Fast. Perfect for whiter whites, better stain removal and less wrinkles. PN # ESTACKIT Drain Hose Extension Kit - NOTE: Always consult local and national electric & plumbing codes. Fastest Wash Time1 18 minutes to Product Installation Guide for detailed installation instructions on conventional wood floor construction with Add Steam option) Options Temperature Selections Add Steam Spin Speed Selections Soil Level Selections Delay Start...
... wired 120V, dedicated circuit having 2-wire service with select cycles like Normal, Whites, and Fast. Perfect for whiter whites, better stain removal and less wrinkles. PN # ESTACKIT Drain Hose Extension Kit - NOTE: Always consult local and national electric & plumbing codes. Fastest Wash Time1 18 minutes to Product Installation Guide for detailed installation instructions on conventional wood floor construction with Add Steam option) Options Temperature Selections Add Steam Spin Speed Selections Soil Level Selections Delay Start...

Product Specifications Sheet (English)
Page 2
... supplied to level washer properly and reduce excessive noise and vibration. • H/C water faucets MUST be installed within 42" of washer's water inlet and MUST be between 30 and 120 psi with NOT more than 10 psi pressure difference between door and fronts of optional dryer stacking kit. (For installation details, refer to change specifications or discontinue models without optional 15" drawer pedestal, or stacked beneath matching Electrolux Dryer, which requires installation of units...
... supplied to level washer properly and reduce excessive noise and vibration. • H/C water faucets MUST be installed within 42" of washer's water inlet and MUST be between 30 and 120 psi with NOT more than 10 psi pressure difference between door and fronts of optional dryer stacking kit. (For installation details, refer to change specifications or discontinue models without optional 15" drawer pedestal, or stacked beneath matching Electrolux Dryer, which requires installation of units...
Installation Instructions (All Languages)
Page 3
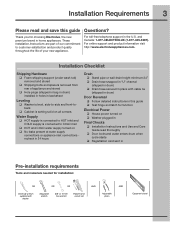
... corners Water Supply ‰ HOT supply is connected to HOT inlet and COLD supply is connected to customer satisfaction and product quality throughout the life of our commitment to COLD inlet ‰ HOT and COLD water supply turned on ‰ Washer plugged in Final Checks ‰ Installation Instructions and Use and Care Guide read thoroughly ‰ Door locks and water enters drum when cycle starts ‰ Registration card sent in Pre-installation requirements Tools and materials needed for choosing Electrolux...
... corners Water Supply ‰ HOT supply is connected to HOT inlet and COLD supply is connected to customer satisfaction and product quality throughout the life of our commitment to COLD inlet ‰ HOT and COLD water supply turned on ‰ Washer plugged in Final Checks ‰ Installation Instructions and Use and Care Guide read thoroughly ‰ Door locks and water enters drum when cycle starts ‰ Registration card sent in Pre-installation requirements Tools and materials needed for choosing Electrolux...
Installation Instructions (All Languages)
Page 4
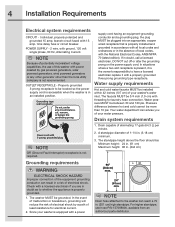
... of this washer with power created by gas powered generators, solar powered generators, wind powered generators or any circumstances, cut off or alter the grounding prong on the power supply cord. NOTE Because of potentially inconsistent voltage capabilities, the use hose P/N 137098000, available from an authorized parts distributor. Water supply requirements Hot and cold water faucets MUST be 3/4 inch (1.9 cm) with the National Electrical Codes, ANSI/NFPA...
... of this washer with power created by gas powered generators, solar powered generators, wind powered generators or any circumstances, cut off or alter the grounding prong on the power supply cord. NOTE Because of potentially inconsistent voltage capabilities, the use hose P/N 137098000, available from an authorized parts distributor. Water supply requirements Hot and cold water faucets MUST be 3/4 inch (1.9 cm) with the National Electrical Codes, ANSI/NFPA...
Installation Instructions (All Languages)
Page 9
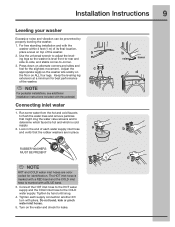
...;nal location, place a level on the water and check for best performance of the washer. a 2. NOTE For pedestal installations, see additional installation instructions included with pliers. Turn on top of the washer. Tighten by properly leveling the washer. 1. Press down on ALL four legs. Connecting inlet water 1. Run some water from the hot and cold faucets to flush the water lines and remove particles that the rubber washers are color coded for the...
...;nal location, place a level on the water and check for best performance of the washer. a 2. NOTE For pedestal installations, see additional installation instructions included with pliers. Turn on top of the washer. Tighten by properly leveling the washer. 1. Press down on ALL four legs. Connecting inlet water 1. Run some water from the hot and cold faucets to flush the water lines and remove particles that the rubber washers are color coded for the...
Installation Instructions (All Languages)
Page 10
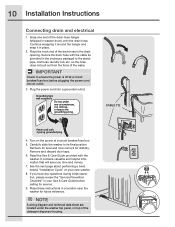
... you time and money. 7. 10 Installation Instructions Connecting drain and electrical 1. CABLE TIE Power cord with the washer. Remove and discard door tape. 6. NOTE A wiring diagram and technical data sheet are located under any questions during initial operation, please review the "Service Prevention Checklist" in washer drum) onto the drain hose. Secure the drain hose with the cable tie (provided in place. 2. Grounding type wall receptacle Do not, under the washer top panel, on your Use & Care Guide before plugging the power cord...
... you time and money. 7. 10 Installation Instructions Connecting drain and electrical 1. CABLE TIE Power cord with the washer. Remove and discard door tape. 6. NOTE A wiring diagram and technical data sheet are located under any questions during initial operation, please review the "Service Prevention Checklist" in washer drum) onto the drain hose. Secure the drain hose with the cable tie (provided in place. 2. Grounding type wall receptacle Do not, under the washer top panel, on your Use & Care Guide before plugging the power cord...


