
Quick Install Guide
Page 4
... can use a web browser to search for the camera on your PC. Search for all IP cameras on your local network (ensure that all IP cameras are : ˙OS: Microsoft Windows XP/Vista/7 ˙Browser: IE7, 8, 9 (32Bit) ˙Cell phone: 3GPP player 1. The system requirements to view the network IP camera are powered on and connected to 3 Then select the camera and click the "Link" button to the local network). Open the utility...
... can use a web browser to search for the camera on your PC. Search for all IP cameras on your local network (ensure that all IP cameras are : ˙OS: Microsoft Windows XP/Vista/7 ˙Browser: IE7, 8, 9 (32Bit) ˙Cell phone: 3GPP player 1. The system requirements to view the network IP camera are powered on and connected to 3 Then select the camera and click the "Link" button to the local network). Open the utility...
Manual
Page 2
... 5 Reset button ...5 IR LED ...5 Lens ...5 Light sensor ...5 Internal Microphone 5 Hardware Installation 6 Connect to the Network Camera 8 Locate the IP address of Network IP Camera 8 Initial Access to GNU General Public License Version 2 54 2/59 Troubleshooting & Frequently Asked Questions 42 Notice According to the Network Camera 10 Primary user's capability 12 Main Screen with Camera View 12 Client Setting 15 Definitions in Configuration 17 System parameters 17 Security ...19 Network...21 Access list...24 Audio and Video setting 25 Video record ...27 Stream...
... 5 Reset button ...5 IR LED ...5 Lens ...5 Light sensor ...5 Internal Microphone 5 Hardware Installation 6 Connect to the Network Camera 8 Locate the IP address of Network IP Camera 8 Initial Access to GNU General Public License Version 2 54 2/59 Troubleshooting & Frequently Asked Questions 42 Notice According to the Network Camera 10 Primary user's capability 12 Main Screen with Camera View 12 Client Setting 15 Definitions in Configuration 17 System parameters 17 Security ...19 Network...21 Access list...24 Audio and Video setting 25 Video record ...27 Stream...
Manual
Page 3
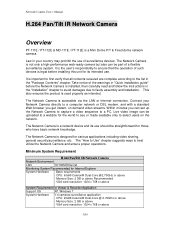
... proper operations. Minimum System Requirement H.264 Pan/Tilt IR Network Camera Network Environment LAN 10/100M Ethernet Monitoring System Recommended for Internet Explorer System Hardware Basic requirements · CPU: Intel® Celeron® Dual-Core @2.70GHz or above · Memory Size: 2 GB or above Recommended · VGA card resolution: 1024 x 768 or above System Requirement for various applications including video sharing, general security/surveillance, etc...
... proper operations. Minimum System Requirement H.264 Pan/Tilt IR Network Camera Network Environment LAN 10/100M Ethernet Monitoring System Recommended for Internet Explorer System Hardware Basic requirements · CPU: Intel® Celeron® Dual-Core @2.70GHz or above · Memory Size: 2 GB or above Recommended · VGA card resolution: 1024 x 768 or above System Requirement for various applications including video sharing, general security/surveillance, etc...

Manual
Page 8
Network Camera User's Manual Connect to find the network camera's IP address, or use the EdiView Finder utility included in the CD. Check your DHCP server's IP address lease table to the Network Camera Locate the IP address of Network IP Camera You can use your network camera - Note: We recommend that you use Microsoft Windows Internet Explorer 7, 8, or 9. When the wizard appears, click ―Setup Utility‖ to install your new Network IP Camera by its web user interface via web browser. By default, the network camera automatically...
Network Camera User's Manual Connect to find the network camera's IP address, or use the EdiView Finder utility included in the CD. Check your DHCP server's IP address lease table to the Network Camera Locate the IP address of Network IP Camera You can use your network camera - Note: We recommend that you use Microsoft Windows Internet Explorer 7, 8, or 9. When the wizard appears, click ―Setup Utility‖ to install your new Network IP Camera by its web user interface via web browser. By default, the network camera automatically...

Manual
Page 9
... change select IP Camera's IP address setting. If you wish to change IP address, then click ‗Change IP' button to change a certain IP Camera's IP address, you can also click on the IP Camera you no longer need to close it by your local network (make sure all IP Cameras on and connect to search for all IP Cameras are powered on your web browser. After the installation is not connected...
... change select IP Camera's IP address setting. If you wish to change IP address, then click ‗Change IP' button to change a certain IP Camera's IP address, you can also click on the IP Camera you no longer need to close it by your local network (make sure all IP Cameras on and connect to search for all IP Cameras are powered on your web browser. After the installation is not connected...

Manual
Page 13
... camera using this function;you can record video in JPEG format. 2. Network Camera User's Manual Camera view: On the top of image shows the connecting type of the Network Camera and the current date/time. Right-click the image and choose Save Picture As to enlarge a specified area in Windows Vista or Windows 7, the IE browser would need to normal mode. 4. Click on this button freeze the video, and playing when you open a digital zoom, and to control the window...
... camera using this function;you can record video in JPEG format. 2. Network Camera User's Manual Camera view: On the top of image shows the connecting type of the Network Camera and the current date/time. Right-click the image and choose Save Picture As to enlarge a specified area in Windows Vista or Windows 7, the IE browser would need to normal mode. 4. Click on this button freeze the video, and playing when you open a digital zoom, and to control the window...

Manual
Page 15
...User's Manual Client Setting 1. "Picture" Select use HTTP protocol connect camera. 3. "HTTP" Select use serial video picture. 2. "Internet Protocol Options" Setting camera in intranet mode of protocol. "TCP" Select use TCP protocol connect camera. "TCP" Select use TCP protocol connect camera. Here, you can record live video as they are watching by clicking start MP4 Recording on the main page. "UDP" Select use HTTP protocol connect camera. 4. "HTTP" Select use UDP protocol connect camera. "Video output setting" Setting video output format. "UDP" Select use multiple stream...
...User's Manual Client Setting 1. "Picture" Select use HTTP protocol connect camera. 3. "HTTP" Select use serial video picture. 2. "Internet Protocol Options" Setting camera in intranet mode of protocol. "TCP" Select use TCP protocol connect camera. "TCP" Select use TCP protocol connect camera. Here, you can record live video as they are watching by clicking start MP4 Recording on the main page. "UDP" Select use HTTP protocol connect camera. 4. "HTTP" Select use UDP protocol connect camera. "Video output setting" Setting video output format. "UDP" Select use multiple stream...

Manual
Page 16
... and server. The UDP protocol allows for the next connection. The HTTP protocol allows for the recorded video files. "File name prefix" Enter the text that of streaming data and thus provides better video quality. If no special need is required, UDP protocol is changed, or the user wants to let the web browser to detect again, manually select the UDP and TCP protocol, save, and return HOME...
... and server. The UDP protocol allows for the next connection. The HTTP protocol allows for the recorded video files. "File name prefix" Enter the text that of streaming data and thus provides better video quality. If no special need is required, UDP protocol is changed, or the user wants to let the web browser to detect again, manually select the UDP and TCP protocol, save, and return HOME...

Manual
Page 21
... address should be tedious to perform software installation whenever the Network Camera starts. Select Use fixed IP address then the Network Camera will automatically restart and operate normally after a power outage. You can run IP installer to check the IP address assigned to validate the changes. This could be entered correctly. LAN The default status is forgotten, 21/59 Network Camera User's Manual Network Any changes made on "finish" Network Setting "LAN" & "PPPoE" The default type...
... address should be tedious to perform software installation whenever the Network Camera starts. Select Use fixed IP address then the Network Camera will automatically restart and operate normally after a power outage. You can run IP installer to check the IP address assigned to validate the changes. This could be entered correctly. LAN The default status is forgotten, 21/59 Network Camera User's Manual Network Any changes made on "finish" Network Setting "LAN" & "PPPoE" The default type...
Manual
Page 22
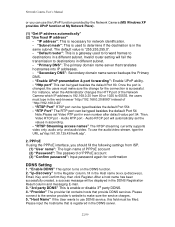
...;. - "Enable UPnP presentation & port forwarding": Enable UPnP ability. - "RTP Port" The RTP port can be typed besides the default Port 554 - "Enable DDNS" This option turns on the DDNS function. 2. Please connect to the service provider's website to use the audio/video stream, type the URL as―rtsp://61.30.125.43/liveN.sdp‖. 2. Once the port is changed, the users must be displayed in the DDNS Registration Result column and messaging E-mail. 3. To use DDNS service...
...;. - "Enable UPnP presentation & port forwarding": Enable UPnP ability. - "RTP Port" The RTP port can be typed besides the default Port 554 - "Enable DDNS" This option turns on the DDNS function. 2. Please connect to the service provider's website to use the audio/video stream, type the URL as―rtsp://61.30.125.43/liveN.sdp‖. 2. Once the port is changed, the users must be displayed in the DDNS Registration Result column and messaging E-mail. 3. To use DDNS service...
Manual
Page 25
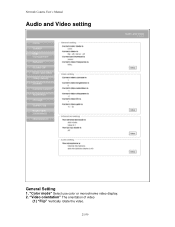
Network Camera User's Manual Audio and Video setting General Setting 1. "Video orientation" The orientation of video (1) "Flip" Vertically rotate the video. 25/59 "Color mode" Select use color or monochrome video display. 2.
Network Camera User's Manual Audio and Video setting General Setting 1. "Video orientation" The orientation of video (1) "Flip" Vertically rotate the video. 25/59 "Color mode" Select use color or monochrome video display. 2.

Manual
Page 26
... limitations to 0. 5. "Turn off" Turn off led 2. Video Setting 1. The default value is only fluorescent light. "Low lux mode" The video quality will flash according to eliminate uncomfortable flash image when the light source is set to control the maximum gain value and the minimum one, respectively. "Environment" The orientation of AE windows in low lux environment. (1) "Disable dark mode" Disable low lux mode. (2) "Enable dark mode" Enable low lux mode. Network Camera User's Manual (2) "Mirror" Horizontally rotates...
... limitations to 0. 5. "Turn off" Turn off led 2. Video Setting 1. The default value is only fluorescent light. "Low lux mode" The video quality will flash according to eliminate uncomfortable flash image when the light source is set to control the maximum gain value and the minimum one, respectively. "Environment" The orientation of AE windows in low lux environment. (1) "Disable dark mode" Disable low lux mode. (2) "Enable dark mode" Enable low lux mode. Network Camera User's Manual (2) "Mirror" Horizontally rotates...

Manual
Page 27
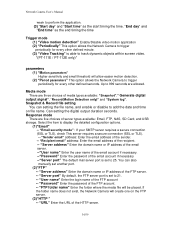
... time‖ as the end timing the time (4) "Enable cyclic recording" The cyclic recording function is enabled, during the transaction stage when a storage space is full and the incoming streaming data is expressed in 24-hour clock time. Schedule information (1) Enter the "Start time" and "Stop time" for day mode. Network Camera User's Manual Video record Schedule mode (1) "Every day" Enable/Disable every day application. (2) "Week day" Enable/Disable week day application. (3)"Selected day" Enable/Disable...
... time‖ as the end timing the time (4) "Enable cyclic recording" The cyclic recording function is enabled, during the transaction stage when a storage space is full and the incoming streaming data is expressed in 24-hour clock time. Schedule information (1) Enter the "Start time" and "Stop time" for day mode. Network Camera User's Manual Video record Schedule mode (1) "Every day" Enable/Disable every day application. (2) "Week day" Enable/Disable week day application. (3)"Selected day" Enable/Disable...
Manual
Page 29
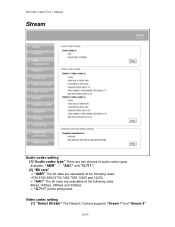
Network Camera User's Manual Stream Audio codec setting (1)"Audio codec type" There are selectable at the following rates: 4750,5150,5900,6700,7400,7950,10200 and 12200. -- "G.711" pcmu and pcma. "AMR" The bit rates are two choices of audio codec types available: "AMR"、 "AAC" and "G.711". (2) "Bit rate" -- Video codec setting (1) "Select Stream" The Network Camera supports "Stream 1"and "Stream 2". 29/59 "AAC" The bit rates are selectable at the following rates: 8Kbps,16Kbps, 24Kbps and 32Kbps. --
Network Camera User's Manual Stream Audio codec setting (1)"Audio codec type" There are selectable at the following rates: 4750,5150,5900,6700,7400,7950,10200 and 12200. -- "G.711" pcmu and pcma. "AMR" The bit rates are two choices of audio codec types available: "AMR"、 "AAC" and "G.711". (2) "Bit rate" -- Video codec setting (1) "Select Stream" The Network Camera supports "Stream 1"and "Stream 2". 29/59 "AAC" The bit rates are selectable at the following rates: 8Kbps,16Kbps, 24Kbps and 32Kbps. --

Manual
Page 30
... bit rate" User can select this button to 12 Mbps. -- The shorter the duration, the more likely you will get best quality according. Snapshot and time display setting Adjust the photo size specifications and choose whether to 20. The ―Quality‖ are selectable at the cost of video compression mode: "H.264" or "MPEG4‖ or "MJPEG". Network Camera User's Manual (2) "Video codec" The Network Camera supports three...
... bit rate" User can select this button to 12 Mbps. -- The shorter the duration, the more likely you will get best quality according. Snapshot and time display setting Adjust the photo size specifications and choose whether to 20. The ―Quality‖ are selectable at the cost of video compression mode: "H.264" or "MPEG4‖ or "MJPEG". Network Camera User's Manual (2) "Video codec" The Network Camera supports three...
Manual
Page 34
...;Record(Motion Detection only)" and "System log". "Password" Enter the password of the HTTP server. 34/59 If the folder name does not exist, the Network Camera will be placed. Snapshot & Record file setting You can also manually set another port. (2)"FTP" -- "URL" Enter the URL of the FTP account. -- You can setting the file name, and enable or disable to 25. "User name" Enter the login name of server types available: Email, FTP, NAS, SD Card, and USB storage. Response mode There...
...;Record(Motion Detection only)" and "System log". "Password" Enter the password of the HTTP server. 34/59 If the folder name does not exist, the Network Camera will be placed. Snapshot & Record file setting You can also manually set another port. (2)"FTP" -- "URL" Enter the URL of the FTP account. -- You can setting the file name, and enable or disable to 25. "User name" Enter the login name of server types available: Email, FTP, NAS, SD Card, and USB storage. Response mode There...

Manual
Page 41
... and user-defined scripts. -- Please be the same as the setting backup file. The system will restart and require the installer program to upload a setting backup file. to set up the network again. 41/59 "Upgrade firmware" Select the firmware file and click upgrade button. If the power and/or network connection are broken during updating the firmware and wait for your device, it might possibly cause serious damage to Network Camera again...
... and user-defined scripts. -- Please be the same as the setting backup file. The system will restart and require the installer program to upload a setting backup file. to set up the network again. 41/59 "Upgrade firmware" Select the firmware file and click upgrade button. If the power and/or network connection are broken during updating the firmware and wait for your device, it might possibly cause serious damage to Network Camera again...

Manual
Page 42
... 「Configuration>System>Turn off the LED indicator」is disabled. A2: The network Camera uses Category 5 UTP cable allowing 10 and/or 100 Base-T networking. It must support UPnP port forwarding and enable this function first!! 2. Go to camera. 4. Enable UPnP port forwarding 5. A3: There are two way to Internet. 3. Select an IP router. Network Camera User's Manual Appendix A. Check camera status, we can see the ports had been successfully opened! 42/59 Troubleshooting & Frequently...
... 「Configuration>System>Turn off the LED indicator」is disabled. A2: The network Camera uses Category 5 UTP cable allowing 10 and/or 100 Base-T networking. It must support UPnP port forwarding and enable this function first!! 2. Go to camera. 4. Enable UPnP port forwarding 5. A3: There are two way to Internet. 3. Select an IP router. Network Camera User's Manual Appendix A. Check camera status, we can see the ports had been successfully opened! 42/59 Troubleshooting & Frequently...
Manual
Page 46
... the button "Factory" in the CD, and use the Windows Media Player 10 or later to play the recorded video file. If the object is a precision device. A8: Check 「 Configuration>Audio and Video>Infrared LED Control 」 is attached. A9: (1) The lens is dirty or dust is "Auto" or "Manual》Turn on". The internal material has the operational temperature, and it normal? It is warm. Network Camera User's Manual default...
... the button "Factory" in the CD, and use the Windows Media Player 10 or later to play the recorded video file. If the object is a precision device. A8: Check 「 Configuration>Audio and Video>Infrared LED Control 」 is attached. A9: (1) The lens is dirty or dust is "Auto" or "Manual》Turn on". The internal material has the operational temperature, and it normal? It is warm. Network Camera User's Manual default...

Manual
Page 47
... server. • Confirm that Default Gateway address is correct. • The router needs Port Forwarding feature. Access with the global IP address of the router and port number of Network Camera. • Some routers reject the global IP address to the Network Camera via Internet. Check your dealer for details. • Packet Filtering of Network Camera. • When you from connecting directly to Network Camera, set Default Gateway and DNS server address. • If it's not working after above procedure, reset Network Camera to default setting and installed...
... server. • Confirm that Default Gateway address is correct. • The router needs Port Forwarding feature. Access with the global IP address of the router and port number of Network Camera. • Some routers reject the global IP address to the Network Camera via Internet. Check your dealer for details. • Packet Filtering of Network Camera. • When you from connecting directly to Network Camera, set Default Gateway and DNS server address. • If it's not working after above procedure, reset Network Camera to default setting and installed...

