User Guide
Page 3
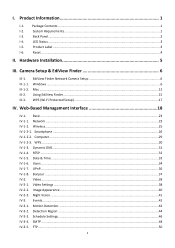
I -1. Product Information 1 I . Back Panel...2 I -2. Hardware Installation 5 III. III-1-2. Computer ...29 IV-1-2-3. Date & Time ...33 IV-1-6. Image Appearance ...40 IV-2-3. Package Contents ...1 I -4. Reset ...4 II. Video ...38 IV-2-1. Night Vision...41 IV-3. Web-Based Management Interface 18 IV-1. Dynamic DNS...31 IV-1-4. Video Settings ...38 IV-2-2. Detection Region ...44 ...
I -1. Product Information 1 I . Back Panel...2 I -2. Hardware Installation 5 III. III-1-2. Computer ...29 IV-1-2-3. Date & Time ...33 IV-1-6. Image Appearance ...40 IV-2-3. Package Contents ...1 I -4. Reset ...4 II. Video ...38 IV-2-1. Night Vision...41 IV-3. Web-Based Management Interface 18 IV-1. Dynamic DNS...31 IV-1-4. Video Settings ...38 IV-2-2. Detection Region ...44 ...
User Guide
Page 8
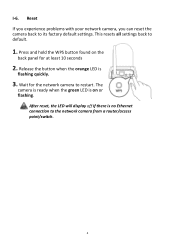
This resets all settings back to restart. Wait for at least 10 seconds 2. Release the button when the orange LED is on the back panel for the network camera to default. 1. After reset, the LED will display off If there is no Ethernet connection to its factory default settings. Press and hold the WPS button found on or flashing. The camera is ready when the green LED is flashing quickly. 3. I-6. Reset If you experience problems with your network camera, you can reset the camera back to the network camera from a router/access point/switch. 4
This resets all settings back to restart. Wait for at least 10 seconds 2. Release the button when the orange LED is on the back panel for the network camera to default. 1. After reset, the LED will display off If there is no Ethernet connection to its factory default settings. Press and hold the WPS button found on or flashing. The camera is ready when the green LED is flashing quickly. 3. I-6. Reset If you experience problems with your network camera, you can reset the camera back to the network camera from a router/access point/switch. 4

User Guide
Page 21
...and hold the WPS button on the network camera for 2 - 5 seconds to activate WPS. 2. Within two minutes, press the WPS/Reset button on your wireless router/access point for how long you need to indicate a successful connection. 17 The devices will flash slowly to... down its WPS. The orange LED will establish a connection. The green LED will display on or flashing to hold the WPS button too long and reset your wireless router/access point. 1. Take care not to establish a secure wireless connection between your network camera and your network camera (see I-5.) 3. ...
...and hold the WPS button on the network camera for 2 - 5 seconds to activate WPS. 2. Within two minutes, press the WPS/Reset button on your wireless router/access point for how long you need to indicate a successful connection. 17 The devices will flash slowly to... down its WPS. The orange LED will establish a connection. The green LED will display on or flashing to hold the WPS button too long and reset your wireless router/access point. 1. Take care not to establish a secure wireless connection between your network camera and your network camera (see I-5.) 3. ...
User Guide
Page 44
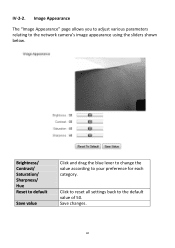
IV-2-2. Save changes. 40 Image Appearance The "Image Appearance" page allows you to adjust various parameters relating to the default value of 50. Click to reset all settings back to the network camera's image appearance using the sliders shown below. Brightness/ Contrast/ Saturation/ Sharpness/ Hue Reset to default Save value Click and drag the blue lever to change the value according to your preference for each category.
IV-2-2. Save changes. 40 Image Appearance The "Image Appearance" page allows you to adjust various parameters relating to the default value of 50. Click to reset all settings back to the network camera's image appearance using the sliders shown below. Brightness/ Contrast/ Saturation/ Sharpness/ Hue Reset to default Save value Click and drag the blue lever to change the value according to your preference for each category.

User Guide
Page 57
Reset the preview window/viewing position back to save the position as a selected preset. Set Initial Position to your preference, and then click "Store Position Information" (above) to the network camera's default position. 53
Reset the preview window/viewing position back to save the position as a selected preset. Set Initial Position to your preference, and then click "Store Position Information" (above) to the network camera's default position. 53

User Guide
Page 59
... this could damage the device. Click "Restart Network Camera" to upgrade the network camera's firmware, backup or restore the network camera's settings, and reset or restart the network camera. Advanced The "Advanced" page allows you to restart the network camera. Restarting will not affect the camera's current configuration.... off or disconnect the device during a firmware upgrade, as config.bin file. Click "Apply" to boot up after a restart. Please check the Edimax website for the latest firmware for network camera to save the current settings on your current settings.
... this could damage the device. Click "Restart Network Camera" to upgrade the network camera's firmware, backup or restore the network camera's settings, and reset or restart the network camera. Advanced The "Advanced" page allows you to restart the network camera. Restarting will not affect the camera's current configuration.... off or disconnect the device during a firmware upgrade, as config.bin file. Click "Apply" to boot up after a restart. Please check the Edimax website for the latest firmware for network camera to save the current settings on your current settings.
User Guide
Page 60
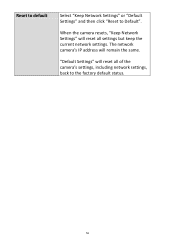
The network camera's IP address will reset all settings but keep the current network settings. When the camera resets, "Keep Network Settings" will reset all of the camera's settings, including network settings, back to Default". Reset to default Select "Keep Network Settings" or "Default Settings" and then click "Reset to the factory default status. 56 "Default Settings" will remain the same.
The network camera's IP address will reset all settings but keep the current network settings. When the camera resets, "Keep Network Settings" will reset all of the camera's settings, including network settings, back to Default". Reset to default Select "Keep Network Settings" or "Default Settings" and then click "Reset to the factory default status. 56 "Default Settings" will remain the same.

User Guide
Page 78
... the selected camera. Displays the model of the selected camera, this tab. Save settings in this function. Model IP* Username* Web Port* Password Video Format** Reset OK Cancel the camera's location or purpose easily. By default it's '80'. Input the user name of the camera. Input the IP address of this...
... the selected camera. Displays the model of the selected camera, this tab. Save settings in this function. Model IP* Username* Web Port* Password Video Format** Reset OK Cancel the camera's location or purpose easily. By default it's '80'. Input the user name of the camera. Input the IP address of this...