
User Manual
Page 2
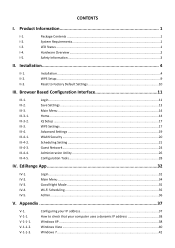
Product Information 1 I -5. Hardware Overview...2 I -1. Reset to check that your IP address 37 How to Factory Default Settings 10 III. III-3. III-4-3. III-4-4. EdiRange ...III-4-5. Admin ...36 V. V-1-1-2. Installation ...4 II-2. III-3. Main Menu ...34 IV-3. V-1-1. System Requirements...1 I -2. Appendix 37 V-1. Configuring your computer uses a dynamic IP address 38 Windows XP ...38 Windows Vista ...40 Windows 7 ...42 Installation 4 II-1. Package Contents ...1 I -3. Browser Based Configuration Interface 11 III-1. V-1-1-1. III-3-2. ...
Product Information 1 I -5. Hardware Overview...2 I -1. Reset to check that your IP address 37 How to Factory Default Settings 10 III. III-3. III-4-3. III-4-4. EdiRange ...III-4-5. Admin ...36 V. V-1-1-2. Installation ...4 II-2. III-3. Main Menu ...34 IV-3. V-1-1. System Requirements...1 I -2. Appendix 37 V-1. Configuring your computer uses a dynamic IP address 38 Windows XP ...38 Windows Vista ...40 Windows 7 ...42 Installation 4 II-1. Package Contents ...1 I -3. Browser Based Configuration Interface 11 III-1. V-1-1-1. III-3-2. ...

User Manual
Page 3
V-1-2-3. V-1-3. V-3. V-1-1-4. V-1-2-4. V-1-3-2. Windows 8 ...45 Mac OS...49 How to modify the IP address of your computer 51 Windows XP ...51 Windows Vista ...53 Windows 7 ...54 Windows 8 ...59 Mac ...63 How to Find Your Network Security Key 66 Windows 7 & Vista...66 Mac ...68 How to Find Your Router's IP Address 71 Windows XP, Vista & 7 71 Windows 8 ...73 Mac ...76 Connecting to a Wi-Fi network 78 Glossary...80 V-1-2-1. V-1-2-5. V-1-1-5. V-1-4. V-1-4-2. V-1-4-3. V-2. V-1-2-2. V-1-4-1. V-1-2. V-1-3-1.
V-1-2-3. V-1-3. V-3. V-1-1-4. V-1-2-4. V-1-3-2. Windows 8 ...45 Mac OS...49 How to modify the IP address of your computer 51 Windows XP ...51 Windows Vista ...53 Windows 7 ...54 Windows 8 ...59 Mac ...63 How to Find Your Network Security Key 66 Windows 7 & Vista...66 Mac ...68 How to Find Your Router's IP Address 71 Windows XP, Vista & 7 71 Windows 8 ...73 Mac ...76 Connecting to a Wi-Fi network 78 Glossary...80 V-1-2-1. V-1-2-5. V-1-1-5. V-1-4. V-1-4-2. V-1-4-3. V-2. V-1-2-2. V-1-4-1. V-1-2. V-1-3-1.
User Manual
Page 8
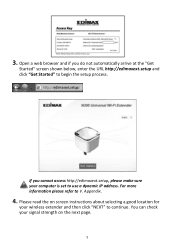
Appendix. 4. Please read the on the next page. 5 Open a web browser and if you cannot access http://edimaxext.setup, please make sure your wireless extender and then click "NEXT" to use a dynamic IP address. You can check your signal strength on screen instructions about selecting a good location for your computer is set to continue. 3. For more information please refer to begin the setup process. If you do not automatically arrive at the "Get Started" screen shown below, enter the URL http://edimaxext.setup and click "Get Started" to V.
Appendix. 4. Please read the on the next page. 5 Open a web browser and if you cannot access http://edimaxext.setup, please make sure your wireless extender and then click "NEXT" to use a dynamic IP address. You can check your signal strength on screen instructions about selecting a good location for your computer is set to continue. 3. For more information please refer to begin the setup process. If you do not automatically arrive at the "Get Started" screen shown below, enter the URL http://edimaxext.setup and click "Get Started" to V.
User Manual
Page 9
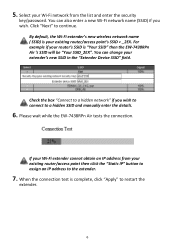
... a new Wi-Fi network name (SSID) if you wish to connect to the extender. 7. When the connection test is "Your SSID" then the EW-7438RPn Air 's SSID will be "Your SSID_2EX". You can change your existing router/access point's SSID + _2EX. Click "Next" to restart the extender. 6 ...If your router's SSID is complete, click "Apply" to continue. For example if your Wi-Fi extender cannot obtain an IP address from the list and enter the security key/password. Please wait while the EW-7438RPn Air tests the connection. Check the box "Connect to a hidden network" if you wish.
... a new Wi-Fi network name (SSID) if you wish to connect to the extender. 7. When the connection test is "Your SSID" then the EW-7438RPn Air 's SSID will be "Your SSID_2EX". You can change your existing router/access point's SSID + _2EX. Click "Next" to restart the extender. 6 ...If your router's SSID is complete, click "Apply" to continue. For example if your Wi-Fi extender cannot obtain an IP address from the list and enter the security key/password. Please wait while the EW-7438RPn Air tests the connection. Check the box "Connect to a hidden network" if you wish.
User Manual
Page 14
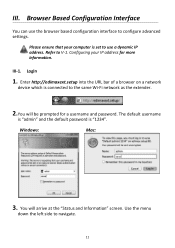
.... 2.You will arrive at the "Status and Information" screen. Windows: Mac: 3. Browser Based Configuration Interface You can use a dynamic IP address. The default username is "admin" and the default password is connected to configure advanced settings. III-1. Login 1. You will be ...prompted for more information. Please ensure that your IP address for a username and password. Refer to navigate. 11 Enter http://edimaxext.setup into the URL bar of a browser on a ...
.... 2.You will arrive at the "Status and Information" screen. Windows: Mac: 3. Browser Based Configuration Interface You can use a dynamic IP address. The default username is "admin" and the default password is connected to configure advanced settings. III-1. Login 1. You will be ...prompted for more information. Please ensure that your IP address for a username and password. Refer to navigate. 11 Enter http://edimaxext.setup into the URL bar of a browser on a ...
User Manual
Page 19
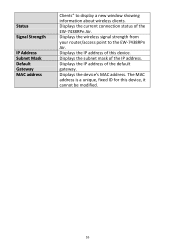
Displays the subnet mask of the default gateway. Displays the IP address of the EW-7438RPn Air. Displays the device's MAC address. Displays the IP address of the IP address. Displays the current connection status of this device, it cannot be modified. 16 The MAC address is a unique, fixed ID for this device. Displays the wireless signal strength from your router/access point to display a new window showing information about wireless clients. Status Signal Strength IP Address Subnet Mask Default Gateway MAC address Clients" to the EW-7438RPn Air.
Displays the subnet mask of the default gateway. Displays the IP address of the EW-7438RPn Air. Displays the device's MAC address. Displays the IP address of the IP address. Displays the current connection status of this device, it cannot be modified. 16 The MAC address is a unique, fixed ID for this device. Displays the wireless signal strength from your router/access point to display a new window showing information about wireless clients. Status Signal Strength IP Address Subnet Mask Default Gateway MAC address Clients" to the EW-7438RPn Air.
User Manual
Page 29
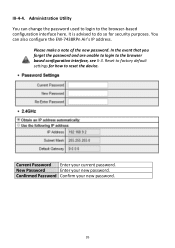
Confirmed Password Confirm your new password. Administration Utility You can also configure the EW-7438RPn Air's IP address. Reset to reset the device. It is advised to do so for how to factory default settings for security purposes. Please make a note of ...
Confirmed Password Confirm your new password. Administration Utility You can also configure the EW-7438RPn Air's IP address. Reset to reset the device. It is advised to do so for how to factory default settings for security purposes. Please make a note of ...
User Manual
Page 30
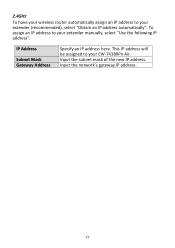
This IP address will be assigned to your extender (recommended), select "Obtain an IP address automatically". IP Address Subnet Mask Gateway Address Specify an IP address here. Input the subnet mask of the new IP address. 2.4GHz To have your wireless router automatically assign an IP address to your EW-7438RPn Air. Input the network's gateway IP address. 27 To assign an IP address to your extender manually, select "Use the following IP address".
This IP address will be assigned to your extender (recommended), select "Obtain an IP address automatically". IP Address Subnet Mask Gateway Address Specify an IP address here. Input the subnet mask of the new IP address. 2.4GHz To have your wireless router automatically assign an IP address to your EW-7438RPn Air. Input the network's gateway IP address. 27 To assign an IP address to your extender manually, select "Use the following IP address".
User Manual
Page 40
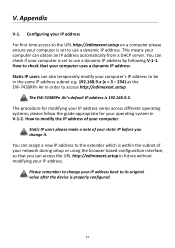
... modify your operating system in future without modifying your computer is set to the extender which is 192.168.9.2. The EW-7438RPn Air's default IP address is within the subnet of your computer uses a dynamic IP address. Appendix V-1. How to change it. Please remember to check that you change your computer is properly configured. 37...
... modify your operating system in future without modifying your computer is set to the extender which is 192.168.9.2. The EW-7438RPn Air's default IP address is within the subnet of your computer uses a dynamic IP address. Appendix V-1. How to change it. Please remember to check that you change your computer is properly configured. 37...

User Manual
Page 41
... appear, click "Properties". 2. V-1-1-1. Double-click the "Network and Internet Connections" icon, click "Network Connections", and then double-click "Local Area Connection". Windows XP 1. "Obtain an IP address automatically" and "Obtain DNS server address automatically" should be selected. 38 Click the "Start" button (it should be located in the lower-left corner...
... appear, click "Properties". 2. V-1-1-1. Double-click the "Network and Internet Connections" icon, click "Network Connections", and then double-click "Local Area Connection". Windows XP 1. "Obtain an IP address automatically" and "Obtain DNS server address automatically" should be selected. 38 Click the "Start" button (it should be located in the lower-left corner...

User Manual
Page 43
Windows Vista 1. Click the "Start" button (it should be located in the lower-left corner of your computer), then click "Control Panel". Right-click "Local Area Network", then select "Properties". The "Local Area Connection Properties" window will then appear, select "Internet Protocol Version 4 (TCP / IPv4)", and then click "Properties". 2. Select "Obtain an IP address automatically" and "Obtain DNS server address automatically" should be selected. 40 V-1-1-2. Click "View Network Status and Tasks", then click "Manage Network Connections".
Windows Vista 1. Click the "Start" button (it should be located in the lower-left corner of your computer), then click "Control Panel". Right-click "Local Area Network", then select "Properties". The "Local Area Connection Properties" window will then appear, select "Internet Protocol Version 4 (TCP / IPv4)", and then click "Properties". 2. Select "Obtain an IP address automatically" and "Obtain DNS server address automatically" should be selected. 40 V-1-1-2. Click "View Network Status and Tasks", then click "Manage Network Connections".

User Manual
Page 47
6. Select "Obtain an IP address automatically" and "Obtain DNS server address automatically" should be selected. 44
6. Select "Obtain an IP address automatically" and "Obtain DNS server address automatically" should be selected. 44

User Manual
Page 50
Select "Obtain an IP address automatically" and "Obtain DNS server address automatically" should be selected. 47 Select "Internet Protocol Version 4 (TCP/IPv4) and then click "Properties". 7. 6.
Select "Obtain an IP address automatically" and "Obtain DNS server address automatically" should be selected. 47 Select "Internet Protocol Version 4 (TCP/IPv4) and then click "Properties". 7. 6.

User Manual
Page 52
V-1-1-5. Mac OS 1. In System Preferences, click on "System Preferences". 2. Click on "Wi-Fi" in the left panel and then click "Advanced" in the drop down menu labeled "Configure IPv4" should be selected. 49 Select "TCP/IP" from the top menu and "Using DHCP" in the lower right corner. 4. Have your Macintosh computer operate as usual, and click on "Network". 3.
V-1-1-5. Mac OS 1. In System Preferences, click on "System Preferences". 2. Click on "Wi-Fi" in the left panel and then click "Advanced" in the drop down menu labeled "Configure IPv4" should be selected. 49 Select "TCP/IP" from the top menu and "Using DHCP" in the lower right corner. 4. Have your Macintosh computer operate as usual, and click on "Network". 3.
User Manual
Page 54
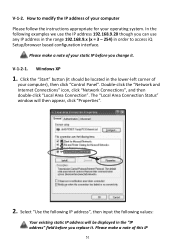
...Please follow the instructions appropriate for your static IP before you can use any IP address in the range 192.168.9.x (x = 3 - 254) in order to modify the IP address of your operating system. V-1-2. In the following values: Your existing static IP address will then appear, click "Properties". ... Connections" icon, click "Network Connections", and then double-click "Local Area Connection". Select "Use the following IP address", then input the following examples we use the IP address 192.168.9.20 though you replace it should be displayed in the lower-left corner of this...
...Please follow the instructions appropriate for your static IP before you can use any IP address in the range 192.168.9.x (x = 3 - 254) in order to modify the IP address of your operating system. V-1-2. In the following values: Your existing static IP address will then appear, click "Properties". ... Connections" icon, click "Network Connections", and then double-click "Local Area Connection". Select "Use the following IP address", then input the following examples we use the IP address 192.168.9.20 though you replace it should be displayed in the lower-left corner of this...

User Manual
Page 55
IP address: 192.168.9.20 Subnet Mask: 255.255.255.0 Click 'OK' when finished. 52 address, subnet mask, default gateway and DNS server addresses.
IP address: 192.168.9.20 Subnet Mask: 255.255.255.0 Click 'OK' when finished. 52 address, subnet mask, default gateway and DNS server addresses.

User Manual
Page 56
..." field before you replace it should be located in the lower-left corner of this IP address, subnet mask, default gateway and DNS server addresses. IP address: 192.168.9.20 Subnet Mask: 255.255.255.0 Click 'OK' when finished. 53 Windows Vista 1. V-1-2-2. Click "... Tasks", then click "Manage Network Connections". Right-click "Local Area Network", then select "Properties". Select "Use the following IP address", then input the following values: Your existing static IP address will then appear, select "Internet Protocol Version 4 (TCP / IPv4)", and then click "Properties". 2. Click the ...
..." field before you replace it should be located in the lower-left corner of this IP address, subnet mask, default gateway and DNS server addresses. IP address: 192.168.9.20 Subnet Mask: 255.255.255.0 Click 'OK' when finished. 53 Windows Vista 1. V-1-2-2. Click "... Tasks", then click "Manage Network Connections". Right-click "Local Area Network", then select "Properties". Select "Use the following IP address", then input the following values: Your existing static IP address will then appear, select "Internet Protocol Version 4 (TCP / IPv4)", and then click "Properties". 2. Click the ...

User Manual
Page 60
Select "Use the following IP address", then input the following values: Your existing static IP address will be displayed in the "IP address" field before you replace it. IP address: 192.168.9.20 Subnet Mask: 255.255.255.0 Click 'OK' when finished. 57 Please make a note of this IP address, subnet mask, default gateway and DNS server addresses. 6.
Select "Use the following IP address", then input the following values: Your existing static IP address will be displayed in the "IP address" field before you replace it. IP address: 192.168.9.20 Subnet Mask: 255.255.255.0 Click 'OK' when finished. 57 Please make a note of this IP address, subnet mask, default gateway and DNS server addresses. 6.

User Manual
Page 65
IP address: 192.168.9.20 Subnet Mask: 255.255.255.0 Click 'OK' when finished. 62 7. Please make a note of this IP address, subnet mask, default gateway and DNS server addresses. Select "Use the following IP address", then input the following values: Your existing static IP address will be displayed in the "IP address" field before you replace it.
IP address: 192.168.9.20 Subnet Mask: 255.255.255.0 Click 'OK' when finished. 62 7. Please make a note of this IP address, subnet mask, default gateway and DNS server addresses. Select "Use the following IP address", then input the following values: Your existing static IP address will be displayed in the "IP address" field before you replace it.

User Manual
Page 66
In System Preferences, click on "Wi-Fi" in the left panel and then click "Advanced" in the lower right corner. 4. Click on "Network". 3. Have your Macintosh computer operate as usual, and click on "System Preferences" 2. Select "TCP/IP" from the top menu and select "Manually" from the drop down menu labeled "Configure IPv4", then click "OK". 63 Mac 1. V-1-2-5.
In System Preferences, click on "Wi-Fi" in the left panel and then click "Advanced" in the lower right corner. 4. Click on "Network". 3. Have your Macintosh computer operate as usual, and click on "System Preferences" 2. Select "TCP/IP" from the top menu and select "Manually" from the drop down menu labeled "Configure IPv4", then click "OK". 63 Mac 1. V-1-2-5.