Datasheet
Page 1
...by using ESSID and 64/128 bit key length WEP encryption, the EW‐7228APn also supports the advanced security features, like airports, hotels and schools...etc. Universal Repeater Mode The Universal Repeater Mode lets this Range Extender/Access Point extend the coverage and signal ...follow a few simple steps to the network without specifying your PC's IP address before starting the configuration. Support Green WLAN The EW‐7228APn has adapted a clever protocol in different networking environment Robust Wireless LAN Security (WPA, WPA2 support) Except for the current wireless...
...by using ESSID and 64/128 bit key length WEP encryption, the EW‐7228APn also supports the advanced security features, like airports, hotels and schools...etc. Universal Repeater Mode The Universal Repeater Mode lets this Range Extender/Access Point extend the coverage and signal ...follow a few simple steps to the network without specifying your PC's IP address before starting the configuration. Support Green WLAN The EW‐7228APn has adapted a clever protocol in different networking environment Robust Wireless LAN Security (WPA, WPA2 support) Except for the current wireless...
Datasheet
Page 2
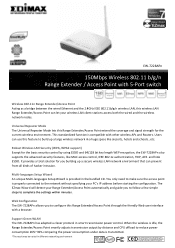
... System) repeater mode. DIMENSION & OUTPUT POWER 26(H) x 136(W) x 90(D) mm 11n: 14±1.5dBm, 11g: 15±1.5dBm 11b:17±1.5dBm NETWORK SETUP DIAGRAM AND RELATED PRODUCTS An example of how the EW‐7228APn can be setup: • Connect the EW‐7228APn to ADSL...hardware button for easy wireless association Support Green WLAN for smart Tx power saving, Implicit Rx power saving and CPU offload. Supports Universal Repeater mode Supports AP Client mode. FEATURES AND TECHNICAL SPECIFICATIONS HARDWARE INTERFACE 5 x Fast Ethernet LAN Port LED Indicators: Power, WLAN, LAN...
... System) repeater mode. DIMENSION & OUTPUT POWER 26(H) x 136(W) x 90(D) mm 11n: 14±1.5dBm, 11g: 15±1.5dBm 11b:17±1.5dBm NETWORK SETUP DIAGRAM AND RELATED PRODUCTS An example of how the EW‐7228APn can be setup: • Connect the EW‐7228APn to ADSL...hardware button for easy wireless association Support Green WLAN for smart Tx power saving, Implicit Rx power saving and CPU offload. Supports Universal Repeater mode Supports AP Client mode. FEATURES AND TECHNICAL SPECIFICATIONS HARDWARE INTERFACE 5 x Fast Ethernet LAN Port LED Indicators: Power, WLAN, LAN...
Quick Install Guide
Page 5
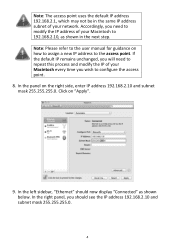
... to 192.168.2.10, as shown below. If the default IP remains unchanged, you will need to modify the IP address of your Macintosh to repeat this process and modify the IP of your Macintosh every time you should now display "Connected" as shown in the same IP address subnet of...
... to 192.168.2.10, as shown below. If the default IP remains unchanged, you will need to modify the IP address of your Macintosh to repeat this process and modify the IP of your Macintosh every time you should now display "Connected" as shown in the same IP address subnet of...
Quick Install Guide
Page 6
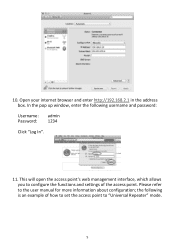
the following username and password: Username: admin Password: 1234 Click "Log In". 11. 10. Please refer to "Universal Repeater" mode. 5 Open your internet browser and enter http://192.168.2.1 in the address box. This will open the access point's web management interface, which allows you to configure the functions and settings of how to set the access point to the user manual for more information about configuration; In the pop up window, enter the following is an example of the access point.
the following username and password: Username: admin Password: 1234 Click "Log In". 11. 10. Please refer to "Universal Repeater" mode. 5 Open your internet browser and enter http://192.168.2.1 in the address box. This will open the access point's web management interface, which allows you to configure the functions and settings of how to set the access point to the user manual for more information about configuration; In the pop up window, enter the following is an example of the access point.

Quick Install Guide
Page 7
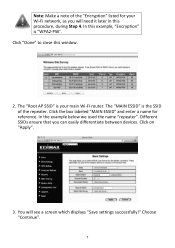
Choose your Wi-Fi network. 6 If your Wi-Fi network is not shown, "Refresh" the list of available Wi-Fi networks, as shown below. Universal Repeater Mode 1. Click the "Select Site Survey" button. On the "Status and Information" page, click "Basic Setting" in the left menu. You will see a list of available networks, then "select" your Wi-Fi network and click on "Done". Select "Universal Repeater" mode. Then click the arrow to open the menu labeled "Mode".
Choose your Wi-Fi network. 6 If your Wi-Fi network is not shown, "Refresh" the list of available Wi-Fi networks, as shown below. Universal Repeater Mode 1. Click the "Select Site Survey" button. On the "Status and Information" page, click "Basic Setting" in the left menu. You will see a list of available networks, then "select" your Wi-Fi network and click on "Done". Select "Universal Repeater" mode. Then click the arrow to open the menu labeled "Mode".
Quick Install Guide
Page 8
... devices. Click "Done" to close this example, "Encryption" is the SSID of the "Encryption" listed for reference. In the example below we used the name "repeater". Click on "Apply". 3. Choose "Continue". 7 The "MAIN ESSID" is "WPA2-PSK'. Click the box labeled "MAIN ESSID" and enter a name for your main Wi-Fi...
... devices. Click "Done" to close this example, "Encryption" is the SSID of the "Encryption" listed for reference. In the example below we used the name "repeater". Click on "Apply". 3. Choose "Continue". 7 The "MAIN ESSID" is "WPA2-PSK'. Click the box labeled "MAIN ESSID" and enter a name for your main Wi-Fi...
Quick Install Guide
Page 9
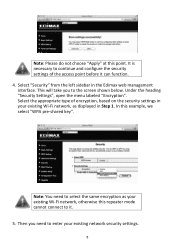
... on the security settings in your existing network security settings. 8 In this point. It is necessary to select the same encryption as displayed in the Edimax web management interface. Under the heading "Security Settings", open the menu labeled "Encryption". Select the appropriate type of the access point before it . 5. Note: ...key". Then you to it can function. 4. Note: You need to enter your existing Wi-Fi network, as your existing Wi-Fi network, otherwise this repeater mode cannot connect to the screen shown below. Select "Security" from the left sidebar in Step 1.
... on the security settings in your existing network security settings. 8 In this point. It is necessary to select the same encryption as displayed in the Edimax web management interface. Under the heading "Security Settings", open the menu labeled "Encryption". Select the appropriate type of the access point before it . 5. Note: ...key". Then you to it can function. 4. Note: You need to enter your existing Wi-Fi network, as your existing Wi-Fi network, otherwise this repeater mode cannot connect to the screen shown below. Select "Security" from the left sidebar in Step 1.

Quick Install Guide
Page 12
In this case, the network was named "repeater". Note: Please refer to "Not Connected". Disconnect the access point from the list. Verify your Macintosh by opening a web browser in the right panel. Select "... now be fully operational. 9. The access point should change to the attached Quick Installation Guide for guidance on Access Point mode, AP Client mode, and Repeater mode installation. 11 Open the "Network Name" menu and choose your access point (Main ESSID) name from your connection by removing the connecting Ethernet cable...
In this case, the network was named "repeater". Note: Please refer to "Not Connected". Disconnect the access point from the list. Verify your Macintosh by opening a web browser in the right panel. Select "... now be fully operational. 9. The access point should change to the attached Quick Installation Guide for guidance on Access Point mode, AP Client mode, and Repeater mode installation. 11 Open the "Network Name" menu and choose your access point (Main ESSID) name from your connection by removing the connecting Ethernet cable...
Manual
Page 3
......31 III-2. WEP...53 III-5-4. Station Infrastructure Mode 36 III-2-3. AP Bridge-Point to Multi-Point Mode 40 III-2-5. Universal Repeater Mode 43 III-3. System Utility ...59 III-7-1.Password Settings ...59 III-7-2. Repeater Mode (Wi-Fi Extender 23 II-6. Configuration Tool...63 III-9. Configuring your IP address 68 IV-1-1. Package Contents...5 I-2. WPA...
......31 III-2. WEP...53 III-5-4. Station Infrastructure Mode 36 III-2-3. AP Bridge-Point to Multi-Point Mode 40 III-2-5. Universal Repeater Mode 43 III-3. System Utility ...59 III-7-1.Password Settings ...59 III-7-2. Repeater Mode (Wi-Fi Extender 23 II-6. Configuration Tool...63 III-9. Configuring your IP address 68 IV-1-1. Package Contents...5 I-2. WPA...
Manual
Page 13
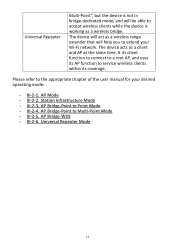
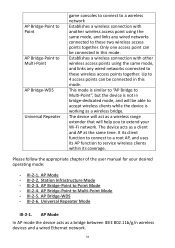
III-2-1. Universal Repeater Mode 13 It its client function to connect to a root AP, and uses its AP function to Multi-Point Mode - Please refer to the appropriate ... clients within its coverage. AP Bridge-Point to Point Mode - III-2-5. The device will help you to extend your desired operating mode: - AP Mode - Universal Repeater Multi-Point", but the device is not in bridge-dedicated mode, and will be able to accept wireless clients while the device is working as...
III-2-1. Universal Repeater Mode 13 It its client function to connect to a root AP, and uses its AP function to Multi-Point Mode - Please refer to the appropriate ... clients within its coverage. AP Bridge-Point to Point Mode - III-2-5. The device will help you to extend your desired operating mode: - AP Mode - Universal Repeater Multi-Point", but the device is not in bridge-dedicated mode, and will be able to accept wireless clients while the device is working as...
Manual
Page 23
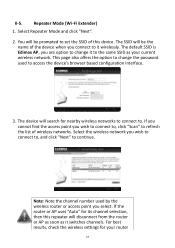
The default SSID is Edimax AP, you are option to refresh the list of this repeater will be the name of the device when you connect to... "Next" to access the device's browser based configuration interface. 3. Select the wireless network you select. Select Repeater Mode and click "Next". 2. If the router or AP uses "Auto" for nearby wireless networks to connect to... set the SSID of wireless networks. Repeater Mode (Wi-Fi Extender) 1. You will disconnect from the router or AP as soon as your router 23...
The default SSID is Edimax AP, you are option to refresh the list of this repeater will be the name of the device when you connect to... "Next" to access the device's browser based configuration interface. 3. Select the wireless network you select. Select Repeater Mode and click "Next". 2. If the router or AP uses "Auto" for nearby wireless networks to connect to... set the SSID of wireless networks. Repeater Mode (Wi-Fi Extender) 1. You will disconnect from the router or AP as soon as your router 23...
Manual
Page 26
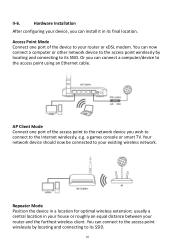
... be connected to its SSID. You can connect to the access point wirelessly by locating and connecting to your router and the furthest wireless client. Repeater Mode Position the device in its SSID. 26 usually a central location in your house or roughly an equal distance between your existing wireless network. You...
... be connected to its SSID. You can connect to the access point wirelessly by locating and connecting to your router and the furthest wireless client. Repeater Mode Position the device in its SSID. 26 usually a central location in your house or roughly an equal distance between your existing wireless network. You...
Manual
Page 34
...of the user manual for your Wi-Fi network. III-2-2. AP Bridge-Point to service wireless clients within its coverage. AP Bridge-WDS - Universal Repeater Mode III-2-1. Only one access point can be connected in this mode. AP Mode - Station Infrastructure Mode - AP Mode In AP mode the device... acts as a client and AP at the same time. AP Bridge-Point to Point AP Bridge-Point to Multi-Point AP Bridge-WDS Universal Repeater game consoles to connect to a wireless network Establishes a wireless connection with other wireless access points using the same mode, and links any wired ...
...of the user manual for your Wi-Fi network. III-2-2. AP Bridge-Point to service wireless clients within its coverage. AP Bridge-WDS - Universal Repeater Mode III-2-1. Only one access point can be connected in this mode. AP Mode - Station Infrastructure Mode - AP Mode In AP mode the device... acts as a client and AP at the same time. AP Bridge-Point to Point AP Bridge-Point to Multi-Point AP Bridge-WDS Universal Repeater game consoles to connect to a wireless network Establishes a wireless connection with other wireless access points using the same mode, and links any wired ...
Manual
Page 43
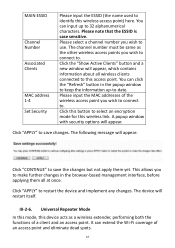
... keep the information up to 32 alphanumerical characters. You can click the "Refresh" button in the browser-based management interface, before applying them yet. Universal Repeater Mode In this mode, this access point. A popup window with security options will appear, which contains information about all at once. MAIN ESSID Channel Number...
... keep the information up to 32 alphanumerical characters. You can click the "Refresh" button in the browser-based management interface, before applying them yet. Universal Repeater Mode In this mode, this access point. A popup window with security options will appear, which contains information about all at once. MAIN ESSID Channel Number...
Manual
Page 44
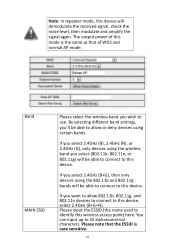
... want to allow or deny devices using the wireless band you wish to this device will be able to connect to this device. Note: In repeater mode, this device. Band MAIN SSID Please select the wireless band you select (802.11b, 802.11n, or 802.11g) will demodulate the received signal...
... want to allow or deny devices using the wireless band you wish to this device will be able to connect to this device. Note: In repeater mode, this device. Band MAIN SSID Please select the wireless band you select (802.11b, 802.11n, or 802.11g) will demodulate the received signal...

Manual
Page 45
...). You will pop up. You can click the "Refresh" button in the table for this access point. It will pop up -to-date. In Universal Repeater mode, this device will not be same as a station and connect to a root AP. Note: The access point you wish to connect to. The channel...
...). You will pop up. You can click the "Refresh" button in the table for this access point. It will pop up -to-date. In Universal Repeater mode, this device will not be same as a station and connect to a root AP. Note: The access point you wish to connect to. The channel...