Datasheet
Page 1
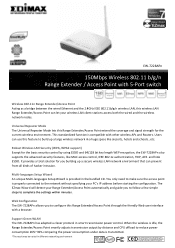
...be varied in a huge space like MAC access control, IEEE 802.1x authentication, TKIP, AES and hide ESSID. Support Green WLAN The EW‐7228APn has adapted a clever protocol in the bundled CD. It provides a total solution for you to follow a few simple steps to complete the...can prevent from all kinds of hacker intrusion. The EZmax Wizard will detect your PC's IP address before starting the configuration. When the wireless is compatible with other wireless APs and Routers. EW‐7228APn 150Mbps Wireless 802.11 b/g/n Range Extender / Access Point with 5‐Port switch Wireless...
...be varied in a huge space like MAC access control, IEEE 802.1x authentication, TKIP, AES and hide ESSID. Support Green WLAN The EW‐7228APn has adapted a clever protocol in the bundled CD. It provides a total solution for you to follow a few simple steps to complete the...can prevent from all kinds of hacker intrusion. The EZmax Wizard will detect your PC's IP address before starting the configuration. When the wireless is compatible with other wireless APs and Routers. EW‐7228APn 150Mbps Wireless 802.11 b/g/n Range Extender / Access Point with 5‐Port switch Wireless...
Quick Install Guide
Page 5
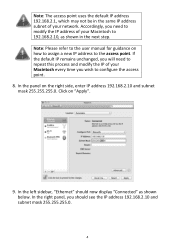
... you will need to modify the IP address of your Macintosh to the access point. If the default IP remains unchanged, you should now display "Connected" as shown in the same IP address subnet of your network. Note: The access point uses the default IP address 192.168.2.1, which may not be... in the next step. In the left sidebar, "Ethernet" should see the IP address 192.168.2.10 and subnet mask 255.255.255.0....
... you will need to modify the IP address of your Macintosh to the access point. If the default IP remains unchanged, you should now display "Connected" as shown in the same IP address subnet of your network. Note: The access point uses the default IP address 192.168.2.1, which may not be... in the next step. In the left sidebar, "Ethernet" should see the IP address 192.168.2.10 and subnet mask 255.255.255.0....
Quick Install Guide
Page 11
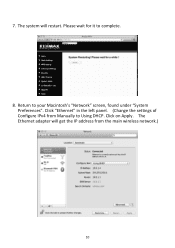
7. The system will get the IP address from Manually to complete. 8. Please wait for it to Using DHCP. Click "Ethernet" in the left panel. (Change the settings of Configure IPv4 from the main wireless network.) 10 Click on Apply. Return to your Macintosh's "Network" screen, found under "System Preferences". The Ethernet adapter will restart.
7. The system will get the IP address from Manually to complete. 8. Please wait for it to Using DHCP. Click "Ethernet" in the left panel. (Change the settings of Configure IPv4 from the main wireless network.) 10 Click on Apply. Return to your Macintosh's "Network" screen, found under "System Preferences". The Ethernet adapter will restart.
Manual
Page 3
... ...56 III-6. MAC Filtering ...57 III-7. Management IP...60 III-7-3. Safety Information ...8 I -3. Package Contents...5 I-2. AP Client Mode ...20 II-5. System Utility ...59 III-7-1.Password Settings ...59 III-7-2. WPA Pre-Shared Key 55 III-5-5. WEP...53 III-5-4. Windows XP ...68 3 Reset ...65 IV. Configuring your IP address 68 IV-1-1. Quick Installation ...10 II-1. Mac...
... ...56 III-6. MAC Filtering ...57 III-7. Management IP...60 III-7-3. Safety Information ...8 I -3. Package Contents...5 I-2. AP Client Mode ...20 II-5. System Utility ...59 III-7-1.Password Settings ...59 III-7-2. WPA Pre-Shared Key 55 III-5-5. WEP...53 III-5-4. Windows XP ...68 3 Reset ...65 IV. Configuring your IP address 68 IV-1-1. Quick Installation ...10 II-1. Mac...
Manual
Page 6
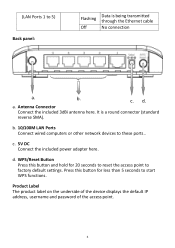
... button and hold for less than 5 seconds to factory default settings. Product Label The product label on the underside of the device displays the default IP address, username and password of the access point. 6 (LAN Ports 1 to these ports.. Antenna Connector Connect the included 3dBi antenna here.
... button and hold for less than 5 seconds to factory default settings. Product Label The product label on the underside of the device displays the default IP address, username and password of the access point. 6 (LAN Ports 1 to these ports.. Antenna Connector Connect the included 3dBi antenna here.
Manual
Page 10
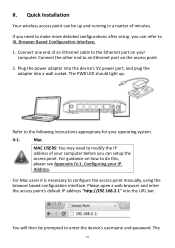
...password. If you need to the Ethernet port on your operating system. II. Connect one end of an Ethernet cable to modify the IP address of minutes. II-1. The 10 Plug the power adapter into the device's 5V power port, and plug the adapter into the URL...an Ethernet port on how to the following instructions appropriate for your computer. Please open a web browser and enter the access point's default IP address "http://192.168.2.1" into a wall socket. Browser Based Configuration Interface. 1. Configuring your computer before you can be prompted to configure the ...
...password. If you need to the Ethernet port on your operating system. II. Connect one end of an Ethernet cable to modify the IP address of minutes. II-1. The 10 Plug the power adapter into the device's 5V power port, and plug the adapter into the URL...an Ethernet port on how to the following instructions appropriate for your computer. Please open a web browser and enter the access point's default IP address "http://192.168.2.1" into a wall socket. Browser Based Configuration Interface. 1. Configuring your computer before you can be prompted to configure the ...
Manual
Page 15
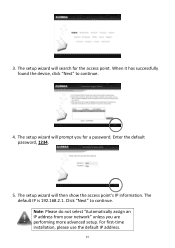
The setup wizard will prompt you are performing more advanced setup. When it has successfully found the device, click "Next" to continue. Note: Please do not select "Automatically assign an IP address from your network" unless you for the access point. For first-time installation, please use the default IP address. 15 The setup wizard will then show the access point's IP information. The default IP is 192.168.2.1. The setup wizard will search for a password. 3. Click "Next" to continue. 4. Enter the default password, 1234. 5.
The setup wizard will prompt you are performing more advanced setup. When it has successfully found the device, click "Next" to continue. Note: Please do not select "Automatically assign an IP address from your network" unless you for the access point. For first-time installation, please use the default IP address. 15 The setup wizard will then show the access point's IP information. The default IP is 192.168.2.1. The setup wizard will search for a password. 3. Click "Next" to continue. 4. Enter the default password, 1234. 5.
Manual
Page 28
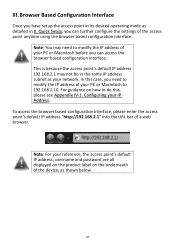
... Once you can further configure the settings of your reference, the access point's default IP address, username and password are all displayed on the product label on how to modify the IP address of your PC or Macintosh before you have setup the access point in its desired...need to do this case, you can access the browser based configuration interface. This is because the access point's default IP address 192.168.2.1 may need to modify the IP address of the access point anytime using the browser based configuration interface. For guidance on the underneath of a web browser.
... Once you can further configure the settings of your reference, the access point's default IP address, username and password are all displayed on the product label on how to modify the IP address of your PC or Macintosh before you have setup the access point in its desired...need to do this case, you can access the browser based configuration interface. This is because the access point's default IP address 192.168.2.1 may need to modify the IP address of the access point anytime using the browser based configuration interface. For guidance on the underneath of a web browser.
Manual
Page 33
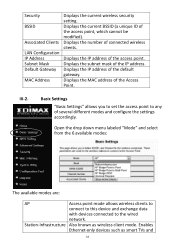
LAN Configuration IP Address Displays the IP address of the IP address. Open the drop down menu labeled "Mode" and select from the 6 available modes: The available modes are: AP Access point mode allows wireless ... wireless security setting. III-2. Associated Clients Displays the number of the Access Point. MAC Address Displays the MAC address of connected wireless clients. Station-Infrastructure Also known as smart TVs and 33 Default Gateway Displays the IP address of the access point, which cannot be modified). BSSID Displays the current BSSID (a unique...
LAN Configuration IP Address Displays the IP address of the IP address. Open the drop down menu labeled "Mode" and select from the 6 available modes: The available modes are: AP Access point mode allows wireless ... wireless security setting. III-2. Associated Clients Displays the number of the Access Point. MAC Address Displays the MAC address of connected wireless clients. Station-Infrastructure Also known as smart TVs and 33 Default Gateway Displays the IP address of the access point, which cannot be modified). BSSID Displays the current BSSID (a unique...

Manual
Page 53
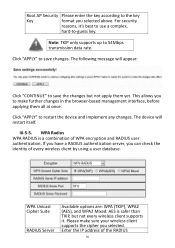
Enter the IP address of the RADIUS authentication server here. Click "APPLY" to make further changes in the browser-based management interface, before applying them yet. Enter the password ... the device and implement any changes. The following message will restart itself. Default value is a simple encryption type. III-5-3. Enable 802.1x Authentication RADIUS Server IP Address RADIUS Server Port RADIUS Server Password Enable or disable the use of the RADIUS authentication server here. Click "APPLY" to save changes. Enter the port...
Enter the IP address of the RADIUS authentication server here. Click "APPLY" to make further changes in the browser-based management interface, before applying them yet. Enter the password ... the device and implement any changes. The following message will restart itself. Default value is a simple encryption type. III-5-3. Enable 802.1x Authentication RADIUS Server IP Address RADIUS Server Port RADIUS Server Password Enable or disable the use of the RADIUS authentication server here. Click "APPLY" to save changes. Enter the port...
Manual
Page 56
... browser-based management interface, before applying them yet. WPA Radius WPA RADIUS is safer than TKIP, but not apply them all at once. Enter the IP address of WPA encryption and RADIUS user authentication. For security reasons, it . Click "APPLY" to the key Key format you to save the changes but not...
... browser-based management interface, before applying them yet. WPA Radius WPA RADIUS is safer than TKIP, but not apply them all at once. Enter the IP address of WPA encryption and RADIUS user authentication. For security reasons, it . Click "APPLY" to the key Key format you to save the changes but not...
Manual
Page 57
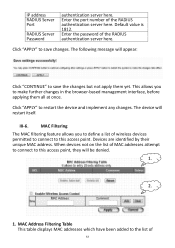
...to the list of the RADIUS authentication server here. Enter the port number of 57 When devices not on the list of MAC addresses attempt to connect to this access point, they will appear: Click "CONTINUE" to this access point. Default value is 1812. Enter... the password of wireless devices permitted to connect to save changes. IP address RADIUS Server Port RADIUS Server Password authentication server here. The following message will be denied. 1. 2. 1. This allows you to restart the device...
...to the list of the RADIUS authentication server here. Enter the port number of 57 When devices not on the list of MAC addresses attempt to connect to this access point, they will appear: Click "CONTINUE" to this access point. Default value is 1812. Enter... the password of wireless devices permitted to connect to save changes. IP address RADIUS Server Port RADIUS Server Password authentication server here. The following message will be denied. 1. 2. 1. This allows you to restart the device...

Manual
Page 60
... IP address, subnet mask and gateway address into the corresponding fields. IP Address Subnet Mask Gateway Address DHCP Server Specify an IP address here. Input the network's gateway IP address. Note: Please write down and remember the new IP address you wish to use the DHCP function of the access point, as IP address, subnet mask and gateway address. III-7-2. Management IP You can modify the IP address...
... IP address, subnet mask and gateway address into the corresponding fields. IP Address Subnet Mask Gateway Address DHCP Server Specify an IP address here. Input the network's gateway IP address. Note: Please write down and remember the new IP address you wish to use the DHCP function of the access point, as IP address, subnet mask and gateway address. III-7-2. Management IP You can modify the IP address...
Manual
Page 61
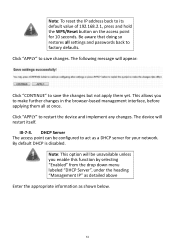
... is disabled. This allows you enable this function by selecting "Enabled" from the drop down menu labeled "DHCP Server", under the heading "Management IP" as detailed above Enter the appropriate information as a DHCP server for 10 seconds. Note: This option will be configured to save changes. The following... value of 192.168.2.1, press and hold the WPS/Reset button on the access point for your network. III-7-3. Note: To reset the IP address back to restart the device and implement any changes. Click "APPLY" to save the changes but not apply them all settings and passwords back...
... is disabled. This allows you enable this function by selecting "Enabled" from the drop down menu labeled "DHCP Server", under the heading "Management IP" as detailed above Enter the appropriate information as a DHCP server for 10 seconds. Note: This option will be configured to save changes. The following... value of 192.168.2.1, press and hold the WPS/Reset button on the access point for your network. III-7-3. Note: To reset the IP address back to restart the device and implement any changes. Click "APPLY" to save the changes but not apply them all settings and passwords back...

Manual
Page 62
...The device will appear: Click "CONTINUE" to save the changes but not apply them all at once. End IP Input the end address of the domain name Server IP server (DNS). Domain Name Input the domain name for your network here. Lease Time Choose a lease time (...the duration that every computer can keep a specific IP address) of your network (optional). Click "APPLY" to save changes. Default Gateway Specify the IP address of the default IP gateway of every IP address assigned by the access point. Click "APPLY" to make further changes in the...
...The device will appear: Click "CONTINUE" to save the changes but not apply them all at once. End IP Input the end address of the domain name Server IP server (DNS). Domain Name Input the domain name for your network here. Lease Time Choose a lease time (...the duration that every computer can keep a specific IP address) of your network (optional). Click "APPLY" to save changes. Default Gateway Specify the IP address of the default IP gateway of every IP address assigned by the access point. Click "APPLY" to make further changes in the...
Manual
Page 68
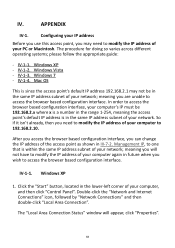
... double-click "Local Area Connection". The "Local Area Connection Status" window will not have to modify the IP address of your computer again in the same IP address subnet of your network; Windows XP 1. The procedure for doing so varies across different operating systems; After ...in the range 1-254, meaning the access point's default IP address is within the same IP address subnet of your network. IV. IV-1-4. APPENDIX IV-1. Configuring your IP address Before you use this access point, you can change the IP address of the access point as shown in the lower-left ...
... double-click "Local Area Connection". The "Local Area Connection Status" window will not have to modify the IP address of your computer again in the same IP address subnet of your network; Windows XP 1. The procedure for doing so varies across different operating systems; After ...in the range 1-254, meaning the access point's default IP address is within the same IP address subnet of your network. IV. IV-1-4. APPENDIX IV-1. Configuring your IP address Before you use this access point, you can change the IP address of the access point as shown in the lower-left ...

Manual
Page 69
2. Select "Use the following IP address", and input the following values: IP address: 192.168.2.10 Subnet Mask: 255.255.255.0 Click 'OK' when finished. 69
2. Select "Use the following IP address", and input the following values: IP address: 192.168.2.10 Subnet Mask: 255.255.255.0 Click 'OK' when finished. 69
Manual
Page 70
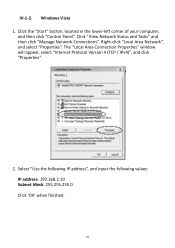
Click the "Start" button, located in the lower-left corner of your computer, and then click "Control Panel". Click "View Network Status and Tasks" and then click "Manage Network Connections". Select "Use the following IP address", and input the following values: IP address: 192.168.2.10 Subnet Mask: 255.255.255.0 Click 'OK' when finished. 70 IV-1-2. Right-click "Local Area Network", and select "Properties". The "Local Area Connection Properties" window will appear, select "Internet Protocol Version 4 (TCP / IPv4)", and click "Properties". 2. Windows Vista 1.
Click the "Start" button, located in the lower-left corner of your computer, and then click "Control Panel". Click "View Network Status and Tasks" and then click "Manage Network Connections". Select "Use the following IP address", and input the following values: IP address: 192.168.2.10 Subnet Mask: 255.255.255.0 Click 'OK' when finished. 70 IV-1-2. Right-click "Local Area Network", and select "Properties". The "Local Area Connection Properties" window will appear, select "Internet Protocol Version 4 (TCP / IPv4)", and click "Properties". 2. Windows Vista 1.

Manual
Page 74
Select "Use the following IP address", and input the following values: IP address: 192.168.2.10 Subnet Mask: 255.255.255.0 Click 'OK' when finished. 74 5.
Select "Use the following IP address", and input the following values: IP address: 192.168.2.10 Subnet Mask: 255.255.255.0 Click 'OK' when finished. 74 5.
Manual
Page 76
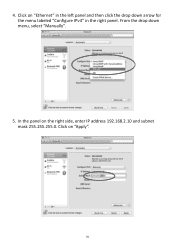
In the panel on "Ethernet" in the left panel and then click the drop down menu, select "Manually". 5. Click on the right side, enter IP address 192.168.2.10 and subnet mask 255.255.255.0. Click on "Apply". 76 From the drop down arrow for the menu labeled "Configure IPv4" in the right panel. 4.
In the panel on "Ethernet" in the left panel and then click the drop down menu, select "Manually". 5. Click on the right side, enter IP address 192.168.2.10 and subnet mask 255.255.255.0. Click on "Apply". 76 From the drop down arrow for the menu labeled "Configure IPv4" in the right panel. 4.