Datasheet
Page 1
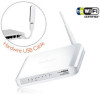
.../g, and is a multi-function wireless broadband router. The 3G-6200n can setup the router to 150Mbps - Extensive Internet Connection Sharing With the built in a snap. 3G-6200n features a control button on /off of the Wi-Fi wireless connection. High Performance Hardware Design and Impressive Data Transmission Rate via IEEE802.11n Edimax 3G-6200n is a high speed solution that complies...
.../g, and is a multi-function wireless broadband router. The 3G-6200n can setup the router to 150Mbps - Extensive Internet Connection Sharing With the built in a snap. 3G-6200n features a control button on /off of the Wi-Fi wireless connection. High Performance Hardware Design and Impressive Data Transmission Rate via IEEE802.11n Edimax 3G-6200n is a high speed solution that complies...

Datasheet
Page 2
...25 (H) mm DC 12V, 1A CE, FCC , WiFi NETWORK SETUP DIAGRAM AND RELATED PRODUCTS An example of how the 3G-6200n can be setup: • Connect the 3G/3.5G USB modem card to 3G-6200n router USB port ** • Connect a computer to the LAN port and setup the Internet connection by running the multi-...language setup wizard. • Share the Internet connection by connecting wired or wireless computers. ** You can connect 3G-6200n router WAN port to your Ethernet (RJ45) cable/xDSL modem as a backup. * Product features and specifications are subject to change without notice.
...25 (H) mm DC 12V, 1A CE, FCC , WiFi NETWORK SETUP DIAGRAM AND RELATED PRODUCTS An example of how the 3G-6200n can be setup: • Connect the 3G/3.5G USB modem card to 3G-6200n router USB port ** • Connect a computer to the LAN port and setup the Internet connection by running the multi-...language setup wizard. • Share the Internet connection by connecting wired or wireless computers. ** You can connect 3G-6200n router WAN port to your Ethernet (RJ45) cable/xDSL modem as a backup. * Product features and specifications are subject to change without notice.
Quick Install Guide
Page 3
PPPoE 24 2-3-3 Router Configuration - Dynamic IP 26 3 Advanced Setup 28 3-1 Change management password 28 3-2 Firmware Upgrade 29 3-3 Restart and Reset to Default Setting 30 3-4 Wireless Setup 31 2 1 Product Introduction 4 1-1 Package Contents 5 1-2 Front Panel 5 1-3 Back Panel 6 2 Network Setup 7 2-1 Hardware Installation 7 2-2 PC LAN IP Configuration 9 2-3 Internet Configuration 12 2-3-1 Wireless 3G/3.5G Setup 12 ( A ) Plug and...
PPPoE 24 2-3-3 Router Configuration - Dynamic IP 26 3 Advanced Setup 28 3-1 Change management password 28 3-2 Firmware Upgrade 29 3-3 Restart and Reset to Default Setting 30 3-4 Wireless Setup 31 2 1 Product Introduction 4 1-1 Package Contents 5 1-2 Front Panel 5 1-3 Back Panel 6 2 Network Setup 7 2-1 Hardware Installation 7 2-2 PC LAN IP Configuration 9 2-3 Internet Configuration 12 2-3-1 Wireless 3G/3.5G Setup 12 ( A ) Plug and...
Quick Install Guide
Page 5
... wizard provides quick setup for the Setup Wizard is the best choice for purchasing Edimax 3G-6200n / 3G-6400n wireless 3G broadband router! Note 1: Only one Internet connection (wireless 3G or xDSL/Cable) can be used at high speed. No instruction for wireless 3G/3.5G Internet connection, Ethernet WAN Internet connection, SSID, wireless security, firmware upgrade and changing...
... wizard provides quick setup for the Setup Wizard is the best choice for purchasing Edimax 3G-6200n / 3G-6400n wireless 3G broadband router! Note 1: Only one Internet connection (wireless 3G or xDSL/Cable) can be used at high speed. No instruction for wireless 3G/3.5G Internet connection, Ethernet WAN Internet connection, SSID, wireless security, firmware upgrade and changing...
Quick Install Guide
Page 6
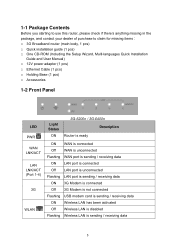
... (1 pcs) □ Ethernet Cable (1 pcs) □ Holding Base (1 pcs) □ Accessories 1-2 Front Panel LED PWR WAN LNK/ACT LAN LNK/ACT (Port 1-4) 3G WLAN Light Status ON 3G-6200n / 3G-6400n Description Router is ready ON WAN is connected Off WAN is unconnected Flashing WAN port is sending / receiving data ON LAN port is connected...
... (1 pcs) □ Ethernet Cable (1 pcs) □ Holding Base (1 pcs) □ Accessories 1-2 Front Panel LED PWR WAN LNK/ACT LAN LNK/ACT (Port 1-4) 3G WLAN Light Status ON 3G-6200n / 3G-6400n Description Router is ready ON WAN is connected Off WAN is unconnected Flashing WAN port is sending / receiving data ON LAN port is connected...
Quick Install Guide
Page 7
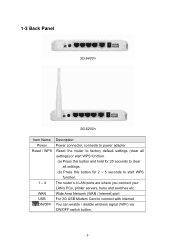
..., hubs and switches etc. Wide Area Network (WAN / Internet) port For 3G USB Modem Card to start WPS function. 1-3 Back Panel 3G-6400n 3G-6200n Item Name Power Reset / WPS 1 - 4 WAN USB ON/OFF Description Power connector, connects to power adapter Reset the router to factory default settings (clear all settings) or start WPS function...
..., hubs and switches etc. Wide Area Network (WAN / Internet) port For 3G USB Modem Card to start WPS function. 1-3 Back Panel 3G-6400n 3G-6200n Item Name Power Reset / WPS 1 - 4 WAN USB ON/OFF Description Power connector, connects to power adapter Reset the router to factory default settings (clear all settings) or start WPS function...

Quick Install Guide
Page 8
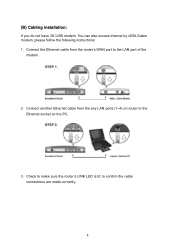
... 1. 2 Network Setup 2-1 Hardware Installation: Instructions for using the router to share the Internet with one of USB port of 3G-6200n / 3G-6400n. Connect another Ethernet cable from the any LAN ports (1~4) on router to the Ethernet socket on 3G-6200n / 3G-6400n will light. 7 Insert SIM card into 3G/3.5G modem card, and connect the modem card with...
... 1. 2 Network Setup 2-1 Hardware Installation: Instructions for using the router to share the Internet with one of USB port of 3G-6200n / 3G-6400n. Connect another Ethernet cable from the any LAN ports (1~4) on router to the Ethernet socket on 3G-6200n / 3G-6400n will light. 7 Insert SIM card into 3G/3.5G modem card, and connect the modem card with...
Quick Install Guide
Page 9
to the Ethernet socket on router to confirm the cable connections are made correctly. 8 (B) Cabling installation: If you do not have 3G USB modem. Connect another Ethernet cable from the router's WAN port to make sure the router's LINK LED is lit; Check to the LAN port of the modem. 2. Connect the Ethernet cable from the any LAN ports (1~4) on the PC. 3. You can also access Internet by xDSL/Cable modem, please follow the following instructions: 1.
to the Ethernet socket on router to confirm the cable connections are made correctly. 8 (B) Cabling installation: If you do not have 3G USB modem. Connect another Ethernet cable from the router's WAN port to make sure the router's LINK LED is lit; Check to the LAN port of the modem. 2. Connect the Ethernet cable from the any LAN ports (1~4) on the PC. 3. You can also access Internet by xDSL/Cable modem, please follow the following instructions: 1.
Quick Install Guide
Page 10
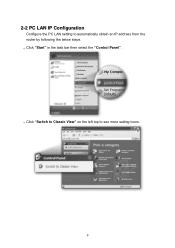
z Click "Switch to Classic View" on the left top to automatically obtain an IP address from the router by following the below steps. 2-2 PC LAN IP Configuration Configure the PC LAN setting to see more setting icons. 9 z Click "Start" in the task bar then select the "Control Panel" .
z Click "Switch to Classic View" on the left top to automatically obtain an IP address from the router by following the below steps. 2-2 PC LAN IP Configuration Configure the PC LAN setting to see more setting icons. 9 z Click "Start" in the task bar then select the "Control Panel" .
Quick Install Guide
Page 14
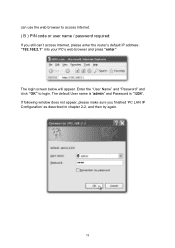
Enter the "User Name" and "Password" and click "OK" to access Internet. ( B ) PIN code or user name / password required: If you finished 'PC LAN IP Configuration' as described in chapter 2-2, and then try again. 13 The default User name is "admin" and Password is "1234", If following window does not appear, please make sure you still can't access Internet, please enter the router's default IP address: "192.168.2.1" into your PC's web browser and press "enter" The login screen below will appear. can use the web browser to login.
Enter the "User Name" and "Password" and click "OK" to access Internet. ( B ) PIN code or user name / password required: If you finished 'PC LAN IP Configuration' as described in chapter 2-2, and then try again. 13 The default User name is "admin" and Password is "1234", If following window does not appear, please make sure you still can't access Internet, please enter the router's default IP address: "192.168.2.1" into your PC's web browser and press "enter" The login screen below will appear. can use the web browser to login.
Quick Install Guide
Page 23
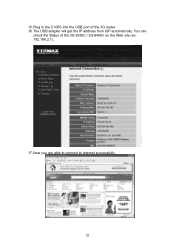
Plug in the C100S into the USB port of the 3G-6200n / 3G-6400n on the Web site (ex: 192.168.2.1). 17. The USB adapter will get the IP address from ISP automatically. Now you are able to connect to Internet successfully. 22 You can check the Status of the 3G router. 16. 15.
Plug in the C100S into the USB port of the 3G-6200n / 3G-6400n on the Web site (ex: 192.168.2.1). 17. The USB adapter will get the IP address from ISP automatically. Now you are able to connect to Internet successfully. 22 You can check the Status of the 3G router. 16. 15.
Quick Install Guide
Page 24
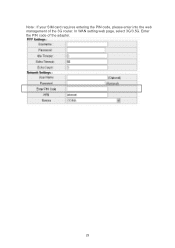
Enter the PIN code of the 3G router. In WAN setting web page, select 3G/3.5G. Note : If your SIM card requires entering the PIN code, please enter into the web management of the adapter. 23
Enter the PIN code of the 3G router. In WAN setting web page, select 3G/3.5G. Note : If your SIM card requires entering the PIN code, please enter into the web management of the adapter. 23
Quick Install Guide
Page 25
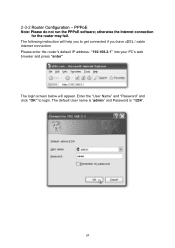
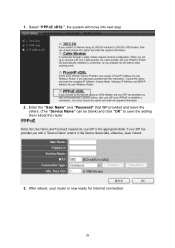
Enter the "User Name" and "Password" and click "OK" to get connected if you have xDSL / cable Internet connection Please enter the router's default IP address: "192.168.2.1" into your PC's web browser and press "enter" The login screen below will help you to login. 2-3-2 Router Configuration - PPPoE Note: Please do not run the PPPoE software; The following instruction will appear. The default User name is "admin" and Password is "1234", 24 otherwise the Internet connection for the router may fail.
Enter the "User Name" and "Password" and click "OK" to get connected if you have xDSL / cable Internet connection Please enter the router's default IP address: "192.168.2.1" into your PC's web browser and press "enter" The login screen below will help you to login. 2-3-2 Router Configuration - PPPoE Note: Please do not run the PPPoE software; The following instruction will appear. The default User name is "admin" and Password is "1234", 24 otherwise the Internet connection for the router may fail.
Quick Install Guide
Page 26
After reboot, your router is now ready for Internet connection. 25 Enter the "User Name" and "Password" that ISP provided and leave the others. (The "Service Name" can be blank) and click "OK" to save the setting then reboot the router 3. 1. Select "PPPoE xDSL", the system will move into next step 2.
After reboot, your router is now ready for Internet connection. 25 Enter the "User Name" and "Password" that ISP provided and leave the others. (The "Service Name" can be blank) and click "OK" to save the setting then reboot the router 3. 1. Select "PPPoE xDSL", the system will move into next step 2.
Quick Install Guide
Page 27
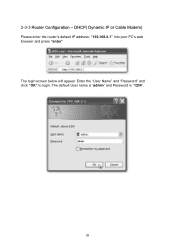
Enter the "User Name" and "Password" and click "OK" to login. The default User name is "admin" and Password is "1234", 26 2-3-3 Router Configuration - DHCP( Dynamic IP or Cable Modem) Please enter the router's default IP address: "192.168.2.1" into your PC's web browser and press "enter" The login screen below will appear.
Enter the "User Name" and "Password" and click "OK" to login. The default User name is "admin" and Password is "1234", 26 2-3-3 Router Configuration - DHCP( Dynamic IP or Cable Modem) Please enter the router's default IP address: "192.168.2.1" into your PC's web browser and press "enter" The login screen below will appear.
Quick Install Guide
Page 28
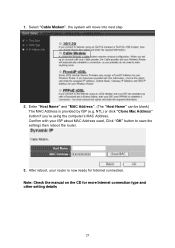
Confirm with your router is provided by ISP (e.g. Enter "Host Name" and "MAC Address". (The "Host Name" can be blank) The MAC Address is now ready for more Internet connection type and other setting details 27 After reboot, your ISP about MAC Address used, Click "OK" button to save the settings then reboot the router. 3. Note: Check the manual on the CD for Internet connection. Select "Cable Modem", the system will move into next step 2. NTL) or click "Clone Mac Address" button if you're using the computer's MAC Address. 1.
Confirm with your router is provided by ISP (e.g. Enter "Host Name" and "MAC Address". (The "Host Name" can be blank) The MAC Address is now ready for more Internet connection type and other setting details 27 After reboot, your ISP about MAC Address used, Click "OK" button to save the settings then reboot the router. 3. Note: Check the manual on the CD for Internet connection. Select "Cable Modem", the system will move into next step 2. NTL) or click "Clone Mac Address" button if you're using the computer's MAC Address. 1.

Quick Install Guide
Page 29
... : Please input current password here. To change the default password, since everyone can see it 's displayed on your web browser: Here are descriptions of this router is 1234, and it .
... : Please input current password here. To change the default password, since everyone can see it 's displayed on your web browser: Here are descriptions of this router is 1234, and it .
Quick Install Guide
Page 30
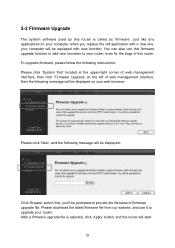
... fix the bugs of firmware upgrade file. 3-2 Firmware Upgrade The system software used by this router. You can also use it to provide the filename of this router is selected, click 'Apply' button, and the router will be equipped with new function. After a firmware upgrade file is called as 'firmware', just like any... web browser: Please click 'Next', and the following message will be displayed: Click 'Browse' button first, you replace the old application with a new one, your router.
... fix the bugs of firmware upgrade file. 3-2 Firmware Upgrade The system software used by this router. You can also use it to provide the filename of this router is selected, click 'Apply' button, and the router will be equipped with new function. After a firmware upgrade file is called as 'firmware', just like any... web browser: Please click 'Next', and the following message will be displayed: Click 'Browse' button first, you replace the old application with a new one, your router.
Quick Install Guide
Page 31
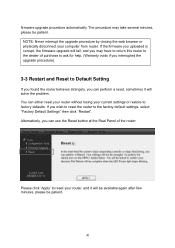
... browser or physically disconnect your current settings or restore to Default Setting If you found the router behaves strangely, you can either reset your router without losing your computer from router. If you can use the Reset button at the Real Panel of purchase to ask for...help. (Warranty voids if you interrupted the upgrade procedure). 3-3 Restart and Reset to factory defaults. Alternatively, you wish to reset the router to reset your router, and it will solve the problem. Please click 'Apply' to the factory default settings, select "Factory Default Settings" then click "...
... browser or physically disconnect your current settings or restore to Default Setting If you found the router behaves strangely, you can either reset your router without losing your computer from router. If you can use the Reset button at the Real Panel of purchase to ask for...help. (Warranty voids if you interrupted the upgrade procedure). 3-3 Restart and Reset to factory defaults. Alternatively, you wish to reset the router to reset your router, and it will solve the problem. Please click 'Apply' to the factory default settings, select "Factory Default Settings" then click "...
Quick Install Guide
Page 32
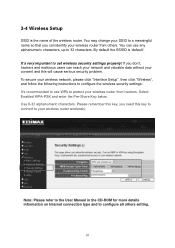
...hackers and malicious users can identify your SSID to configure all others . To secure your wireless router wirelessly. Please remember this key, you can reach your network and valuable data without your wireless router from others setting. 31 3-4 Wireless Setup SSID is 'default'. By default the ESSID is ...the name of the wireless router. It's very important to your wireless network, please click "Interface Setup", then click "Wireless", and follow the following instructions to configure ...
...hackers and malicious users can identify your SSID to configure all others . To secure your wireless router wirelessly. Please remember this key, you can reach your network and valuable data without your wireless router from others setting. 31 3-4 Wireless Setup SSID is 'default'. By default the ESSID is ...the name of the wireless router. It's very important to your wireless network, please click "Interface Setup", then click "Wireless", and follow the following instructions to configure ...


