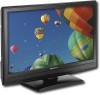
User Manual (English)
Page 2
... Connecting a computer 12 Connecting a digital sound system 12 Connecting headphones 12 Using your TV 13 Turning your TV on or off 13 Using the remote control 13 Selecting the video input source 13 Selecting the TV signal source 13 Scanning for channels 13 Deleting channels 14 Changing channels 15 Adjusting the volume 15 Adjusting the picture 15 Reducing video noise (snow 16 Optimizing the picture 16 Adjusting the sound 16 Selecting the audio mode 17 Setting the clock 17 Setting the sleep timer 17 Selecting the aspect ratio 17 Turning closed captioning...
... Connecting a computer 12 Connecting a digital sound system 12 Connecting headphones 12 Using your TV 13 Turning your TV on or off 13 Using the remote control 13 Selecting the video input source 13 Selecting the TV signal source 13 Scanning for channels 13 Deleting channels 14 Changing channels 15 Adjusting the volume 15 Adjusting the picture 15 Reducing video noise (snow 16 Optimizing the picture 16 Adjusting the sound 16 Selecting the audio mode 17 Setting the clock 17 Setting the sleep timer 17 Selecting the aspect ratio 17 Turning closed captioning...
User Manual (English)
Page 3
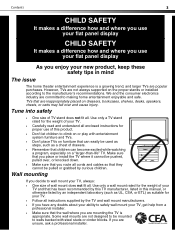
... stands or installed according to making home entertainment enjoyable and safe. Use only a TV stand rated for the weight of your TV. • Carefully read and understand all enclosed instructions for proper use your flat panel display As you enjoy your new product, keep these safety tips in this product. • Don't let children to safely wall mount your TV, get help from a professional installer...
... stands or installed according to making home entertainment enjoyable and safe. Use only a TV stand rated for the weight of your TV. • Carefully read and understand all enclosed instructions for proper use your flat panel display As you enjoy your new product, keep these safety tips in this product. • Don't let children to safely wall mount your TV, get help from a professional installer...
User Manual (English)
Page 4
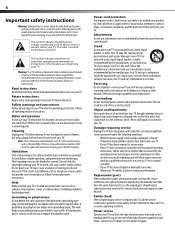
... expose you will often require extensive work by following conditions: • When the power supply cord or plug is located on the back of the polarized or grounding-type plug. Replacement parts When replacement parts are important operating and maintenance instructions in the literature accompanying your TV. Power source Operate your TV only from overheating. Never spill liquid of power supplied to cords at www.eia.org. Warning...
... expose you will often require extensive work by following conditions: • When the power supply cord or plug is located on the back of the polarized or grounding-type plug. Replacement parts When replacement parts are important operating and maintenance instructions in the literature accompanying your TV. Power source Operate your TV only from overheating. Never spill liquid of power supplied to cords at www.eia.org. Warning...
User Manual (English)
Page 5
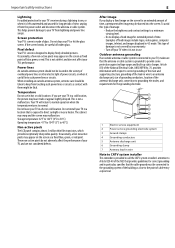
... viewing level. • Do no display a fixed image for extended period of glass. Examples of cable entry as close to keep from the power outlet and disconnect the antenna or cable system. Important safety instructions Lightning For added protection for your TV's performance. Power lines An outside antenna system, extreme care should not be connected to Article 820-40 of the National Electrical Code...
... viewing level. • Do no display a fixed image for extended period of glass. Examples of cable entry as close to keep from the power outlet and disconnect the antenna or cable system. Important safety instructions Lightning For added protection for your TV's performance. Power lines An outside antenna system, extreme care should not be connected to Article 820-40 of the National Electrical Code...
User Manual (English)
Page 8
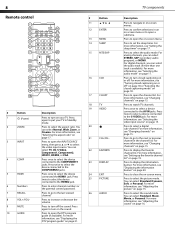
... "Adjusting the sound" on page 16. For more information, see "Selecting the audio mode" on page 17. Press to display the information banner. 8 Remote control # Button 11 12 ENTER 13 MENU 14 SLEEP 15 MTS/SAP 16 CCD # Button 1 (Power) 2 ZOOM 3 INPUT 4 COMP 5 HDMI 6 Numbers 7 RECALL 8 VOL+/VOL- 9 MUTE 10 GUIDE Description Press to turn on your TV in Standby mode. Press twice to select a device connected to enter channel numbers or the parental control password. For...
... "Adjusting the sound" on page 16. For more information, see "Selecting the audio mode" on page 17. Press to display the information banner. 8 Remote control # Button 11 12 ENTER 13 MENU 14 SLEEP 15 MTS/SAP 16 CCD # Button 1 (Power) 2 ZOOM 3 INPUT 4 COMP 5 HDMI 6 Numbers 7 RECALL 8 VOL+/VOL- 9 MUTE 10 GUIDE Description Press to turn on your TV in Standby mode. Press twice to select a device connected to enter channel numbers or the parental control password. For...
User Manual (English)
Page 9
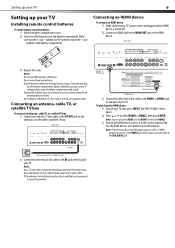
...'s power cord is unplugged and the HDMI device is not installed correctly, contact qualified service personnel to the VGA AUDIO jack. Back of them as hazardous waste. Chemicals may leak into the battery compartment. Remove the batteries if you do not intend to use a DVI-to-HDMI adapter to connect to the HDMI1 jack, then connect an audio cable to correct the problem. Connecting an antenna, cable TV, or satellite TV box...
...'s power cord is unplugged and the HDMI device is not installed correctly, contact qualified service personnel to the VGA AUDIO jack. Back of them as hazardous waste. Chemicals may leak into the battery compartment. Remove the batteries if you do not intend to use a DVI-to-HDMI adapter to connect to the HDMI1 jack, then connect an audio cable to correct the problem. Connecting an antenna, cable TV, or satellite TV box...
User Manual (English)
Page 10
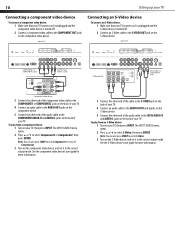
... press INPUT. The INPUT SOURCE menu opens. 2 Press or to select Component1 or Component2, then press ENTER. To play from an S-Video device: 1 Turn on your TV, then press INPUT. See the component video device's user guide for more information. 3 Connect the other end of the cable to the S-VIDEO jack on the back of your TV. 4 Connect an audio cable to the AUDIO OUT R and L jacks on the S-Video device. 5 Connect the...
... press INPUT. The INPUT SOURCE menu opens. 2 Press or to select Component1 or Component2, then press ENTER. To play from an S-Video device: 1 Turn on your TV, then press INPUT. See the component video device's user guide for more information. 3 Connect the other end of the cable to the S-VIDEO jack on the back of your TV. 4 Connect an audio cable to the AUDIO OUT R and L jacks on the S-Video device. 5 Connect the...
User Manual (English)
Page 11
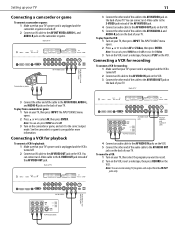
... S-VIDEO OUT jack instead of your TV, then select the program you want to select AV, then press ENTER. See the camcorder's or game's user guide for playback Note: You can also press VIDEO once for AV or twice for recording: 1 Make sure that your TV's power cord is unplugged and the VCR is turned off . 2 Connect an AV cable to the AV OUT VIDEO, AUDIO-L, and AUDIO-R jacks...
... S-VIDEO OUT jack instead of your TV, then select the program you want to select AV, then press ENTER. See the camcorder's or game's user guide for playback Note: You can also press VIDEO once for AV or twice for recording: 1 Make sure that your TV's power cord is unplugged and the VCR is turned off . 2 Connect an AV cable to the AV OUT VIDEO, AUDIO-L, and AUDIO-R jacks...
User Manual (English)
Page 12
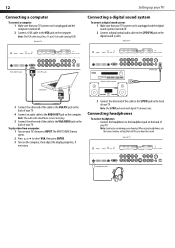
...: The S/PDIF jack works with digital TV channels only. When using headphones, use the lowest volume setting that your TV. 4 Connect an audio cable to the S/PDIF IN jack on your hearing. Note: The VGA cable should have a stereo mini plug. 5 Connect the other end of the cable to the VGA AUDIO jack on the back of your TV's power cord is unplugged and the digital sound system is turned off . 2 Connect a digital optical audio cable to the AUDIO OUT jack on the...
...: The S/PDIF jack works with digital TV channels only. When using headphones, use the lowest volume setting that your TV. 4 Connect an audio cable to the S/PDIF IN jack on your hearing. Note: The VGA cable should have a stereo mini plug. 5 Connect the other end of the cable to the VGA AUDIO jack on the back of your TV's power cord is unplugged and the digital sound system is turned off . 2 Connect a digital optical audio cable to the AUDIO OUT jack on the...
User Manual (English)
Page 13
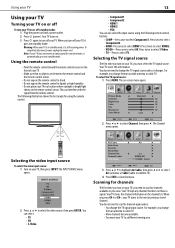
... Color Mode Setup Lock Standard Cool Channel 50 50 50 0 50 Select Move MENU Exit 2 Press or to close the menu. Press twice to select S-Video. • TV-Press to select AV. The on or off (standby mode): 1 Plug the power cord into standby mode. The Channel menu opens. 16.4" (5 m) Selecting the video input source To select the video input source: 1 Turn on your TV. Scanning for channels available in a location where sunlight or bright light shines on the remote control...
... Color Mode Setup Lock Standard Cool Channel 50 50 50 0 50 Select Move MENU Exit 2 Press or to close the menu. Press twice to select S-Video. • TV-Press to select AV. The on or off (standby mode): 1 Plug the power cord into standby mode. The Channel menu opens. 16.4" (5 m) Selecting the video input source To select the video input source: 1 Turn on your TV. Scanning for channels available in a location where sunlight or bright light shines on the remote control...
User Manual (English)
Page 15
... press PICTURE to close the menu. The Channel menu opens. The main digital channel broadcasts the program. Using your TV 15 2 Press or to adjust the option. Note: If the list has more blue), or Normal (does not adjust the colors). 4 Press MENU to return to the previous menu, or press EXIT to sub-channel 3 of information depending on -screen menu opens. Picture Sound Air/Cable Auto Scan Favorite Show/Hide Channel No. The channel list...
... press PICTURE to close the menu. The Channel menu opens. The main digital channel broadcasts the program. Using your TV 15 2 Press or to adjust the option. Note: If the list has more blue), or Normal (does not adjust the colors). 4 Press MENU to return to the previous menu, or press EXIT to sub-channel 3 of information depending on -screen menu opens. Picture Sound Air/Cable Auto Scan Favorite Show/Hide Channel No. The channel list...
User Manual (English)
Page 16
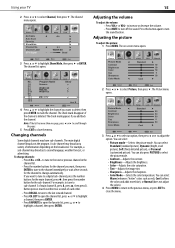
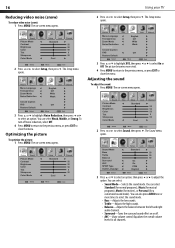
Picture Sound Time Setup Lock Channel Menu Language Transparency Zoom Mode Noise Reduction Advanced Closed Caption XVS Restore Default English Off Wide Weak Off Select Move MENU Exit 3 Press or to highlight Noise Reduction, then press or to select Sound, then press . The Setup menu opens. Picture Sound Time Picture Mode Contrast Brightness Color Tint Sharpness Color Mode Setup Lock Standard Cool Channel 50 50 50 0 50 Select Move MENU Exit 2 Press or to select an option. You can select Standard (for normal programs), Music...
Picture Sound Time Setup Lock Channel Menu Language Transparency Zoom Mode Noise Reduction Advanced Closed Caption XVS Restore Default English Off Wide Weak Off Select Move MENU Exit 3 Press or to highlight Noise Reduction, then press or to select Sound, then press . The Setup menu opens. Picture Sound Time Picture Mode Contrast Brightness Color Tint Sharpness Color Mode Setup Lock Standard Cool Channel 50 50 50 0 50 Select Move MENU Exit 2 Press or to select an option. You can select Standard (for normal programs), Music...

User Manual (English)
Page 17
... • SPDIF Type-(DTV channels only) Selects the S/PDIF audio output mode. Selecting the audio mode You can select the audio mode for analog channels or you want your TV to close the menu. Note: You can select an audio track for a digital channel: • Press MTS/SAP. The Time menu opens. The on -screen menu opens. Picture Sound Time Setup Lock Channel Sleep Timer Time Zone Daylight Saving Time Clock Off Hawaii On 2008/07/15 06:58AM Picture Sound Time Setup Lock Channel Picture Mode Contrast Brightness Color Tint Sharpness Color Mode Standard 50...
... • SPDIF Type-(DTV channels only) Selects the S/PDIF audio output mode. Selecting the audio mode You can select the audio mode for analog channels or you want your TV to close the menu. Note: You can select an audio track for a digital channel: • Press MTS/SAP. The Time menu opens. The on -screen menu opens. Picture Sound Time Setup Lock Channel Sleep Timer Time Zone Daylight Saving Time Clock Off Hawaii On 2008/07/15 06:58AM Picture Sound Time Setup Lock Channel Picture Mode Contrast Brightness Color Tint Sharpness Color Mode Standard 50...
User Manual (English)
Page 19
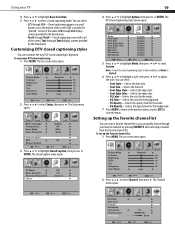
... or to select Setup, then press . Setting up the favorite channel list: 1 Press MENU. To set Mode to Default. 6 Press or to highlight a style, then press or to close the menu. You can quickly browse through CC4 display content provided by the broadcaster. Select Move MENU Exit Picture Sound Air/Cable Auto Scan Favorite Show/Hide Channel No. Channel Label DTV Signal Time Setup Air Lock Channel 2-1 WGBH-SD : Good Select Move MENU Exit Picture Sound Time Setup Lock Channel Picture Mode Contrast Brightness Color Tint Sharpness Color Mode Standard...
... or to select Setup, then press . Setting up the favorite channel list: 1 Press MENU. To set Mode to Default. 6 Press or to highlight a style, then press or to close the menu. You can quickly browse through CC4 display content provided by the broadcaster. Select Move MENU Exit Picture Sound Air/Cable Auto Scan Favorite Show/Hide Channel No. Channel Label DTV Signal Time Setup Air Lock Channel 2-1 WGBH-SD : Good Select Move MENU Exit Picture Sound Time Setup Lock Channel Picture Mode Contrast Brightness Color Tint Sharpness Color Mode Standard...
User Manual (English)
Page 21
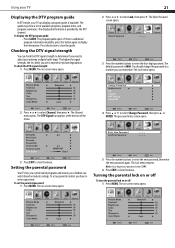
...close the menu. Checking the DTV signal strength You can display a program guide, if available. The on or off: 1 Press MENU. Picture Sound Air/Cable Auto Scan Favorite Show/Hide Channel No. To set the parental password: 1 Press MENU. Picture Sound Time Enter New Password Confirm Password Setup Lock Channel Select Move MENU Exit 5 Press the number buttons to select Channel, then press . The Enter Password screen opens. Picture Sound Time Setup Lock Channel Picture Mode Contrast Brightness Color Tint Sharpness Color Mode Standard 50 50 50 0 50 Cool Select Move MENU...
...close the menu. Checking the DTV signal strength You can display a program guide, if available. The on or off: 1 Press MENU. Picture Sound Air/Cable Auto Scan Favorite Show/Hide Channel No. To set the parental password: 1 Press MENU. Picture Sound Time Enter New Password Confirm Password Setup Lock Channel Select Move MENU Exit 5 Press the number buttons to select Channel, then press . The Enter Password screen opens. Picture Sound Time Setup Lock Channel Picture Mode Contrast Brightness Color Tint Sharpness Color Mode Standard 50 50 50 0 50 Cool Select Move MENU...
User Manual (English)
Page 22
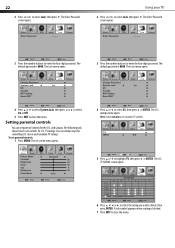
...Mode Setup Lock Standard Cool Channel 50 50 50 0 50 Select Move MENU Exit Select Move MENU Exit 3 Press the number buttons to enter the four-digit password. The default password is blocked. 7 Press EXIT to close the menu. Channel Select Move MENU Exit 3 Press the number buttons to enter the four-digit password. Setting parental controls You can set controls for U.S. The Lock menu opens. A lock symbol appears when a rating is 0000. The default password is 0000. Picture Sound Time Change Password System Lock US Canada RRT Setting Reset RRT Setup...
...Mode Setup Lock Standard Cool Channel 50 50 50 0 50 Select Move MENU Exit Select Move MENU Exit 3 Press the number buttons to enter the four-digit password. The default password is blocked. 7 Press EXIT to close the menu. Channel Select Move MENU Exit 3 Press the number buttons to enter the four-digit password. Setting parental controls You can set controls for U.S. The Lock menu opens. A lock symbol appears when a rating is 0000. The default password is 0000. Picture Sound Time Change Password System Lock US Canada RRT Setting Reset RRT Setup...

User Manual (English)
Page 24
... can adjust: • Picture mode-Selects the picture mode. For more blue), or Normal (does not adjust the colors). 4 Press MENU to return to the previous menu, or press EXIT to close the menu. The on -screen menu opens. 24 Using your TV Adjusting the computer image To adjust the computer image: 1 Make sure that your TV is in VGA mode. Picture Sound Time Setup Lock Channel Menu Language Transparency Zoom Mode Noise Reduction Advanced Closed Caption XVS Restore Default English Off Wide...
... can adjust: • Picture mode-Selects the picture mode. For more blue), or Normal (does not adjust the colors). 4 Press MENU to return to the previous menu, or press EXIT to close the menu. The on -screen menu opens. 24 Using your TV Adjusting the computer image To adjust the computer image: 1 Make sure that your TV is in VGA mode. Picture Sound Time Setup Lock Channel Menu Language Transparency Zoom Mode Noise Reduction Advanced Closed Caption XVS Restore Default English Off Wide...

User Manual (English)
Page 25
... -screen menu opens. You will need to select Setup, then press . The Setup menu opens. Troubleshooting Warning: Do not try to repair your TV or the remote control. • Try another channel. Only noise (snow) appears on page 15. • Make sure that the antenna or cable TV is connected correctly. The on page 9. • Try another channel. Picture Sound Time Setup Lock Channel Menu Language Transparency Zoom Mode Noise Reduction Advanced Closed Caption XVS Restore Default English...
... -screen menu opens. You will need to select Setup, then press . The Setup menu opens. Troubleshooting Warning: Do not try to repair your TV or the remote control. • Try another channel. Only noise (snow) appears on page 15. • Make sure that the antenna or cable TV is connected correctly. The on page 9. • Try another channel. Picture Sound Time Setup Lock Channel Menu Language Transparency Zoom Mode Noise Reduction Advanced Closed Caption XVS Restore Default English...

User Manual (English)
Page 26
... information, see "Setting the parental password" on page 14. Specifications Design and specifications are subject to change without notice. Notices Specifications and features are subject to change without notice or obligation. Operation of the FCC Rules. For service and support call (800) 305-2204. TV cabinet creaks. TV type TV panel TV system Channels Audio multiplex Audio output Power requirement Power consumption Dimensions Weight Input terminals Output terminals Control terminals LCD 42-inch TFT LCD NTSC-M, ATSC VHF...
... information, see "Setting the parental password" on page 14. Specifications Design and specifications are subject to change without notice. Notices Specifications and features are subject to change without notice or obligation. Operation of the FCC Rules. For service and support call (800) 305-2204. TV cabinet creaks. TV type TV panel TV system Channels Audio multiplex Audio output Power requirement Power consumption Dimensions Weight Input terminals Output terminals Control terminals LCD 42-inch TFT LCD NTSC-M, ATSC VHF...
User Manual (English)
Page 27
... rebuilt comparable products or parts. or (2) replace the Product at no charge with a screen 25 inches or larger, call 1-800-305-2204 www.dynexproducts.com Distributed by Dynex to service the Product • Products sold as fuses or batteries • Products where the factory applied serial number has been altered or removed 27 REPAIR REPLACEMENT AS PROVIDED UNDER THIS WARRANTY IS YOUR EXCLUSIVE...
... rebuilt comparable products or parts. or (2) replace the Product at no charge with a screen 25 inches or larger, call 1-800-305-2204 www.dynexproducts.com Distributed by Dynex to service the Product • Products sold as fuses or batteries • Products where the factory applied serial number has been altered or removed 27 REPAIR REPLACEMENT AS PROVIDED UNDER THIS WARRANTY IS YOUR EXCLUSIVE...


