User Manual (English)
Page 9
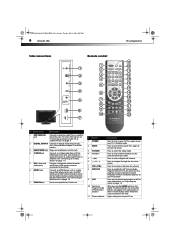
... Page 6 Tuesday, July 28, 2009 10:07 AM 6 DX-L40-10A TV components Side connections HDMI1 VIDEOḤḤḤ SERVICE L ḤḤR S-VIDEO HEADPHONEḤḤḤḤ Remote control 11 1 POWER INPUT 12 1 2 MUTE PICTURE AUDIO ZOOM 13 1 2 3 GUIDE 2 3 14 4 5 6 INFO 4 15 7 8 9 EXIT 3 5 0 RECALL MENU 16 17 4 6 ENTER 18 19 5 7 20 VOL+ CH...
... Page 6 Tuesday, July 28, 2009 10:07 AM 6 DX-L40-10A TV components Side connections HDMI1 VIDEOḤḤḤ SERVICE L ḤḤR S-VIDEO HEADPHONEḤḤḤḤ Remote control 11 1 POWER INPUT 12 1 2 MUTE PICTURE AUDIO ZOOM 13 1 2 3 GUIDE 2 3 14 4 5 6 INFO 4 15 7 8 9 EXIT 3 5 0 RECALL MENU 16 17 4 6 ENTER 18 19 5 7 20 VOL+ CH...
User Manual (English)
Page 13
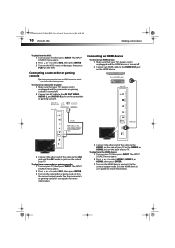
...; L HDMI1 SERVICE 3 Connect the other end of the cable to select HDMI 1, HDMI 2, or HDMI3, then press ENTER. 3 Turn on the HDMI device. The INPUT SOURCE menu opens. 2 Press or to connectors. See the camcorder's or gaming console's user guides for a better picture. The INPUT SOURCE menu opens. 2 ... Connect an HDMI cable to the HDMI OUT jack on the HDMI device, and set it to white. DX-L40-10A_09-0537_MAN_ENG_V1.book Page 10 Tuesday, July 28, 2009 10:07 AM 10 DX-L40-10A Making connections To play from the VCR: 1 Turn on the camcorder or gaming console. To connect a camcorder...
...; L HDMI1 SERVICE 3 Connect the other end of the cable to select HDMI 1, HDMI 2, or HDMI3, then press ENTER. 3 Turn on the HDMI device. The INPUT SOURCE menu opens. 2 Press or to connectors. See the camcorder's or gaming console's user guides for a better picture. The INPUT SOURCE menu opens. 2 ... Connect an HDMI cable to the HDMI OUT jack on the HDMI device, and set it to white. DX-L40-10A_09-0537_MAN_ENG_V1.book Page 10 Tuesday, July 28, 2009 10:07 AM 10 DX-L40-10A Making connections To play from the VCR: 1 Turn on the camcorder or gaming console. To connect a camcorder...

User Manual (English)
Page 14
...menu opens. 2 Press or to select COMP1 or COMP2, then press ENTER. 3 Turn on the component video device and set it to the correct output mode. Side of TV S-video cable Audio cable S-VIDEO ḤḤR VIDEOḤḤḤ L HDMI1 VIDEOḤḤḤ L ḤḤR S-VIDEO SERVICE... audio jacks on the back of TV Note: Cables are often color-coded to connectors. DX-L40-10A_09-0537_MAN_ENG_V1.book Page 11 Tuesday, July 28, 2009 10:07 AM Making connections DX-L40-10A 11 Connecting a component video device A component (Y, Pb, Pr) picture can be displayed only...
...menu opens. 2 Press or to select COMP1 or COMP2, then press ENTER. 3 Turn on the component video device and set it to the correct output mode. Side of TV S-video cable Audio cable S-VIDEO ḤḤR VIDEOḤḤḤ L HDMI1 VIDEOḤḤḤ L ḤḤR S-VIDEO SERVICE... audio jacks on the back of TV Note: Cables are often color-coded to connectors. DX-L40-10A_09-0537_MAN_ENG_V1.book Page 11 Tuesday, July 28, 2009 10:07 AM Making connections DX-L40-10A 11 Connecting a component video device A component (Y, Pb, Pr) picture can be displayed only...
User Manual (English)
Page 15
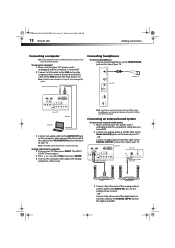
...: • Connect your headphones to the DIGITAL OUTPUT jack on the side of your TV. The INPUT SOURCE menu opens. 2 Press or to the VGA jack on the side of your TV. SERVICE Note: Loud noise can be a 15-pin D-Sub (analog RGB) cable. Connect a digital optical (Toslink)...cable to the Audio Out (L/R) jacks on the back of the analog audio (L and R) cable to the VGA jack on the analog stereo receiver. - DX-L40-10A_09-0537_MAN_ENG_V1.book Page 12 Tuesday, July 28, 2009 10:07 AM 12 DX-L40-10A Making connections Connecting a computer Tip: Some computers have a stereo mini plug.
...: • Connect your headphones to the DIGITAL OUTPUT jack on the side of your TV. The INPUT SOURCE menu opens. 2 Press or to the VGA jack on the side of your TV. SERVICE Note: Loud noise can be a 15-pin D-Sub (analog RGB) cable. Connect a digital optical (Toslink)...cable to the Audio Out (L/R) jacks on the back of the analog audio (L and R) cable to the VGA jack on the analog stereo receiver. - DX-L40-10A_09-0537_MAN_ENG_V1.book Page 12 Tuesday, July 28, 2009 10:07 AM 12 DX-L40-10A Making connections Connecting a computer Tip: Some computers have a stereo mini plug.
User Manual (English)
Page 21
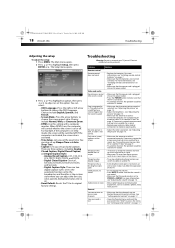
..." on page 15. • Make sure the antenna or cable is turned on page 9. The Main menu opens. 2 Press or to choose the OSD Language. Contact authorized service personnel. For more information, see "Installing remote control batteries" on page 15. • Adjust the brightness...Try another channel. Enter "0532" to choose the screen aspect ratio. DX-L40-10A_09-0537_MAN_ENG_V1.book Page 18 Tuesday, July 28, 2009 10:07 AM 18 DX-L40-10A Troubleshooting Adjusting the setup To adjust the setup: 1 Press MENU. Choices include English, Spanish, and French. • Screen Mode-Press ...
..." on page 15. • Make sure the antenna or cable is turned on page 9. The Main menu opens. 2 Press or to choose the OSD Language. Contact authorized service personnel. For more information, see "Installing remote control batteries" on page 15. • Adjust the brightness...Try another channel. Enter "0532" to choose the screen aspect ratio. DX-L40-10A_09-0537_MAN_ENG_V1.book Page 18 Tuesday, July 28, 2009 10:07 AM 18 DX-L40-10A Troubleshooting Adjusting the setup To adjust the setup: 1 Press MENU. Choices include English, Spanish, and French. • Screen Mode-Press ...

