

User Manual (English)
Page 8
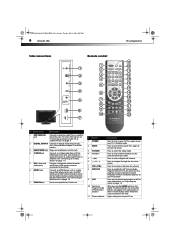
...L and R) these jacks. For more information, see "Connecting a component video device" on your TV in standby mode. DX-L40-10A_09-0537_MAN_ENG_V1.book Page 5 Tuesday, July 28, 2009 10:07 AM TV components DX-L40-10A 5 TV components Front and side controls 76 Back connections 1 2 3 8 4 7 5 6 1 23 HDMI3 HDMI2 VGA...one of these jacks. Press your TV. again to put 6 Power/Standby Lights blue when your TV is in the channel list. 5 (power) button Press to turn on page 11. 6 AC IN Connect the AC power cord to make an audio connection. For more information, see "...
...L and R) these jacks. For more information, see "Connecting a component video device" on your TV in standby mode. DX-L40-10A_09-0537_MAN_ENG_V1.book Page 5 Tuesday, July 28, 2009 10:07 AM TV components DX-L40-10A 5 TV components Front and side controls 76 Back connections 1 2 3 8 4 7 5 6 1 23 HDMI3 HDMI2 VGA...one of these jacks. Press your TV. again to put 6 Power/Standby Lights blue when your TV is in the channel list. 5 (power) button Press to turn on page 11. 6 AC IN Connect the AC power cord to make an audio connection. For more information, see "...
User Manual (English)
Page 9
... 3 HEADPHONE jack Plug your TV provider. Do not use. # Button 1 POWER 2 MUTE 3 PICTURE 4 Numbers 5 • (dot) 6 7 VOL+/VOL- 8 MTS/SAP 9 CCD 10 Electronic Program Guide (EPG) function buttons 11 Power indicator Description Press to this jack. (Only available in the on ...jack. For service update only. DX-L40-10A_09-0537_MAN_ENG_V1.book Page 6 Tuesday, July 28, 2009 10:07 AM 6 DX-L40-10A TV components Side connections HDMI1 VIDEOḤḤḤ SERVICE L ḤḤR S-VIDEO HEADPHONEḤḤḤḤ Remote control 11 1 POWER INPUT 12 1 2 MUTE ...
... 3 HEADPHONE jack Plug your TV provider. Do not use. # Button 1 POWER 2 MUTE 3 PICTURE 4 Numbers 5 • (dot) 6 7 VOL+/VOL- 8 MTS/SAP 9 CCD 10 Electronic Program Guide (EPG) function buttons 11 Power indicator Description Press to this jack. (Only available in the on ...jack. For service update only. DX-L40-10A_09-0537_MAN_ENG_V1.book Page 6 Tuesday, July 28, 2009 10:07 AM 6 DX-L40-10A TV components Side connections HDMI1 VIDEOḤḤḤ SERVICE L ḤḤR S-VIDEO HEADPHONEḤḤḤḤ Remote control 11 1 POWER INPUT 12 1 2 MUTE ...

User Manual (English)
Page 10
...the + and - The remote control should be used within 26 feet (7.9 m) of time. DX-L40-10A_09-0537_MAN_ENG_V1.book Page 7 Tuesday, July 28, 2009 10:07 AM Using the remote control DX-L40-10A 7 # Button 12 INPUT 13 ZOOM 14 AUDIO 15 GUIDE 16 INFO 17 EXIT 18 MENU 19 RECALL 20 .... symbols in direct sunlight. Remove the batteries if you use the remote control: • Point the remote control towards the remote sensor on page 15. POWER INPUT MUTE PICTURE AUDIO ZOOM 1 2 3 GUIDE 4 5 6 INFO 7 8 9 EXIT 0 LAST MENU ENTER VOL+ CH+ VOL- CH- Do not place objects, ...
...the + and - The remote control should be used within 26 feet (7.9 m) of time. DX-L40-10A_09-0537_MAN_ENG_V1.book Page 7 Tuesday, July 28, 2009 10:07 AM Using the remote control DX-L40-10A 7 # Button 12 INPUT 13 ZOOM 14 AUDIO 15 GUIDE 16 INFO 17 EXIT 18 MENU 19 RECALL 20 .... symbols in direct sunlight. Remove the batteries if you use the remote control: • Point the remote control towards the remote sensor on page 15. POWER INPUT MUTE PICTURE AUDIO ZOOM 1 2 3 GUIDE 4 5 6 INFO 7 8 9 EXIT 0 LAST MENU ENTER VOL+ CH+ VOL- CH- Do not place objects, ...
User Manual (English)
Page 21
..."Installing remote control batteries" on page 7. • Make sure that the power cord is plugged into an AC power outlet. • Make sure that the power cord is plugged into an AC power outlet. • Press the POWER button to one or more information, see "Adjusting the sound" on page 16....; Adjust the color saturation. See "Setting parental controls" on page 15. • Adjust the brightness. DX-L40-10A_09-0537_MAN_ENG_V1.book Page 18 Tuesday, July 28, 2009 10:07 AM 18 DX-L40-10A Troubleshooting Adjusting the setup To adjust the setup: 1 Press MENU. The Main menu opens. 2 Press or...
..."Installing remote control batteries" on page 7. • Make sure that the power cord is plugged into an AC power outlet. • Make sure that the power cord is plugged into an AC power outlet. • Press the POWER button to one or more information, see "Adjusting the sound" on page 16....; Adjust the color saturation. See "Setting parental controls" on page 15. • Adjust the brightness. DX-L40-10A_09-0537_MAN_ENG_V1.book Page 18 Tuesday, July 28, 2009 10:07 AM 18 DX-L40-10A Troubleshooting Adjusting the setup To adjust the setup: 1 Press MENU. The Main menu opens. 2 Press or...
User Manual (English)
Page 22
... by calling DYNEX Customer Service at (800) 304-2204 (USA and Canada only). If additional cleaning is necessary, apply a small amount of the FCC Rules. TV model TV type TV panel TV system DX-L40-10A LCD 40-inch TFT LCD NTSC-M, ATSC Channels Audio output Power requirement Power consumption Dimensions ...on, the user is encouraged to try to radio communications. DX-L40-10A_09-0537_MAN_ENG_V1.book Page 19 Tuesday, July 28, 2009 10:07 AM Maintenance DX-L40-10A 19 Problem Solution You cannot access some items The TV cabinet creaks The buttons do not work • If a setting or option is...
... by calling DYNEX Customer Service at (800) 304-2204 (USA and Canada only). If additional cleaning is necessary, apply a small amount of the FCC Rules. TV model TV type TV panel TV system DX-L40-10A LCD 40-inch TFT LCD NTSC-M, ATSC Channels Audio output Power requirement Power consumption Dimensions ...on, the user is encouraged to try to radio communications. DX-L40-10A_09-0537_MAN_ENG_V1.book Page 19 Tuesday, July 28, 2009 10:07 AM Maintenance DX-L40-10A 19 Problem Solution You cannot access some items The TV cabinet creaks The buttons do not work • If a setting or option is...


