
User Manual (English)
Page 2
... 13, 2009 11:38 AM ii Dynex DX-L321-10A 32" LCD TV Contents CHILD SAFETY 1 Important safety instructions 2 Warnings 2 Cautions 2 Installing and removing the stand 3 Installing the stand 3 Removing the stand 4 Installing a wall-mount bracket 4 TV components 4 Side controls 4 Back connections...control batteries 6 Aiming the remote control 6 Programming a universal remote control to work with your TV 7 Making connections 7 Connecting the power 7 Connecting an antenna, cable TV, or satellite TV box 7 Connecting a VCR 8 Connecting a camcorder or gaming console 9 Connecting an HDMI ...
... 13, 2009 11:38 AM ii Dynex DX-L321-10A 32" LCD TV Contents CHILD SAFETY 1 Important safety instructions 2 Warnings 2 Cautions 2 Installing and removing the stand 3 Installing the stand 3 Removing the stand 4 Installing a wall-mount bracket 4 TV components 4 Side controls 4 Back connections...control batteries 6 Aiming the remote control 6 Programming a universal remote control to work with your TV 7 Making connections 7 Connecting the power 7 Connecting an antenna, cable TV, or satellite TV box 7 Connecting a VCR 8 Connecting a camcorder or gaming console 9 Connecting an HDMI ...
User Manual (English)
Page 3
DX-L321-10A_09-0407_MAN_ENG_V3.book Page iii Wednesday, May 13, 2009 11:38 AM iii Setting or changing the PIN 16 Setting parental control levels 17 Blocking unrated TV 18 Locking control panel buttons 18 Using closed captioning 19 Turning closed captioning on or off 19 Selecting the closed ...captioning mode 19 Customizing DTV closed captioning styles 20 Adjusting time settings 20 Setting the TV clock 20 Setting the sleep timer 21 Adjusting menu settings 21 Selecting the menu language 21 Labeling an input source 22 Restoring default...
DX-L321-10A_09-0407_MAN_ENG_V3.book Page iii Wednesday, May 13, 2009 11:38 AM iii Setting or changing the PIN 16 Setting parental control levels 17 Blocking unrated TV 18 Locking control panel buttons 18 Using closed captioning 19 Turning closed captioning on or off 19 Selecting the closed ...captioning mode 19 Customizing DTV closed captioning styles 20 Adjusting time settings 20 Setting the TV clock 20 Setting the sleep timer 21 Adjusting menu settings 21 Selecting the menu language 21 Labeling an input source 22 Restoring default...

User Manual (English)
Page 5
...'t let children climb on or play with steel studs or cinder blocks. Make sure that you place or install the TV where it cannot be pushed, pulled over and cause injury. DX-L321-10A_09-0407_MAN_ENG_V3.book Page 1 Wednesday, May 13, 2009 11:38 AM 1 CHILD SAFETY It makes a difference how ...and where you use of TV stand does not fit all instructions supplied by the TV and wall mount manufacturers. • If you have...
...'t let children climb on or play with steel studs or cinder blocks. Make sure that you place or install the TV where it cannot be pushed, pulled over and cause injury. DX-L321-10A_09-0407_MAN_ENG_V3.book Page 1 Wednesday, May 13, 2009 11:38 AM 1 CHILD SAFETY It makes a difference how ...and where you use of TV stand does not fit all instructions supplied by the TV and wall mount manufacturers. • If you have...
User Manual (English)
Page 6
...10 Protect the power cord from tip-over. Replacement parts When replacement parts are important operating and maintenance instructions in the literature accompanying your TV. 1 Read these instructions. 2 Keep these instructions. 3 Heed all warnings. 4 Follow all servicing to keep from touching such power... has been damaged in accordance with them might be grounded to rain or water. • If your TV has been exposed to prevent possible electric shock. DX-L321-10A_09-0407_MAN_ENG_V3.book Page 2 Wednesday, May 13, 2009 11:38 AM 2 Important safety instructions Important safety...
...10 Protect the power cord from tip-over. Replacement parts When replacement parts are important operating and maintenance instructions in the literature accompanying your TV. 1 Read these instructions. 2 Keep these instructions. 3 Heed all warnings. 4 Follow all servicing to keep from touching such power... has been damaged in accordance with them might be grounded to rain or water. • If your TV has been exposed to prevent possible electric shock. DX-L321-10A_09-0407_MAN_ENG_V3.book Page 2 Wednesday, May 13, 2009 11:38 AM 2 Important safety instructions Important safety...
User Manual (English)
Page 7
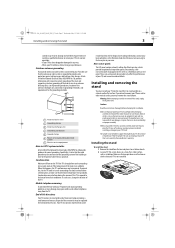
...as an aid to assembly, make sure that can cause damage to your TV exhibits a distinct change the location of the TV. If you intend to mount your TV into a warm room or if the temperature of the room rises suddenly. DX-L321-10A_09-0407_MAN_ENG_V3.book Page 3 Wednesday, May 13, 2009 11:38 AM... Installing and removing the stand 3 controls may result in damage and will form on the TV if the TV is brought from cool surroundings into the stand for it to...
...as an aid to assembly, make sure that can cause damage to your TV exhibits a distinct change the location of the TV. If you intend to mount your TV into a warm room or if the temperature of the room rises suddenly. DX-L321-10A_09-0407_MAN_ENG_V3.book Page 3 Wednesday, May 13, 2009 11:38 AM... Installing and removing the stand 3 controls may result in damage and will form on the TV if the TV is brought from cool surroundings into the stand for it to...

User Manual (English)
Page 8
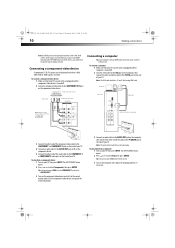
...DVI connections, to open the on your TV. Press again to a wall-mount bracket: Warning: These servicing instructions are for use by qualified service personnel only. To reduce the risk of your TV using an HDMI-to turn on -screen menu. 2 VOL+/VOL- DX-L321-10A_09-0407_MAN_ENG_V3.book Page 4 Wednesday, May... 13, 2009 11:38 AM 4 TV components 3 Align the base with the bottom of the TV, then secure the base to the back of ...
...DVI connections, to open the on your TV. Press again to a wall-mount bracket: Warning: These servicing instructions are for use by qualified service personnel only. To reduce the risk of your TV using an HDMI-to turn on -screen menu. 2 VOL+/VOL- DX-L321-10A_09-0407_MAN_ENG_V3.book Page 4 Wednesday, May... 13, 2009 11:38 AM 4 TV components 3 Align the base with the bottom of the TV, then secure the base to the back of ...
User Manual (English)
Page 9
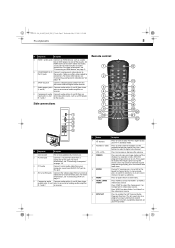
DX-L321-10A_09-0407_MAN_ENG_V3.book Page 5 Wednesday, May 13, 2009 11:38 AM TV components 5 ## Component Description 4 HDMI 1 and 2 jacks Connect an HDMI ...input source. 8 MTS/SAP Press to connectors. Do not use. For more time. 5 ENTER During TV viewing, press to switch to enter channel numbers or the parental control password. This lets you do not...HDMI, COMP, VIDEO Press HDMI to select the Component 1 or Component 2 video input source. Function availability depends on your TV in Standby mode. 2 Numbers/• (dot) Press to the keyed in an on-screen menu or to open a ...
DX-L321-10A_09-0407_MAN_ENG_V3.book Page 5 Wednesday, May 13, 2009 11:38 AM TV components 5 ## Component Description 4 HDMI 1 and 2 jacks Connect an HDMI ...input source. 8 MTS/SAP Press to connectors. Do not use. For more time. 5 ENTER During TV viewing, press to switch to enter channel numbers or the parental control password. This lets you do not...HDMI, COMP, VIDEO Press HDMI to select the Component 1 or Component 2 video input source. Function availability depends on your TV in Standby mode. 2 Numbers/• (dot) Press to the keyed in an on-screen menu or to open a ...

User Manual (English)
Page 10
...use the remote control. 3 Replace the cover. Press to go to the next or previous channel in the battery compartment. Press to select the TV as the video input source. For more information, see "Selecting a channel" on the sound. Chemicals may not work if direct sunlight or bright... Tuner, Video1, Video2, Component1, Component2, HDMI1, HDMI2, or VGA. Notes: Do not expose the remote control to use the remote control in a fire. DX-L321-10A_09-0407_MAN_ENG_V3.book Page 6 Wednesday, May 13, 2009 11:38 AM 6 Using the remote control # Button 9 SLEEP 10 PICTURE 11 ZOOM 12 (Mute) ...
...use the remote control. 3 Replace the cover. Press to go to the next or previous channel in the battery compartment. Press to select the TV as the video input source. For more information, see "Selecting a channel" on the sound. Chemicals may not work if direct sunlight or bright... Tuner, Video1, Video2, Component1, Component2, HDMI1, HDMI2, or VGA. Notes: Do not expose the remote control to use the remote control in a fire. DX-L321-10A_09-0407_MAN_ENG_V3.book Page 6 Wednesday, May 13, 2009 11:38 AM 6 Using the remote control # Button 9 SLEEP 10 PICTURE 11 ZOOM 12 (Mute) ...
User Manual (English)
Page 11
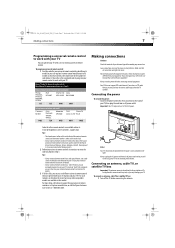
...the brands Orion, Emerson, Memorex, Sansui, Sylvania, or Zenith. See your universal remote control's instructions for details. 3 If all Dynex TVs manufactured after Jan. 1, 2007) Universal remote control manufacturer and model Philips PHDVD5, PH5DSS, PMDVR8, PDVR8 RCA RCU807 One for All Sony...; If your universal remote control has a "Learn" feature, you found in the market. Always turn the power off the TV before connecting the antenna. DX-L321-10A_09-0407_MAN_ENG_V3.book Page 7 Wednesday, May 13, 2009 11:38 AM Making connections 7 Programming a universal remote control to work...
...the brands Orion, Emerson, Memorex, Sansui, Sylvania, or Zenith. See your universal remote control's instructions for details. 3 If all Dynex TVs manufactured after Jan. 1, 2007) Universal remote control manufacturer and model Philips PHDVD5, PH5DSS, PMDVR8, PDVR8 RCA RCU807 One for All Sony...; If your universal remote control has a "Learn" feature, you found in the market. Always turn the power off the TV before connecting the antenna. DX-L321-10A_09-0407_MAN_ENG_V3.book Page 7 Wednesday, May 13, 2009 11:38 AM Making connections 7 Programming a universal remote control to work...
User Manual (English)
Page 12
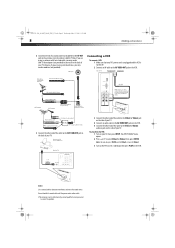
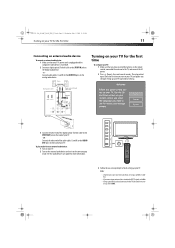
...Video2. 3 Turn on the VCR, insert a videotape, then press PLAY on the back of your TV. Side of TV VHF, UHF, or combination antenna RF coaxial cable (75 ohm) RF coaxial cable (75 ohm) ...the cable or satellite TV box. ANT. Antenna, cable TV, or satellite box Back of TV 3 Connect the other end of the cable to the Video1 or Video2 jack on the side of your TV. DX-L321-10A_09-0407_MAN_ENG_V3.book ... cord or other end of the cable to the Video1 or Video2 audio in jacks on your TV's power cord is unplugged and the VCR is not installed correctly, contact qualified service personnel to ...
...Video2. 3 Turn on the VCR, insert a videotape, then press PLAY on the back of your TV. Side of TV VHF, UHF, or combination antenna RF coaxial cable (75 ohm) RF coaxial cable (75 ohm) ...the cable or satellite TV box. ANT. Antenna, cable TV, or satellite box Back of TV 3 Connect the other end of the cable to the Video1 or Video2 jack on the side of your TV. DX-L321-10A_09-0407_MAN_ENG_V3.book ... cord or other end of the cable to the Video1 or Video2 audio in jacks on your TV's power cord is unplugged and the VCR is not installed correctly, contact qualified service personnel to ...
User Manual (English)
Page 13
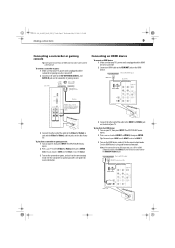
...HDMI once for HDMI 1 or twice for more information. Device with HDMI output HDMI cable Back of TV Side of TV Camcorder or gaming console AV cable Note: Cables are often color-coded to connectors. DX-L321-10A_09-0407_MAN_ENG_V3.book Page 9 Wednesday, May 13, 2009 11:38 AM Making connections 9 Connecting a ... the HDMI device, and set it to select HDMI 1 or HDMI 2, then press ENTER. To play from the HDMI device: 1 Turn on your TV's power cord is unplugged and the HDMI device is turned off . 2 Connect an HDMI cable to the HDMI OUT jack on the camcorder or game...
...HDMI once for HDMI 1 or twice for more information. Device with HDMI output HDMI cable Back of TV Side of TV Camcorder or gaming console AV cable Note: Cables are often color-coded to connectors. DX-L321-10A_09-0407_MAN_ENG_V3.book Page 9 Wednesday, May 13, 2009 11:38 AM Making connections 9 Connecting a ... the HDMI device, and set it to select HDMI 1 or HDMI 2, then press ENTER. To play from the HDMI device: 1 Turn on your TV's power cord is unplugged and the HDMI device is turned off . 2 Connect an HDMI cable to the HDMI OUT jack on the camcorder or game...
User Manual (English)
Page 14
DX-L321-10A_09-0407_MAN_ENG_V3.book Page 10 Wednesday, May 13, 2009 11:38 AM 10 Making connections Note: An HDMI picture can also press VGA on the remote control. 3 Turn on the computer, then adjust the display properties, if necessary. To play video from a component device: 1 Turn on your TV. ... Audio cable (stereo mini plugs) 3 Connect the other end of the component video cable to the COMPONENT 1 or COMPONENT 2 jacks on the back of TV Connecting a computer Tip: Some computers have a stereo mini plug. Tip: You can be a 15-pin D-Sub (analog RGB) cable. See the component...
DX-L321-10A_09-0407_MAN_ENG_V3.book Page 10 Wednesday, May 13, 2009 11:38 AM 10 Making connections Note: An HDMI picture can also press VGA on the remote control. 3 Turn on the computer, then adjust the display properties, if necessary. To play video from a component device: 1 Turn on your TV. ... Audio cable (stereo mini plugs) 3 Connect the other end of the component video cable to the COMPONENT 1 or COMPONENT 2 jacks on the back of TV Connecting a computer Tip: Some computers have a stereo mini plug. Tip: You can be a 15-pin D-Sub (analog RGB) cable. See the component...
User Manual (English)
Page 15
... cables (L and R) to the AUDIO OUT jacks on the back of your TV. 2 Turn on the external audio device and set it to the correct output mode. To play audio from an external audio device: 1 Turn on your TV. - DX-L321-10A_09-0407_MAN_ENG_V3.book Page 11 Wednesday, May 13, 2009 11:38 AM Turning... on your TV for the first time 11 Connecting an external audio device To connect an external audio device: 1 Make sure...
... cables (L and R) to the AUDIO OUT jacks on the back of your TV. 2 Turn on the external audio device and set it to the correct output mode. To play audio from an external audio device: 1 Turn on your TV. - DX-L321-10A_09-0407_MAN_ENG_V3.book Page 11 Wednesday, May 13, 2009 11:38 AM Turning... on your TV for the first time 11 Connecting an external audio device To connect an external audio device: 1 Make sure...

User Manual (English)
Page 16
... not receive an input signal for closed captioning (CC, also known as when listening to select TV. Select the default display aspect ratio. Warning: When your TV is in your area. DX-L321-10A_09-0407_MAN_ENG_V3.book Page 12 Wednesday, May 13, 2009 11:38 AM 12 Understanding the basics Understanding the... basics Turning your TV on or off To turn your TV on or off . Channel List View the channel...
... not receive an input signal for closed captioning (CC, also known as when listening to select TV. Select the default display aspect ratio. Warning: When your TV is in your area. DX-L321-10A_09-0407_MAN_ENG_V3.book Page 12 Wednesday, May 13, 2009 11:38 AM 12 Understanding the basics Understanding the... basics Turning your TV on or off To turn your TV on or off . Channel List View the channel...
User Manual (English)
Page 17
...This menu is only visible when the input source is Tuner (TV connection) and the Channel List panel is the default PIN. A digital sub-channel is properly connected to key it in case the original one has been compromised. DX-L321-10A_09-0407_MAN_ENG_V3.book Page 13 Wednesday, May 13, 2009 11:...38 AM Understanding the basics 13 Locks Ratings Locks Set allowable video content for TV programs based on -screen cursor left side of the TV. ENTER Press to select menu items, to...
...This menu is only visible when the input source is Tuner (TV connection) and the Channel List panel is the default PIN. A digital sub-channel is properly connected to key it in case the original one has been compromised. DX-L321-10A_09-0407_MAN_ENG_V3.book Page 13 Wednesday, May 13, 2009 11:...38 AM Understanding the basics 13 Locks Ratings Locks Set allowable video content for TV programs based on -screen cursor left side of the TV. ENTER Press to select menu items, to...
User Manual (English)
Page 18
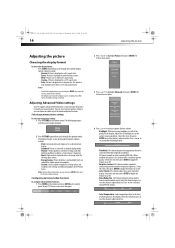
... on the remote control, or MENU on or off . • Color Stretch-This feature allows for all input sources, excluding TV, is a TV signal connection. DX-L321-10A_09-0407_MAN_ENG_V3.book Page 14 Wednesday, May 13, 2009 11:38 AM 14 Adjusting the picture Adjusting the picture Choosing the display format...-Picture quality is displayed in the display. Press or to view the feature's adjustment bar. Select this item then press to set your TV. You can select a preset picture setting or you can tailor the picture to view the feature's adjustment bar. Select this item then ...
... on the remote control, or MENU on or off . • Color Stretch-This feature allows for all input sources, excluding TV, is a TV signal connection. DX-L321-10A_09-0407_MAN_ENG_V3.book Page 14 Wednesday, May 13, 2009 11:38 AM 14 Adjusting the picture Adjusting the picture Choosing the display format...-Picture quality is displayed in the display. Press or to view the feature's adjustment bar. Select this item then press to set your TV. You can select a preset picture setting or you can tailor the picture to view the feature's adjustment bar. Select this item then ...
User Manual (English)
Page 19
...• Digital Audio-Select the preferred audio format for over-the-air and digital TV channels: 1 Press MENU on the remote control, or MENU on the control panel of your TV. Press or to factory default. DX-L321-10A_09-0407_MAN_ENG_V3.book Page 15 Wednesday, May 13, 2009 11:38 AM Adjusting the ... set up, you will be instances when you start a channel scan. • If a system PIN has been set automatically. • TV Speaker-Turns the TV speaker on the type of the display in your area. The Audio menu opens. To auto scan for available channels in a separate screen while...
...• Digital Audio-Select the preferred audio format for over-the-air and digital TV channels: 1 Press MENU on the remote control, or MENU on the control panel of your TV. Press or to factory default. DX-L321-10A_09-0407_MAN_ENG_V3.book Page 15 Wednesday, May 13, 2009 11:38 AM Adjusting the ... set up, you will be instances when you start a channel scan. • If a system PIN has been set automatically. • TV Speaker-Turns the TV speaker on the type of the display in your area. The Audio menu opens. To auto scan for available channels in a separate screen while...

User Manual (English)
Page 20
... opens. 3 Press or to confirm it . You are prompted to enter the number again to highlight Cable Scan, then press ENTER. Your TV automatically scans for available channels. You will be prompted to highlight Channels, then press ENTER. Options include: • Enable All-View all channels...and deny access to highlight Locks, then press ENTER. Setting or changing the PIN To set , parental controls read the rating of your TV. DX-L321-10A_09-0407_MAN_ENG_V3.book Page 16 Wednesday, May 13, 2009 11:38 AM 16 Setting parental controls 2 Press or to highlight Channels, then press...
... opens. 3 Press or to confirm it . You are prompted to enter the number again to highlight Cable Scan, then press ENTER. Your TV automatically scans for available channels. You will be prompted to highlight Channels, then press ENTER. Options include: • Enable All-View all channels...and deny access to highlight Locks, then press ENTER. Setting or changing the PIN To set , parental controls read the rating of your TV. DX-L321-10A_09-0407_MAN_ENG_V3.book Page 16 Wednesday, May 13, 2009 11:38 AM 16 Setting parental controls 2 Press or to highlight Channels, then press...

User Manual (English)
Page 21
.... 6 If you set parental controls: 1 Press MENU on the remote control, or MENU on -screen menu bar opens. 2 Press or to highlight your TV. French or CAN - The Enter PIN box opens. 3 Using the number keys, enter the original four-digit PIN number. (If you have forgotten the ...5 Press or to highlight Locks, then press ENTER. Setting parental control levels To set . DX-L321-10A_09-0407_MAN_ENG_V3.book Page 17 Wednesday, May 13, 2009 11:38 AM Setting parental controls 17 4 Enter the PIN again. TV or USA-Movie, then press ENTER. - The ratings panel for the sub-menu you need...
.... 6 If you set parental controls: 1 Press MENU on the remote control, or MENU on -screen menu bar opens. 2 Press or to highlight your TV. French or CAN - The Enter PIN box opens. 3 Using the number keys, enter the original four-digit PIN number. (If you have forgotten the ...5 Press or to highlight Locks, then press ENTER. Setting parental control levels To set . DX-L321-10A_09-0407_MAN_ENG_V3.book Page 17 Wednesday, May 13, 2009 11:38 AM Setting parental controls 17 4 Enter the PIN again. TV or USA-Movie, then press ENTER. - The ratings panel for the sub-menu you need...

User Manual (English)
Page 22
... Canadian Home Video Rating System determined by the Motion Picture Association of your TV. S Sexual situations. PG-13 Suitable for children 7 and older. C8+ Suitable for all children. DX-L321-10A_09-0407_MAN_ENG_V3.book Page 18 Wednesday, May 13, 2009 11:38 AM 18... Setting parental controls 9 When you set. TV-14 Parental guidance strongly suggested . R Parental guidance suggested for children 16 ...
... Canadian Home Video Rating System determined by the Motion Picture Association of your TV. S Sexual situations. PG-13 Suitable for children 7 and older. C8+ Suitable for all children. DX-L321-10A_09-0407_MAN_ENG_V3.book Page 18 Wednesday, May 13, 2009 11:38 AM 18... Setting parental controls 9 When you set. TV-14 Parental guidance strongly suggested . R Parental guidance suggested for children 16 ...


