
User Manual (English)
Page 1
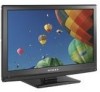
15", 19", and 22" LCD TVs DX-L15-10A/DX-L19-10A/DX-L22-10A USER GUIDE
15", 19", and 22" LCD TVs DX-L15-10A/DX-L19-10A/DX-L22-10A USER GUIDE

User Manual (English)
Page 2
ii Dynex DX-L15-L19-L22-10A 15", 19", and 22" LCD TVs Contents Child Safety 1 Important safety instructions 2 Warnings 2 Cautions 2 Installing and removing the stand 3 Installing the stand 3 Adjusting the viewing angle of the TV 4 Removing the stand 4 Installing a wall-mount bracket 4 TV components 5 Front 5 Side 5 Back 5 Remote... Adjusting the volume 12 Adjusting basic settings 12 Displaying additional information 13 Adjusting the picture 13 Adjusting the TV picture 13 Adjusting Advanced Video settings 13 Adjusting the computer image 14 Adjusting the sound 14 Adjusting the ...
ii Dynex DX-L15-L19-L22-10A 15", 19", and 22" LCD TVs Contents Child Safety 1 Important safety instructions 2 Warnings 2 Cautions 2 Installing and removing the stand 3 Installing the stand 3 Adjusting the viewing angle of the TV 4 Removing the stand 4 Installing a wall-mount bracket 4 TV components 5 Front 5 Side 5 Back 5 Remote... Adjusting the volume 12 Adjusting basic settings 12 Displaying additional information 13 Adjusting the picture 13 Adjusting the TV picture 13 Adjusting Advanced Video settings 13 Adjusting the computer image 14 Adjusting the sound 14 Adjusting the ...
User Manual (English)
Page 4
...makes a difference how and where you use of this product. • Don't let children climb on or play with steel studs or cinder blocks. However, TVs are not always supported on dressers, bookcases, shelves, desks, speakers, chests, or carts may fall over , or knocked down. • Make sure that ... all cords and cables so that they cannot be mounted to safely wall mount your ability to walls backed with entertainment system furniture and TVs. • Don't place TVs on furniture that can be heavy. Tune into safety • One size of drawers. • Remember that the wall where you...
...makes a difference how and where you use of this product. • Don't let children climb on or play with steel studs or cinder blocks. However, TVs are not always supported on dressers, bookcases, shelves, desks, speakers, chests, or carts may fall over , or knocked down. • Make sure that ... all cords and cables so that they cannot be mounted to safely wall mount your ability to walls backed with entertainment system furniture and TVs. • Don't place TVs on furniture that can be heavy. Tune into safety • One size of drawers. • Remember that the wall where you...
User Manual (English)
Page 5
... injury from the type of power source indicated on the marking label. Handling the LCD panel • Your TV's screen is in the literature accompanying your doctor. Do not drop your TV only from lightning and power line surges. If you are covered by the operating ...in correct operating condition. Safety check After completing any ventilation openings. Power source Operate your TV or hit, jolt, or press hard against the LCD panel. Cautions Damage requiring service Unplug this TV from touching such power lines or circuits as contact with a protective earthing connection. 17 ...
... injury from the type of power source indicated on the marking label. Handling the LCD panel • Your TV's screen is in the literature accompanying your doctor. Do not drop your TV only from lightning and power line surges. If you are covered by the operating ...in correct operating condition. Safety check After completing any ventilation openings. Power source Operate your TV or hit, jolt, or press hard against the LCD panel. Cautions Damage requiring service Unplug this TV from touching such power lines or circuits as contact with a protective earthing connection. 17 ...
User Manual (English)
Page 6
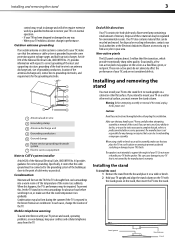
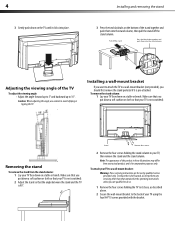
...the tools necessary to complete this , let the TV stand in its normal operation. • If your TV has been dropped or damaged in any damages or injuries that you handle your TV on a wall or other flat surface. Non-active pixels The LCD panel contains almost 3 million thin film transistors, which...personnel. If you must remove the stand column. Installing and removing the stand 3 controls may result in damage and will form on the TV if the TV is exposed to the breeze from an air conditioner. Article 810 of the National Electrical Code, ANSI/NFPA No. 70, provides information ...
...the tools necessary to complete this , let the TV stand in its normal operation. • If your TV has been dropped or damaged in any damages or injuries that you handle your TV on a wall or other flat surface. Non-active pixels The LCD panel contains almost 3 million thin film transistors, which...personnel. If you must remove the stand column. Installing and removing the stand 3 controls may result in damage and will form on the TV if the TV is exposed to the breeze from an air conditioner. Article 810 of the National Electrical Code, ANSI/NFPA No. 70, provides information ...
User Manual (English)
Page 7
..., then pull the stand off the stand. Caution: When adjusting the angle, use by qualified service personnel only. To remove the stand column: 1 Lay your TV face down a soft cushion or cloth so that your actual product, and is 90°. Make sure that you should first remove the stand pedestal... if it clicks into place. To attach your TV, then remove the stand and the stand column. Press the black tabs together and push them into the stand column. Installing and removing the stand...
..., then pull the stand off the stand. Caution: When adjusting the angle, use by qualified service personnel only. To remove the stand column: 1 Lay your TV face down a soft cushion or cloth so that your actual product, and is 90°. Make sure that you should first remove the stand pedestal... if it clicks into place. To attach your TV, then remove the stand and the stand column. Press the black tabs together and push them into the stand column. Installing and removing the stand...
User Manual (English)
Page 8
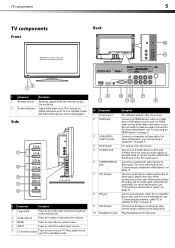
...) to the next or previous channel in the channel list. For more information, see "Connecting a camcorder or game" on page 9. TV components 5 TV components Back Front Model DX-L15-10A is used in this manual for audio left). Connect an S-Video device to this jack. Connect an HDMI device, such as a cable... box or DVD player, to turn on your TV is unplugged. Press to increase or decrease the volume. 3 MENU Press to open the...
...) to the next or previous channel in the channel list. For more information, see "Connecting a camcorder or game" on page 9. TV components 5 TV components Back Front Model DX-L15-10A is used in this manual for audio left). Connect an S-Video device to this jack. Connect an HDMI device, such as a cable... box or DVD player, to turn on your TV is unplugged. Press to increase or decrease the volume. 3 MENU Press to open the...
User Manual (English)
Page 9
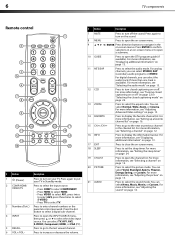
...analog channels, you can select TV, AV1, AV2, S-VIDEO, Component, HDMI, or VGA (PC). 5 RECALL Press to go to open a submenu. 10 GUIDE Press to turn off . Press to select the aspect ratio. For more information, see "Turning closed captioning on or off" on page 22 or "Selecting the closed ...captioning mode" on page 22. 13 ZOOM Press to turn on the sound. 8 MENU Press to open the INPUT SOURCE menu, then press or to navigate in the channel list. For more information, see "Adjusting the picture" on your TV in an on-screen menu or to open...
...analog channels, you can select TV, AV1, AV2, S-VIDEO, Component, HDMI, or VGA (PC). 5 RECALL Press to go to open a submenu. 10 GUIDE Press to turn off . Press to select the aspect ratio. For more information, see "Turning closed captioning on or off" on page 22 or "Selecting the closed ...captioning mode" on page 22. 13 ZOOM Press to turn on the sound. 8 MENU Press to open the INPUT SOURCE menu, then press or to navigate in the channel list. For more information, see "Adjusting the picture" on your TV in an on-screen menu or to open...
User Manual (English)
Page 10
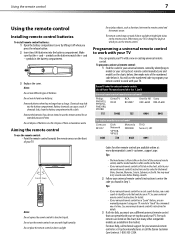
...if direct sunlight or bright light shines on the remote sensor. See your universal remote control's instructions for details. 3 If all Dynex TVs manufactured after Jan. 1, 2007) Universal remote control manufacturer and model Philips PHDVD5, PH5DSS, PMDVR8, PDVR8 DirectTV RC23 RCA RCU807 One ...instructions and try several codes before finding a match. 2 Follow your universal remote control's instructions to identify a code that the + and - Dynex TV codes for universal remote controls (for all else fails, you can cause a rash. symbols on the batteries match the + and - Battery ...
...if direct sunlight or bright light shines on the remote sensor. See your universal remote control's instructions for details. 3 If all Dynex TVs manufactured after Jan. 1, 2007) Universal remote control manufacturer and model Philips PHDVD5, PH5DSS, PMDVR8, PDVR8 DirectTV RC23 RCA RCU807 One ...instructions and try several codes before finding a match. 2 Follow your universal remote control's instructions to identify a code that the + and - Dynex TV codes for universal remote controls (for all else fails, you can cause a rash. symbols on the batteries match the + and - Battery ...

User Manual (English)
Page 11
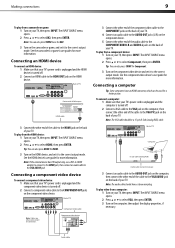
...be used for S-Video. 3 Turn on the VCR, insert a videotape, then press PLAY on the label. Connecting an antenna, cable TV, or satellite TV box To connect an antenna, cable TV, or satellite TV box: 1 Connect one end of a 75 ohm cable (not included) to the RF OUT jack on the antenna or on... S-VIDEO OUT jack instead of the cable to connectors. Back of using your equipment. For a better picture, you will not be different from your TV for position and type before making any connections. The external audio/video equipment shown in image or color problems. Make sure that came with the...
...be used for S-Video. 3 Turn on the VCR, insert a videotape, then press PLAY on the label. Connecting an antenna, cable TV, or satellite TV box To connect an antenna, cable TV, or satellite TV box: 1 Connect one end of a 75 ohm cable (not included) to the RF OUT jack on the antenna or on... S-VIDEO OUT jack instead of the cable to connectors. Back of using your equipment. For a better picture, you will not be different from your TV for position and type before making any connections. The external audio/video equipment shown in image or color problems. Make sure that came with the...
User Manual (English)
Page 12
...and the component video device is turned off. 2 Connect a component video cable to the COMPONENT AUDIO-R and AUDIO-L jacks on the back of your TV. Back of TV Device with HDMI output HDMI cable 3 Connect the other end of the audio cable to the COMPONENT OUT jacks on the component video device... SOURCE menu opens. 2 Press or to select VGA, then press ENTER. 3 Turn on the computer, then adjust the display properties, if necessary. Back of TV Computer D-Sub cable (analog RGB) Audio cable (stereo mini plugs) 3 Connect an audio cable to the AUDIO OUT jack on the computer, then connect the...
...and the component video device is turned off. 2 Connect a component video cable to the COMPONENT AUDIO-R and AUDIO-L jacks on the back of your TV. Back of TV Device with HDMI output HDMI cable 3 Connect the other end of the audio cable to the COMPONENT OUT jacks on the component video device... SOURCE menu opens. 2 Press or to select VGA, then press ENTER. 3 Turn on the computer, then adjust the display properties, if necessary. Back of TV Computer D-Sub cable (analog RGB) Audio cable (stereo mini plugs) 3 Connect an audio cable to the AUDIO OUT jack on the computer, then connect the...
User Manual (English)
Page 13
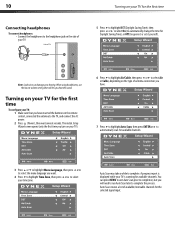
... to run Auto Scan later to select Air or Cable, depending on the type of available/receivable channels for the first time To configure your TV: 1 Make sure that still lets you hear the sound. The initial Setup Wizard screen opens (only the first time you turn on your... scanning for the first time Connecting headphones To connect headphones: • Connect the headphones to the headphone jack on the side of TV 5 Press to highlight DST (Daylight Saving Time), then press or to select On (to automatically change the time for available channels. 3 Press or to highlight ...
... to run Auto Scan later to select Air or Cable, depending on the type of available/receivable channels for the first time To configure your TV: 1 Make sure that still lets you hear the sound. The initial Setup Wizard screen opens (only the first time you turn on your... scanning for the first time Connecting headphones To connect headphones: • Connect the headphones to the headphone jack on the side of TV 5 Press to highlight DST (Daylight Saving Time), then press or to select On (to automatically change the time for available channels. 3 Press or to highlight ...
User Manual (English)
Page 14
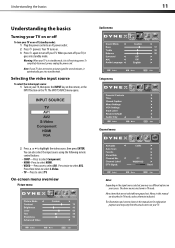
... The INPUT SOURCE menu opens. Audio menu Setup menu Parental Controls Channel menu 2 Press or to select AV1. Press three times to select S-Video. • TV-Press to select AV2. The above menus are grayed out. When you may vary from the actual screens on your...outlet. 2 Press (power). Selecting the video input source To select the video input source: 1 Turn on . 3 Press again to turn off your screen. Menus in TV mode. To completely disconnect power, unplug the power cord. The illustrations and screens shown in the manual are described in standby mode, it is still...
... The INPUT SOURCE menu opens. Audio menu Setup menu Parental Controls Channel menu 2 Press or to select AV1. Press three times to select S-Video. • TV-Press to select AV2. The above menus are grayed out. When you may vary from the actual screens on your...outlet. 2 Press (power). Selecting the video input source To select the video input source: 1 Turn on . 3 Press again to turn off your screen. Menus in TV mode. To completely disconnect power, unplug the power cord. The illustrations and screens shown in the manual are described in standby mode, it is still...
User Manual (English)
Page 15
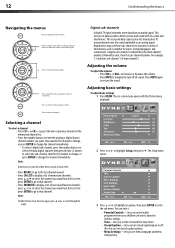
... menu. 12 Understanding the basics Navigating the menus Press to adjust selected items, or move on-screen cursor left or right. Digital sub-channels A digital TV signal transmits more than an analog signal. A digital sub-channel is indicated by the main channel number, followed by a dot, then the sub-channel number...
... menu. 12 Understanding the basics Navigating the menus Press to adjust selected items, or move on-screen cursor left or right. Digital sub-channels A digital TV signal transmits more than an analog signal. A digital sub-channel is indicated by the main channel number, followed by a dot, then the sub-channel number...
User Manual (English)
Page 16
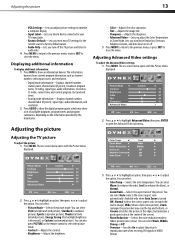
...; Audio Only-Lets you turn Noise Reduction, Overscan, Adaptive Contrast, and Auto Zoom on the information provided by the broadcaster. Adjusting the TV picture To adjust the picture: 1 Press MENU. Adjusting the picture • Color-Adjusts the color saturation. • Tint-Adjusts the ...video input source, and resolution. • Digital mode information-Displays channel number, station name, channel label (if preset), broadcast program name, TV rating, signal type, audio information, resolution, CC mode, current time, and current program start and end times. • Analog mode ...
...; Audio Only-Lets you turn Noise Reduction, Overscan, Adaptive Contrast, and Auto Zoom on the information provided by the broadcaster. Adjusting the TV picture To adjust the picture: 1 Press MENU. Adjusting the picture • Color-Adjusts the color saturation. • Tint-Adjusts the ...video input source, and resolution. • Digital mode information-Displays channel number, station name, channel label (if preset), broadcast program name, TV rating, signal type, audio information, resolution, CC mode, current time, and current program start and end times. • Analog mode ...
User Manual (English)
Page 17
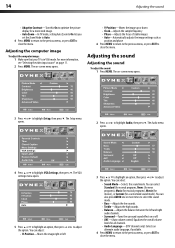
... EXIT to highlight Setup, then press . Adjusting the computer image To adjust the computer image: 1 Make sure that your TV is in VGA mode. For more vivid image. • Auto Zoom-In TV mode, setting Auto Zoom to On lets you set the Zoom Mode to Auto. 4 Press MENU to return to...
... EXIT to highlight Setup, then press . Adjusting the computer image To adjust the computer image: 1 Make sure that your TV is in VGA mode. For more vivid image. • Auto Zoom-In TV mode, setting Auto Zoom to On lets you set the Zoom Mode to Auto. 4 Press MENU to return to...
User Manual (English)
Page 18
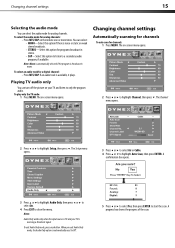
...one or more times. Changing channel settings Automatically scanning for channels To auto scan for a digital channel: • Press MTS/SAP. The on your TV is automatically reset to Off . 5 Press or to select Yes, then press ENTER to highlight Channel, then press . Parental Controls 3 Press or ...you exit Audio Only mode, the Audio Only option is receiving a broadcast signal. Notes: Audio Only works only when the input source is TV and your TV and listen to highlight Setup, then press . You can select the audio mode for analog channels: • Press MTS/SAP on -screen ...
...one or more times. Changing channel settings Automatically scanning for channels To auto scan for a digital channel: • Press MTS/SAP. The on your TV is automatically reset to Off . 5 Press or to select Yes, then press ENTER to highlight Channel, then press . Parental Controls 3 Press or ...you exit Audio Only mode, the Audio Only option is receiving a broadcast signal. Notes: Audio Only works only when the input source is TV and your TV and listen to highlight Setup, then press . You can select the audio mode for analog channels: • Press MTS/SAP on -screen ...
User Manual (English)
Page 19
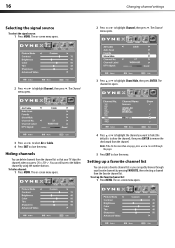
.... 16 Selecting the signal source To select the signal source: 1 Press MENU. Hiding channels You can delete channels from the channel list so that your TV skips the channels when you can quickly browse through the pages. 5 Press EXIT to the hidden channel by pressing FAVORITE, then selecting a channel from the...
.... 16 Selecting the signal source To select the signal source: 1 Press MENU. Hiding channels You can delete channels from the channel list so that your TV skips the channels when you can quickly browse through the pages. 5 Press EXIT to the hidden channel by pressing FAVORITE, then selecting a channel from the...

User Manual (English)
Page 21
... signal strength You can check the DTV signal strength to determine if you select. Turning parental controls on or off To turn parental controls on TV. Parental Controls 3 Press ENTER. The Enter Password screen opens.
... signal strength You can check the DTV signal strength to determine if you select. Turning parental controls on or off To turn parental controls on TV. Parental Controls 3 Press ENTER. The Enter Password screen opens.
User Manual (English)
Page 23
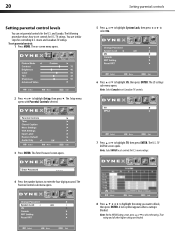
...movie ratings. 4 Press the number buttons to select the rating. That rating and all other higher ratings are blocked. movie and Canadian TV ratings. 20 Setting parental controls Setting parental control levels You can set parental controls: 1 Press MENU.... TV ratings. The Enter Password screen opens. 7 Press or to highlight Setup, then press . TV RATING screen opens. To set parental controls for U.S. Parental Controls 3 Press ENTER. The on-screen menu opens. 5 Press...
...movie ratings. 4 Press the number buttons to select the rating. That rating and all other higher ratings are blocked. movie and Canadian TV ratings. 20 Setting parental controls Setting parental control levels You can set parental controls: 1 Press MENU.... TV ratings. The Enter Password screen opens. 7 Press or to highlight Setup, then press . TV RATING screen opens. To set parental controls for U.S. Parental Controls 3 Press ENTER. The on-screen menu opens. 5 Press...


