User Manual (English)
Page 2
ii Dynex DX-60D260A13 60" LED TV Contents Important Safety Instructions 2 Warning 2 Caution 3 Introduction 4 INlink 4 120Hz screen refresh 4 Installing the stand or wall-mount bracket 5 Installing the stand 5 Installing a wall-mount bracket 5 TV components 5 Package contents 5 Front 6 Side 6 Remote control 7 Making connections 8 What connection should I use 8 Connecting power 9 Connecting a cable or satellite box 9 Connecting an antenna or cable TV (no box 12 Connecting a DVD or Blu-ray player 12 Connecting a VCR 14 Connecting a camcorder or game console 15 Connecting a ...
ii Dynex DX-60D260A13 60" LED TV Contents Important Safety Instructions 2 Warning 2 Caution 3 Introduction 4 INlink 4 120Hz screen refresh 4 Installing the stand or wall-mount bracket 5 Installing the stand 5 Installing a wall-mount bracket 5 TV components 5 Package contents 5 Front 6 Side 6 Remote control 7 Making connections 8 What connection should I use 8 Connecting power 9 Connecting a cable or satellite box 9 Connecting an antenna or cable TV (no box 12 Connecting a DVD or Blu-ray player 12 Connecting a VCR 14 Connecting a camcorder or game console 15 Connecting a ...

User Manual (English)
Page 3
... System Lock 28 Setting parental control levels 29 Downloading rating information 30 Using closed captioning 30 Turning closed captioning on or off 30 Selecting the analog closed captioning mode 31 Customizing digital closed captioning styles 31 Adjusting time settings 32 Setting the clock 32 Setting the sleep timer 33 Adjusting menu settings 33 Selecting the menu language 33 Labeling an input source 33 Using INlink 34 Turning INlink on or off 34 Turning Device Auto Power Off on or off 35 Turning TV Auto Power On on or off 35 Displaying a list...
... System Lock 28 Setting parental control levels 29 Downloading rating information 30 Using closed captioning 30 Turning closed captioning on or off 30 Selecting the analog closed captioning mode 31 Customizing digital closed captioning styles 31 Adjusting time settings 32 Setting the clock 32 Setting the sleep timer 33 Adjusting menu settings 33 Selecting the menu language 33 Labeling an input source 33 Using INlink 34 Turning INlink on or off 34 Turning Device Auto Power Off on or off 35 Turning TV Auto Power On on or off 35 Displaying a list...

User Manual (English)
Page 5
... help from a professional installer. • Make sure that the wall where you route all cords and cables so that they cannot be used as steps, such as suitable for proper use your TV and that are unsure, ask a professional installer. • TVs can be heavy. Some wall mounts are not designed to wall mount your TV, always remember: • One size of your flat panel display...
... help from a professional installer. • Make sure that the wall where you route all cords and cables so that they cannot be used as steps, such as suitable for proper use your TV and that are unsure, ask a professional installer. • TVs can be heavy. Some wall mounts are not designed to wall mount your TV, always remember: • One size of your flat panel display...

User Manual (English)
Page 6
... TV's screen is made of broken glass. • If the LCD panel is broken, make sure that the service technician uses replacement parts specified by the manufacturer that you are inside. If you connect the Class I apparatus which needs to be placed on the back of power supplied to qualified service technicians. Make sure that have the same characteristics as power-supply cord or plug is...
... TV's screen is made of broken glass. • If the LCD panel is broken, make sure that the service technician uses replacement parts specified by the manufacturer that you are inside. If you connect the Class I apparatus which needs to be placed on the back of power supplied to qualified service technicians. Make sure that have the same characteristics as power-supply cord or plug is...
User Manual (English)
Page 10
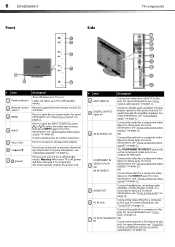
... these jacks. Lights red when your TV is off (standby mode). Receives signals from the remote control. For more information see "Using analog audio" on page 20. For more information, see "Selecting the video input source" on page 18. 6 PC IN VGA Connect the video (VGA) for a component video device to these jacks. In menu mode, press to these jacks. For more information, see "Selecting a channel" on or off , power still flows through the amplifier speakers. Warning...
... these jacks. Lights red when your TV is off (standby mode). Receives signals from the remote control. For more information see "Using analog audio" on page 20. For more information, see "Selecting the video input source" on page 18. 6 PC IN VGA Connect the video (VGA) for a component video device to these jacks. In menu mode, press to these jacks. For more information, see "Selecting a channel" on or off , power still flows through the amplifier speakers. Warning...

User Manual (English)
Page 11
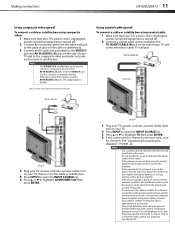
... the parental control password. Remote control # Button 1 (Power) 2 Video Input Description Press to increase or decrease the volume. For more information, see "Setting up a favorite channel list" on page 25 and "Viewing a favorite channel" on page 30. Press to turn closed captioning on page 23. For more information, see "Selecting a channel" on page 36. For more information, see "Connecting a USB flash drive" on page 16 and "Using a USB flash drive" on page 21. Press to select the sound mode...
... the parental control password. Remote control # Button 1 (Power) 2 Video Input Description Press to increase or decrease the volume. For more information, see "Setting up a favorite channel list" on page 25 and "Viewing a favorite channel" on page 30. Press to turn closed captioning on page 23. For more information, see "Selecting a channel" on page 36. For more information, see "Connecting a USB flash drive" on page 16 and "Using a USB flash drive" on page 21. Press to select the sound mode...
User Manual (English)
Page 13
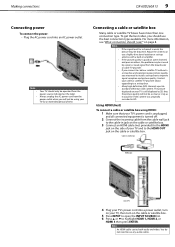
... picture quality. Adjust the antenna or use ?" To get the best video, you will not be as clear or crisp as it would be distorted. You do not need to install a set -top box. Making connections DX-60D260A13 9 Connecting power To connect the power: • Plug the AC power cord into a power outlet, turn on your TV, then turn on the cable or satellite box. 5 Press INPUT to open the INPUT SOURCE list. 6 Press or to highlight HDMI 1, HDMI 2, or HDMI...
... picture quality. Adjust the antenna or use ?" To get the best video, you will not be as clear or crisp as it would be distorted. You do not need to install a set -top box. Making connections DX-60D260A13 9 Connecting power To connect the power: • Plug the AC power cord into a power outlet, turn on your TV, then turn on the cable or satellite box. 5 Press INPUT to open the INPUT SOURCE list. 6 Press or to highlight HDMI 1, HDMI 2, or HDMI...
User Manual (English)
Page 15
... installed correctly, contact qualified service personnel to the antenna or cable TV wall jack. Cables are often color-coded to highlight COMPONENT/AV then press ENTER. If the antenna is good on some channels and poor on others, the problem may be caused by a poor or weak signal from the broadcaster or cable TV provider. Adjust the antenna or use a highly directional outdoor or set-top antenna with the power cord or other cables...
... installed correctly, contact qualified service personnel to the antenna or cable TV wall jack. Cables are often color-coded to highlight COMPONENT/AV then press ENTER. If the antenna is good on some channels and poor on others, the problem may be caused by a poor or weak signal from the broadcaster or cable TV provider. Adjust the antenna or use a highly directional outdoor or set-top antenna with the power cord or other cables...
User Manual (English)
Page 16
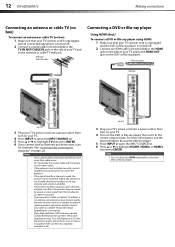
... the INPUT SOURCE list. 6 Press or to a set -top box and experience poor picture quality, you know exist, scan for channels" on the DVD or Blu-ray player, then set -top antenna with the power cord or other cables. Antenna or cable TV (no box): 1 Make sure that your TV's power cord is unplugged, and all connected equipment is turned off . 2 Connect an HDMI cable (not provided) to the HDMI jack on the side of TV 3 Plug...
... the INPUT SOURCE list. 6 Press or to a set -top box and experience poor picture quality, you know exist, scan for channels" on the DVD or Blu-ray player, then set -top antenna with the power cord or other cables. Antenna or cable TV (no box): 1 Make sure that your TV's power cord is unplugged, and all connected equipment is turned off . 2 Connect an HDMI cable (not provided) to the HDMI jack on the side of TV 3 Plug...
User Manual (English)
Page 28
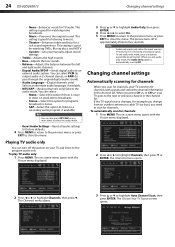
... EXIT to close the menu. You can also press MTS/SAP one or more times to select the audio mode. • Reset Audio Settings-Reset all audio settings to factory defaults. 4 Press MENU to return to the previous menu, or press EXIT to close the menu. The on your TV goes to the next or previous channel in stereo. • SAP-Select this option for channels. 24 DX-60D260A13 Changing channel settings • News-Enhances vocals for channels: 1 Press MENU.
... EXIT to close the menu. You can also press MTS/SAP one or more times to select the audio mode. • Reset Audio Settings-Reset all audio settings to factory defaults. 4 Press MENU to return to the previous menu, or press EXIT to close the menu. The on your TV goes to the next or previous channel in stereo. • SAP-Select this option for channels. 24 DX-60D260A13 Changing channel settings • News-Enhances vocals for channels: 1 Press MENU.
User Manual (English)
Page 43
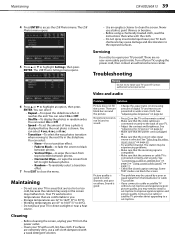
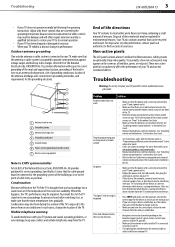
... closed caption settings. Picture quality is connected correctly and securely. See "Adjusting the TV picture" on others. The USB Photos Settings menu opens. 6 Press or to the exposed surfaces. Servicing Do not try to repair your TV with the cloth. • Do not spray insecticide liquid near a heat source. Video and audio Problem Solution Picture does not fill the screen. Contact your cable or satellite TV provider about upgrading...
... closed caption settings. Picture quality is connected correctly and securely. See "Adjusting the TV picture" on others. The USB Photos Settings menu opens. 6 Press or to the exposed surfaces. Servicing Do not try to repair your TV with the cloth. • Do not spray insecticide liquid near a heat source. Video and audio Problem Solution Picture does not fill the screen. Contact your cable or satellite TV provider about upgrading...
User Manual (English)
Page 45
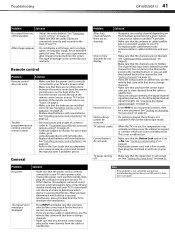
... "Setting parental control levels" on page 43. • Codes are using these troubleshooting instructions, turn on your cable or satellite TV provider. • Make sure that came with new batteries. For the location of common codes in "Programming a different universal remote control" on page 29. • Make sure that the power cord is not turned off. Trouble programming your TV. Troubleshooting DX-60D260A13 41 Problem Solution No output from the channel list. Contact your TV. Password is...
... "Setting parental control levels" on page 43. • Codes are using these troubleshooting instructions, turn on your cable or satellite TV provider. • Make sure that came with new batteries. For the location of common codes in "Programming a different universal remote control" on page 29. • Make sure that the power cord is not turned off. Trouble programming your TV. Troubleshooting DX-60D260A13 41 Problem Solution No output from the channel list. Contact your TV. Password is...

User Manual (English)
Page 46
...-QAM DX-60D260A13 HDMI/DVI 3 (side) E-EDID compliant HDCP compliant Component video 1 (side) Composite video 1 (side) Shared with component Y Shared audio (component Yes and composite) S-Video No PC/VGA 1 (side) 3.5mm PC audio input 1 (side) DVI 1 (side) HDMI1/DVI jack USB 1 (side) Supports JPEG and firmware upgrade Antenna/Cable 1 (side) Specifications Outputs Audio DX-60D260A13 Video No Analog audio/Headphone 1 (side) Digital audio 1 Optical (side) WiFi No Ethernet No DX-60D260A13 Watts/Channel 10W Number of Speakers 2 Power DX-60D260A13 Power...
...-QAM DX-60D260A13 HDMI/DVI 3 (side) E-EDID compliant HDCP compliant Component video 1 (side) Composite video 1 (side) Shared with component Y Shared audio (component Yes and composite) S-Video No PC/VGA 1 (side) 3.5mm PC audio input 1 (side) DVI 1 (side) HDMI1/DVI jack USB 1 (side) Supports JPEG and firmware upgrade Antenna/Cable 1 (side) Specifications Outputs Audio DX-60D260A13 Video No Analog audio/Headphone 1 (side) Digital audio 1 Optical (side) WiFi No Ethernet No DX-60D260A13 Watts/Channel 10W Number of Speakers 2 Power DX-60D260A13 Power...
User Manual (English)
Page 47
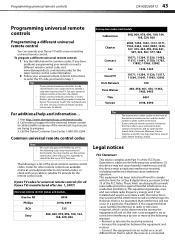
... to your universal remote control's instructions and try several codes before finding a match. Programming universal remote controls DX-60D260A13 43 Programming universal remote controls Programming a different universal remote control You can operate your Dynex TV with your TV, especially to control the Blu-ray or DVD functions. For additional help and information... 1. Codes for All 0054 Phillips 0198, 0490 RCA 135 Sony 068, 069, 078, 096, 100, 164, 168, 229, 026 Set-top box makes and models Cablevision...
... to your universal remote control's instructions and try several codes before finding a match. Programming universal remote controls DX-60D260A13 43 Programming universal remote controls Programming a different universal remote control You can operate your Dynex TV with your TV, especially to control the Blu-ray or DVD functions. For additional help and information... 1. Codes for All 0054 Phillips 0198, 0490 RCA 135 Sony 068, 069, 078, 096, 100, 164, 168, 229, 026 Set-top box makes and models Cablevision...
Quick Setup Guide (English)
Page 1
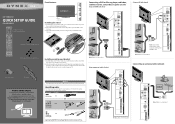
... CABLE IN IN PC IN COMPONENT IN CABLE Note: Cable is not provided in the Manual, Firmware, Drivers & Product Information, then click Search. ANT CABLE IN DIGITAL OUTPUT R COMPONENT IN PR AUDIO PB L AUDIO OUT VIDEO/Y VGA PC IN PC/DVI AUDIO IN 60" 1080p LED QUICK SETUP GUIDE DX-60D260A13 TV VIDEO HDMI ACC Remote control and 2 AAA batteries Front features MENU INPUT VOL + VOL - Identifying cables Your TV has several connection types for information about how to be supported by a UL Listed wall mount bracket...
... CABLE IN IN PC IN COMPONENT IN CABLE Note: Cable is not provided in the Manual, Firmware, Drivers & Product Information, then click Search. ANT CABLE IN DIGITAL OUTPUT R COMPONENT IN PR AUDIO PB L AUDIO OUT VIDEO/Y VGA PC IN PC/DVI AUDIO IN 60" 1080p LED QUICK SETUP GUIDE DX-60D260A13 TV VIDEO HDMI ACC Remote control and 2 AAA batteries Front features MENU INPUT VOL + VOL - Identifying cables Your TV has several connection types for information about how to be supported by a UL Listed wall mount bracket...

Quick Setup Guide (English)
Page 2
... - Quick Launch Inputs Select another source connected to your model number in a 16:9 (wide-screen) aspect ratio. Retail Mode is a registered trademark of the image may take several minutes. Need additional help? Distributed by TV source Setup Wizard Choose Your TV Source 5 Antenna RF CH :0 Cable 0 Digital Channels Cable/Satellite Box 0 Analog Channels Scan for the latest remote control code information. Zoom: Expands the image to highlight a language, then press OK/ENTER. TV VIDEO HDMI ACC MENU ENTER EXIT INPUT CCD...
... - Quick Launch Inputs Select another source connected to your model number in a 16:9 (wide-screen) aspect ratio. Retail Mode is a registered trademark of the image may take several minutes. Need additional help? Distributed by TV source Setup Wizard Choose Your TV Source 5 Antenna RF CH :0 Cable 0 Digital Channels Cable/Satellite Box 0 Analog Channels Scan for the latest remote control code information. Zoom: Expands the image to highlight a language, then press OK/ENTER. TV VIDEO HDMI ACC MENU ENTER EXIT INPUT CCD...

Important Information (English)
Page 3
...type plug is a Class I apparatus to a grounding-type, three-prong outlet. 17 Remote control batteries should not be exposed to excessive heat such as sunshine, fire, or the like. 18 The apparatus should be taken to keep from the power outlet and refer servicing to qualified service personnel under the following conditions: • When the power supply cord or plug... user-serviceable parts are inside. When installing an outside antenna system should be placed on the back of broken glass. • If the LCD panel is broken, make sure that the service technician uses replacement parts ...
...type plug is a Class I apparatus to a grounding-type, three-prong outlet. 17 Remote control batteries should not be exposed to excessive heat such as sunshine, fire, or the like. 18 The apparatus should be taken to keep from the power outlet and refer servicing to qualified service personnel under the following conditions: • When the power supply cord or plug... user-serviceable parts are inside. When installing an outside antenna system should be placed on the back of broken glass. • If the LCD panel is broken, make sure that the service technician uses replacement parts ...
Important Information (English)
Page 4
... to view channels from the cable or satellite box. See "Installing remote control batteries" in and turn on your TV, and are using a cable or satellite box, use . • If you have the correct input selected to use the remote that the power cord is correctly connected to the point of the room rises suddenly. No power. • Make sure that came with your TV. "No signal" error message is causing interference. Specifically...
... to view channels from the cable or satellite box. See "Installing remote control batteries" in and turn on your TV, and are using a cable or satellite box, use . • If you have the correct input selected to use the remote that the power cord is correctly connected to the point of the room rises suddenly. No power. • Make sure that came with your TV. "No signal" error message is causing interference. Specifically...

Important Information (English)
Page 5
... DVI 1 (side) HDMI1/DVI jack USB 1 (side) Supports JPEG and firmware upgrade Antenna/Cable 1 (side) Audio DX-60D260A13 Video No Analog audio/Headphone 1 (side) Digital audio 1 Optical (side) WiFi No Ethernet No DX-60D260A13 Watts/Channel 10W Number of Speakers 2 Power DX-60D260A13 Power consumption On: 150 W Standby: See "Hiding channels" in . (96.5 x 143.8 x 33 cm) 75 lbs (34 kg) DX-60D260A13 Screen size measured diagonally 60" Display type LED Panel 60 Hz vs.120 Hz 120Hz Display resolution 1080p Panel resolution 1920 (H) × 1080 (V) Aspect ratio...
... DVI 1 (side) HDMI1/DVI jack USB 1 (side) Supports JPEG and firmware upgrade Antenna/Cable 1 (side) Audio DX-60D260A13 Video No Analog audio/Headphone 1 (side) Digital audio 1 Optical (side) WiFi No Ethernet No DX-60D260A13 Watts/Channel 10W Number of Speakers 2 Power DX-60D260A13 Power consumption On: 150 W Standby: See "Hiding channels" in . (96.5 x 143.8 x 33 cm) 75 lbs (34 kg) DX-60D260A13 Screen size measured diagonally 60" Display type LED Panel 60 Hz vs.120 Hz 120Hz Display resolution 1080p Panel resolution 1920 (H) × 1080 (V) Aspect ratio...
Information Brochure (English)
Page 1
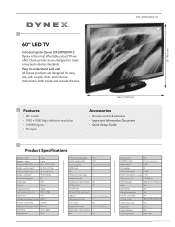
... angle 176° Tuner-supports: NTSC, ATSC, 8-VSB, Clear-QAM HDMI inputs 3 DVI 1 Component video inputs 1 Composite inputs 1 Shared audio inputs (component & composite) Yes S-Video inputs No PC/VGA input 1 3.5 mm PC/DVI audio input 1 USB port 1 Supports JPEG & FW upgrade Cable/antenna inputs 1 Video output No Analog audio output 1 (shared with headphone) Digital audio output (optical) 1 WiFi No Ethernet port Headphone jack No 1 (shared analog audio out) Watts/channel 10W # of speakers 2 Power consumption 150W Power consumption-in standby Easy to...
... angle 176° Tuner-supports: NTSC, ATSC, 8-VSB, Clear-QAM HDMI inputs 3 DVI 1 Component video inputs 1 Composite inputs 1 Shared audio inputs (component & composite) Yes S-Video inputs No PC/VGA input 1 3.5 mm PC/DVI audio input 1 USB port 1 Supports JPEG & FW upgrade Cable/antenna inputs 1 Video output No Analog audio output 1 (shared with headphone) Digital audio output (optical) 1 WiFi No Ethernet port Headphone jack No 1 (shared analog audio out) Watts/channel 10W # of speakers 2 Power consumption 150W Power consumption-in standby Easy to...


