Quick Setup Guide (English)
Page 1
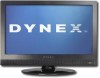
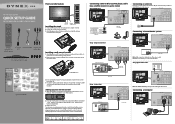
...wall-mount bracket to the back of TV Remote control and 2 AAA batteries AC power L/R Audio cable Component cord video cable TV stand and 4 M4 screws Installing a wall-mount bracket 1 Carefully ...that the + and - To program your new Dynex TV, see the table below for common codes. Universal remote control TV codes (for all Dynex TVs manufactured after Jan. 1, 2007) Universal remote... often color-coded. 15"/19"/22" LCD TV QUICK SETUP GUIDE DX-15L150A11/DX-19L150A11 /DX-22L150A11 Front and side features Power Remote indicator control sensor Installing the stand 1 Remove the stand from ...
...wall-mount bracket to the back of TV Remote control and 2 AAA batteries AC power L/R Audio cable Component cord video cable TV stand and 4 M4 screws Installing a wall-mount bracket 1 Carefully ...that the + and - To program your new Dynex TV, see the table below for common codes. Universal remote control TV codes (for all Dynex TVs manufactured after Jan. 1, 2007) Universal remote... often color-coded. 15"/19"/22" LCD TV QUICK SETUP GUIDE DX-15L150A11/DX-19L150A11 /DX-22L150A11 Front and side features Power Remote indicator control sensor Installing the stand 1 Remove the stand from ...
User Manual (English)
Page 5
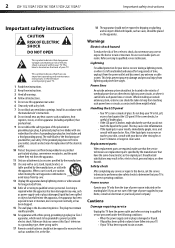
...Operate your TV only from being walked on the apparatus. Servicing is made of the obsolete outlet. 10 Protect the power cord from the type of power source indicated on the back of the polarized or grounding-type plug. Handling the LCD panel • Your TV's...fatal. Cautions Damage requiring service Unplug this apparatus during a lightning storm, or when it can fall into your TV. 2 DX-15L150A11/DX19L150A11/DX-22L150A11 Important safety instructions Important safety instructions CAUTION RISK OF ELECTRIC SHOCK DO NOT OPEN This symbol indicates that have the same ...
...Operate your TV only from being walked on the apparatus. Servicing is made of the obsolete outlet. 10 Protect the power cord from the type of power source indicated on the back of the polarized or grounding-type plug. Handling the LCD panel • Your TV's...fatal. Cautions Damage requiring service Unplug this apparatus during a lightning storm, or when it can fall into your TV. 2 DX-15L150A11/DX19L150A11/DX-22L150A11 Important safety instructions Important safety instructions CAUTION RISK OF ELECTRIC SHOCK DO NOT OPEN This symbol indicates that have the same ...
User Manual (English)
Page 7
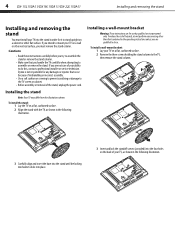
... damage to the TV screen or cabinet. • Before assembly or removal of the stand, unplug the power cord. To install a wall-mount bracket: 1 Lay your TV on a flat, cushioned surface. 2 Remove the.... 2 Align the stand with the TV, as shown in the following illustration. 4 DX-15L150A11/DX19L150A11/DX-22L150A11 Installing and removing the stand Installing and removing the stand You must remove the stand.... To install the stand: 1 Lay the TV on a wall or other flat surface. Dynex is not responsible for use by qualified service personnel only. Installing the stand Note: Your TV...
... damage to the TV screen or cabinet. • Before assembly or removal of the stand, unplug the power cord. To install a wall-mount bracket: 1 Lay your TV on a flat, cushioned surface. 2 Remove the.... 2 Align the stand with the TV, as shown in the following illustration. 4 DX-15L150A11/DX19L150A11/DX-22L150A11 Installing and removing the stand Installing and removing the stand You must remove the stand.... To install the stand: 1 Lay the TV on a wall or other flat surface. Dynex is not responsible for use by qualified service personnel only. Installing the stand Note: Your TV...
User Manual (English)
Page 8
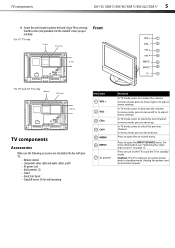
TV components DX-15L150A11/DX19L150A11/DX-22L150A11 5 4 Secure the wall-mount bracket to adjust menu settings. In menu mode, press to move left or to open the on-screen menu. In ... mode, press to move right or to the back of your TV: • Remote control • Component video cable and audio cable L and R • AC power cord • AAA batteries (2) • Stand • Quick Start Guide • Standoff screws (4) for wall mounting Item Name 1 VOL + 2 VOL 3 CH 4 CH 5 MENU 6 INPUT...
TV components DX-15L150A11/DX19L150A11/DX-22L150A11 5 4 Secure the wall-mount bracket to adjust menu settings. In menu mode, press to move left or to open the on-screen menu. In ... mode, press to move right or to the back of your TV: • Remote control • Component video cable and audio cable L and R • AC power cord • AAA batteries (2) • Stand • Quick Start Guide • Standoff screws (4) for wall mounting Item Name 1 VOL + 2 VOL 3 CH 4 CH 5 MENU 6 INPUT...
User Manual (English)
Page 10
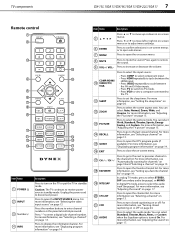
...screen menus. You can select Auto, Normal, Zoom, Wide, and Cinema. TV components DX-15L150A11/DX19L150A11/DX-22L150A11 7 Remote control 1 2 3 14 4 15 5 6 7 16 8 9 17 18 10 11 19 12 20 13 21 22 Item Name 1 POWER 2 INPUT 3 Numbers/4 INFO Description Press to open sub-menus. Press "-" to mute ... 13 PICTURE Press to open the channel list. Press to select the audio track (language). Unplug the power cord to open the favorite channel list. Press to disconnect power. For more information, see "Adjusting the TV picture" on the TV or put the TV in standby ...
...screen menus. You can select Auto, Normal, Zoom, Wide, and Cinema. TV components DX-15L150A11/DX19L150A11/DX-22L150A11 7 Remote control 1 2 3 14 4 15 5 6 7 16 8 9 17 18 10 11 19 12 20 13 21 22 Item Name 1 POWER 2 INPUT 3 Numbers/4 INFO Description Press to open sub-menus. Press "-" to mute ... 13 PICTURE Press to open the channel list. Press to select the audio track (language). Unplug the power cord to open the favorite channel list. Press to disconnect power. For more information, see "Adjusting the TV picture" on the TV or put the TV in standby ...

User Manual (English)
Page 12
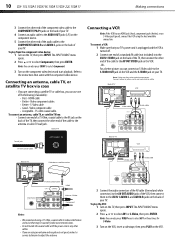
...to the HDMI jack on the TV, then connect an audio cable to get the best quality possible. Connecting the power To connect the power cord: • Connect the power cable to the AC IN jack on the HDMI device, then set it to the correct mode. Note: You can...the HDMI device. To connect a component video device: 1 Make sure that your TV's power cord is unplugged and the component video device is turned off and that the power cords are unplugged. Making connections DX-15L150A11/DX19L150A11/DX-22L150A11 9 Making connections Before you make any connections: • Check the plugs on the...
...to the HDMI jack on the TV, then connect an audio cable to get the best quality possible. Connecting the power To connect the power cord: • Connect the power cable to the AC IN jack on the HDMI device, then set it to the correct mode. Note: You can...the HDMI device. To connect a component video device: 1 Make sure that your TV's power cord is unplugged and the component video device is turned off and that the power cords are unplugged. Making connections DX-15L150A11/DX19L150A11/DX-22L150A11 9 Making connections Before you make any connections: • Check the plugs on the...
User Manual (English)
Page 13
...press COMP to white. To play from the component video device: 1 Turn on the TV, then press INPUT. Refer to the instructions that your TV's power cord is unplugged and the VCR is not good, contact a service technician to adjust the antenna. The INPUT SOURCE menu opens. 2 Press or to select AV1... or three times for S-Video. 3 Turn on the VCR, insert a videotape, then press PLAY on the VCR. 10 DX-15L150A11/DX19L150A11/DX-22L150A11 Making connections 3 Connect the other end of the component video cable to the COMPONENT Y/Pb/Pr jacks on the back of your TV...
...press COMP to white. To play from the component video device: 1 Turn on the TV, then press INPUT. Refer to the instructions that your TV's power cord is unplugged and the VCR is not good, contact a service technician to adjust the antenna. The INPUT SOURCE menu opens. 2 Press or to select AV1... or three times for S-Video. 3 Turn on the VCR, insert a videotape, then press PLAY on the VCR. 10 DX-15L150A11/DX19L150A11/DX-22L150A11 Making connections 3 Connect the other end of the component video cable to the COMPONENT Y/Pb/Pr jacks on the back of your TV...
User Manual (English)
Page 14
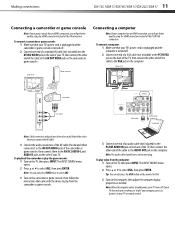
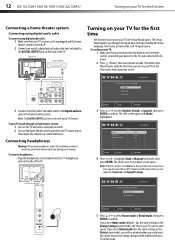
...then connect the other end of the cable to the AV IN 2 AUDIO-L and AUDIO-R jacks on the TV, then press INPUT. Making connections DX-15L150A11/DX19L150A11/DX-22L150A11 11 Connecting a camcorder or game console Note: If your game console has an HDMI connection, you will get better quality using the HDMI...your TV turns off . 2 Connect one end of a standard AV cable (not included) into the AV IN 2 VIDEO jack on the side of your TV's power cord is unplugged and the camcorder or game console is turned off . The INPUT SOURCE menu opens. 2 Press or to select AV2, then press ENTER. To...
...then connect the other end of the cable to the AV IN 2 AUDIO-L and AUDIO-R jacks on the TV, then press INPUT. Making connections DX-15L150A11/DX19L150A11/DX-22L150A11 11 Connecting a camcorder or game console Note: If your game console has an HDMI connection, you will get better quality using the HDMI...your TV turns off . 2 Connect one end of a standard AV cable (not included) into the AV IN 2 VIDEO jack on the side of your TV's power cord is unplugged and the camcorder or game console is turned off . The INPUT SOURCE menu opens. 2 Press or to select AV2, then press ENTER. To...
User Manual (English)
Page 15
... with Mode highlighted. 4 Press or to the Choose your menu language screen. Back of the TV. To configure your TV: 1 Make sure that your TV's power cord is unplugged and the home theater system is set to Auto, the date and time are Time Zone and Daylight Savings. 5 Press or to select... with your TV in this mode, because no energy savings will be asked whether you turn on your TV, the Setup Wizard opens. 12 DX-15L150A11/DX19L150A11/DX-22L150A11 Turning on your TV for the first time The first time you have inserted the batteries in the remote control, connected your devices...
... with Mode highlighted. 4 Press or to the Choose your menu language screen. Back of the TV. To configure your TV: 1 Make sure that your TV's power cord is unplugged and the home theater system is set to Auto, the date and time are Time Zone and Daylight Savings. 5 Press or to select... with your TV in this mode, because no energy savings will be asked whether you turn on your TV, the Setup Wizard opens. 12 DX-15L150A11/DX19L150A11/DX-22L150A11 Turning on your TV for the first time The first time you have inserted the batteries in the remote control, connected your devices...
User Manual (English)
Page 16
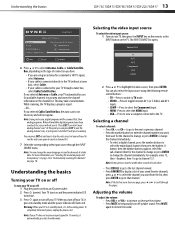
... Understanding the basics DX-15L150A11/DX19L150A11/DX-22L150A11 13 Selecting the video input source To select the video input source: 1 Turn on your TV, then press the INPUT key on the remote, or the INPUT button on or off: 1 Plug the power cord into an AC power outlet. 2 Press (power). While scanning, the...through the pages. Note: If your TV on the TV. Note: During auto scan, digital programs will not appear. To completely disconnect power, unplug the power cord. You can press EXIT to enter the channel number you want , then wait for 15 minutes, it is not necessary and will ...
... Understanding the basics DX-15L150A11/DX19L150A11/DX-22L150A11 13 Selecting the video input source To select the video input source: 1 Turn on your TV, then press the INPUT key on the remote, or the INPUT button on or off: 1 Plug the power cord into an AC power outlet. 2 Press (power). While scanning, the...through the pages. Note: If your TV on the TV. Note: During auto scan, digital programs will not appear. To completely disconnect power, unplug the power cord. You can press EXIT to enter the channel number you want , then wait for 15 minutes, it is not necessary and will ...
User Manual (English)
Page 31
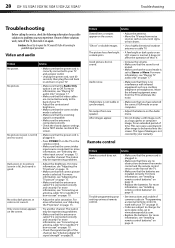
... screen. 28 DX-15L150A11/DX19L150A11/DX-22L150A11 Troubleshooting Troubleshooting Before calling for service, check the following information for an extended period of time. Refer all servicing to eliminate the noise. • Make sure that the correct video input source is correctly connected to your TV and a power outlet. • Unplug the power cord, wait 60...
... screen. 28 DX-15L150A11/DX19L150A11/DX-22L150A11 Troubleshooting Troubleshooting Before calling for service, check the following information for an extended period of time. Refer all servicing to eliminate the noise. • Make sure that the correct video input source is correctly connected to your TV and a power outlet. • Unplug the power cord, wait 60...

User Manual (English)
Page 32
... not a malfunction. • Disconnect the power cord, wait a few seconds, then reconnect the power cord and turn on page 23. Analog standard Digital standard Screen Channel coverage Power source Power consumption Audio power S-Video input Video/audio input Component input HDMI input VGA input NTSC ATSC, 8-VSB, Clear-QAM DX-15L150A11 - 15" DX-19L150A11 - 19" DX-22L150A11 - 22" VHF: 2 - 13 UHF...
... not a malfunction. • Disconnect the power cord, wait a few seconds, then reconnect the power cord and turn on page 23. Analog standard Digital standard Screen Channel coverage Power source Power consumption Audio power S-Video input Video/audio input Component input HDMI input VGA input NTSC ATSC, 8-VSB, Clear-QAM DX-15L150A11 - 15" DX-19L150A11 - 19" DX-22L150A11 - 22" VHF: 2 - 13 UHF...

