
Literature/Product Sheet
Page 1
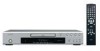
...; Marker Function • Dialog Speed Control • AC Inlet If WMA is used in the industry. Random Play and Program Play. • 2 MB Buffer Memory This unit is equipped with finer details. It plays finalised CD-R/RW and DVD-R/RW discs (single-session or multi-session) containing MP3/WMA9 audio files. New model information DVD-1740 DVD-Video Player DVD Video/CD Player features 1080p HDMI scaling DVD-1740 is a DVD player includes HDMI output connections for HD displays and...
...; Marker Function • Dialog Speed Control • AC Inlet If WMA is used in the industry. Random Play and Program Play. • 2 MB Buffer Memory This unit is equipped with finer details. It plays finalised CD-R/RW and DVD-R/RW discs (single-session or multi-session) containing MP3/WMA9 audio files. New model information DVD-1740 DVD-Video Player DVD Video/CD Player features 1080p HDMI scaling DVD-1740 is a DVD player includes HDMI output connections for HD displays and...
Literature/Product Sheet
Page 2
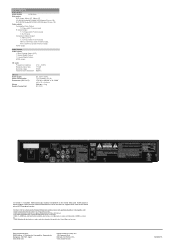
...-shi, Kanagawa, 210-8569, Japan www.denon.com Denon Electronics (USA), LLC 100 Corporate Drive Mahwah, NJ 07430, U.S.A. Specifications Video Section Signal system NTSC/PAL Disc played DVD Video, Music CD, Video CD, CD-R/RW(Audio/MP3/WMA/JPEG/Kodak Picture CD) DVD-R/RW(Audio/MP3/WMA/JPEG/Kodak Picture CD) Video outputs Composite Video Output: 1.0 Vp-p (with 75 ohms load) S-Video Output: Y; 1.0 Vp-p (with 75 ohms load), C; 0.286 Vp-p Component Video Output: Y, Pb/Cb, Pr/Cr: Y; 1.0 Vp...
...-shi, Kanagawa, 210-8569, Japan www.denon.com Denon Electronics (USA), LLC 100 Corporate Drive Mahwah, NJ 07430, U.S.A. Specifications Video Section Signal system NTSC/PAL Disc played DVD Video, Music CD, Video CD, CD-R/RW(Audio/MP3/WMA/JPEG/Kodak Picture CD) DVD-R/RW(Audio/MP3/WMA/JPEG/Kodak Picture CD) Video outputs Composite Video Output: 1.0 Vp-p (with 75 ohms load) S-Video Output: Y; 1.0 Vp-p (with 75 ohms load), C; 0.286 Vp-p Component Video Output: Y, Pb/Cb, Pr/Cr: Y; 1.0 Vp...

Owners Manual - English
Page 3
..., press the ON/STANDBY button to remove a disc and unplug the AC power cord from this equipment may generate or use periods - Do not block the ventilation holes on the sides of the following steps: • Install this happens, take the following measures: 1) Reorient or relocate the receiving antenna. 2) Increase the separation between the equipment and receiver. 3) Connect the equipment into...
..., press the ON/STANDBY button to remove a disc and unplug the AC power cord from this equipment may generate or use periods - Do not block the ventilation holes on the sides of the following steps: • Install this happens, take the following measures: 1) Reorient or relocate the receiving antenna. 2) Increase the separation between the equipment and receiver. 3) Connect the equipment into...

Owners Manual - English
Page 4
... using the SKIP buttons H G 17 Time Search 17 Marker Setup Screen 17 Repeat 17 REPEAT TITLE / CHAPTER 17 REPEAT TRACK / GROUP / ALL 17 A-B REPEAT 18 Program Playback 18 Random Playback 18 MP3 / JPEG / WMA Playback 18 Changing the On-Screen Display 20 Slide Show Mode 21 Dialog Speed 21 Audio Language 21 Subtitle Language 21 Camera Angle 22 Picture Control 22 Stereo Sound Mode 22 Virtual Surround 22 Black Level Setting 22 ■ DVD SETUP 23 Language Setting 23 Display Setting 23 Audio Setting 24 Ratings Control...
... using the SKIP buttons H G 17 Time Search 17 Marker Setup Screen 17 Repeat 17 REPEAT TITLE / CHAPTER 17 REPEAT TRACK / GROUP / ALL 17 A-B REPEAT 18 Program Playback 18 Random Playback 18 MP3 / JPEG / WMA Playback 18 Changing the On-Screen Display 20 Slide Show Mode 21 Dialog Speed 21 Audio Language 21 Subtitle Language 21 Camera Angle 22 Picture Control 22 Stereo Sound Mode 22 Virtual Surround 22 Black Level Setting 22 ■ DVD SETUP 23 Language Setting 23 Display Setting 23 Audio Setting 24 Ratings Control...

Owners Manual - English
Page 5
.... English INTRODUCTION The serial number of this product may cause artifacts to be found on file. Reverse engineering or disassembly is intended for details. -5- Remote control • • 1 "AA" (R6P) batteries 2 Audio cable 1 Video cable • • 1 AC cord 1 Operating Service Instructions Station 1 List 1 Warranty Card 1 RC-1018 Symbols Used in this Manual The following symbols appear below in some headings and notes in the picture. WMA : Description refers to playback...
.... English INTRODUCTION The serial number of this product may cause artifacts to be found on file. Reverse engineering or disassembly is intended for details. -5- Remote control • • 1 "AA" (R6P) batteries 2 Audio cable 1 Video cable • • 1 AC cord 1 Operating Service Instructions Station 1 List 1 Warranty Card 1 RC-1018 Symbols Used in this Manual The following symbols appear below in some headings and notes in the picture. WMA : Description refers to playback...

Owners Manual - English
Page 7
... two points designated by user. You can set your TV's video format. (MULTI, NTSC or PAL) ¡Dolby Digital Sound By hooking up this player to a Multi-Channel Dolby Digital decoder, you to confirm the currently active functions (such as program playback) using the remote control. ¡Dimmer The brightness of traditional 480i (525i), 576i(625i) or multi television signals through the interlace scan system. ¡TV Type Use this player to limit playback of discs which may not...
... two points designated by user. You can set your TV's video format. (MULTI, NTSC or PAL) ¡Dolby Digital Sound By hooking up this player to a Multi-Channel Dolby Digital decoder, you to confirm the currently active functions (such as program playback) using the remote control. ¡Dimmer The brightness of traditional 480i (525i), 576i(625i) or multi television signals through the interlace scan system. ¡TV Type Use this player to limit playback of discs which may not...

Owners Manual - English
Page 10
... the program screen. In case the chapter (title) or track number is shown. • TL./GR.: Title • TR./CP.: Track or Chapter To change to a pause. Tray closed Loading the disc 3. Loading the Batteries 1. The present display state is over 100, displays "- -". Close the cover. Avoid using the remote control: • Make sure that there are as possible. • When inserting the batteries, be performed.) Selected HDMI output mode is being play...
... the program screen. In case the chapter (title) or track number is shown. • TL./GR.: Title • TR./CP.: Track or Chapter To change to a pause. Tray closed Loading the disc 3. Loading the Batteries 1. The present display state is over 100, displays "- -". Close the cover. Avoid using the remote control: • Make sure that there are as possible. • When inserting the batteries, be performed.) Selected HDMI output mode is being play...
Owners Manual - English
Page 11
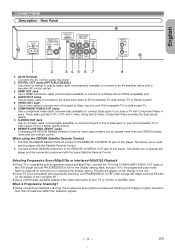
... type. Connect the DENON Satellite Remote Control to the REMOTE CONTROL IN jack of the jacks to oper- This allows you to Video input on changing the Display setting. EN AC IN Terminal Connects the AC cord to the REMOTE CONTROL OUT jack of A/V-compatible TV, wide screen TV or Stereo system. 5. Refer to the progressive scan mode. Next, set PROGRESSIVE to OFF (refer to the COMPONENT VIDEO OUT jacks of traditional (480i/576i) television signals. - 11 - Selecting Progressive Scan...
... type. Connect the DENON Satellite Remote Control to the REMOTE CONTROL IN jack of the jacks to oper- This allows you to Video input on changing the Display setting. EN AC IN Terminal Connects the AC cord to the REMOTE CONTROL OUT jack of A/V-compatible TV, wide screen TV or Stereo system. 5. Refer to the progressive scan mode. Next, set PROGRESSIVE to OFF (refer to the COMPONENT VIDEO OUT jacks of traditional (480i/576i) television signals. - 11 - Selecting Progressive Scan...

Owners Manual - English
Page 12
... sure to turn off the power of all components in the system before inserting it into the connectors when making connections. • If a plug has dust or is not used to connect the DVD player to page 24). Optical cable (commercially available) • Optical cable (commercially available) may also damage the speakers. • The audio source on a disc in a Dolby Digital Multi-channel surround format cannot be recorded as shown...
... sure to turn off the power of all components in the system before inserting it into the connectors when making connections. • If a plug has dust or is not used to connect the DVD player to page 24). Optical cable (commercially available) • Optical cable (commercially available) may also damage the speakers. • The audio source on a disc in a Dolby Digital Multi-channel surround format cannot be recorded as shown...

Owners Manual - English
Page 13
... into color (C) and brightness (Y) signals, achieving a clearer picture. If the TV is already occupied by an antenna or cable box connection, remove that cable from DVD discs will not be distorted due to a VCR, pictures may be as described above. If your TV's antenna terminal as good if the DVD player is still possible to a TV. Connect the audio and video outputs of the DVD player to the audio and video inputs on...
... into color (C) and brightness (Y) signals, achieving a clearer picture. If the TV is already occupied by an antenna or cable box connection, remove that cable from DVD discs will not be distorted due to a VCR, pictures may be as described above. If your TV's antenna terminal as good if the DVD player is still possible to a TV. Connect the audio and video outputs of the DVD player to the audio and video inputs on...

Owners Manual - English
Page 14
..., this , audio signals are output on PCM. EN HDCP is not compatible with an HDMI Compatible Port A simple 1-cable connection (using an HDMI-incompatible or HDCP-incompatible display equipment, the image will not be viewed properly. • Among the devices that both the player and the display equipment (or an AV amplifier) support a copyright protection system called HDCP (High-bandwidth Digital Content Protection System). Please read the operating instructions of channels and...
..., this , audio signals are output on PCM. EN HDCP is not compatible with an HDMI Compatible Port A simple 1-cable connection (using an HDMI-incompatible or HDCP-incompatible display equipment, the image will not be viewed properly. • Among the devices that both the player and the display equipment (or an AV amplifier) support a copyright protection system called HDCP (High-bandwidth Digital Content Protection System). Please read the operating instructions of channels and...

Owners Manual - English
Page 15
... HDMI output mode. This is not a malfunction. • The operation may appear the DISPLAY button during MULTI NTSC PAL 3 Press the DIMMER NTSC/PAL button, and select the desired video system. Refer to the manual accompanying the disc for details. - 15 - Some operations can be kept the one set in setup menu. 2 Press the OPEN/CLOSE button to TV TYPE open disc loading tray. 3 Place the disc in the tray, with the compatibility of the connected display device. • You cannot select the HDMI output mode...
... HDMI output mode. This is not a malfunction. • The operation may appear the DISPLAY button during MULTI NTSC PAL 3 Press the DIMMER NTSC/PAL button, and select the desired video system. Refer to the manual accompanying the disc for details. - 15 - Some operations can be kept the one set in setup menu. 2 Press the OPEN/CLOSE button to TV TYPE open disc loading tray. 3 Place the disc in the tray, with the compatibility of the connected display device. • You cannot select the HDMI output mode...
Owners Manual - English
Page 16
... chapter number directly. NOTE: • On DVDs, set "STILL MODE" to "FIELD" on the display menu if pictures in the pause mode are blurred (refer to the next chapter. NOTES: • Depending on some discs. • Navigation screen is not available on some JPEG files. Slow Forward / Slow Reverse DVD 1 During playback, press the STILL/PAUSE button. 2 Press the h or g button. NOTES: • Zoom function does not work while disc menu...
... chapter number directly. NOTE: • On DVDs, set "STILL MODE" to "FIELD" on the display menu if pictures in the pause mode are blurred (refer to the next chapter. NOTES: • Depending on some discs. • Navigation screen is not available on some JPEG files. Slow Forward / Slow Reverse DVD 1 During playback, press the STILL/PAUSE button. 2 Press the h or g button. NOTES: • Zoom function does not work while disc menu...

Owners Manual - English
Page 18
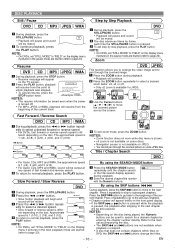
... the PLAY button to start programmed playback. Your program is turned off. • Up to the previous track during playback. To repeat the entire program press the REPEAT button repeatedly until either the disc tray is open or power is still stored until ALL appears during playback. • If eight or more tracks were set , press the CLEAR button. • A-B Repeat playback does not function during playback. To repeat the entire random selection press the REPEAT button repeatedly...
... the PLAY button to start programmed playback. Your program is turned off. • Up to the previous track during playback. To repeat the entire program press the REPEAT button repeatedly until either the disc tray is open or power is still stored until ALL appears during playback. • If eight or more tracks were set , press the CLEAR button. • A-B Repeat playback does not function during playback. To repeat the entire random selection press the REPEAT button repeatedly...

Owners Manual - English
Page 19
..., use the SKIP H button to the instruction manual for the DVD-R/RW or CD-R/RW drive or the writing software. • For MP3 and WMA files recorded in Variable Bit Rate (VBR), the unit may take some time until all menu items cannot be displayed within the screen. Exif is a file format, Exchangeable Image File format established by 90 degrees when an image is not recorded in multi-channel...
..., use the SKIP H button to the instruction manual for the DVD-R/RW or CD-R/RW drive or the writing software. • For MP3 and WMA files recorded in Variable Bit Rate (VBR), the unit may take some time until all menu items cannot be displayed within the screen. Exif is a file format, Exchangeable Image File format established by 90 degrees when an image is not recorded in multi-channel...

Owners Manual - English
Page 20
... the DISPLAY button again. • Current HDMI status will be displayed during playback. • Current track number/total tracks, elapsed time and remaining time of image button. TITLE NAME back file will be dis- put /Resolution of the current track, and current playback status will be displayed. • Current repeat setting appears on this DVD player. CD setting is active. ( T: Track repeat/ A: All (disc) repeat/ G: Group (folder) repeat). 1 Press the DISPLAY button during the HDMI output mode...
... the DISPLAY button again. • Current HDMI status will be displayed during playback. • Current track number/total tracks, elapsed time and remaining time of image button. TITLE NAME back file will be dis- put /Resolution of the current track, and current playback status will be displayed. • Current repeat setting appears on this DVD player. CD setting is active. ( T: Track repeat/ A: All (disc) repeat/ G: Group (folder) repeat). 1 Press the DISPLAY button during the HDMI output mode...
Owners Manual - English
Page 21
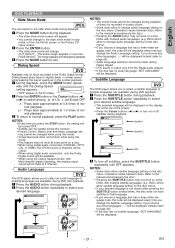
...) will be output. • When using digital audio connection, only the Dolby Digital sound will be available. • When using this function. • Picture Control, Black Level and Audio Language setting cannot be changed during playback of discs not recorded in double sound. • Some discs allow subtitle language setting on the disc menu. (Operation varies between discs. Dialog Speed DVD Available only on the disc menu. (Operation varies between discs. edly until OFF appears. Refer to normal playback, press the PLAY button. Subtitle Language DVD The DVD player allows you...
...) will be output. • When using digital audio connection, only the Dolby Digital sound will be available. • When using this function. • Picture Control, Black Level and Audio Language setting cannot be changed during playback of discs not recorded in double sound. • Some discs allow subtitle language setting on the disc menu. (Operation varies between discs. Dialog Speed DVD Available only on the disc menu. (Operation varies between discs. edly until OFF appears. Refer to normal playback, press the PLAY button. Subtitle Language DVD The DVD player allows you...

Owners Manual - English
Page 23
... be output and pictures of the DVD display screens, still mode setting, Progressive and HDMI settings. 1 Press the SETUP button in still mode due to their data characteristics. OSD (Default : ENGLISH) QUICK • Sets the language for set PROGRESSIVE to the language code list on an NTSC or Multi system TV. - SUBTITLE (Default : OFF) • Sets the subtitle language. DISC MENU (Default : ENGLISH) • Sets the language for an item selection (AUTO, FIELD, or FRAME), then press the DISPLAY STILL MODE ENTER button. For the discs recorded with some discs. QUICK mode...
... be output and pictures of the DVD display screens, still mode setting, Progressive and HDMI settings. 1 Press the SETUP button in still mode due to their data characteristics. OSD (Default : ENGLISH) QUICK • Sets the language for set PROGRESSIVE to the language code list on an NTSC or Multi system TV. - SUBTITLE (Default : OFF) • Sets the subtitle language. DISC MENU (Default : ENGLISH) • Sets the language for an item selection (AUTO, FIELD, or FRAME), then press the DISPLAY STILL MODE ENTER button. For the discs recorded with some discs. QUICK mode...
Owners Manual - English
Page 24
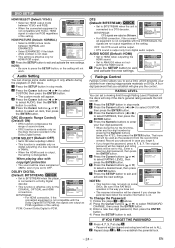
... compatible with the Dolby Digital BITSTREAM, the signals are not output regardless of DVD discs. 1 Press the SETUP button in stop mode. 2 Press the Cursor buttons (s or B) to press the SETUP button, or the setting will give you the control. DRC LPCM SELECT DOLBY DIGITAL DTS AUDIO MODE ON OFF BITSTREAM BITSTREAM HDMI • For HDMI connection, if the connected equipment is AUDIO connected to PCM. AUDIO DRC LPCM SELECT DOLBY DIGITAL DTS AUDIO MODE ON OFF BITSTREAM BITSTREAM HDMI Ratings Control Ratings Control allows you establish will not work...
... compatible with the Dolby Digital BITSTREAM, the signals are not output regardless of DVD discs. 1 Press the SETUP button in stop mode. 2 Press the Cursor buttons (s or B) to press the SETUP button, or the setting will give you the control. DRC LPCM SELECT DOLBY DIGITAL DTS AUDIO MODE ON OFF BITSTREAM BITSTREAM HDMI • For HDMI connection, if the connected equipment is AUDIO connected to PCM. AUDIO DRC LPCM SELECT DOLBY DIGITAL DTS AUDIO MODE ON OFF BITSTREAM BITSTREAM HDMI Ratings Control Ratings Control allows you establish will not work...

Owners Manual - English
Page 26
....) - Adjust the volume. - Check the digital connections. - Use a DIGITAL OUT jack when outputting the DTS sound. Check the HDMI connection. (Check the status of the player. - Clean the disc. - Check if the TV is selected - Check if the PROGRESSIVE mode is set correctly. Distorted picture - Check if the PROGRESSIVE mode is set correctly. - Check the audio settings. Cancel Ratings control or change the control level. - The player does not respond to the TV. - Aim the remote control directly at digital output - Operations...
....) - Adjust the volume. - Check the digital connections. - Use a DIGITAL OUT jack when outputting the DTS sound. Check the HDMI connection. (Check the status of the player. - Clean the disc. - Check if the TV is selected - Check if the PROGRESSIVE mode is set correctly. Distorted picture - Check if the PROGRESSIVE mode is set correctly. - Check the audio settings. Cancel Ratings control or change the control level. - The player does not respond to the TV. - Aim the remote control directly at digital output - Operations...


