
Owners Manual
Page 25
... measurements cannot be displayed when the speaker polarity is producing the noise for producing suitable reproduction have not been detected. Please check the following matters, reset the pertinent items, and measure again. Check that is connected in the room, the speakers may not be completed because of each channel is too...
... measurements cannot be displayed when the speaker polarity is producing the noise for producing suitable reproduction have not been detected. Please check the following matters, reset the pertinent items, and measure again. Check that is connected in the room, the speakers may not be completed because of each channel is too...
Owners Manual
Page 34
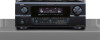
... m) or less. Please note that the difference of 0.1 foot (0.03 meters) each time the button is selected for the listening room. The AVR-3805 automatically sets the optimum surround delay time for "Default", the settings are used, their playback levels can select the unit of "1ft (0.1m)" or...is pressed. The Speaker Setup Menu reappears. ENTER (Remote control unit) (Main unit) Example: When the distance is set , the settings are reset to the measured distance. The distance changes in highlighted line. If you can be adjusted directly from the remote control unit. (For details, ...
... m) or less. Please note that the difference of 0.1 foot (0.03 meters) each time the button is selected for the listening room. The AVR-3805 automatically sets the optimum surround delay time for "Default", the settings are used, their playback levels can select the unit of "1ft (0.1m)" or...is pressed. The Speaker Setup Menu reappears. ENTER (Remote control unit) (Main unit) Example: When the distance is set , the settings are reset to the measured distance. The distance changes in highlighted line. If you can be adjusted directly from the remote control unit. (For details, ...
Owners Manual
Page 39
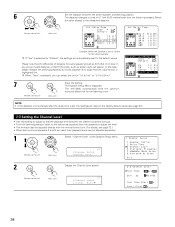
... digital recording between a digital audio source (stereo - 2 channel) and a digital audio recorder. • Do not connect the output of the AVR-3805 for which no digital input jacks are automatically reset to "DENON LINK connections". (See page 14) 39 CH SEL ENTER CH SEL ENTER (Remote control unit) (Main unit) *Input Setup Digital In...
... digital recording between a digital audio source (stereo - 2 channel) and a digital audio recorder. • Do not connect the output of the AVR-3805 for which no digital input jacks are automatically reset to "DENON LINK connections". (See page 14) 39 CH SEL ENTER CH SEL ENTER (Remote control unit) (Main unit) *Input Setup Digital In...
Owners Manual
Page 41
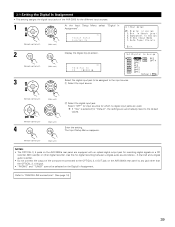
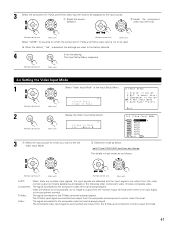
... be used. The composite video input signal is up-converted and output from the video monitor output terminal is selected automatically in each mode are reset to the composite video terminal is no image is selected, the settings are as below.
... be used. The composite video input signal is up-converted and output from the video monitor output terminal is selected automatically in each mode are reset to the composite video terminal is no image is selected, the settings are as below.
Owners Manual
Page 53
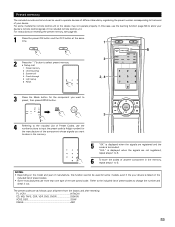
... in the memory. 5 "OK" is displayed when the signals are as follows upon shipment from the factory and after resetting: TV, VCR1 HITACHI CD, MD, TAPE, CDR, VDP, DVD, DVDR DENON VCR2, DBS SONY CABLE ABC 53 Refer to 5. 6 To store the codes of remote control code. "FAIL" is... operate devices of different brands by registering the preset number corresponding to the brand of preset codes to store your device. NOTES: • Depending on resetting the preset memory, see page 60. 1 Press the power ON button and the OFF button at the same time. 1 5 2 Press the "1"button...
... in the memory. 5 "OK" is displayed when the signals are as follows upon shipment from the factory and after resetting: TV, VCR1 HITACHI CD, MD, TAPE, CDR, VDP, DVD, DVDR DENON VCR2, DBS SONY CABLE ABC 53 Refer to 5. 6 To store the codes of remote control code. "FAIL" is... operate devices of different brands by registering the preset number corresponding to the brand of preset codes to store your device. NOTES: • Depending on resetting the preset memory, see page 60. 1 Press the power ON button and the OFF button at the same time. 1 5 2 Press the "1"button...

Owners Manual
Page 60
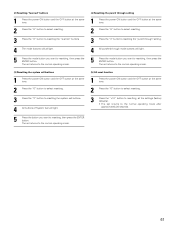
... button and the OFF button at the same time. 2 Press the "6" button to select Resetting. 1 4 2, 3 3 Press the "1" button to resetting the preset memory. • Presetting List 1 : Resetting the preset memory 2 : Resetting the "Learned" buttons 3 : Resetting the system call 5 4 : Resetting the punch through setting +10: All reset function (factory default) 4 The mode buttons that were set returns to...
... button and the OFF button at the same time. 2 Press the "6" button to select Resetting. 1 4 2, 3 3 Press the "1" button to resetting the preset memory. • Presetting List 1 : Resetting the preset memory 2 : Resetting the "Learned" buttons 3 : Resetting the system call 5 4 : Resetting the punch through setting +10: All reset function (factory default) 4 The mode buttons that were set returns to...
Owners Manual
Page 61
... 1 Press the power ON button and the OFF button at the same time. 2 Press the "6" button to select resetting. 3 Press the "2" button to resetting the "learned" buttons 4 The mode buttons will all the settings (factory defaults). • The set returns to the normal operating mode ... call buttons. 4 All buttons of System Call will light. 5 Press the mode button you want to resetting, then press the ENTER button. The set returns to the normal operating mode. (4) Resetting the punch through setting 1 Press the power ON button and the OFF button at the same time. 2...
... 1 Press the power ON button and the OFF button at the same time. 2 Press the "6" button to select resetting. 3 Press the "2" button to resetting the "learned" buttons 4 The mode buttons will all the settings (factory defaults). • The set returns to the normal operating mode ... call buttons. 4 All buttons of System Call will light. 5 Press the mode button you want to resetting, then press the ENTER button. The set returns to the normal operating mode. (4) Resetting the punch through setting 1 Press the power ON button and the OFF button at the same time. 2...
Owners Manual
Page 76
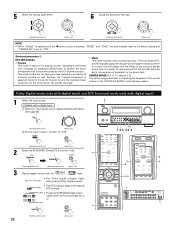
...) (Main unit) 2 2 3 4 5, 6 1 3 CH SEL ENTER CH SEL ENTER 6 Adjust the parameter settings. The front channel (FL and FR) signals bypass the decoder and are automatically reset to the default values and "CINEMA EQ" is set to digital (COAXIAL/OPTICAL) (see page 39). (Remote control unit) (Main unit) w Set the input mode...
...) (Main unit) 2 2 3 4 5, 6 1 3 CH SEL ENTER CH SEL ENTER 6 Adjust the parameter settings. The front channel (FL and FR) signals bypass the decoder and are automatically reset to the default values and "CINEMA EQ" is set to digital (COAXIAL/OPTICAL) (see page 39). (Remote control unit) (Main unit) w Set the input mode...
Owners Manual
Page 77
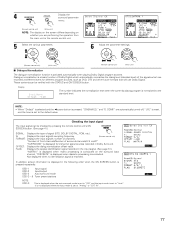
... conducted. fs: Displays the input signal's sampling frequency. (Remote control unit) FORMAT: Displays the input signal's number of surround channels/LFE on/off , "LFE" is reset, and the tone is activated automatically when playing Dolby Digital program sources.
... conducted. fs: Displays the input signal's sampling frequency. (Remote control unit) FORMAT: Displays the input signal's number of surround channels/LFE on/off , "LFE" is reset, and the tone is activated automatically when playing Dolby Digital program sources.
Owners Manual
Page 87
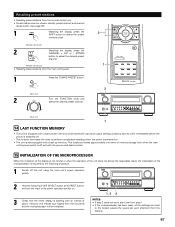
... microprocessor will be initialized. 1, 2 2 NOTES: • If step 3 does not work, start over from step 1. • If the microprocessor has been reset, all the settings are reset to perform complicated resetting when the power is switched on. • The unit is also equipped with the power cord disconnected. 15 INITIALIZATION OF THE MICROPROCESSOR...
... microprocessor will be initialized. 1, 2 2 NOTES: • If step 3 does not work, start over from step 1. • If the microprocessor has been reset, all the settings are reset to perform complicated resetting when the power is switched on. • The unit is also equipped with the power cord disconnected. 15 INITIALIZATION OF THE MICROPROCESSOR...

