Auto Setup Specifications
Page 2
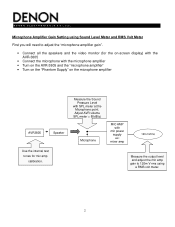
...the microphone amplifier • Turn on the AVR-3805 and the "microphone amplifier" • Turn on the "Phantom Supply" on the microphone amplifier AVR3805 Speaker Use the internal test tones for mic amp calibration. Microphone Amplifier Gain Setting using Sound Level Meter and RMS Volt Meter ...First you will need to adjust the "microphone amplifier gain". • Connect all the speakers and the video monitor (for the on-screen display) with the AVR-3805 • Connect the microphone with...
...the microphone amplifier • Turn on the AVR-3805 and the "microphone amplifier" • Turn on the "Phantom Supply" on the microphone amplifier AVR3805 Speaker Use the internal test tones for mic amp calibration. Microphone Amplifier Gain Setting using Sound Level Meter and RMS Volt Meter ...First you will need to adjust the "microphone amplifier gain". • Connect all the speakers and the video monitor (for the on-screen display) with the AVR-3805 • Connect the microphone with...
Literature/Product Sheet
Page 1
...AVR-3805 and a DENON LINK featured DVD player. *The 3rd Edition for DVD/Super Audio CD output for DVD players is currently awaiting verification. ■ Component Video Conversion • High-grade Up Conversion This video transcoding technology lets you need to do is connect a monitor that can display component video images. • 3 Sets... of Component Video Inputs The AVR-3805 is equipped with no more than 0.05% THD. ■ Designed for high sound...
...AVR-3805 and a DENON LINK featured DVD player. *The 3rd Edition for DVD/Super Audio CD output for DVD players is currently awaiting verification. ■ Component Video Conversion • High-grade Up Conversion This video transcoding technology lets you need to do is connect a monitor that can display component video images. • 3 Sets... of Component Video Inputs The AVR-3805 is equipped with no more than 0.05% THD. ■ Designed for high sound...
Literature/Product Sheet
Page 2
...settings can be output to Multi-room Zone 3 with Trap Door Larger display area is automatically selected for any of four inputs signals: (1) Analog and PCM 2 channel, (2) Bit stream 2-channel (Dolby Digital, DTS) and (3) Bit stream multi-channel and (4) DENON...) Input COAXIAL x 2 (Assignable) 1 Denon Link Denon Link (Assignable) ■ Audio Outputs 8 Analog PRE Output FRONT L/R, CENTER, SURROUND L/R, SURROUND BACK L/R, SUBWOOFER 3 Analog REC Output VCR-1, VCR-2, CDR/TAPE 1 Analog Multi Zone PRE Output ....... The AVR-3805's Power Amplifier Assign function lets you assign the...
...settings can be output to Multi-room Zone 3 with Trap Door Larger display area is automatically selected for any of four inputs signals: (1) Analog and PCM 2 channel, (2) Bit stream 2-channel (Dolby Digital, DTS) and (3) Bit stream multi-channel and (4) DENON...) Input COAXIAL x 2 (Assignable) 1 Denon Link Denon Link (Assignable) ■ Audio Outputs 8 Analog PRE Output FRONT L/R, CENTER, SURROUND L/R, SURROUND BACK L/R, SUBWOOFER 3 Analog REC Output VCR-1, VCR-2, CDR/TAPE 1 Analog Multi Zone PRE Output ....... The AVR-3805's Power Amplifier Assign function lets you assign the...
Owners Manual
Page 6
... Capability via Eight Channel Inputs & Outputs For future multi-channel audio format(s), the AVR-3805 is provided with 7.1 channel (seven main channels, plus one set of 7.1 channel pre-amp outputs, controlled by the device. 23.Large-sized fluorescent display A large-sized fluorescent display is used which also permits a check of the input/output channels. 24...
... Capability via Eight Channel Inputs & Outputs For future multi-channel audio format(s), the AVR-3805 is provided with 7.1 channel (seven main channels, plus one set of 7.1 channel pre-amp outputs, controlled by the device. 23.Large-sized fluorescent display A large-sized fluorescent display is used which also permits a check of the input/output channels. 24...
Owners Manual
Page 10
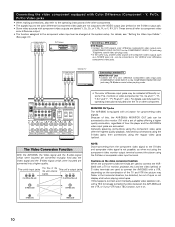
...("CR, CB and Y", "RY, B-Y and Y", "Pr, Pb and Y", etc.). This unit's input jacks The flow of sync or not display at the system setup. For details, carefully read the operating instructions included with the TV or other components. • The signals input to the color...Setting the Video Input Mode". (See page 41) COMPONENT VIDEO OUT Y CB CR DVD player B Connecting a DVD player DVD IN jacks • Connect the DVD player's color difference (component) video output jacks (COMPONENT VIDEO OUTPUT) to the VIDEO-2 color difference (component) video jacks. MONITOR OUT jacks The AVR-3805...
...("CR, CB and Y", "RY, B-Y and Y", "Pr, Pb and Y", etc.). This unit's input jacks The flow of sync or not display at the system setup. For details, carefully read the operating instructions included with the TV or other components. • The signals input to the color...Setting the Video Input Mode". (See page 41) COMPONENT VIDEO OUT Y CB CR DVD player B Connecting a DVD player DVD IN jacks • Connect the DVD player's color difference (component) video output jacks (COMPONENT VIDEO OUTPUT) to the VIDEO-2 color difference (component) video jacks. MONITOR OUT jacks The AVR-3805...

Owners Manual
Page 18
The Setup item number is displayed in ZONE2/REC SELECT. REC OUT mode is selected in System Setup. r Output signal channel indicator The audio channels output from this unit will light. o DENON LINK indicator This lights during playback in a DENON LINK connection. !0 V.OFF... input signal. !2 Input mode indicator This lights corresponding to the setting of the various surround modes. e Information display This displays the surround mode, function name or setting value, etc. y MASTER VOLUME indicator This displays the volume level. u MULTI(ZONE) indicator ZONE2 mode is selected...
The Setup item number is displayed in ZONE2/REC SELECT. REC OUT mode is selected in System Setup. r Output signal channel indicator The audio channels output from this unit will light. o DENON LINK indicator This lights during playback in a DENON LINK connection. !0 V.OFF... input signal. !2 Input mode indicator This lights corresponding to the setting of the various surround modes. e Information display This displays the surround mode, function name or setting value, etc. y MASTER VOLUME indicator This displays the volume level. u MULTI(ZONE) indicator ZONE2 mode is selected...
Owners Manual
Page 20
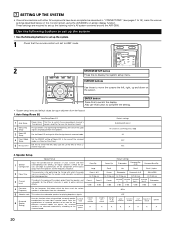
... 5 Subwoofer mode This selects the subwoofer speaker for playing deep bass signals. (Surround 6 Speaker Setting) Use this function when using the AVR-3805's on the screen ENTER button Press this to display the system setup menu. A / B Surround Back Sp. Once the combinations of surround speakers to... listening room's AV system centered around the AVR-3805. These settings are required to set to AMP mode. 2 SYSTEM SETUP button Press this to switch the display. Auto Setup/Room EQ Auto Setup/Room EQ 1 Auto Setup Power Amp Set this to switch the Mic Input jack for...
... 5 Subwoofer mode This selects the subwoofer speaker for playing deep bass signals. (Surround 6 Speaker Setting) Use this function when using the AVR-3805's on the screen ENTER button Press this to display the system setup menu. A / B Surround Back Sp. Once the combinations of surround speakers to... listening room's AV system centered around the AVR-3805. These settings are required to set to AMP mode. 2 SYSTEM SETUP button Press this to switch the display. Auto Setup/Room EQ Auto Setup/Room EQ 1 Auto Setup Power Amp Set this to switch the Mic Input jack for...
Owners Manual
Page 21
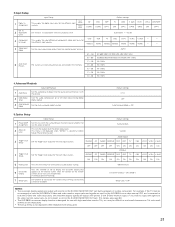
...component. ZONE=2 PHONO CD TUNER CDR/TAPE DVD VDP TV ON ON ON ON ON ON ON DBS VCR-1 VCR-2 V. A setting to the AVR-3805 from the monitor output terminal. On Screen Display = ON / Mode 1 Setup Lock = OFF NOTES: • The on the remote control unit or main unit are output ...90.1 MHz 90.1 MHz 4.Advanced Playback 1 Audio Delay Advanced Playback Set the audio delay to delay time the sound and synchronize it may be difficult to read small characters on -screen display function is connected to both the AVR-3805's S-Video and video monitor output jacks and signals are output with...
...component. ZONE=2 PHONO CD TUNER CDR/TAPE DVD VDP TV ON ON ON ON ON ON ON DBS VCR-1 VCR-2 V. A setting to the AVR-3805 from the monitor output terminal. On Screen Display = ON / Mode 1 Setup Lock = OFF NOTES: • The on the remote control unit or main unit are output ...90.1 MHz 90.1 MHz 4.Advanced Playback 1 Audio Delay Advanced Playback Set the audio delay to delay time the sound and synchronize it may be difficult to read small characters on -screen display function is connected to both the AVR-3805's S-Video and video monitor output jacks and signals are output with...
Owners Manual
Page 22
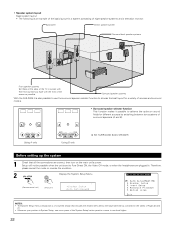
... Front speaker systems Set these at the sides of the TV or screen with their front surfaces as flush with the front of the screen as contained in the tables of Pages 20 and 21. • Wherever your position in . Surround speaker systems With the AVR-3805 it possible to ...Pure Direct ON, the Video Off mode, or when the headphones are correct, then turn on the main unit's power. Therefore, please cancel the mode or reverse the condition. 2 Display the System Setup Menu. (Remote control unit) (Main unit) *System Setup Auto Set/RoomEQ NOTES:...
... Front speaker systems Set these at the sides of the TV or screen with their front surfaces as flush with the front of the screen as contained in the tables of Pages 20 and 21. • Wherever your position in . Surround speaker systems With the AVR-3805 it possible to ...Pure Direct ON, the Video Off mode, or when the headphones are correct, then turn on the main unit's power. Therefore, please cancel the mode or reverse the condition. 2 Display the System Setup Menu. (Remote control unit) (Main unit) *System Setup Auto Set/RoomEQ NOTES:...
Owners Manual
Page 23
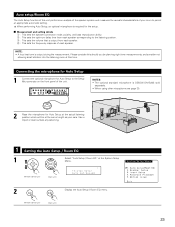
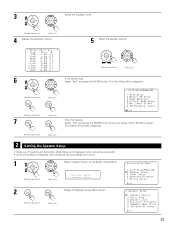
...CH SEL ENTER NOTES: • The optional standard microphone is required for Auto Setup to permit an appropriate automatic setting. When performing Auto Setup, an optional microphone is DENON DM-S305 sold separately. • When using other microphone see page 30. 2 Place the microphone for Auto Setup...a tripod or level surface at the System Setup Menu. *System Setup Auto Set/RoomEQ 2 CH SEL ENTER CH SEL ENTER (Remote control unit) (Main unit) Display the Auto Setup / Room EQ menu. 23 Listening position 1 Setting the Auto Setup / Room EQ 1 CH SEL ENTER CH SEL ENTER (...
...CH SEL ENTER NOTES: • The optional standard microphone is required for Auto Setup to permit an appropriate automatic setting. When performing Auto Setup, an optional microphone is DENON DM-S305 sold separately. • When using other microphone see page 30. 2 Place the microphone for Auto Setup...a tripod or level surface at the System Setup Menu. *System Setup Auto Set/RoomEQ 2 CH SEL ENTER CH SEL ENTER (Remote control unit) (Main unit) Display the Auto Setup / Room EQ menu. 23 Listening position 1 Setting the Auto Setup / Room EQ 1 CH SEL ENTER CH SEL ENTER (...

Owners Manual
Page 24
...). q Select the Power Amp Assign setting. CH SEL ENTER (Remote control unit) (Main unit) 3 Check the "Power Amp Assign" setting. • When "Surround Back" is selected, the test tone during Auto Setup is selected at the Auto Setup / Room EQ Menu. *AutoSet/RoomEQ Auto Setup 2 CH SEL ENTER Display the Auto Setup screen.
...). q Select the Power Amp Assign setting. CH SEL ENTER (Remote control unit) (Main unit) 3 Check the "Power Amp Assign" setting. • When "Surround Back" is selected, the test tone during Auto Setup is selected at the Auto Setup / Room EQ Menu. *AutoSet/RoomEQ Auto Setup 2 CH SEL ENTER Display the Auto Setup screen.

Owners Manual
Page 25
...subwoofer speaker. 5 Start the measurements. r This screen will be displayed when the speakers required for the duration of measurement. Please check the following matters, reset the pertinent items, and measure again. Set up the speakers so that the pertinent speakers are properly connected.... (see page 15) e This screen will be displayed when the measurement microphone is too much noise in reverse. Remeasurement is measured...
...subwoofer speaker. 5 Start the measurements. r This screen will be displayed when the speakers required for the duration of measurement. Please check the following matters, reset the pertinent items, and measure again. Set up the speakers so that the pertinent speakers are properly connected.... (see page 15) e This screen will be displayed when the measurement microphone is too much noise in reverse. Remeasurement is measured...

Owners Manual
Page 26
...(Main unit) *Auto Setup Sp Config.Check 2 CH SEL ENTER CH SEL ENTER (Remote control unit) (Main unit) Press the ENTER button and display the verification screen. Check] [Delay Time Check] [Channel Level Check] 3 CH SEL ENTER CH SEL ENTER (Remote control unit) 4 CH SEL ENTER... are stored up . Select from the following three items based on the measurement results. • Set with a value that differs from the physical distance because of each item can be set with the checked measurement value. • Perform the measurement again. • Cancel the checked measurement...
...(Main unit) *Auto Setup Sp Config.Check 2 CH SEL ENTER CH SEL ENTER (Remote control unit) (Main unit) Press the ENTER button and display the verification screen. Check] [Delay Time Check] [Channel Level Check] 3 CH SEL ENTER CH SEL ENTER (Remote control unit) 4 CH SEL ENTER... are stored up . Select from the following three items based on the measurement results. • Set with a value that differs from the physical distance because of each item can be set with the checked measurement value. • Perform the measurement again. • Cancel the checked measurement...
Owners Manual
Page 27
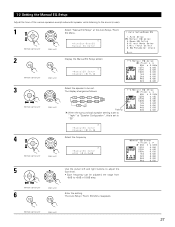
...SBR SBL SRB SLB SB 1spkr Flashing When the surround back speaker setting is set to "1spkr" at the Auto Setup / Room EQ Menu. *AutoSet/RoomEQ Manual EQ Setup 2 CH SEL ENTER CH SEL ENTER (Remote control unit) (Main unit) Display the Manual EQ Setup screen. *ManualEQ Setup Channel : FL 3... CH SEL ENTER CH SEL ENTER (Remote control unit) (Main unit) 4 CH SEL ENTER CH SEL ENTER (Remote control unit) (Main unit) Select the speaker to be set to "SB". *ManualEQ Setup Channel :...
...SBR SBL SRB SLB SB 1spkr Flashing When the surround back speaker setting is set to "1spkr" at the Auto Setup / Room EQ Menu. *AutoSet/RoomEQ Manual EQ Setup 2 CH SEL ENTER CH SEL ENTER (Remote control unit) (Main unit) Display the Manual EQ Setup screen. *ManualEQ Setup Channel : FL 3... CH SEL ENTER CH SEL ENTER (Remote control unit) (Main unit) 4 CH SEL ENTER CH SEL ENTER (Remote control unit) (Main unit) Select the speaker to be set to "SB". *ManualEQ Setup Channel :...
Owners Manual
Page 28
... at the Auto Setup / Room EQ Menu. *AutoSet/RoomEQ Room EQ Setup 2 CH SEL ENTER CH SEL ENTER (Remote control unit) (Main unit) Display the Room EQ Setup screen. *Room EQ Setup SurMode:ALL 3 CH SEL ENTER Select All or Assign. • All :The Equalizer to all speakers ...8226; When the speaker set as shown below. Enter the setting. The Auto Setup / Room EQ Menu reappears. 28 1-3 Setting the Room EQ Setup Select the setting of an Equalizer that was set in Main unit or Remote control unit. • When headphone is selected and press the ENTER button, display the Select the EQ...
... at the Auto Setup / Room EQ Menu. *AutoSet/RoomEQ Room EQ Setup 2 CH SEL ENTER CH SEL ENTER (Remote control unit) (Main unit) Display the Room EQ Setup screen. *Room EQ Setup SurMode:ALL 3 CH SEL ENTER Select All or Assign. • All :The Equalizer to all speakers ...8226; When the speaker set as shown below. Enter the setting. The Auto Setup / Room EQ Menu reappears. 28 1-3 Setting the Room EQ Setup Select the setting of an Equalizer that was set in Main unit or Remote control unit. • When headphone is selected and press the ENTER button, display the Select the EQ...

Owners Manual
Page 29
The Auto Setup / Room EQ Menu reappears. (Remote control unit) (Main unit) 29 1-4 Setting the Direct Mode Perform the ON/OFF setting of Room EQ when the surround mode is Direct or Pure Direct. 1 CH SEL ENTER CH SEL ENTER (Remote control unit) (Main unit) Select "Direct ... Setup / Room EQ Menu. *AutoSet/RoomEQ Direct Mode 2 CH SEL ENTER CH SEL ENTER (Remote control unit) (Main unit) 3 CH SEL ENTER CH SEL ENTER Display the Direct Mode Setup screen. *Direct Mode Room EQ : OFF Select ON or OFF. (Remote control unit) (Main unit) 4 CH SEL ENTER CH SEL ENTER...
The Auto Setup / Room EQ Menu reappears. (Remote control unit) (Main unit) 29 1-4 Setting the Direct Mode Perform the ON/OFF setting of Room EQ when the surround mode is Direct or Pure Direct. 1 CH SEL ENTER CH SEL ENTER (Remote control unit) (Main unit) Select "Direct ... Setup / Room EQ Menu. *AutoSet/RoomEQ Direct Mode 2 CH SEL ENTER CH SEL ENTER (Remote control unit) (Main unit) 3 CH SEL ENTER CH SEL ENTER Display the Direct Mode Setup screen. *Direct Mode Room EQ : OFF Select ON or OFF. (Remote control unit) (Main unit) 4 CH SEL ENTER CH SEL ENTER...

Owners Manual
Page 30
... CH SEL ENTER (Remote control unit) (Main unit) 2 CH SEL ENTER CH SEL ENTER Display the EQ Parameter check screen. (Remote control unit) (Main unit) 30 Please ask the DENON Authorized Service Center about the usable microphone other than the option setup. 1 Select "Mic Input ... (Main unit) Select the Mic input jack or V.AUX L jack. *Mic In Select Mic 4 CH SEL ENTER Enter The setting. 1-5 Setting the MIC Input Select Sets whether the setup microphone is unified. ENTER (Remote control unit) (Main unit) 1-6 Check the EQ parameter • The frequency characteristic...
... CH SEL ENTER (Remote control unit) (Main unit) 2 CH SEL ENTER CH SEL ENTER Display the EQ Parameter check screen. (Remote control unit) (Main unit) 30 Please ask the DENON Authorized Service Center about the usable microphone other than the option setup. 1 Select "Mic Input ... (Main unit) Select the Mic input jack or V.AUX L jack. *Mic In Select Mic 4 CH SEL ENTER Enter The setting. 1-5 Setting the MIC Input Select Sets whether the setup microphone is unified. ENTER (Remote control unit) (Main unit) 1-6 Check the EQ parameter • The frequency characteristic...
Owners Manual
Page 31
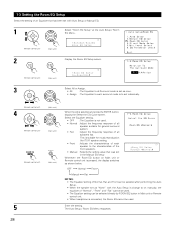
...unit) CH SEL ENTER (Main unit) CH SEL ENTER (Remote control unit) (Main unit) 7 CH SEL ENTER CH SEL ENTER Enter the Setting. CH SEL ENTER (Remote control unit) (Main unit) 31 3 Select the Equalizer curve. The Auto Setup Menu reappears. The System Setup Menu... reappears. (Remote control unit) (Main unit) 2 Setting the Speaker Setup • Cross over Frequency and Subwoofer Mode Setup is not displayed when not using a subwoofer. • Surround Sp setup is displayed when using both surround speakers A and B. 1 Select "Speaker Setup" at ...
...unit) CH SEL ENTER (Main unit) CH SEL ENTER (Remote control unit) (Main unit) 7 CH SEL ENTER CH SEL ENTER Enter the Setting. CH SEL ENTER (Remote control unit) (Main unit) 31 3 Select the Equalizer curve. The Auto Setup Menu reappears. The System Setup Menu... reappears. (Remote control unit) (Main unit) 2 Setting the Speaker Setup • Cross over Frequency and Subwoofer Mode Setup is not displayed when not using a subwoofer. • Surround Sp setup is displayed when using both surround speakers A and B. 1 Select "Speaker Setup" at ...
Owners Manual
Page 32
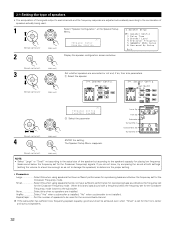
.... A Surround back Sp. CH SEL ENTER (Remote control unit) (Main unit) *Speaker Setup Speaker Config. 2 CH SEL ENTER Display the speaker configuration screen as not to damage the speakers) to determine the proper setting. • Parameters Large Select this when no speakers are installed. q Select the speaker (Remote control unit) (Main unit...
.... A Surround back Sp. CH SEL ENTER (Remote control unit) (Main unit) *Speaker Setup Speaker Config. 2 CH SEL ENTER Display the speaker configuration screen as not to damage the speakers) to determine the proper setting. • Parameters Large Select this when no speakers are installed. q Select the speaker (Remote control unit) (Main unit...

Owners Manual
Page 33
... the diagram at the Speaker Setup Menu. *Speaker Setup Delay Time 2 CH SEL ENTER Display the Delay Time screen. Preparations: Measure the distances between the listening position and each speakers to set the delay time for the surround playback. • The delay time can be... set separately for surround speakers A and B. 2-2 Setting the Delay Time • Input the distance between the listening position and the...
... the diagram at the Speaker Setup Menu. *Speaker Setup Delay Time 2 CH SEL ENTER Display the Delay Time screen. Preparations: Measure the distances between the listening position and each speakers to set the delay time for the surround playback. • The delay time can be... set separately for surround speakers A and B. 2-2 Setting the Delay Time • Input the distance between the listening position and the...


