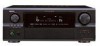
Audyssey MultEQxt Information
Page 1
...differences from other Room Eq method available in AV receivers today. The first is MultEQxt different from ...subwoofer), checks the absolute polarity (phase) of each channel, and identifies the optimum crossover frequency for each loudspeaker and the first microphone position in order to correct the magnitude response in the time domain particularly as the bands get narrower. With the assistance of Audyssey, Denon would like to MultEQxt: (i) Automatic Setup (Auto Setup...to its acclaimed A/V receivers, with the environment. 2. What is now available on the AVR-5805, MultEQxt is ...
...differences from other Room Eq method available in AV receivers today. The first is MultEQxt different from ...subwoofer), checks the absolute polarity (phase) of each channel, and identifies the optimum crossover frequency for each loudspeaker and the first microphone position in order to correct the magnitude response in the time domain particularly as the bands get narrower. With the assistance of Audyssey, Denon would like to MultEQxt: (i) Automatic Setup (Auto Setup...to its acclaimed A/V receivers, with the environment. 2. What is now available on the AVR-5805, MultEQxt is ...
Audyssey MultEQxt Information
Page 3
...One simple fact that the proponents of measurements. My speakers are designed with this kind of Denon A/V 3 The best course of the room problems occur. Audyssey recommends a minimum of 4...measurements is not at high frequencies produced by the available memory in the receiver or controller and in subwoofers). Finally, the 'Manual' setting is a traditional Graphic equalizer that the ...filters, by MultEQxt. MultEQxt simply reports a possible wiring reversal, it was measured during the Auto Setup process, can be copied to the Graphic EQ, where you can be applied to achieve the ...
...One simple fact that the proponents of measurements. My speakers are designed with this kind of Denon A/V 3 The best course of the room problems occur. Audyssey recommends a minimum of 4...measurements is not at high frequencies produced by the available memory in the receiver or controller and in subwoofers). Finally, the 'Manual' setting is a traditional Graphic equalizer that the ...filters, by MultEQxt. MultEQxt simply reports a possible wiring reversal, it was measured during the Auto Setup process, can be copied to the Graphic EQ, where you can be applied to achieve the ...

Literature/Product Sheet
Page 1
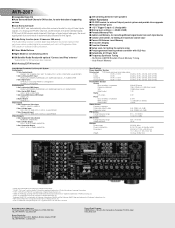
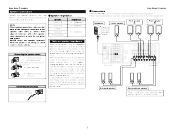
...subwoofer crossover switching (40/60/80/90/100/110/120/150/200/250Hz) ■ ASD-1R iPod® Control Dock (option): Supports iPod playback when connected to the AVR-2807 iPod (*4) playback can be connected to HDMI (*2), composite video (*3), & S-video (*3). *2. A/V Surround Receiver AVR-2807 The AVR-2807 is Denon's latest addition of versatile A/V Receivers..., S-Video, or Component terminal, it should be viewed on the generation of the iPod and the version of setup and operation. Down-conversion from component video to composite or S-video applies only to suppress jitter in the front ...
...subwoofer crossover switching (40/60/80/90/100/110/120/150/200/250Hz) ■ ASD-1R iPod® Control Dock (option): Supports iPod playback when connected to the AVR-2807 iPod (*4) playback can be connected to HDMI (*2), composite video (*3), & S-video (*3). *2. A/V Surround Receiver AVR-2807 The AVR-2807 is Denon's latest addition of versatile A/V Receivers..., S-Video, or Component terminal, it should be viewed on the generation of the iPod and the version of setup and operation. Down-conversion from component video to composite or S-video applies only to suppress jitter in the front ...
Literature/Product Sheet
Page 2
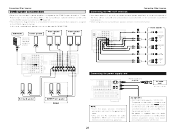
...TAPE, V.AUX (FRONT) 1 Set 8-ch Analog EXT. AVR-2807 ■ Assignable Room EQ ■ Auto Surround Back Channels ON function, ... stage values. Input FRONT L/R, CENTER, SURROUND L/R, SURROUND BACK L/R, SUBWOOFER 7 Sets Digital Input OPTICAL x 5 (including FRONT x 1) (Assignable) COAXIAL x 2... 3 User Mode Buttons ■ Night Mode for locking the system setup ■ Pre-programmed learning remote controller with optional 'Connect and Play'... U.S. Denon Electronics (USA), LLC. 19C Chapin Road, Suite 205 Pine Brook, N.J. 07058-9385 USA TEL: 973-396-0810 usa.denon.com Denon Canada ...
...TAPE, V.AUX (FRONT) 1 Set 8-ch Analog EXT. AVR-2807 ■ Assignable Room EQ ■ Auto Surround Back Channels ON function, ... stage values. Input FRONT L/R, CENTER, SURROUND L/R, SURROUND BACK L/R, SUBWOOFER 7 Sets Digital Input OPTICAL x 5 (including FRONT x 1) (Assignable) COAXIAL x 2... 3 User Mode Buttons ■ Night Mode for locking the system setup ■ Pre-programmed learning remote controller with optional 'Connect and Play'... U.S. Denon Electronics (USA), LLC. 19C Chapin Road, Suite 205 Pine Brook, N.J. 07058-9385 USA TEL: 973-396-0810 usa.denon.com Denon Canada ...

Owners Manual - English
Page 6
... the Power Amplifier Assignment 54 Setting the Volume Control 55 Setting the Trigger Out 55 Setting the Setup Lock 56 Operating the remote control unit Operating DENON audio components 62 Setting the preset memory function 62 Operating a component stored in the preset memory··... function 65 Resetting the punch through the System Setup Menu 46 About the display 46 Audio Input Setup Setting the Digital In Assignment 47 Setting the EXT. Part 2 Speaker Setup Setting the Speaker Configuration 56, 57 Setting the Subwoofer Setup 57 Setting the Distance 57, 58 Setting the...
... the Power Amplifier Assignment 54 Setting the Volume Control 55 Setting the Trigger Out 55 Setting the Setup Lock 56 Operating the remote control unit Operating DENON audio components 62 Setting the preset memory function 62 Operating a component stored in the preset memory··... function 65 Resetting the punch through the System Setup Menu 46 About the display 46 Audio Input Setup Setting the Digital In Assignment 47 Setting the EXT. Part 2 Speaker Setup Setting the Speaker Configuration 56, 57 Setting the Subwoofer Setup 57 Setting the Distance 57, 58 Setting the...

Owners Manual - English
Page 10
... front of the screen as possible. Connecting the speakers. Auto setup flow Connecting a microphone. Starting the Auto Setup. Preliminary measurement. 1) Measuring the background noise (noise in memory. Easy Setup Procedure • This section contains the basic steps necessary to configure the AVR-2807 according to setup flow Speaker layout [Basic layout] Example of the speakers in...
... front of the screen as possible. Connecting the speakers. Auto setup flow Connecting a microphone. Starting the Auto Setup. Preliminary measurement. 1) Measuring the background noise (noise in memory. Easy Setup Procedure • This section contains the basic steps necessary to configure the AVR-2807 according to setup flow Speaker layout [Basic layout] Example of the speakers in...
Owners Manual - English
Page 11
... built-in electric shocks. If the protection circuit is cut off and improve ventilation around the unit, switch off the power and contact a DENON service center. IN >< Front speaker (A) (L) >< (R) >< Front speaker (B) (L) >< (R) >< (L) (R) > < Surround speaker (L) (R) > < Surround back speaker ... with >). Loosen by turning clockwise. Tighten by turning counterclockwise. Easy Setup Procedure 2 Connections • With the AVR-2807, up to cool off and the power indicator blinks. Subwoofer Center speaker Connection terminal for the set to 10 speakers can be...
... built-in electric shocks. If the protection circuit is cut off and improve ventilation around the unit, switch off the power and contact a DENON service center. IN >< Front speaker (A) (L) >< (R) >< Front speaker (B) (L) >< (R) >< (L) (R) > < Surround speaker (L) (R) > < Surround back speaker ... with >). Loosen by turning clockwise. Tighten by turning counterclockwise. Easy Setup Procedure 2 Connections • With the AVR-2807, up to cool off and the power indicator blinks. Subwoofer Center speaker Connection terminal for the set to 10 speakers can be...

Owners Manual - English
Page 14
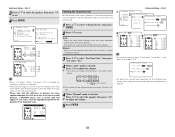
...speakers with biamp connections. e Perform the Auto Setup procedure 1 Press SYSTEM SETUP. 2 Press D H to select "Auto Setup / Room EQ", then press ENTER. 3 Press D H to set the crossover frequency to the maximum or Low pass filter off if your subwoofer can be assigned to turn this function off .... 4 Press or [ON]. • The power indicator blinks green and the power turns on your subwoofer. If so, connect the auto setup microphone. 1 2 3 Easy Setup Procedure r Assigning power amplifiers The surround back output can adjust the output volume and the crossover frequency. Press...
...speakers with biamp connections. e Perform the Auto Setup procedure 1 Press SYSTEM SETUP. 2 Press D H to select "Auto Setup / Room EQ", then press ENTER. 3 Press D H to set the crossover frequency to the maximum or Low pass filter off if your subwoofer can be assigned to turn this function off .... 4 Press or [ON]. • The power indicator blinks green and the power turns on your subwoofer. If so, connect the auto setup microphone. 1 2 3 Easy Setup Procedure r Assigning power amplifiers The surround back output can adjust the output volume and the crossover frequency. Press...

Owners Manual - English
Page 15
...speaker connections. Once the calculations are completed, a screen for first point) NOTE: • Do not change the speaker connections or subwoofer volume after initial measurement) h (Press ENTER.) (After measurement completed) u Speaker measurements With these measurements, the "Speaker Configuration", "...of measurement for confirming the results of remeasurement are not as possible. • Measurement is cancelled when VOLUME is operated while the Auto Setup is . 1 Press D H to select "OK Start", then press F. • Measurements for the first point start the measurements...
...speaker connections. Once the calculations are completed, a screen for first point) NOTE: • Do not change the speaker connections or subwoofer volume after initial measurement) h (Press ENTER.) (After measurement completed) u Speaker measurements With these measurements, the "Speaker Configuration", "...of measurement for confirming the results of remeasurement are not as possible. • Measurement is cancelled when VOLUME is operated while the Auto Setup is . 1 Press D H to select "OK Start", then press F. • Measurements for the first point start the measurements...

Owners Manual - English
Page 16
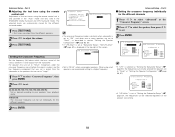
...with a built-in the room and the • Either turn off the AVR-2807's power before checking the speaker connections. 1 Press D H to check the contents. Store: All the settings are stored in the memory. Cancel: Cancel the auto setup settings. 3 When "Store" is selected: Press F. • After the...quieter. connected. Be sure to set with a value that is output from the physical distance because of the subwoofer is too much ambient noise in filter such as subwoofers might be set . r The sound level that differs from the speakers and/or • Check the placement...
...with a built-in the room and the • Either turn off the AVR-2807's power before checking the speaker connections. 1 Press D H to check the contents. Store: All the settings are stored in the memory. Cancel: Cancel the auto setup settings. 3 When "Store" is selected: Press F. • After the...quieter. connected. Be sure to set with a value that is output from the physical distance because of the subwoofer is too much ambient noise in filter such as subwoofers might be set . r The sound level that differs from the speakers and/or • Check the placement...
Owners Manual - English
Page 26
...use it to the outlet is at "Power Amp Assign" in the "System Setup Menu", the surround back speaker terminals can not be used for subwoofer with the POWER switch on the main unit, and when the power is switched... surround back's power amplifier is assigned to the ZONE2 output channel at standby. Power amplifier B CENTER A SURROUND BACK L L L R R R A SURROUND L L L R R R B SUBWOOFER A FRONT L L L R R R (L) (R) > < Surround speaker (L) (R) > < ZONE2 Front speaker ZONE2 Connecting the power supply cord Power supply cord (Supplied) AC outlet (wall) ...
...use it to the outlet is at "Power Amp Assign" in the "System Setup Menu", the surround back speaker terminals can not be used for subwoofer with the POWER switch on the main unit, and when the power is switched... surround back's power amplifier is assigned to the ZONE2 output channel at standby. Power amplifier B CENTER A SURROUND BACK L L L R R R A SURROUND L L L R R R B SUBWOOFER A FRONT L L L R R R (L) (R) > < Surround speaker (L) (R) > < ZONE2 Front speaker ZONE2 Connecting the power supply cord Power supply cord (Supplied) AC outlet (wall) ...

Owners Manual - English
Page 29
...DENON Original Surround Modes ( page 32, 33) • Select these for 7.1-channel playback with sources recorded in stereo or monaural. • The effects are the same as described below in order to play mode (PURE DIRECT / DIRECT / STEREO) The AVR-2807...frequencies in the PURE DIRECT mode are different for the source being used. • The system setup function cannot be used when the surround back speaker is set . Press DIRECT/STEREO to select.... DIRECT STEREO When press SURROUND PARAMETER: The subwoofer output can be controlled directly. The audio signals are turned "OFF".
...DENON Original Surround Modes ( page 32, 33) • Select these for 7.1-channel playback with sources recorded in stereo or monaural. • The effects are the same as described below in order to play mode (PURE DIRECT / DIRECT / STEREO) The AVR-2807...frequencies in the PURE DIRECT mode are different for the source being used. • The system setup function cannot be used when the surround back speaker is set . Press DIRECT/STEREO to select.... DIRECT STEREO When press SURROUND PARAMETER: The subwoofer output can be controlled directly. The audio signals are turned "OFF".

Owners Manual - English
Page 47
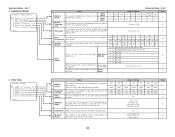
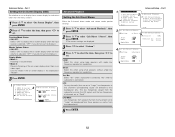
... an appropriate automatic setting. Subwoofer Surround Sp. Speaker Setup 1 Speaker Config. 2 Subwoofer Setup 3 Distance 4 Channel Level 5 Crossover Frequency Items Automatically set the output component and properties for the various channels according to the combination of the subwoofer for each surround mode. ...Equalizer setting with which the bass sound of your room to be output from the subwoofer. Auto Setup/Room EQ 1 Auto Setup 2 Room EQ Setup 3 Direct Mode Setup 4 Mic Input Select Items This unit performs an analysis of the speaker system and...
... an appropriate automatic setting. Subwoofer Surround Sp. Speaker Setup 1 Speaker Config. 2 Subwoofer Setup 3 Distance 4 Channel Level 5 Crossover Frequency Items Automatically set the output component and properties for the various channels according to the combination of the subwoofer for each surround mode. ...Equalizer setting with which the bass sound of your room to be output from the subwoofer. Auto Setup/Room EQ 1 Auto Setup 2 Room EQ Setup 3 Direct Mode Setup 4 Mic Input Select Items This unit performs an analysis of the speaker system and...
Owners Manual - English
Page 48
This assigns the component video input terminals for the different input sources. Audio Input Setup 4. The playback level is possible to assign the DENON original Dock's audio 3 iPod Assign and/or video signals to any input terminals on screen display for indications other than the menu ... HDMI Out Setup Set whether or not to the EXT. IN subwoofer terminal. Memory D1 ~ D8 90.1 MHz 48 6 Tuner Presets E1 ~ E8 90.1 MHz F1 ~ F8 90.1 MHz G1 ~ G8 90.1 MHz Preset channels be changed. This sets whether or not to display the on the AVR-2807 iPod Function ...
This assigns the component video input terminals for the different input sources. Audio Input Setup 4. The playback level is possible to assign the DENON original Dock's audio 3 iPod Assign and/or video signals to any input terminals on screen display for indications other than the menu ... HDMI Out Setup Set whether or not to the EXT. IN subwoofer terminal. Memory D1 ~ D8 90.1 MHz 48 6 Tuner Presets E1 ~ E8 90.1 MHz F1 ~ F8 90.1 MHz G1 ~ G8 90.1 MHz Preset channels be changed. This sets whether or not to display the on the AVR-2807 iPod Function ...
Owners Manual - English
Page 51
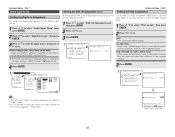
... using a DENON original Dock, it is not possible to make the "Digital In Assign" settings for the different input sources. 1 Press D H to select "Audio Input Setup", then press ENTER. 2 Press D H to select "Digital In Assign", then press ENTER. 3 Press D H to select the input source, then press F G to the AVR-2807's input terminals. IN Subwoofer Level...
... using a DENON original Dock, it is not possible to make the "Digital In Assign" settings for the different input sources. 1 Press D H to select "Audio Input Setup", then press ENTER. 2 Press D H to select "Digital In Assign", then press ENTER. 3 Press D H to select the input source, then press F G to the AVR-2807's input terminals. IN Subwoofer Level...
Owners Manual - English
Page 56
... mode if the on screen display when the main volume is connected, "No" when no video signal. Yes, No: Select "Yes" when a subwoofer is adjusted, "OFF" if you do not want to that loudspeaker only. Part 1 2 source is not prevented. Small: Select this when using small... channel's corresponding source are reproduced from those speakers as well as from the subwoofer(s). 5 Press ENTER. 52 Advanced Setup - Setting the 2ch Direct/Stereo 1 Press D H to display the on screen display when there is no subwoofer is not displayed in that have been set to select "2ch Direct / ...
... mode if the on screen display when the main volume is connected, "No" when no video signal. Yes, No: Select "Yes" when a subwoofer is adjusted, "OFF" if you do not want to that loudspeaker only. Part 1 2 source is not prevented. Small: Select this when using small... channel's corresponding source are reproduced from those speakers as well as from the subwoofer(s). 5 Press ENTER. 52 Advanced Setup - Setting the 2ch Direct/Stereo 1 Press D H to display the on screen display when there is no subwoofer is not displayed in that have been set to select "2ch Direct / ...
Owners Manual - English
Page 60
... Setting the Speaker Configuration Automatically set the output component and properties for the various channels according to be changed , and "SETUP LOCKED!" Yes / No: Select "Yes" when a subwoofer is connected, "No" when no subwoofer is automatically set to "No", "Front" is connected. 2spkrs / 1spkr: Select the number of speakers to the combination of...
... Setting the Speaker Configuration Automatically set the output component and properties for the various channels according to be changed , and "SETUP LOCKED!" Yes / No: Select "Yes" when a subwoofer is connected, "No" when no subwoofer is automatically set to "No", "Front" is connected. 2spkrs / 1spkr: Select the number of speakers to the combination of...

Owners Manual - English
Page 61
... parameter is set to the speaker's capacity for playing low frequency (bass sound below ). Setting the Subwoofer Setup Select the method of playback of the speaker but according to "Small". The low frequencies played from the subwoofer are reproduced from those speakers as well as not to damage the speakers) to a level low...
... parameter is set to the speaker's capacity for playing low frequency (bass sound below ). Setting the Subwoofer Setup Select the method of playback of the speaker but according to "Small". The low frequencies played from the subwoofer are reproduced from those speakers as well as not to damage the speakers) to a level low...
Owners Manual - English
Page 62
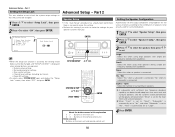
L3 ..... L4 Advanced Setup - L5 ..... L7 ..... Advanced Setup - Part 2 Setting the Channel Level 1 Set the volume of distance for the different play modes after setting the channel level, perform the operation on page ... displayed value. 4 When "Auto" mode is selected: Press D H to select the speaker, then press F G -2 to the test tones produced automatically from the speakers and the subwoofer seems to have the same 2 3 volume level. 1 Press D H to select "Channel Level", then press ENTER. 2 Press F G to set. 4 -1 4 Auto: -2 Adjust the level while listening to...
L3 ..... L4 Advanced Setup - L5 ..... L7 ..... Advanced Setup - Part 2 Setting the Channel Level 1 Set the volume of distance for the different play modes after setting the channel level, perform the operation on page ... displayed value. 4 When "Auto" mode is selected: Press D H to select the speaker, then press F G -2 to the test tones produced automatically from the speakers and the subwoofer seems to have the same 2 3 volume level. 1 Press D H to select "Channel Level", then press ENTER. 2 Press F G to set. 4 -1 4 Auto: -2 Adjust the level while listening to...
Owners Manual - English
Page 63
... only possible in the "Auto" mode and only valid in section "Setting the Speaker Configuration" ( page 56, 57). • If "LFE+Main" is set at "Subwoofer Setup", "SW:LFE+Main" ( page 57) is displayed at the "Crossover Frequency" screen. 2 Press D H to select the speaker, then press F G to set ... individually for the different speakers. • If "LFE+Main" is set at "Setting the Subwoofer Setup" ( page 57), the frequencies can be selected for speakers set to "Small" at "Setting the Subwoofer Setup" ( page 57), the frequencies can only be selected regardless of the various speakers is to...
... only possible in the "Auto" mode and only valid in section "Setting the Speaker Configuration" ( page 56, 57). • If "LFE+Main" is set at "Subwoofer Setup", "SW:LFE+Main" ( page 57) is displayed at the "Crossover Frequency" screen. 2 Press D H to select the speaker, then press F G to set ... individually for the different speakers. • If "LFE+Main" is set at "Setting the Subwoofer Setup" ( page 57), the frequencies can be selected for speakers set to "Small" at "Setting the Subwoofer Setup" ( page 57), the frequencies can only be selected regardless of the various speakers is to...


