Operating Instructions
Page 1
PLEASE RECORD UNIT SERIAL NUMBER ATTACHED TO THE REAR OF THE CABINET FOR FUTURE REFERENCE DIRECT DRIVE MANUAL TURNTABLE SYSTEM DP-500M OPERATING INSTRUCTIONS SERIAL NO.
PLEASE RECORD UNIT SERIAL NUMBER ATTACHED TO THE REAR OF THE CABINET FOR FUTURE REFERENCE DIRECT DRIVE MANUAL TURNTABLE SYSTEM DP-500M OPERATING INSTRUCTIONS SERIAL NO.
Operating Instructions
Page 2
... the power cord carefully. Please be sure to the presence of important operating and maintenance (servicing) instructions in contact with Part 15 of uninsulated "dangerous voltage" within an equilateral triangle is still connected on the rating label. Hold the plug when unplugging the cord. • Manipuler le cordon d'alimentation avec précaution. This device complies with the set in...
... the power cord carefully. Please be sure to the presence of important operating and maintenance (servicing) instructions in contact with Part 15 of uninsulated "dangerous voltage" within an equilateral triangle is still connected on the rating label. Hold the plug when unplugging the cord. • Manipuler le cordon d'alimentation avec précaution. This device complies with the set in...
Operating Instructions
Page 3
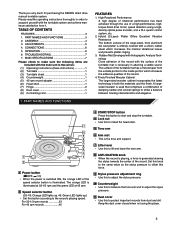
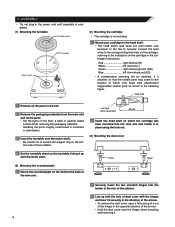
... instructions 1 (2) Turntable 1 (3) Turntable sheet 1 (4) Counterweight 1 (5) 45 rpm record adapter 1 (6) Head shell 1 (7) Hinge 2 (8) Dust cover 1 (9) Connecting cord 1 1. The orange LED is the tone arm support. OPERATION 6 6. c START/STOP button Press this force. . z Power button (£OFF, ¢ON) • When the power is necessary in order to start and stop the turntable. Keep the dust cover closed when not using a highdensity optical pulse encoder, and a PLL quartz control...
... instructions 1 (2) Turntable 1 (3) Turntable sheet 1 (4) Counterweight 1 (5) 45 rpm record adapter 1 (6) Head shell 1 (7) Hinge 2 (8) Dust cover 1 (9) Connecting cord 1 1. The orange LED is the tone arm support. OPERATION 6 6. c START/STOP button Press this force. . z Power button (£OFF, ¢ON) • When the power is necessary in order to start and stop the turntable. Keep the dust cover closed when not using a highdensity optical pulse encoder, and a PLL quartz control...
Operating Instructions
Page 4
... another stable surface when removing the packaging materials. head shell 1 Remove all the parts. • Set the parts on the cartridge or the cartridge's instructions. Use tweezers or the like to securely connect the lead wires to the corresponding terminals on the shaft at the back of the turntable. Red right channel (R) White left channel (L) Green right channel ground (RG) Blue left channel ground (LG) •...
... another stable surface when removing the packaging materials. head shell 1 Remove all the parts. • Set the parts on the cartridge or the cartridge's instructions. Use tweezers or the like to securely connect the lead wires to the corresponding terminals on the shaft at the back of the turntable. Red right channel (R) White left channel (L) Green right channel ground (RG) Blue left channel ground (LG) •...
Operating Instructions
Page 5
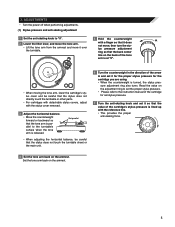
... touch the turntable sheet or the main unit. 6 Turn the counterweight in the direction of the cartridge's stylus pressure is released. I-SKATING 0 ANT 1 2 3 4 Set the tone arm back on the armrest. 5 Set the tone arm back on the armrest. ADJUSTMENTS • Turn the power off when performing adjustments. (1) Stylus pressure and anti-skating adjustment 1 Set the anti-skating knob to the instruction manual of the...
... touch the turntable sheet or the main unit. 6 Turn the counterweight in the direction of the cartridge's stylus pressure is released. I-SKATING 0 ANT 1 2 3 4 Set the tone arm back on the armrest. 5 Set the tone arm back on the armrest. ADJUSTMENTS • Turn the power off when performing adjustments. (1) Stylus pressure and anti-skating adjustment 1 Set the anti-skating knob to the instruction manual of the...
Operating Instructions
Page 6
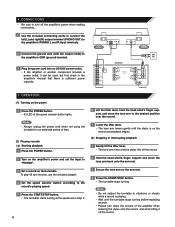
RL ORUTPULT 2 Connect the ground wire (with the output cords) to turn down the volume of the speed selector button lights. OPERATION (1) Turning on the arm rest. 4 Press the START/STOP button. • The turntable stops turning. To play 45 rpm records, use the included adapter. 4 Set the speed selector button according to the record's playing speed. 5 Press the START/STOP button. • The turntable starts turning at the speed set the input to the...
RL ORUTPULT 2 Connect the ground wire (with the output cords) to turn down the volume of the speed selector button lights. OPERATION (1) Turning on the arm rest. 4 Press the START/STOP button. • The turntable stops turning. To play 45 rpm records, use the included adapter. 4 Set the speed selector button according to the record's playing speed. 5 Press the START/STOP button. • The turntable starts turning at the speed set the input to the...
Operating Instructions
Page 7
...'s connection selector set being used ? If the turntable system still does not function properly, check it plays at stylus pressure of 80 g Within ʶ 0.003% ˙ General Power supply: Power consumption: Dimensions: Weight: AC 120 V, 60 Hz 10 W 450 (width) x 170 (height) x 370 (depth) mm (including feet) 10.1 kg ˙ Tone arm Arm type: Effective length: Overhang: Tracking error: Stylus...
...'s connection selector set being used ? If the turntable system still does not function properly, check it plays at stylus pressure of 80 g Within ʶ 0.003% ˙ General Power supply: Power consumption: Dimensions: Weight: AC 120 V, 60 Hz 10 W 450 (width) x 170 (height) x 370 (depth) mm (including feet) 10.1 kg ˙ Tone arm Arm type: Effective length: Overhang: Tracking error: Stylus...


