Owner's Manual
Page 4
...37 System Functions 37 Display Functions 37 Battery 37 Power Management 38 Microsoft® Windows® Logo Key Functions . . . . 38 Dell™ QuickSet Key Combinations 38 Adjusting Keyboard Settings 38 Touch Pad 39 Customizing the Touch Pad 40 4 Using the Display 41 Adjusting Brightness... 41 Switching the Video Image From Your Computer Display To a Projector 41 Setting Display Resolution and Refresh Rate 42 5 Using a Battery 43 Battery Performance 43...
...37 System Functions 37 Display Functions 37 Battery 37 Power Management 38 Microsoft® Windows® Logo Key Functions . . . . 38 Dell™ QuickSet Key Combinations 38 Adjusting Keyboard Settings 38 Touch Pad 39 Customizing the Touch Pad 40 4 Using the Display 41 Adjusting Brightness... 41 Switching the Video Image From Your Computer Display To a Projector 41 Setting Display Resolution and Refresh Rate 42 5 Using a Battery 43 Battery Performance 43...
Owner's Manual
Page 5
...the Sleep Power State 47 Charging the Battery 47 Replacing the Battery 48 Storing a Battery 49 6 Using Multimedia 51 Playing Media 51 Playing Media Using Dell Travel Remote 52 Copying CD, DVD, and Blu-ray Disc™ (BD) Media 54 How to Copy a CD, DVD or BD 54 ... 55 Helpful Tips 56 Adjusting the Volume 57 Adjusting the Picture 58 Using Dell MediaDirect 58 Connecting Your Computer to a TV or Audio Device 59 HDMI 61 S-Video and Standard Audio 62 Component Video and Standard Audio 63 Composite Video and Standard Audio 65 Enabling the Display Settings for a TV 67 Contents ...
...the Sleep Power State 47 Charging the Battery 47 Replacing the Battery 48 Storing a Battery 49 6 Using Multimedia 51 Playing Media 51 Playing Media Using Dell Travel Remote 52 Copying CD, DVD, and Blu-ray Disc™ (BD) Media 54 How to Copy a CD, DVD or BD 54 ... 55 Helpful Tips 56 Adjusting the Volume 57 Adjusting the Picture 58 Using Dell MediaDirect 58 Connecting Your Computer to a TV or Audio Device 59 HDMI 61 S-Video and Standard Audio 62 Component Video and Standard Audio 63 Composite Video and Standard Audio 65 Enabling the Display Settings for a TV 67 Contents ...
Owner's Manual
Page 6
7 Using the Camera 69 Accessing the Camera's Help File 69 Manually Adjusting the Camera Settings 70 Creating a Picture or a Video 70 8 Using ExpressCards 71 ExpressCard Blanks 71 Installing an ExpressCard 72 Removing an ExpressCard or Blank 72 9 Using the Memory Card Reader 73 Memory Card ...
7 Using the Camera 69 Accessing the Camera's Help File 69 Manually Adjusting the Camera Settings 70 Creating a Picture or a Video 70 8 Using ExpressCards 71 ExpressCard Blanks 71 Installing an ExpressCard 72 Removing an ExpressCard or Blank 72 9 Using the Memory Card Reader 73 Memory Card ...

Owner's Manual
Page 9
... from integrated speakers 114 No sound from external speakers 114 No sound from headphones 115 Remote Control Problems 115 Touch Pad or Mouse Problems 115 Video and Display Problems 116 If the display is blank 116 If the display is difficult to read 117 If only part of the display is...
... from integrated speakers 114 No sound from external speakers 114 No sound from headphones 115 Remote Control Problems 115 Touch Pad or Mouse Problems 115 Video and Display Problems 116 If the display is blank 116 If the display is difficult to read 117 If only part of the display is...
Owner's Manual
Page 26
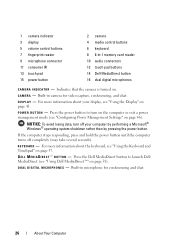
...: To avoid losing data, turn on the computer or exit a power management mode (see "Using Dell MediaDirect™" on page 46). Built-in camera for conferencing and chat. 26 About Your Computer Built-in microphone for video capture, conferencing, and chat. K E Y B O A R D - D E L L M E D I A D I C A T O R - P O W E R B U T T O N - 1 camera indicator 3 display 5 volume control buttons 7 fingerprint reader 9 microphone connector 11...
...: To avoid losing data, turn on the computer or exit a power management mode (see "Using Dell MediaDirect™" on page 46). Built-in camera for conferencing and chat. 26 About Your Computer Built-in microphone for video capture, conferencing, and chat. K E Y B O A R D - D E L L M E D I A D I C A T O R - P O W E R B U T T O N - 1 camera indicator 3 display 5 volume control buttons 7 fingerprint reader 9 microphone connector 11...
Owner's Manual
Page 27
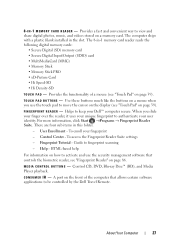
Provides a fast and convenient way to view and share digital photos, music, and videos stored on the front of a mouse (see "Touch Pad" on page 86. Helps to fingerprint scanning - For more information, click Start... your user identity. F I N G E R P R I A C O N T R O L B U T T O N S - When you use the security management software that allows certain software applications to be controlled by the Dell Travel Remote. Fingerprint Tutorial - Help - User Enrollment - To access the Fingerprint Reader Suite settings - Guide to keep your unique fingerprint to move the cursor on...
Provides a fast and convenient way to view and share digital photos, music, and videos stored on the front of a mouse (see "Touch Pad" on page 86. Helps to fingerprint scanning - For more information, click Start... your user identity. F I N G E R P R I A C O N T R O L B U T T O N S - When you use the security management software that allows certain software applications to be controlled by the Dell Travel Remote. Fingerprint Tutorial - Help - User Enrollment - To access the Fingerprint Reader Suite settings - Guide to keep your unique fingerprint to move the cursor on...

Owner's Manual
Page 31
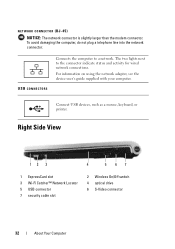
... digital signal to the DC power required by the computer. The AC adapter converts AC power to produce hi-definition video and audio. H D M I E E E 1 3 9 4 A C O N N E C T O R - VGA CONNECTOR Connects video devices, such as some digital video cameras. Attaches an AC adapter to the computer. Connects devices supporting IEEE 1394a high-speed transfer rates, such as a monitor...
... digital signal to the DC power required by the computer. The AC adapter converts AC power to produce hi-definition video and audio. H D M I E E E 1 3 9 4 A C O N N E C T O R - VGA CONNECTOR Connects video devices, such as some digital video cameras. Attaches an AC adapter to the computer. Connects devices supporting IEEE 1394a high-speed transfer rates, such as a monitor...
Owner's Manual
Page 32
Right Side View 12 3 4 5 67 1 ExpressCard slot 3 Wi-Fi Catcher™ Network Locator 5 USB connector 7 security cable slot 2 Wireless On/Off switch 4 optical drive 6 S-Video connector 32 About Your Computer USB CONNECTORS Connects the computer to the connector indicate status and activity for wired network connections. The two lights next ...
Right Side View 12 3 4 5 67 1 ExpressCard slot 3 Wi-Fi Catcher™ Network Locator 5 USB connector 7 security cable slot 2 Wireless On/Off switch 4 optical drive 6 S-Video connector 32 About Your Computer USB CONNECTORS Connects the computer to the connector indicate status and activity for wired network connections. The two lights next ...

Owner's Manual
Page 33
... off : Disables wireless devices. 2 on any wireless devices such as a mouse, keyboard, or printer. NOTE: The S-Video port does not support audio. O P T I C A L D R I T Y C A B L E S L O T - S E C U R I V E - When enabled through Dell QuickSet, this switch can also use the headphone port at the front of the system to connect to the computer (see... "Dell Wi-Fi Catcher™ Network Locator" on page 83). 1 23 1 off or on : Enables wireless devices. 3 Wi-Fi Catcher™...
... off : Disables wireless devices. 2 on any wireless devices such as a mouse, keyboard, or printer. NOTE: The S-Video port does not support audio. O P T I C A L D R I T Y C A B L E S L O T - S E C U R I V E - When enabled through Dell QuickSet, this switch can also use the headphone port at the front of the system to connect to the computer (see... "Dell Wi-Fi Catcher™ Network Locator" on page 83). 1 23 1 off or on : Enables wireless devices. 3 Wi-Fi Catcher™...
Owner's Manual
Page 41
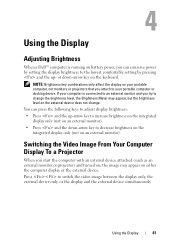
If your computer is running on battery power, you can press the following keys to switch the video image between the display only, the external device only, or the display and the external device simultaneously. Using the Display 41 NOTE: Brightness key ... not monitors or projectors that you attach to change . Using the Display Adjusting Brightness When a Dell™ computer is connected to an external monitor and you try to your portable computer or docking device. Switching the Video Image From Your Computer Display To a Projector When you start the computer with an external...
If your computer is running on battery power, you can press the following keys to switch the video image between the display only, the external device only, or the display and the external device simultaneously. Using the Display 41 NOTE: Brightness key ... not monitors or projectors that you attach to change . Using the Display Adjusting Brightness When a Dell™ computer is connected to an external monitor and you try to your portable computer or docking device. Switching the Video Image From Your Computer Display To a Projector When you start the computer with an external...
Owner's Manual
Page 42
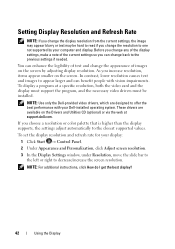
... and can change back to the closest supported values. To set the display resolution and refresh rate for your Dell-installed operating system. NOTE: Use only the Dell-provided video drivers, which are available on the Drivers and Utilities CD (optional) or via the web at a specific resolution..., both the video card and the display must support the program, and the necessary video drivers must be hard to read if ...
... and can change back to the closest supported values. To set the display resolution and refresh rate for your Dell-installed operating system. NOTE: Use only the Dell-provided video drivers, which are available on the Drivers and Utilities CD (optional) or via the web at a specific resolution..., both the video card and the display must support the program, and the necessary video drivers must be hard to read if ...
Owner's Manual
Page 59
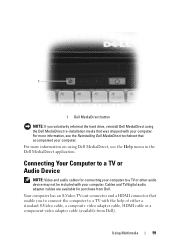
... media that was shipped with the help of either a standard S-Video cable, a composite video adapter cable, HDMI cable or a component video adapter cable (available from Dell. Cables and TV/digital audio adapter cables are available for connecting your computer. Your computer has an S-Video TV-out connector and a HDMI connector that accompanied your computer to...
... media that was shipped with the help of either a standard S-Video cable, a composite video adapter cable, HDMI cable or a component video adapter cable (available from Dell. Cables and TV/digital audio adapter cables are available for connecting your computer. Your computer has an S-Video TV-out connector and a HDMI connector that accompanied your computer to...
Owner's Manual
Page 60
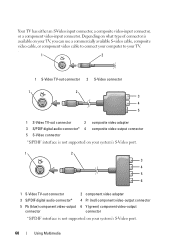
... of connector is available on your TV, you can use a commercially available S-video cable, composite video cable, or component video cable to connect your computer to your TV. . 1 2 1 S-Video TV-out connector 2 S-Video connector 1 2 3 4 5 1 S-Video TV-out connector 2 3 S/PDIF digital audio connector* 4 5 S-Video connector composite video adapter composite video-output connector *S/PDIF interface is not supported on your system...
... of connector is available on your TV, you can use a commercially available S-video cable, composite video cable, or component video cable to connect your computer to your TV. . 1 2 1 S-Video TV-out connector 2 S-Video connector 1 2 3 4 5 1 S-Video TV-out connector 2 3 S/PDIF digital audio connector* 4 5 S-Video connector composite video adapter composite video-output connector *S/PDIF interface is not supported on your system...
Owner's Manual
Page 61
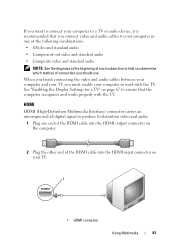
... computer and your TV, you must enable your computer to produce hi-definition video and audio. 1 Plug one of the following combinations: • S-Video and standard audio • Component-out video and standard audio • Composite video and standard audio NOTE: See the diagrams at the beginning of each subsection ...uncompressed all digital signal to work with the TV. See "Enabling the Display Settings for a TV" on page 67 to ensure that you connect video and audio cables to your computer in one end of the HDMI cable into the HDMI output connector on your TV. 1 1 HDMI connector ...
... computer and your TV, you must enable your computer to produce hi-definition video and audio. 1 Plug one of the following combinations: • S-Video and standard audio • Component-out video and standard audio • Composite video and standard audio NOTE: See the diagrams at the beginning of each subsection ...uncompressed all digital signal to work with the TV. See "Enabling the Display Settings for a TV" on page 67 to ensure that you connect video and audio cables to your computer in one end of the HDMI cable into the HDMI output connector on your TV. 1 1 HDMI connector ...

Owner's Manual
Page 62
... and the TV and/or audio device that you can connect an S-Video cable directly to the S-Video TV-out connector on the computer (without the TV/digital audio adapter cable). 2 Plug one end of the S-Video cable into the S-Video output connector on the computer. 3 Plug the other end of the... S-Video cable into the S-Video input connector on your TV or audio device supports S-Video but not S/PDIF digital audio, you want to connect. NOTE: If your...
... and the TV and/or audio device that you can connect an S-Video cable directly to the S-Video TV-out connector on the computer (without the TV/digital audio adapter cable). 2 Plug one end of the S-Video cable into the S-Video output connector on the computer. 3 Plug the other end of the... S-Video cable into the S-Video input connector on your TV or audio device supports S-Video but not S/PDIF digital audio, you want to connect. NOTE: If your...
Owner's Manual
Page 63
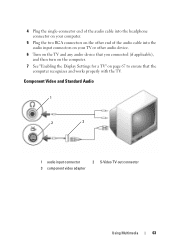
... Standard Audio 1 2 3 1 audio input connector 3 component video adapter 2 S-Video TV-out connector Using Multimedia 63 4 Plug the single-connector end of the audio cable into the headphone connector on your computer. 5 Plug the two ...
... Standard Audio 1 2 3 1 audio input connector 3 component video adapter 2 S-Video TV-out connector Using Multimedia 63 4 Plug the single-connector end of the audio cable into the headphone connector on your computer. 5 Plug the two ...
Owner's Manual
Page 64
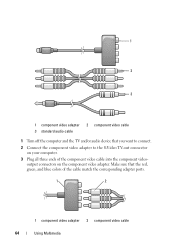
1 2 3 1 component video adapter 3 standard audio cable 2 component video cable 1 Turn off the computer and the TV and/or audio device that the red, green, and blue colors of the component video cable into the component videooutput connectors on the component video adapter. Make sure that you want to connect. 2 Connect the component video adapter to the S-Video TV-out connector on your computer. 3 Plug all three ends of the cable match the corresponding adapter ports. 1 2 1 component video adapter 2 component video cable 64 Using Multimedia
1 2 3 1 component video adapter 3 standard audio cable 2 component video cable 1 Turn off the computer and the TV and/or audio device that the red, green, and blue colors of the component video cable into the component videooutput connectors on the component video adapter. Make sure that you want to connect. 2 Connect the component video adapter to the S-Video TV-out connector on your computer. 3 Plug all three ends of the cable match the corresponding adapter ports. 1 2 1 component video adapter 2 component video cable 64 Using Multimedia

Owner's Manual
Page 65
... audio cable into the headphone connector on the computer. 6 Plug the two RCA connectors on the other end of the audio cable into the component video-input connectors on page 67 to ensure that you connected (if applicable), and then turn on any audio device that the computer recognizes and works... properly with the TV. 4 Plug all three connectors from the other end of the component video cable into the audio input connectors on your TV or audio device. 7 Turn on the TV, turn on the computer. 8 See "Enabling the Display ...
... audio cable into the headphone connector on the computer. 6 Plug the two RCA connectors on the other end of the audio cable into the component video-input connectors on page 67 to ensure that you connected (if applicable), and then turn on any audio device that the computer recognizes and works... properly with the TV. 4 Plug all three connectors from the other end of the component video cable into the audio input connectors on your TV or audio device. 7 Turn on the TV, turn on the computer. 8 See "Enabling the Display ...
Owner's Manual
Page 66
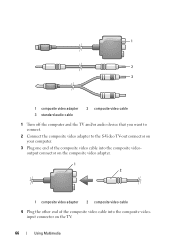
1 2 3 1 composite video adapter 3 standard audio cable 2 composite video cable 1 Turn off the computer and the TV and/or audio device that you want to connect. 2 Connect the composite video adapter to the S-Video TV-out connector on your computer. 3 Plug one end of the composite video cable into the composite videooutput connector on the composite video adapter. 1 2 1 composite video adapter 2 composite video cable 4 Plug the other end of the composite video cable into the composite videoinput connector on the TV. 66 Using Multimedia
1 2 3 1 composite video adapter 3 standard audio cable 2 composite video cable 1 Turn off the computer and the TV and/or audio device that you want to connect. 2 Connect the composite video adapter to the S-Video TV-out connector on your computer. 3 Plug one end of the composite video cable into the composite videooutput connector on the composite video adapter. 1 2 1 composite video adapter 2 composite video cable 4 Plug the other end of the composite video cable into the composite videoinput connector on the TV. 66 Using Multimedia
Owner's Manual
Page 67
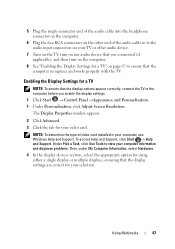
... the single-connector end of the audio cable into the headphone connector on the computer. 6 Plug the two RCA connectors on the other end of video card installed in to the audio input connectors on your TV or other audio device. 7 Turn on the TV, turn on any audio device that... the computer recognizes and works properly with the TV. Enabling the Display Settings for your video card. NOTE: To determine the type of the audio cable in your computer, see Windows Help and Support. Under Pick a Task, click Use Tools to...
... the single-connector end of the audio cable into the headphone connector on the computer. 6 Plug the two RCA connectors on the other end of video card installed in to the audio input connectors on your TV or other audio device. 7 Turn on the TV, turn on any audio device that... the computer recognizes and works properly with the TV. Enabling the Display Settings for your video card. NOTE: To determine the type of the audio cable in your computer, see Windows Help and Support. Under Pick a Task, click Use Tools to...


