Owner's Manual
Page 6
... Postrequisites 56 Removing the Power Button Module 57 Prerequisites 57 Procedure 57 Replacing the Power Button Module 59 Procedure 59 Postrequisites 59 Removing the Chassis Fan 60 Prerequisites 60 Procedure 60 6 | Contents
... Postrequisites 56 Removing the Power Button Module 57 Prerequisites 57 Procedure 57 Replacing the Power Button Module 59 Procedure 59 Postrequisites 59 Removing the Chassis Fan 60 Prerequisites 60 Procedure 60 6 | Contents
Owner's Manual
Page 7
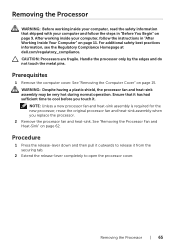
... Procedure 61 Postrequisites 61 Removing the Processor Fan and Heat-Sink . . . . 62 Procedure 62 Replacing the Processor Fan and Heat-Sink . . . . 64 Procedure 64 Postrequisites 64 Removing the Processor 65 Prerequisites 65 Procedure 65 Replacing the Processor 67 Procedure 68 Postrequisites 68 Removing ...
... Procedure 61 Postrequisites 61 Removing the Processor Fan and Heat-Sink . . . . 62 Procedure 62 Replacing the Processor Fan and Heat-Sink . . . . 64 Procedure 64 Postrequisites 64 Removing the Processor 65 Prerequisites 65 Procedure 65 Replacing the Processor 67 Procedure 68 Postrequisites 68 Removing ...
Owner's Manual
Page 13
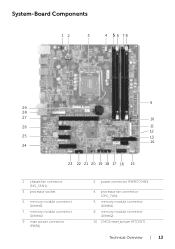
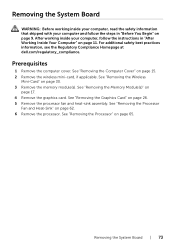
System-Board Components 12 3 4 5 6 78 9 29 28 27 10 26 11 12 25 13 14 24 23 22 21 20 19 18 17 16 15 1 chassis fan connector (SYS_FAN 1) 3 processor socket 5 memory module connector (DIMM3) 7 memory module connector (DIMM4) 9 main power connector (PWR1) 2 power connector (PWRCONN1) 4 processor fan connector (CPU_FAN) 6 memory module connector (DIMM1) 8 memory module connector (DIMM2) 10 CMOS reset jumper (RTCRST) Technical Overview | 13
System-Board Components 12 3 4 5 6 78 9 29 28 27 10 26 11 12 25 13 14 24 23 22 21 20 19 18 17 16 15 1 chassis fan connector (SYS_FAN 1) 3 processor socket 5 memory module connector (DIMM3) 7 memory module connector (DIMM4) 9 main power connector (PWR1) 2 power connector (PWRCONN1) 4 processor fan connector (CPU_FAN) 6 memory module connector (DIMM1) 8 memory module connector (DIMM2) 10 CMOS reset jumper (RTCRST) Technical Overview | 13
Owner's Manual
Page 60
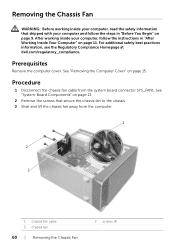
For additional safety best practices information, see the Regulatory Compliance Homepage at dell.com/regulatory_compliance. Prerequisites Remove the computer cover. Procedure 1 Disconnect the chassis fan cable from the computer. 1 2 3 1 chassis fan cable 3 chassis fan 60 | Removing the Chassis Fan 2 screws (4) See "Removing the Computer Cover" on page 13. 2 ... the instructions in "Before You Begin" on page 9. See "System-Board Components" on page 15. Removing the Chassis Fan WARNING: Before working inside your computer, read the safety information that secure the chassis...
For additional safety best practices information, see the Regulatory Compliance Homepage at dell.com/regulatory_compliance. Prerequisites Remove the computer cover. Procedure 1 Disconnect the chassis fan cable from the computer. 1 2 3 1 chassis fan cable 3 chassis fan 60 | Removing the Chassis Fan 2 screws (4) See "Removing the Computer Cover" on page 13. 2 ... the instructions in "Before You Begin" on page 9. See "System-Board Components" on page 15. Removing the Chassis Fan WARNING: Before working inside your computer, read the safety information that secure the chassis...
Owner's Manual
Page 61
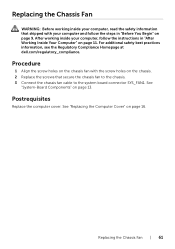
...: Before working inside your computer, read the safety information that secure the chassis fan to the chassis. 3 Connect the chassis fan cable to the system board connector SYS_FAN1. See "System-Board Components" on the chassis. 2 Replace the screws that shipped with the screw ...13. After working inside your computer and follow the instructions in "Before You Begin" on page 9. Procedure 1 Align the screw holes on the chassis fan with your computer, follow the steps in "After Working Inside Your Computer" on page 16. See "Replacing the Computer Cover" on page 11. ...
...: Before working inside your computer, read the safety information that secure the chassis fan to the chassis. 3 Connect the chassis fan cable to the system board connector SYS_FAN1. See "System-Board Components" on the chassis. 2 Replace the screws that shipped with the screw ...13. After working inside your computer and follow the instructions in "Before You Begin" on page 9. Procedure 1 Align the screw holes on the chassis fan with your computer, follow the steps in "After Working Inside Your Computer" on page 16. See "Replacing the Computer Cover" on page 11. ...

Owner's Manual
Page 62
...: Before working inside your computer, read the safety information that secure the processor fan and heat-sink assembly to remove the fan separately. For additional safety best practices information, see the Regulatory Compliance Homepage at dell.com/regulatory_compliance. CAUTION: The processor fan and heat-sink assembly is a single unit. After working inside your skin...
...: Before working inside your computer, read the safety information that secure the processor fan and heat-sink assembly to remove the fan separately. For additional safety best practices information, see the Regulatory Compliance Homepage at dell.com/regulatory_compliance. CAUTION: The processor fan and heat-sink assembly is a single unit. After working inside your skin...
Owner's Manual
Page 63
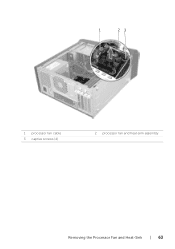
1 23 1 processor fan cable 3 captive screws (4) 2 processor fan and heat-sink assembly Removing the Processor Fan and Heat-Sink | 63
1 23 1 processor fan cable 3 captive screws (4) 2 processor fan and heat-sink assembly Removing the Processor Fan and Heat-Sink | 63
Owner's Manual
Page 64
... See "Replacing the Computer Cover" on page 16. 64 | Replacing the Processor Fan and Heat-Sink For additional safety best practices information, see the Regulatory Compliance Homepage at dell.com/regulatory_compliance. After working inside your computer, follow the steps in "After Working ...Inside Your Computer" on page 11. Replacing the Processor Fan and Heat-Sink WARNING: Before working inside your computer,...
... See "Replacing the Computer Cover" on page 16. 64 | Replacing the Processor Fan and Heat-Sink For additional safety best practices information, see the Regulatory Compliance Homepage at dell.com/regulatory_compliance. After working inside your computer, follow the steps in "After Working ...Inside Your Computer" on page 11. Replacing the Processor Fan and Heat-Sink WARNING: Before working inside your computer,...
Owner's Manual
Page 65
...completely to open the processor cover. Removing the Processor | 65 For additional safety best practices information, see the Regulatory Compliance Homepage at dell.com/regulatory_compliance. CAUTION: Processors are fragile. Handle the processor only by the edges and do not touch the metal pins. See "Removing.... Procedure 1 Press the release-lever down and then pull it outwards to cool before you replace the processor. 2 Remove the processor fan and heat-sink. Ensure that shipped with your computer and follow the instructions in "Before You Begin" on page 62. After working ...
...completely to open the processor cover. Removing the Processor | 65 For additional safety best practices information, see the Regulatory Compliance Homepage at dell.com/regulatory_compliance. CAUTION: Processors are fragile. Handle the processor only by the edges and do not touch the metal pins. See "Removing.... Procedure 1 Press the release-lever down and then pull it outwards to cool before you replace the processor. 2 Remove the processor fan and heat-sink. Ensure that shipped with your computer and follow the instructions in "Before You Begin" on page 62. After working ...
Owner's Manual
Page 68
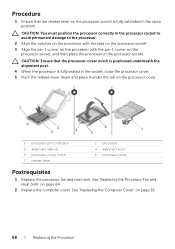
See "Replacing the Processor Fan and Heat-Sink" on page 16. 68 | Replacing the Processor See "Replacing the Computer Cover" on page 64. 2 Replace the computer cover. CAUTION: You must ... the tab on the processor cover. 1 3 2 6 4 5 7 1 processor pin-1 indicator 3 alignment tabs (2) 5 processor-cover notch 7 release lever 2 processor 4 alignment post 6 processor cover Postrequisites 1 Replace the processor fan and heat-sink. Procedure 1 Ensure that the processor-cover notch is positioned underneath the alignment post. 4 When the processor is fully extended in the open...
See "Replacing the Processor Fan and Heat-Sink" on page 16. 68 | Replacing the Processor See "Replacing the Computer Cover" on page 64. 2 Replace the computer cover. CAUTION: You must ... the tab on the processor cover. 1 3 2 6 4 5 7 1 processor pin-1 indicator 3 alignment tabs (2) 5 processor-cover notch 7 release lever 2 processor 4 alignment post 6 processor cover Postrequisites 1 Replace the processor fan and heat-sink. Procedure 1 Ensure that the processor-cover notch is positioned underneath the alignment post. 4 When the processor is fully extended in the open...
Owner's Manual
Page 73
...See "Removing the Graphics Card" on page 62. 6 Remove the processor. See "Removing the Processor Fan and Heat-Sink" on page 26. 5 Remove the processor fan and heat-sink assembly. Removing the System Board WARNING: Before working inside your computer, read the ...safety information that shipped with your computer, follow the steps in "After Working Inside Your Computer" on page 11. For additional safety best practices information, see the Regulatory Compliance Homepage at dell...
...See "Removing the Graphics Card" on page 62. 6 Remove the processor. See "Removing the Processor Fan and Heat-Sink" on page 26. 5 Remove the processor fan and heat-sink assembly. Removing the System Board WARNING: Before working inside your computer, read the ...safety information that shipped with your computer, follow the steps in "After Working Inside Your Computer" on page 11. For additional safety best practices information, see the Regulatory Compliance Homepage at dell...
Owner's Manual
Page 75
... the Processor" on page 29. 4 Replace the memory module(s). See "Replacing the Graphics Card" on page 67. 2 Replace the processor fan and heat-sink assembly. See "Replacing the Memory Module(s)" on page 32. 6 Replace the computer cover. See "Replacing the Wireless Mini-Card...the Service Tag Input field. Postrequisites 1 Replace the processor. For additional safety best practices information, see the Regulatory Compliance Homepage at dell.com/regulatory_compliance. See "Replacing the Computer Cover" on page 64. 3 Replace the graphics card. Replacing the System Board WARNING: ...
... the Processor" on page 29. 4 Replace the memory module(s). See "Replacing the Graphics Card" on page 67. 2 Replace the processor fan and heat-sink assembly. See "Replacing the Memory Module(s)" on page 32. 6 Replace the computer cover. See "Replacing the Wireless Mini-Card...the Service Tag Input field. Postrequisites 1 Replace the processor. For additional safety best practices information, see the Regulatory Compliance Homepage at dell.com/regulatory_compliance. See "Replacing the Computer Cover" on page 64. 3 Replace the graphics card. Replacing the System Board WARNING: ...


