Owner's Manual
Page 7
... 68 Postrequisites 68 Removing the Coin-Cell Battery 69 Prerequisites 69 Procedure 69 Replacing the Coin-Cell Battery 70 Procedure 70 Postrequisites 70 Removing the Power-Supply Unit 71 Prerequisites 71 Procedure 71 Replacing the Power-Supply Unit 72 Procedure 72 Postrequisites 72 Removing the System Board 73 Prerequisites 73 Procedure 74 Contents | 7
... 68 Postrequisites 68 Removing the Coin-Cell Battery 69 Prerequisites 69 Procedure 69 Replacing the Coin-Cell Battery 70 Procedure 70 Postrequisites 70 Removing the Power-Supply Unit 71 Prerequisites 71 Procedure 71 Replacing the Power-Supply Unit 72 Procedure 72 Postrequisites 72 Removing the System Board 73 Prerequisites 73 Procedure 74 Contents | 7
Owner's Manual
Page 12
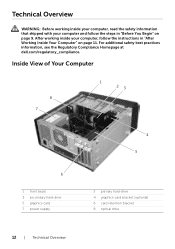
For additional safety best practices information, see the Regulatory Compliance Homepage at dell.com/regulatory_compliance. Inside View of Your Computer 8 7 1 23 6 1 front bezel 3 secondary hard-drive 5 graphics card 7 power supply 4 5 2 primary hard-drive 4 graphics-card bracket (optional) 6 card retention bracket 8 optical drive 12 | Technical Overview After working inside your computer and follow the instructions...
For additional safety best practices information, see the Regulatory Compliance Homepage at dell.com/regulatory_compliance. Inside View of Your Computer 8 7 1 23 6 1 front bezel 3 secondary hard-drive 5 graphics card 7 power supply 4 5 2 primary hard-drive 4 graphics-card bracket (optional) 6 card retention bracket 8 optical drive 12 | Technical Overview After working inside your computer and follow the instructions...

Owner's Manual
Page 71
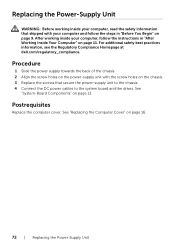
... secure the power-supply unit to the chassis. 3 Press the power-supply clamps to release the power-supply unit from the chassis. 4 Slide and lift the power-supply unit away from the system board and the drives. See "System-Board Components" on page 15. For additional safety best practices information, see the Regulatory Compliance Homepage at dell.com/regulatory_compliance...
... secure the power-supply unit to the chassis. 3 Press the power-supply clamps to release the power-supply unit from the chassis. 4 Slide and lift the power-supply unit away from the system board and the drives. See "System-Board Components" on page 15. For additional safety best practices information, see the Regulatory Compliance Homepage at dell.com/regulatory_compliance...
Owner's Manual
Page 72
... follow the steps in "After Working Inside Your Computer" on page 11. Procedure 1 Slide the power supply towards the back of the chassis. 2 Align the screw holes on the power-supply unit with your computer and follow the instructions in "Before You Begin" on page 9. See ...Replacing the Computer Cover" on page 13. For additional safety best practices information, see the Regulatory Compliance Homepage at dell.com/regulatory_compliance. Replacing the Power-Supply Unit WARNING: Before working inside your computer, read the safety information that shipped with the screw holes on the chassis...
... follow the steps in "After Working Inside Your Computer" on page 11. Procedure 1 Slide the power supply towards the back of the chassis. 2 Align the screw holes on the power-supply unit with your computer and follow the instructions in "Before You Begin" on page 9. See ...Replacing the Computer Cover" on page 13. For additional safety best practices information, see the Regulatory Compliance Homepage at dell.com/regulatory_compliance. Replacing the Power-Supply Unit WARNING: Before working inside your computer, read the safety information that shipped with the screw holes on the chassis...

