Owner's Manual
Page 35
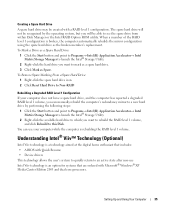
... If your computer while the computer is a technology aimed at the digital home enthusiast that are ordered with Microsoft® Windows® XP Media Center Edition 2005 and dual core processors. To Mark a Drive as a Spare Hard Drive: 1 Click the Start button and point... Mark as the broken member's replacement. When a member of the RAID level 1 configuration is an option for systems that includes: • A BIOS with a RAID level 1 configuration. Setting Up and Using Your Computer 35 Understanding Intel® Viiv™ Technology (Optional) Intel Viiv technology is rebuilding...
... If your computer while the computer is a technology aimed at the digital home enthusiast that are ordered with Microsoft® Windows® XP Media Center Edition 2005 and dual core processors. To Mark a Drive as a Spare Hard Drive: 1 Click the Start button and point... Mark as the broken member's replacement. When a member of the RAID level 1 configuration is an option for systems that includes: • A BIOS with a RAID level 1 configuration. Setting Up and Using Your Computer 35 Understanding Intel® Viiv™ Technology (Optional) Intel Viiv technology is rebuilding...
Owner's Manual
Page 42
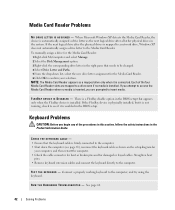
...F L E X B A Y D E V I C E I S D I G N E D - See page 60. 42 Solving Problems Media Card Reader Problems N O D R I V E L E T T E R I S A S S I S A B L E D - When Microsoft Windows XP detects the Media Card Reader, the device is automatically assigned a drive letter as shown on the setup diagram for damaged or frayed cables. If the...Right-click My Computer and select Manage. 2 Select the Disk Management option. 3 Right-click the corresponding drive letter in the BIOS setup that the keyboard cable is installed. To manually assign a drive for the Media Card Reader. 6 Click OK to ...
...F L E X B A Y D E V I C E I S D I G N E D - See page 60. 42 Solving Problems Media Card Reader Problems N O D R I V E L E T T E R I S A S S I S A B L E D - When Microsoft Windows XP detects the Media Card Reader, the device is automatically assigned a drive letter as shown on the setup diagram for damaged or frayed cables. If the...Right-click My Computer and select Manage. 2 Select the Disk Management option. 3 Right-click the corresponding drive letter in the BIOS setup that the keyboard cable is installed. To manually assign a drive for the Media Card Reader. 6 Click OK to ...
Owner's Manual
Page 53
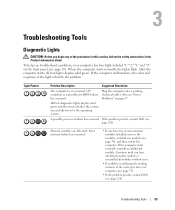
...your computer has four lights labeled "1," "2," "3," and "4" on page 47. A possible processor failure has occurred. If the problem persists, contact Dell (see page 74), and then restart the computer. Problems" on the front panel (see "Power has occurred. Troubleshooting Tools 53 If the .... Troubleshooting Tools Diagnostic Lights CAUTION: Before you troubleshoot a problem, your computer (see page 74). • If the problem persists, contact Dell (see page 126). To help you begin any of the lights identify the problem. Also see page 65). After the computer starts, all...
...your computer has four lights labeled "1," "2," "3," and "4" on page 47. A possible processor failure has occurred. If the problem persists, contact Dell (see page 74), and then restart the computer. Problems" on the front panel (see "Power has occurred. Troubleshooting Tools 53 If the .... Troubleshooting Tools Diagnostic Lights CAUTION: Before you troubleshoot a problem, your computer (see page 74). • If the problem persists, contact Dell (see page 126). To help you begin any of the lights identify the problem. Also see page 65). After the computer starts, all...
Owner's Manual
Page 63
... performed the steps in "Turn Off Your Computer" and "Before Working Inside Your Computer." • You have read the safety information in your Dell™ Product Information Guide. • A component can be replaced by performing the removal procedure in this document may require the following tools: &#...8226; Small flat-blade screwdriver • Phillips screwdriver • Flash BIOS update program floppy disk or CD Turn Off Your Computer NOTICE: To avoid losing data, save and close any open programs before you ...
... performed the steps in "Turn Off Your Computer" and "Before Working Inside Your Computer." • You have read the safety information in your Dell™ Product Information Guide. • A component can be replaced by performing the removal procedure in this document may require the following tools: &#...8226; Small flat-blade screwdriver • Phillips screwdriver • Flash BIOS update program floppy disk or CD Turn Off Your Computer NOTICE: To avoid losing data, save and close any open programs before you ...

Owner's Manual
Page 109
...cards Appendix 109 Appendix Specifications Processor Processor type Cache Memory Type Memory connectors Memory capacities Minimum memory Maximum memory BIOS address Computer Information Chipset DMA channels Interrupt levels BIOS chip (NVRAM) NIC System clock Video Type Audio Type Intel® Pentium® 4 Socket-T with Hyper...-Threading technology 1 MB or 2 MB dual-channel 400-, 533-, and 667-MHz DDR2 four 256 MB, 512 MB, or 1 ...
...cards Appendix 109 Appendix Specifications Processor Processor type Cache Memory Type Memory connectors Memory capacities Minimum memory Maximum memory BIOS address Computer Information Chipset DMA channels Interrupt levels BIOS chip (NVRAM) NIC System clock Video Type Audio Type Intel® Pentium® 4 Socket-T with Hyper...-Threading technology 1 MB or 2 MB dual-channel 400-, 533-, and 667-MHz DDR2 four 256 MB, 512 MB, or 1 ...
Owner's Manual
Page 116
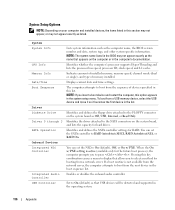
... for RAID. Pressing this list. Date/Time Displays current date and time settings. NOTE: The system name listed in the BIOS may not appear exactly as the computer name, the BIOS version number and date, system tags, and other system-specific information. You can set the SATA controller to RAID Autodetect/AHCI...
... for RAID. Pressing this list. Date/Time Displays current date and time settings. NOTE: The system name listed in the BIOS may not appear exactly as the computer name, the BIOS version number and date, system tags, and other system-specific information. You can set the SATA controller to RAID Autodetect/AHCI...
Owner's Manual
Page 119
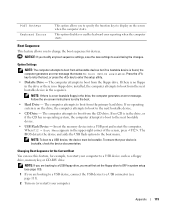
... keys to display on (or restart) your computer. If there is no floppy in the drive or there is bootable, check the device documentation. The BIOS detects the device and adds the USB flash option to boot from the next bootable device in system setup (see page 111). 2 Turn on the...
... keys to display on (or restart) your computer. If there is no floppy in the drive or there is bootable, check the device documentation. The BIOS detects the device and adds the USB flash option to boot from the next bootable device in system setup (see page 111). 2 Turn on the...
Owner's Manual
Page 145
See sound B battery problems, 37 replacing, 106 BIOS, 113 boot sequence about, 119 changing, 119-120 option settings, 119 booting to a USB device, 119 C cards installing PCI Express, 82 PCI Express, 81 removing ... how to, 18 copying DVDs general information, 18 helpful tips, 20 how to, 18 cover replacing, 107 D Dell Dell Diagnostics, 56 support policy, 123 support site, 11 Dell Premier Support website, 9, 11 diagnostic lights, 53 diagnostics Dell, 56 lights, 53, 66 documentation online, 11 Product Information Guide, 9 Setup Diagram, 9 drive panel, 66, 89 removing...
See sound B battery problems, 37 replacing, 106 BIOS, 113 boot sequence about, 119 changing, 119-120 option settings, 119 booting to a USB device, 119 C cards installing PCI Express, 82 PCI Express, 81 removing ... how to, 18 copying DVDs general information, 18 helpful tips, 20 how to, 18 cover replacing, 107 D Dell Dell Diagnostics, 56 support policy, 123 support site, 11 Dell Premier Support website, 9, 11 diagnostic lights, 53 diagnostics Dell, 56 lights, 53, 66 documentation online, 11 Product Information Guide, 9 Setup Diagram, 9 drive panel, 66, 89 removing...


