Setup and Quick Reference Guide
Page 21
... NOTE: Offerings may vary by region. Processor Processor type L1 cache L2 cache External bus frequency Vostro A840 Intel® Core™2 Duo Intel® Pentium™ Dual-Core Intel® Celeron® Dual and Single Core Vostro A860 Intel® Core™2 Duo Intel® Pentium™ Dual-Core Intel® Celeron®...
... NOTE: Offerings may vary by region. Processor Processor type L1 cache L2 cache External bus frequency Vostro A840 Intel® Core™2 Duo Intel® Pentium™ Dual-Core Intel® Celeron® Dual and Single Core Vostro A860 Intel® Core™2 Duo Intel® Pentium™ Dual-Core Intel® Celeron®...
Setup and Quick Reference Guide
Page 24
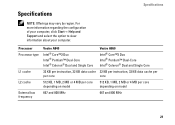
...-1 Media Card Reader 3-in-1 media memory card controller 3-in-1 media memory card connector Cards supported Vostro A840 Ricoh 5C847 Vostro A860 Ricoh R5C847 3-in-1 combo card connector 3-in-1 combo card connector SD/SDIO/MMC SD/SDIO/MMC Communications Vostro A840 Vostro A860 Modem: Type v.92 Data/Fax MDC Modem v.92 Data/Fax MDC Modem Controller softmodem softmodem Interface...
...-1 Media Card Reader 3-in-1 media memory card controller 3-in-1 media memory card connector Cards supported Vostro A840 Ricoh 5C847 Vostro A860 Ricoh R5C847 3-in-1 combo card connector 3-in-1 combo card connector SD/SDIO/MMC SD/SDIO/MMC Communications Vostro A840 Vostro A860 Modem: Type v.92 Data/Fax MDC Modem v.92 Data/Fax MDC Modem Controller softmodem softmodem Interface...

Setup and Quick Reference Guide
Page 25
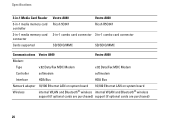
... Graphics Video memory up to 128 MB Vostro A860 integrated on system board, hardware accelerated integrated video Intel Extreme Graphics up to 128 MB Audio Audio type Audio controller Stereo conversion Interfaces: Internal External Vostro A840 two-channel high definition audio (Azalia) Conexant... CX20561-12Z 24-bit (analog-to-digital and digital-to-analog) Vostro A860 two-channel high definition audio (Azalia) Conexant CX20561-12Z 24-bit...
... Graphics Video memory up to 128 MB Vostro A860 integrated on system board, hardware accelerated integrated video Intel Extreme Graphics up to 128 MB Audio Audio type Audio controller Stereo conversion Interfaces: Internal External Vostro A840 two-channel high definition audio (Azalia) Conexant... CX20561-12Z 24-bit (analog-to-digital and digital-to-analog) Vostro A860 two-channel high definition audio (Azalia) Conexant CX20561-12Z 24-bit...
Setup and Quick Reference Guide
Page 26
...ohms Volume controls program menus Display Vostro A840 Type (active-matrix TFT) WXGA Active area (X/Y) 303.36 x 189.6 Dimensions: Height 206 mm (8.11 inches) Width 320 mm (12.6 inches) Diagonal 358.14 mm (14.1 inches) Operating angle 0° (closed) to 165° Vostro A860 one 4-ohm speaker 2-W channel ...into 4 ohms program menus Vostro A860 HD 344.23 x 193.53 209.5 mm (8.24 inches) 359.3 mm (14.14 inches) 396.24 mm (15.6 ...
...ohms Volume controls program menus Display Vostro A840 Type (active-matrix TFT) WXGA Active area (X/Y) 303.36 x 189.6 Dimensions: Height 206 mm (8.11 inches) Width 320 mm (12.6 inches) Diagonal 358.14 mm (14.1 inches) Operating angle 0° (closed) to 165° Vostro A860 one 4-ohm speaker 2-W channel ...into 4 ohms program menus Vostro A860 HD 344.23 x 193.53 209.5 mm (8.24 inches) 359.3 mm (14.14 inches) 396.24 mm (15.6 ...

Setup and Quick Reference Guide
Page 27
and Canada); 87 (Europe); 90 (Japan) QWERTY/AZERTY/Kanji Vostro A860 86 (U.S. and Canada); 87 (Europe); 90 (Japan) QWERTY/AZERTY/Kanji 27 Specifications Display (continued) Viewing angles: WXGA Horizontal WXGA Vertical Pixel pitch: HD Power Consumption (panel with backlight) (typical): WXGA Vostro A840 40/40° 15/30° 0.2373 Vostro A860 40/40° 15/30° 0.255 6.2 W (max) with no inverter losses 6.5 W (max) with no inverter losses Keyboard Number of keys Layout Vostro A840 86 (U.S.
and Canada); 87 (Europe); 90 (Japan) QWERTY/AZERTY/Kanji Vostro A860 86 (U.S. and Canada); 87 (Europe); 90 (Japan) QWERTY/AZERTY/Kanji 27 Specifications Display (continued) Viewing angles: WXGA Horizontal WXGA Vertical Pixel pitch: HD Power Consumption (panel with backlight) (typical): WXGA Vostro A840 40/40° 15/30° 0.2373 Vostro A860 40/40° 15/30° 0.255 6.2 W (max) with no inverter losses 6.5 W (max) with no inverter losses Keyboard Number of keys Layout Vostro A840 86 (U.S.
Setup and Quick Reference Guide
Page 28
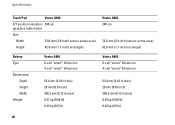
...Width 73.0-mm (2.9-inch) sensor-active area) Height 42.9-mm (1.7-inch) rectangle) Vostro A860 240 cpi 73.0-mm (2.9-inch) sensor-active area) 42.9-mm (1.7-inch) rectangle) Battery Type Dimensions: Depth Height Width Weight Vostro A840 6-cell "smart" lithium ion 4-cell "smart" lithium ion 53.4 mm (2.10 ...inches) 20 mm (0.78 inch) 206.2 mm (8.12 inches) 0.31 kg (0.68 lb) 0.23 kg (0.5 lb) Vostro A860 6-cell "smart" lithium ion 4-cell "smart" lithium...
...Width 73.0-mm (2.9-inch) sensor-active area) Height 42.9-mm (1.7-inch) rectangle) Vostro A860 240 cpi 73.0-mm (2.9-inch) sensor-active area) 42.9-mm (1.7-inch) rectangle) Battery Type Dimensions: Depth Height Width Weight Vostro A840 6-cell "smart" lithium ion 4-cell "smart" lithium ion 53.4 mm (2.10 ...inches) 20 mm (0.78 inch) 206.2 mm (8.12 inches) 0.31 kg (0.68 lb) 0.23 kg (0.5 lb) Vostro A860 6-cell "smart" lithium ion 4-cell "smart" lithium...
Setup and Quick Reference Guide
Page 29
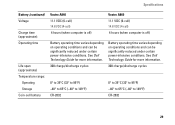
... Vostro A860 11.1 VDC (6-cell) 14.8 VDC (4-cell) 4 hours (when computer is off ) Battery operating time varies depending on operating conditions and can be significantly reduced under certain power-intensive conditions. See Dell ...Technology Guide for more information. 300 charge/discharge cycles 0° to 35°C (32° to 95°F) -40° to 65°C (-40° to 149°F) CR-2032 29 Specifications Battery (continued) Voltage Charge time (approximate): Operating time Life span (approximate) Temperature range: Operating Storage Coin-cell battery Vostro A840...
... Vostro A860 11.1 VDC (6-cell) 14.8 VDC (4-cell) 4 hours (when computer is off ) Battery operating time varies depending on operating conditions and can be significantly reduced under certain power-intensive conditions. See Dell ...Technology Guide for more information. 300 charge/discharge cycles 0° to 35°C (32° to 95°F) -40° to 65°C (-40° to 149°F) CR-2032 29 Specifications Battery (continued) Voltage Charge time (approximate): Operating time Life span (approximate) Temperature range: Operating Storage Coin-cell battery Vostro A840...

Setup and Quick Reference Guide
Page 30
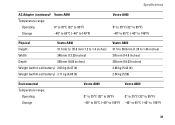
... Vostro A840 Input voltage 100-240 VAC Input current (maximum) 1.5 A Input frequency 50-60 Hz Output current 4.34 A (maximum at 4-second pulse); 3.34 A (continuous) Output power 65 W Rated output voltage 19.5 +/-1.0 VDC Dimensions: Height 28.2 mm (1.11 inches) Width 57.9 mm (2.28 inches) Depth 137.2 mm (5.4 inches) Weight (with cables) 0.4 kg (0.9 lb) Vostro A860...
... Vostro A840 Input voltage 100-240 VAC Input current (maximum) 1.5 A Input frequency 50-60 Hz Output current 4.34 A (maximum at 4-second pulse); 3.34 A (continuous) Output power 65 W Rated output voltage 19.5 +/-1.0 VDC Dimensions: Height 28.2 mm (1.11 inches) Width 57.9 mm (2.28 inches) Depth 137.2 mm (5.4 inches) Weight (with cables) 0.4 kg (0.9 lb) Vostro A860...
Setup and Quick Reference Guide
Page 31
...° to 95°F) Storage -40° to 65°C (-40° to 149°F) Vostro A860 0° to 35°C (32° to 95°F) -40° to 65°C (-40° to 149°F) Physical Vostro A840 Height 31.1mm to 35.6 mm (1.2 to 1.4 inches) Width 340 mm (13.39 inches) Depth... (1.24 to 1.44 inches) 376 mm (14.8 inches) 255 mm (10.03 inches) 2.46 kg (5.42 lb) 2.54 kg (5.59) Environmental Temperature range: Operating Storage Vostro A840 Vostro A860 0° to 35°C (32° to 95°F) 0° to 35°C (32° to 95°F) -40° to 65°C (-40°...
...° to 95°F) Storage -40° to 65°C (-40° to 149°F) Vostro A860 0° to 35°C (32° to 95°F) -40° to 65°C (-40° to 149°F) Physical Vostro A840 Height 31.1mm to 35.6 mm (1.2 to 1.4 inches) Width 340 mm (13.39 inches) Depth... (1.24 to 1.44 inches) 376 mm (14.8 inches) 255 mm (10.03 inches) 2.46 kg (5.42 lb) 2.54 kg (5.59) Environmental Temperature range: Operating Storage Vostro A840 Vostro A860 0° to 35°C (32° to 95°F) 0° to 35°C (32° to 95°F) -40° to 65°C (-40°...
Setup and Quick Reference Guide
Page 32
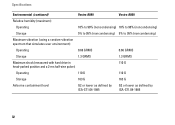
Specifications Environmental (continued) Vostro A840 Vostro A860 Relative humidity (maximum): Operating 10% to 90% (noncondensing) 10% to 90% (noncondensing) Storage 5% to 95% (noncondensing) 5% to 95% (noncondensing) Maximum vibration (using a random-vibration spectrum ...
Specifications Environmental (continued) Vostro A840 Vostro A860 Relative humidity (maximum): Operating 10% to 90% (noncondensing) 10% to 90% (noncondensing) Storage 5% to 95% (noncondensing) 5% to 95% (noncondensing) Maximum vibration (using a random-vibration spectrum ...

Service Manual
Page 1
Information in this document is used in this text: Dell, the DELL logo, and Vostro are either potential damage to hardware or loss of data and tells you make better use of your computer. All rights reserved. Trademarks used ... SIG, Inc. Model PP38L, PP37L September 2008 Rev. Reproduction of these materials in trademarks and trade names other countries. Bluetooth is strictly forbidden. Dell™ Vostro™ A840/A860 Service Manual Before You Begin Module Cover Memory Module Mini-Cards Center Control Cover Keyboard Display Palm Rest System Fan Processor Heat Sink Processor...
Information in this document is used in this text: Dell, the DELL logo, and Vostro are either potential damage to hardware or loss of data and tells you make better use of your computer. All rights reserved. Trademarks used ... SIG, Inc. Model PP38L, PP37L September 2008 Rev. Reproduction of these materials in trademarks and trade names other countries. Bluetooth is strictly forbidden. Dell™ Vostro™ A840/A860 Service Manual Before You Begin Module Cover Memory Module Mini-Cards Center Control Cover Keyboard Display Palm Rest System Fan Processor Heat Sink Processor...

Service Manual
Page 2
... by using a wrist grounding strap or by periodically touching an unpainted metal surface (such as a connector on page 9. 2. Back to Contents Page Module Cover Dell™ Vostro™ A840/A860 Service Manual Removing the Module Cover Replacing the Module Cover CAUTION: Before working inside your computer, read the safety information that shipped with your... on the module cover. 3. Replacing the Module Cover 1. Back to Contents Page For additional safety best practices information, see the Regulatory Compliance Homepage at www.dell.com/regulatory_compliance.
... by using a wrist grounding strap or by periodically touching an unpainted metal surface (such as a connector on page 9. 2. Back to Contents Page Module Cover Dell™ Vostro™ A840/A860 Service Manual Removing the Module Cover Replacing the Module Cover CAUTION: Before working inside your computer, read the safety information that shipped with your... on the module cover. 3. Replacing the Module Cover 1. Back to Contents Page For additional safety best practices information, see the Regulatory Compliance Homepage at www.dell.com/regulatory_compliance.
Service Manual
Page 3
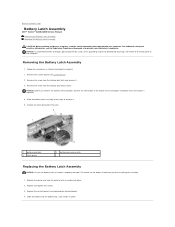
... Assembly NOTICE: Ensure the battery latch assembly is replaced. 4. Slide the battery latch assembly to the right to Contents Page Battery Latch Assembly Dell™ Vostro™ A840/A860 Service Manual Removing the Battery Latch Assembly Replacing the Battery Latch Assembly CAUTION: Before working inside your computer, read the safety information that shipped...Removing the Battery Latch Assembly 1. Replace the system board (see System Board). 2. For additional safety best practices information, see the Regulatory Compliance Homepage at www.dell.com/regulatory_compliance.
... Assembly NOTICE: Ensure the battery latch assembly is replaced. 4. Slide the battery latch assembly to the right to Contents Page Battery Latch Assembly Dell™ Vostro™ A840/A860 Service Manual Removing the Battery Latch Assembly Replacing the Battery Latch Assembly CAUTION: Before working inside your computer, read the safety information that shipped...Removing the Battery Latch Assembly 1. Replace the system board (see System Board). 2. For additional safety best practices information, see the Regulatory Compliance Homepage at www.dell.com/regulatory_compliance.

Service Manual
Page 5
... Off Your Computer). Do not touch the components or contacts on your computer (see the Regulatory Compliance Homepage at www.dell.com/regulatory_compliance. Disconnect all attached devices are correctly oriented and aligned. Save and close all open files and exit all open...being scratched. 2. Also, before you pull connectors apart, keep them evenly aligned to Contents Page Before You Begin Dell™ Vostro™ A840/A860 Service Manual Recommended Tools Turning Off Your Computer Before Working Inside Your Computer This section provides procedures for removing and installing...
... Off Your Computer). Do not touch the components or contacts on your computer (see the Regulatory Compliance Homepage at www.dell.com/regulatory_compliance. Disconnect all attached devices are correctly oriented and aligned. Save and close all open files and exit all open...being scratched. 2. Also, before you pull connectors apart, keep them evenly aligned to Contents Page Before You Begin Dell™ Vostro™ A840/A860 Service Manual Recommended Tools Turning Off Your Computer Before Working Inside Your Computer This section provides procedures for removing and installing...
Service Manual
Page 7
... the BIOS-update program CD, and restart the computer. Ensure that the AC adapter is plugged in and that appear on your computer at support.dell.com. 4. If you use a BIOS-update program CD to flash the BIOS, set up the computer to boot from the hard drive. The Save In... click Save. Double-click the file icon on the desktop and follow the instructions on the computer. 3. Back to Contents Page Flashing the BIOS Dell™ Vostro™ A840/A860 Service Manual Flashing the BIOS From a CD Flashing the BIOS From the Hard Drive If a BIOS-update program CD is titled the same as...
... the BIOS-update program CD, and restart the computer. Ensure that the AC adapter is plugged in and that appear on your computer at support.dell.com. 4. If you use a BIOS-update program CD to flash the BIOS, set up the computer to boot from the hard drive. The Save In... click Save. Double-click the file icon on the desktop and follow the instructions on the computer. 3. Back to Contents Page Flashing the BIOS Dell™ Vostro™ A840/A860 Service Manual Flashing the BIOS From a CD Flashing the BIOS From the Hard Drive If a BIOS-update program CD is titled the same as...

Service Manual
Page 8
... battery into the battery bay, until it clicks in Replacing the Palm Rest. 4. Back to Contents Page Internal Card With Bluetooth®Wireless Technology Dell™ Vostro™ A840/A860 Service Manual Removing the Bluetooth® Card Replacing the Bluetooth® Card CAUTION: Before working inside your computer, read the safety information that shipped...
... battery into the battery bay, until it clicks in Replacing the Palm Rest. 4. Back to Contents Page Internal Card With Bluetooth®Wireless Technology Dell™ Vostro™ A840/A860 Service Manual Removing the Bluetooth® Card Replacing the Bluetooth® Card CAUTION: Before working inside your computer, read the safety information that shipped...

Service Manual
Page 9
...Page For additional safety best practices information, see Removing the System Board). 3. Back to Contents Page Coin-Cell Battery Dell™ Vostro™ A840/A860 Service Manual Removing the Coin-Cell Battery Replacing the Coin-Cell Battery CAUTION: Before working inside your computer, read the... coin-cell battery cable connector Replacing the Coin-Cell Battery 1. Remove the system board (see the Regulatory Compliance Homepage at www.dell.com/regulatory_compliance. Remove the coin-cell battery out of the computer). Slide the main battery into the battery bay, until it clicks ...
...Page For additional safety best practices information, see Removing the System Board). 3. Back to Contents Page Coin-Cell Battery Dell™ Vostro™ A840/A860 Service Manual Removing the Coin-Cell Battery Replacing the Coin-Cell Battery CAUTION: Before working inside your computer, read the... coin-cell battery cable connector Replacing the Coin-Cell Battery 1. Remove the system board (see the Regulatory Compliance Homepage at www.dell.com/regulatory_compliance. Remove the coin-cell battery out of the computer). Slide the main battery into the battery bay, until it clicks ...
Service Manual
Page 10
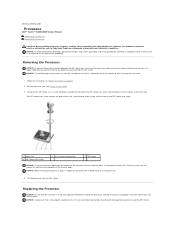
Remove the heat sink (see the Regulatory Compliance Homepage at www.dell.com/regulatory_compliance. Make a note of the arrow on the ZIF-socket cam screw. 1 processor 4 ZIF-socket cam screw 2 pin-1 corner of the computer). Be ... A processor that is perpendicular to the processor when turning the cam screw. 1. Lift the processor from the ZIF socket. Back to Contents Page Processor Dell™ Vostro™ A840/A860 Service Manual Removing the Processor Replacing the Processor CAUTION: Before working inside your computer, read the safety information that shipped with your skin can...
Remove the heat sink (see the Regulatory Compliance Homepage at www.dell.com/regulatory_compliance. Make a note of the arrow on the ZIF-socket cam screw. 1 processor 4 ZIF-socket cam screw 2 pin-1 corner of the computer). Be ... A processor that is perpendicular to the processor when turning the cam screw. 1. Lift the processor from the ZIF socket. Back to Contents Page Processor Dell™ Vostro™ A840/A860 Service Manual Removing the Processor Replacing the Processor CAUTION: Before working inside your computer, read the safety information that shipped with your skin can...

Service Manual
Page 12
... the safety information that shipped with the screw holes on page 9. 2. Remove the system board (see the Regulatory Compliance Homepage at www.dell.com/regulatory_compliance NOTICE: To avoid electrostatic discharge, ground yourself by using a wrist grounding strap or by periodically touching an unpainted metal surface (... sink are ready to Contents Page Turn the system board over. 4. Back to Contents Page Processor Heat Sink Dell™ Vostro™ A840/A860 Service Manual Removing the Processor Heat Sink Replacing the Processor Heat Sink CAUTION: Before working inside your computer.
... the safety information that shipped with the screw holes on page 9. 2. Remove the system board (see the Regulatory Compliance Homepage at www.dell.com/regulatory_compliance NOTICE: To avoid electrostatic discharge, ground yourself by using a wrist grounding strap or by periodically touching an unpainted metal surface (... sink are ready to Contents Page Turn the system board over. 4. Back to Contents Page Processor Heat Sink Dell™ Vostro™ A840/A860 Service Manual Removing the Processor Heat Sink Replacing the Processor Heat Sink CAUTION: Before working inside your computer.

Service Manual
Page 13
... surface (such as a connector on page 10. 2. For additional safety best practices information, see the Regulatory Compliance Homepage at www.dell.com/regulatory_compliance. Back to Contents Page Display Dell™ Vostro™ A840/A860 Service Manual Display Assembly Display Bezel Display Panel Display Panel Cable Display Inverter CAUTION: Before working inside your computer, read the...
... surface (such as a connector on page 10. 2. For additional safety best practices information, see the Regulatory Compliance Homepage at www.dell.com/regulatory_compliance. Back to Contents Page Display Dell™ Vostro™ A840/A860 Service Manual Display Assembly Display Bezel Display Panel Display Panel Cable Display Inverter CAUTION: Before working inside your computer, read the...


