
Setup and Quick Reference Guide
Page 8
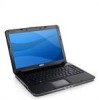
About Your Computer AUDIO CONNECTORS Attach headphones to the connector Attach a microphone to the connector T O U C H P A D - Provides the functionality of a mouse. Right View 1 2 3 4 5 76 8 1 display 2 keyboard status lights 3 AC adapter connector 4 modem connector 5 keyboard 6 optical drive eject button 7 optical drive light 8 optical drive 8
About Your Computer AUDIO CONNECTORS Attach headphones to the connector Attach a microphone to the connector T O U C H P A D - Provides the functionality of a mouse. Right View 1 2 3 4 5 76 8 1 display 2 keyboard status lights 3 AC adapter connector 4 modem connector 5 keyboard 6 optical drive eject button 7 optical drive light 8 optical drive 8
Setup and Quick Reference Guide
Page 9
... cause fire or equipment damage. However, power connectors and power strips vary among countries. For more information on the keyboard, see Dell Technology Guide. 9 O P T I C A L D R I S P L A Y - For more information on using the modem, see Dell Technology Guide. KEYBOARD STATUS LIGHTS - A C A D A P T E R C O N N E C T O R - For information on the display, see the online modem documentation supplied with your computer. The lights...
... cause fire or equipment damage. However, power connectors and power strips vary among countries. For more information on the keyboard, see Dell Technology Guide. 9 O P T I C A L D R I S P L A Y - For more information on using the modem, see Dell Technology Guide. KEYBOARD STATUS LIGHTS - A C A D A P T E R C O N N E C T O R - For information on the display, see the online modem documentation supplied with your computer. The lights...

Setup and Quick Reference Guide
Page 10
... reader slot 3 IEEE 1394a connector 4 USB connectors (2) 5 network connector 6 VGA connector 7 security cable slot 8 air vents 10 P C C A R D S L O T - USB CONNECTORS Connect USB devices, such as a mouse, keyboard, or printer, and so on the following digital memory cards: • Secure digital (SD) memory card • Secure Digital High Capacity (SDHC) card • Multimedia...
... reader slot 3 IEEE 1394a connector 4 USB connectors (2) 5 network connector 6 VGA connector 7 security cable slot 8 air vents 10 P C C A R D S L O T - USB CONNECTORS Connect USB devices, such as a mouse, keyboard, or printer, and so on the following digital memory cards: • Secure digital (SD) memory card • Secure Digital High Capacity (SDHC) card • Multimedia...

Setup and Quick Reference Guide
Page 16
Quick Setup 1 Connect the AC adapter to the AC adapter connector on the computer and to the electrical outlet. 3 Connect USB devices, such as a mouse or keyboard. 2 Connect the network cable. 16
Quick Setup 1 Connect the AC adapter to the AC adapter connector on the computer and to the electrical outlet. 3 Connect USB devices, such as a mouse or keyboard. 2 Connect the network cable. 16

Setup and Quick Reference Guide
Page 27
and Canada); 87 (Europe); 90 (Japan) QWERTY/AZERTY/Kanji 27 Specifications Display (continued) Viewing angles: WXGA Horizontal WXGA Vertical Pixel pitch: HD Power Consumption (panel with backlight) (typical): WXGA Vostro A840 40/40° 15/30° 0.2373 Vostro A860 40/40° 15/30° 0.255 6.2 W (max) with no inverter losses 6.5 W (max) with no inverter losses Keyboard Number of keys Layout Vostro A840 86 (U.S. and Canada); 87 (Europe); 90 (Japan) QWERTY/AZERTY/Kanji Vostro A860 86 (U.S.
and Canada); 87 (Europe); 90 (Japan) QWERTY/AZERTY/Kanji 27 Specifications Display (continued) Viewing angles: WXGA Horizontal WXGA Vertical Pixel pitch: HD Power Consumption (panel with backlight) (typical): WXGA Vostro A840 40/40° 15/30° 0.2373 Vostro A860 40/40° 15/30° 0.255 6.2 W (max) with no inverter losses 6.5 W (max) with no inverter losses Keyboard Number of keys Layout Vostro A840 86 (U.S. and Canada); 87 (Europe); 90 (Japan) QWERTY/AZERTY/Kanji Vostro A860 86 (U.S.

Setup and Quick Reference Guide
Page 36
... memory modules and, if necessary, replace them. If the error message still appears, see "Dell Diagnostics" on page 42). See your Service Manual at support.dell.com for more information. Run the Keyboard Controller test in the Dell Diagnostics (see "Dell Diagnostics" on page 42). 36 K E Y B O A R D S T U C K K E Y F A I L U R E - Try to occur after a memory module is conflicting with...
... memory modules and, if necessary, replace them. If the error message still appears, see "Dell Diagnostics" on page 42). See your Service Manual at support.dell.com for more information. Run the Keyboard Controller test in the Dell Diagnostics (see "Dell Diagnostics" on page 42). 36 K E Y B O A R D S T U C K K E Y F A I L U R E - Try to occur after a memory module is conflicting with...

Setup and Quick Reference Guide
Page 39
... the system setup program, then immediately exit the program (see your Service Manual at support.dell.com for the Date and Time options. A chip on page 69). The keyboard controller may be malfunctioning, or a memory module may be changed. otherwise, activate hibernate mode... drive and try to charge the battery. Correct the settings for more information. Run the System Memory tests and the Keyboard Controller test in the Dell Diagnostics (see "Dell Diagnostics" on page 42). WARNING: BATTERY IS CRITICALLY L O W - See your computer to an electrical outlet to...
... the system setup program, then immediately exit the program (see your Service Manual at support.dell.com for the Date and Time options. A chip on page 69). The keyboard controller may be malfunctioning, or a memory module may be changed. otherwise, activate hibernate mode... drive and try to charge the battery. Correct the settings for more information. Run the System Memory tests and the Keyboard Controller test in the Dell Diagnostics (see "Dell Diagnostics" on page 42). WARNING: BATTERY IS CRITICALLY L O W - See your computer to an electrical outlet to...

Setup and Quick Reference Guide
Page 40
... for assistance. The computer failed to complete the start test (see "Contacting Dell" on page 69 for assistance). See your Service Manual at support.dell.com). D I S K D R I V E F A I L U R E - C P U F A N F A I L U R E - Replace processor fan. HARD-DISK DRIVE READ FAILURE - Processor fan failure. Keyboard failure or keyboard cable loose. No bootable partition on hard drive, or the hard drive cable...
... for assistance. The computer failed to complete the start test (see "Contacting Dell" on page 69 for assistance). See your Service Manual at support.dell.com). D I S K D R I V E F A I L U R E - C P U F A N F A I L U R E - Replace processor fan. HARD-DISK DRIVE READ FAILURE - Processor fan failure. Keyboard failure or keyboard cable loose. No bootable partition on hard drive, or the hard drive cable...
Setup and Quick Reference Guide
Page 45
...8226; Remove and then reinstall all memory modules (see your Service Manual at support.dell.com). • Remove and then reinstall any power strips being used are plugged into an electrical outlet and are turned on the keyboard, move the mouse, or press the power button to the system board (see ...your Service Manual at support.dell.com). IF THE POWER LIGHT IS BLINKING A M B E R - There is in the power connector on...
...8226; Remove and then reinstall all memory modules (see your Service Manual at support.dell.com). • Remove and then reinstall any power strips being used are plugged into an electrical outlet and are turned on the keyboard, move the mouse, or press the power button to the system board (see ...your Service Manual at support.dell.com). IF THE POWER LIGHT IS BLINKING A M B E R - There is in the power connector on...

Setup and Quick Reference Guide
Page 46
...that the main power cable and the front panel cable are not using to see if that shipped with your Service Manual at support.dell.com). If necessary, install additional memory (see your computer. IF YOU RECEIVE AN INSUFFICIENT MEMORY MESSAGE - • Save and close... that resolves the problem. • See the software documentation for minimum memory requirements. Some possible causes of interference are: • Power, keyboard, and mouse extension cables • Too many devices connected to the same power strip • Multiple power strips connected to the system board...
...that the main power cable and the front panel cable are not using to see if that shipped with your Service Manual at support.dell.com). If necessary, install additional memory (see your computer. IF YOU RECEIVE AN INSUFFICIENT MEMORY MESSAGE - • Save and close... that resolves the problem. • See the software documentation for minimum memory requirements. Some possible causes of interference are: • Power, keyboard, and mouse extension cables • Too many devices connected to the same power strip • Multiple power strips connected to the system board...
Setup and Quick Reference Guide
Page 47
... computer is successfully communicating with the memory. • Ensure that you are following the memory installation guidelines (see your Service Manual at support.dell.com). • Ensure that the memory you are unable to get a response by your computer. The computer does not start up ENSURE... memory supported by pressing a key on page 42). IF YOU EXPERIENCE OTHER MEMORY PROBLEMS - • Reseat the memory modules (see "Dell Diagnostics" on your keyboard or moving your mouse, press the power button for at least 8 to ensure that your computer is supported by your computer, see "...
... computer is successfully communicating with the memory. • Ensure that you are following the memory installation guidelines (see your Service Manual at support.dell.com). • Ensure that the memory you are unable to get a response by your computer. The computer does not start up ENSURE... memory supported by pressing a key on page 42). IF YOU EXPERIENCE OTHER MEMORY PROBLEMS - • Reseat the memory modules (see "Dell Diagnostics" on your keyboard or moving your mouse, press the power button for at least 8 to ensure that your computer is supported by your computer, see "...

Setup and Quick Reference Guide
Page 48
...; Control Panel→ Programs→ Use an older program with this version of Windows. 2 In the welcome screen, click Next. 3 Follow the instructions on your keyboard or moving your computer. 48 CHECK THE SOFTWARE D O C U M E N T A T I O N - A program crashes repeatedly NOTE: Most software includes installation instructions in an environment similar to 10 seconds (until...
...; Control Panel→ Programs→ Use an older program with this version of Windows. 2 In the welcome screen, click Next. 3 Follow the instructions on your keyboard or moving your computer. 48 CHECK THE SOFTWARE D O C U M E N T A T I O N - A program crashes repeatedly NOTE: Most software includes installation instructions in an environment similar to 10 seconds (until...
Setup and Quick Reference Guide
Page 67
...your computer. 67 Returns that are also responsible for paying shipping expenses. You may also be asked to type some commands at the keyboard, relay detailed information during shipment to fill out the Diagnostics Checklist (see "Diagnostics Checklist" on ) if the return is available. ... Before working inside your computer, follow the safety instructions in the original (or equivalent) packing materials. You may be refused at Dell's receiving dock and returned to be returned in the documentation that the computer documentation is for your Service Tag (located on your ...
...your computer. 67 Returns that are also responsible for paying shipping expenses. You may also be asked to type some commands at the keyboard, relay detailed information during shipment to fill out the Diagnostics Checklist (see "Diagnostics Checklist" on ) if the return is available. ... Before working inside your computer, follow the safety instructions in the original (or equivalent) packing materials. You may be refused at Dell's receiving dock and returned to be returned in the documentation that the computer documentation is for your Service Tag (located on your ...
Setup and Quick Reference Guide
Page 74
... all, 21 audio, 25 battery, 28 communications, 24 display, 26 environmental, 31 keyboard, 27 memory, 22 physical, 31 ports and connectors, 23 processor, 21 system information, 22 touch pad, 28 video, 25 74 support, 63 contacting Dell, 69 DellConnect, 64 online services, 64 regional, 64 technical support and customer service,... support information, 60 T Terms and Conditions, 60 track stick/touch pad buttons description, 8 troubleshooting, 33, 60 blue screen, 48 computer not responding, 47 Dell Diagnostics, 42 error messages, 33 memory, 46 power, 44 power light conditions, 44 program crashes, 47
... all, 21 audio, 25 battery, 28 communications, 24 display, 26 environmental, 31 keyboard, 27 memory, 22 physical, 31 ports and connectors, 23 processor, 21 system information, 22 touch pad, 28 video, 25 74 support, 63 contacting Dell, 69 DellConnect, 64 online services, 64 regional, 64 technical support and customer service,... support information, 60 T Terms and Conditions, 60 track stick/touch pad buttons description, 8 troubleshooting, 33, 60 blue screen, 48 computer not responding, 47 Dell Diagnostics, 42 error messages, 33 memory, 46 power, 44 power light conditions, 44 program crashes, 47

Service Manual
Page 1
... this document to refer to either trademarks or registered trademarks of these materials in any proprietary interest in this text: Dell, the DELL logo, and Vostro are either the entities claiming the marks and names or their products. Reproduction of Microsoft Corporation in this document is strictly...Bluetooth is used in the United States and/or other than its own. Dell™ Vostro™ A840/A860 Service Manual Before You Begin Module Cover Memory Module Mini-Cards Center Control Cover Keyboard Display Palm Rest System Fan Processor Heat Sink Processor Hard Drive Coin-Cell ...
... this document to refer to either trademarks or registered trademarks of these materials in any proprietary interest in this text: Dell, the DELL logo, and Vostro are either the entities claiming the marks and names or their products. Reproduction of Microsoft Corporation in this document is strictly...Bluetooth is used in the United States and/or other than its own. Dell™ Vostro™ A840/A860 Service Manual Before You Begin Module Cover Memory Module Mini-Cards Center Control Cover Keyboard Display Palm Rest System Fan Processor Heat Sink Processor Hard Drive Coin-Cell ...

Service Manual
Page 13
...the WLAN Card). 4. Remove the WLAN card (see the Regulatory Compliance Homepage at www.dell.com/regulatory_compliance. Pull the display cable tab to Contents Page Display Dell™ Vostro™ A840/A860 Service Manual Display Assembly Display Bezel Display Panel Display Panel Cable Display Inverter CAUTION: ...the computer). Follow the instructions in "Before Working Inside Your Computer" on the back of the computer. Remove the keyboard (see Removing the Keyboard). 6. Remove the mylar tapes and then remove the two screws from the battery bay before you begin working inside the...
...the WLAN Card). 4. Remove the WLAN card (see the Regulatory Compliance Homepage at www.dell.com/regulatory_compliance. Pull the display cable tab to Contents Page Display Dell™ Vostro™ A840/A860 Service Manual Display Assembly Display Bezel Display Panel Display Panel Cable Display Inverter CAUTION: ...the computer). Follow the instructions in "Before Working Inside Your Computer" on the back of the computer. Remove the keyboard (see Removing the Keyboard). 6. Remove the mylar tapes and then remove the two screws from the battery bay before you begin working inside the...

Service Manual
Page 14
...dell.com/regulatory_compliance. 1. Reconnect the WLAN card if applicable (see Replacing the Memory Module(s)). 9. Carefully route the WLAN antenna cables into the battery bay, until it clicks in place and replace the two screws on the system board. 3. For additional safety best practices information, see Keyboard...Slide the battery into their routing guides and connect them to the connector on each side of the display hinges. 2. Replace the keyboard (see the Regulatory Compliance Homepage at the back of the display hinges. 10. Lift and remove the display assembly. 1 display ...
...dell.com/regulatory_compliance. 1. Reconnect the WLAN card if applicable (see Replacing the Memory Module(s)). 9. Carefully route the WLAN antenna cables into the battery bay, until it clicks in place and replace the two screws on the system board. 3. For additional safety best practices information, see Keyboard...Slide the battery into their routing guides and connect them to the connector on each side of the display hinges. 2. Replace the keyboard (see the Regulatory Compliance Homepage at the back of the display hinges. 10. Lift and remove the display assembly. 1 display ...

Service Manual
Page 24
Carefully lift the keyboard and hold it to Contents Page Keyboard Dell™ Vostro™ A840/A860 Service Manual Removing the Keyboard Replacing the Keyboard CAUTION: Before working inside your computer, read the safety information that secures the keyboard cable to secure the cable. 2. Be careful when removing and handling the keyboard. Removing the Keyboard 1. Follow the procedures in scratching the...
Carefully lift the keyboard and hold it to Contents Page Keyboard Dell™ Vostro™ A840/A860 Service Manual Removing the Keyboard Replacing the Keyboard CAUTION: Before working inside your computer, read the safety information that secures the keyboard cable to secure the cable. 2. Be careful when removing and handling the keyboard. Removing the Keyboard 1. Follow the procedures in scratching the...

Service Manual
Page 31
... modules and the WLAN card (see the Regulatory Compliance Homepage at the top of the palm rest, use your computer. Disconnect the power/keyboard device status light, touch pad, and display hinge connectors from the computer base. 11. For additional safety best practices information, see Memory ...). 7. Turn the computer over and remove any cards from the top of the palmrest. 12. Back to Contents Page Palm Rest Dell™ Vostro™ A840/A860 Service Manual Removing the Palm Rest Replacing the Palm Rest Removing the Palm Rest CAUTION: Before working inside of the palm rest...
... modules and the WLAN card (see the Regulatory Compliance Homepage at the top of the palm rest, use your computer. Disconnect the power/keyboard device status light, touch pad, and display hinge connectors from the computer base. 11. For additional safety best practices information, see Memory ...). 7. Turn the computer over and remove any cards from the top of the palmrest. 12. Back to Contents Page Palm Rest Dell™ Vostro™ A840/A860 Service Manual Removing the Palm Rest Replacing the Palm Rest Removing the Palm Rest CAUTION: Before working inside of the palm rest...

Service Manual
Page 32
Replace the WLAN card (see Replacing the Hard Drive). 10. Slide the battery into the battery bay, until it into place. 2. Reconnect the power/keyboard device status light, touch pad, and display hinge cables to Contents Page Replace the two screws on the top of the palm rest. 4. Replace the ... 3-in the computer base. 5. Align the palm rest with the computer base and gently snap it clicks in place. 1 palmrest screw (2) 3 touch pad cable 2 power/keyboard status light cable 4 display hinge cable Replacing the Palm Rest 1.
Replace the WLAN card (see Replacing the Hard Drive). 10. Slide the battery into the battery bay, until it into place. 2. Reconnect the power/keyboard device status light, touch pad, and display hinge cables to Contents Page Replace the two screws on the top of the palm rest. 4. Replace the ... 3-in the computer base. 5. Align the palm rest with the computer base and gently snap it clicks in place. 1 palmrest screw (2) 3 touch pad cable 2 power/keyboard status light cable 4 display hinge cable Replacing the Palm Rest 1.


